Cette page fournit une simple interface de navigation pour trouver des entités décrites par une propriété et une valeur nommée. D’autres interfaces de recherche disponibles comprennent la page recherche de propriété, et le constructeur de requêtes ask.
Liste de résultats
- R0015038 Bench Assemble V notch Datum Rollers + (Use locktite 243 on all fasteners Use loctite 572 on all threaded pneumatic connection Pen mark all fasteners to show finalised)
- R0015063 Bench Assemble Roller Tables + (Use locktite 243 on all fasteners Use loctite 572 on all threaded pneumatic connection Pen mark all fasteners to show finalised)
- R0000963E Bench Assemble Z axis Components + (Use locktite 243 on all fasteners Use loctite 572 on all threaded pneumatic connection Pen mark all fasteners to show finalised)
- R0015321 Bench Assemble Guards and Doors + (Use locktite 243 on all fasteners Use loctite 572 on all threaded pneumatic connection Pen mark all fasteners to show finalised)
- R0000962E Bench assemble Y axis Components + (Use locktite 243 on all fasteners Use loctite 572 on all threaded pneumatic connection Pen mark all fasteners to show finalised)
- R0015090 Bench Assemble Roller Tables + (Use locktite 243 on all fasteners Use loctite 572 on all threaded pneumatic connection Pen mark all fasteners to show finalised)
- R0000706 Bench assemble Infeed Datum rollers + (Use locktite 243 on all fasteners Use loctite 572 on all threaded pneumatic connection Pen mark all fasteners to show finalised)
- R0015121 Bench assemble Infeed arms + (Use loctite 243 on all fasteners Pen mark all fasteners once finalised)
- R0015262 Drive shaft fitting + (Attach 9 off B0001150 to load arms as sho … Attach 9 off B0001150 to load arms as shown . ensure correct position is used for mounting of bearings . Use 2 off M8 x 30 socket countersink fasteners per bearing to align and fix to arms Ensure greasing point of bearing is facing towards the front of the machine as shown towards the front of the machine as shown)
- R0002913E Install and Align Rotary head Subframe PART 2 + (Use loctite 243 on all fasteners Use Loctite 572 on all threaded pneumatic connections Pen mark all bolts to show finalised)
- R0015264 Fit Loader chains to arms + (It is vital to tension the securing grubsc … It is vital to tension the securing grubscrew for the drive sprockets correctly Use a straight ended 4mm hex key and extension bar to apply as much tension as possible to the m8 grubscrew Then add 2 drops of self wicking thread locker to complete the tension processead locker to complete the tension process)
- R0015357 Fit Guards + (Use loctite 243 on all fasteners Use Loctite 572 on all threaded pneumatic connections Pen mark all bolts to show finalised)
- R0015270 Bench assemble Shafts, bearings and sprockets + (Use loctite 243 on all fasteners Use Loctite 572 on all threaded pneumatic connections Pen mark all bolts to show finalised)
- R0015290 Bench Assemble Top guard + (Use loctite 243 on all fasteners Use Loctite 572 on all threaded pneumatic connections Pen mark all bolts to show finalised)
- Gripper Push Speed on Flowline and ZX + (You can adjust the Flow control and Slow d … You can adjust the Flow control and Slow down the cylinder speed.
The one you need to wind IN (clockwise) to slow down is the one nearest to the MH side - Not the Extractor side.
feed machine, the video is from a Left to Right feed machine</div> </div><br/>) - Filling Out An Online Daily Timesheet Form + (You will receive a link via email that wil … You will receive a link via email that will open up your timesheet. Copy the link from the email and paste it into a new shortcut on the desktop of the device you are using. The shortcut should be labelled 'Timesheet' for clarity. To create the shortcut, right-click on a spare area on your desktop and hover over 'New'. This will open a selection panel. Select 'Shortcut'. A text box will appear and this is where you need to paste the link from the email. Once you have pasted the link, select 'Next'. A prompt will will then ask you to name the shortcut. I would suggest that it is named 'Timesheet'. After naming the shortcut, click 'Finish' and the shortcut will appear on your desktop. Double-click on the shortcut to open up your timesheet form.e shortcut to open up your timesheet form.)
- Autocut Monthly Maintenance + ([[Autocut Open Guard Doors|https://stuga.dokit.app/wiki/Autocut_Open_Guard_Doors]])
- Full Version Upgrade TwinCAT3 WinMulti + ([[Create a TwinCAT Project from Scratch]] This procedure ensures that the front end PC has the latest TwinCAT version, and that the PLC source control program is correctly integrated, meaning the latest PLC code version will be available)
- Stuga Product Database - Edit Product Data + (Search box is upper right)
- R0015278 Mount Completed Assemblies Section two + (these steps follow on from dokit [[R0015278 Mount Completed Assemblies]])
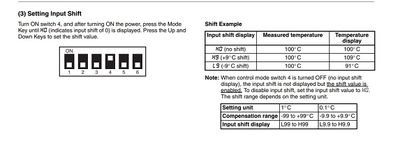
- Omron E5CVS PV Shift + (<div class="annotatedImageDiv" typeof=" …
)

- VM Upgrade Software + ( # Install the VM Upgrade hardware [[VM Upgrade Hardware]] # Check that you have at lease 12GB of memory. # Check that the extra disk is present (Should be D) )
- TB0449 Ecoline Clearing out Old Archived Data + ( # Open the '''Ecoline software''' and press '''login'''. # Select '''Supervisor''' and type password: '''th0mas''' # Now '''login'''. )
- Updating Teamviewer Host + ( # Right click on the teamviewer icon in the taskbar (bottom right of screen) # Select Exit Teamviewer )
- OBSOLETE Installing SourceTree Version Control Software + ( #Download [http://sourcetreeapp.com/download/?v=win here] #Agree to Ts&Cs <br/> )
- ZX5 Alignment Check + ( * Check backfence roller alignment to infeed * Check roller heights to infeed and outfeed )
- Setting Up Windows PC C0000422-KIT 2023 + ( * Connect Keyboard and mouse * Connect network * Connect monitor )
- Autoflow Maintenance - Sawing Centre + ( * Remove any debris from clamp pads and rollers * Visually check the rollers and clamp pads for damage or excessive wear, oil rollers with supplied oil, visually check cylinder rods for damage )
- R0019207 Upgrade SR Axis Spigot + (Refit bearing housing assembly to main plate)
- Zx5-Zx 4-Zx3-FL-S65 Saw Blade Removal and Refitting + (1 Open front door via control screen 2 Ensure emergency stop system is also activated for safe working 3 Remove swarf from saw)
- WinMulti Shutdown procedure + (Once you have a black screen with a small blue text box in the middle you are safe to press the physical red 'POWER OFF' button on the console.)
- Back Polish Stuga Saw Blades + (<div class="icon-instructions caution-icon"> <div class="icon-instructions-icon"><i class="fa fa-exclamation-triangle"></i></div> <div class="icon-instructions-text">Always Polish in this orientation in relation to the Teeth of the blade</div> </div>)
- Setting Profile Detection Laser Sensor + (<div class="icon-instructions caution-i … # Turn L/D adjustment clockwise so it is on its maximum "L" # Turn anticlockwise until Yellow light comes on # Turn clockwise until Yellow light goes offurn anticlockwise until Yellow light comes on # Turn clockwise until Yellow light goes off)
- Ecoline Site Installation Guide + (This is what the taper on the roller approach is for - to raise the profile onto the rollers)
- Turning Off and Changing Datum Tool + (<div class="icon-instructions dont-icon"> <div class="icon-instructions-icon"><i class="fa fa-hand-paper-o"></i></div> <div class="icon-instructions-text">Do not alter anything on the 'Tool' Settings' side.</div> </div><br/>)
- Disabling a Tool Home or Tool Out Sensor + (A change has to be made to one of the setup files, so you need to exit to the desktop)
- R0000712E Rotary Trunking + (All bolts must have Loctite 243 adhesive applied unless otherwise stated. All bolts must be marked with pen once completed to indicate adhesive and correct tension has been applied)
- R0015034B ZX5 Module B Wiring Loom installation Part 2 + (All bolts to have Loctite 243 adhesive applied unless otherwise stated All Threaded Pneumatic connections to have Loctite 570 applied All bolts to be pen marked once adhesive applied and correct tension added)
- R0015041 Bench Assemble Top Hood Assembly + (All bolts to have Loctite 243 adhesive applied unless otherwise stated All Threaded Pneumatic connections to have Loctite 570 applied All bolts to be pen marked once adhesive applied and correct tension added)
- R000569E Bench Assemble Head Spindle Posts + (All bolts to have Loctite 243 adhesive applied unless otherwise stated All Threaded Pneumatic connections to have Loctite 570 applied All bolts to be pen marked once adhesive applied and correct tension added)
- R0015081 Bench Assemble Single Roller Table + (All bolts to have Loctite 243 adhesive applied unless otherwise stated All Threaded Pneumatic connections to have Loctite 570 applied All bolts to be pen marked once adhesive applied and correct tension added)
- R0000570B Bench Assemble 1st stage Ejector + (All bolts to have Loctite 243 adhesive applied unless otherwise stated All Threaded Pneumatic connections to have Loctite 570 applied All bolts to be pen marked once adhesive applied and correct tension added)
- R0015305 Install Wiring loom for Rotary loom + (All bolts to have Loctite 243 adhesive applied unless otherwise stated All bolts to be pen marked once adhesive applied and correct tension added)
- R0015037 Bench Assemble SY Assembly + (All bolts to have Loctite 243 adhesive applied unless otherwise stated All Threaded Pneumatic connections to have Loctite 570 applied All bolts to be pen marked once adhesive applied and correct tension added)
- R0015034B ZX5 Module B Wiring Loom installation + (All bolts to have Loctite 243 adhesive applied unless otherwise stated All Threaded Pneumatic connections to have Loctite 570 applied All bolts to be pen marked once adhesive applied and correct tension added)
- R0015300 Rotary Ring pneumatic test + (When air is connect to rotary ring, attention should be paid to any audible air leaks. If any are present, identify source and rectify)
- R0015029D Hepco Beam Alignment Part 2 + (Always Use Loctite 243 on all fasteners Always use Loctite 570 on all threaded pneumatic connections Pen mark all fasteners to show finalised)
- Upgrading Visual Studio to Beckhoff TCXAEShell + (Ask one of the IT team to connect and down … Ask one of the IT team to connect and download it
G:\Design\TwinCAT3\TC31-FULL-Setup.3.1.4024.22.exe
er 1Gb long!</div> </div> G:\Design\TwinCAT3\TC31-FULL-Setup.3.1.4024.22.exe <br/>) - Upgrading Project File on TwinCAT2 System + (Check the [https://stugaltd.monday.com/boards/304269981 Control Systems Log] board to look up the machine and the control system used This procedure only applies to TwinCAT2 For TwinCAT3 upgrades use [[Full Version Upgrade TwinCAT3 WinMulti]])
- Removing or changing a Beckhoff AX8000 series servo drive + (Circuit breaker will be labelled 'Servo Drives')
- PLC Source Control - Working with GIT and TcXaeShell + ( #Select '''Push''' #Message appears showing the successful push to the '''Origin''' which is in the remote cloud Repo )
- Ecoline - Datum and MitreOffset Tests + (Cut 3 lengths of outerframe around 1000mm … Cut 3 lengths of outerframe around 1000mm long
ie no swarf and profile tape is not "flapping" over the end</div> </div><br/>) - CX5120 Replacement + (Ensure replacement CX5120 is setup using [[TB0451 CX5120 Beckhoff PC Setup|https://stuga.dokit.app/wiki/TB0451_CX5120_Beckhoff_PC_Setup]] before sending to site)
- Autocut Startup Procedure + (Ensure the main isolator on the console is in the on position (pointing up).)
- Recovery of Bar Queue following winMulti Crash + (First you need to check out the bar queue … First you need to check out the bar queue to see if it is the same as the actual bars on the transfer table #Restart winMulti #Count the total number of bars on the saw infeed and transfer table #Compare with the number of bars on the saw queue If there is '''one more bar''' actually on the table than on the bar queue screen, follow the process below to add the missing bar to the queue.han on the bar queue screen, follow the process below to add the missing bar to the queue.)
- Alignment guide using wire line + (Firstly, identify the two datums that are required to set the wire line to. A wire line should be pulled tight and then anchored to give a wire line from the first and last component)
- TB0422 Commissioning ZX5 Software 2018 + (Follow [https://stuga.dokit.app/wiki/TB0409_Setting_Up_Windows_10_PC_2018 technical bulletin 409] to setup PC with correct naming conventions and TeamViewer.)
- ZX5 Transfer Table Crank set up + (Follow the instructions in [[Programming Eaton DE Drive|this]] … Follow the instructions in [[Programming Eaton DE Drive|this]] tutorial.
xt">...Programming the drives after the mechanical set up may lead to crashes. Ensure this is done first.</div> </div><br/>) - TB0425 Lenovo Tablet Setup + (Go to the PlayStore and download the e-Drawings app. This will cost (currently £1.25) therefore ask appropriate member for a company card.)
- Troubleshoot - Permanent IP Address - Windows 8 + (Go to '''Control Panel > Network and Sh … Go to '''Control Panel > Network and Sharing Centre'''.
the bottom right toolbar on the windows desktop (see picture).</div> </div><br/>) - Troubleshoot - Permanent IP Address - Windows 10 + (Go to '''Control Panel > Network and Sh … Go to '''Control Panel > Network and Sharing Centre'''.
the network icon in the bottom right toolbar on the windows desktop.</div> </div><br/>) - TestGG + (Here is some process #Mini step 1 #mini step 2 <br/><div class="icon-instructions caution-icon"> <div class="icon-instructions-icon"><i class="fa fa-exclamation-triangle"></i></div> <div class="icon-instructions-text">...Do not do this</div> </div><br/>)
- Stuertz VSM 30.20-P Welder Installation + (Lift uprights into positions and fix with 3 x bolts each side on each upright. Fit 2 x cap heads on each rail each side)
- ZX5 - ZX3 Hepco alignment Module E Saw Infeed + (Locations of jigs required mounting method)
- R0015307 Bench assembly spindle drive cylinders + (8 off P0001200 cylinder Use Loctite 572 on all air fittings 1 Attach P0001098 elbow as shown 2 Attach P0001198 elbow 3 Attach P0000238 elbow <br/>)
- R0008013 Clacker assembly + (M0000101 is not required for bench assembly , and will not be shown within the work instruction . Ensure this part is issued with each assembled clacker)
- R0008013-ECO Ecoline dipper arm clacker + (M0000101 is not required for bench assembly , and will not be shown within the work instruction . Ensure this part is issued with each assembled clacker)
- ZX5 Gripper Energy Chain & Tray Setup + (Make sure the cables and piped are fixed with cable ties to the fingers of the bracket to avoid movement or twisting inside the energy chain.)
- Installation Procedure - Autoflow Mk4 + (Machining centre distance to infeed between frames =)
- Changing Main Saw Blade + (Make sure you have stopped cutting and nothing on the machine is moving - press an emergency stop button to ensure this.)
- OBSOLETE Upgrade - ZX5 Energy Chain - Both Sides + (IMPORTANT Check brackets visually to ensure they correct '''A0001074''' Horizontal Mount bracket required to allow pivoting)
- B0000082b Motor replacement For Obsolete part B0000082 + (New motor B0000082b will need modification of drive key to function correctly. 5mm should be removed from key in situ as shown in photo This will enable clutch plate to move to desired position on assembly)
- ZX5 Datum and Grip Pin Setup + (In SETTINGS > PARAMETERS > MEASUREMENT > loadingPos=11 If set at a different figure, update to 11 and SAVE)
- 500mm Saw Blade Upgrade + (Remove the two grub screws from the taper … Remove the two grub screws from the taper lock pulleys and insert one into the hole that was initially empty. Screw in tight to break seal of taperlock and split the two parts. If siezed the outer part can be tapped back with a hammer. These parts are usually very brittle and can shatter with a heavy hammer blow. It can also be useful to have the belts on at this point to stop the pulley from turning.his point to stop the pulley from turning.)
- Monday - Emails to Updates + (On the job / case / item in Mondays, open the Updates and click on "Write Updates via Email)
- Autocut Open Guard Doors + (Once the machine has stopped production, press an emergency stop button to ensure the machine is safe to work on)
- Autocut Daily Maintenance + (Once the machine has stopped production, press an emergency stop button to ensure the machine is safe to work on)
- Changing Pneumax Valve slice + (Please ensure screwdriver is a good fit to avoid wearing the head of the screw.)
- TB0451 CX5120 Beckhoff PC Setup + (Go to Control Panel then ‘Region and Language’ and select ’English (United Kingdom)’.)
- Allocations + issuing received parts + (Populate the allocate column for each part … Populate the allocate column for each part in accordance to the pick bins that are available. The general rule is to prioritize allocation to the range of Bins of the Build numnber which is next to in line to be Built according to the production schedule. If there is no bin physically available for the Job car number shown it must be zero'd in the allocation quantity column and put into stock normally.antity column and put into stock normally.)
- R0000299 Stroke assembly rebuild + (R0000728 and R0000729 are mirror images to each other Please inspect pictures to clarify and confirm correct hand to be built (Supplied unit to be refurbished will always be rebuilt as the same hand ))
- R0000728 R0000729 Stroke Assembly Dismantling + (The stroke assembly must be dismantled in the exact manner stated as many sections can only be removed once mating parts have been extracted Please use the following steps accurately)
- Flowline Turret Upgrade - Somatec + (Remove all parts from the existing turret, to leave just the mounting plate and the cylinder and fittings etc, as shown)
- R0000711 Rotary Base Assembly REV2 + (Rotary drive ring needs checking before f … Rotary drive ring needs checking before fitment.
#Check teeth for burrs, damage and debris. Use compressed air to clean all areas #V edge should be checked for damage. Check entire circumference with fingers to identify any damage, lumps or high low spots #Check drive ring has been countersunk in the shown arearive ring has been countersunk in the shown area) - X252 Forward Clamp Out Sensor Setup Stuertz Infeed + (Select Q1)
- Device Magic - Adding a Device Email Address + (Select the 3 dots dropdown box)
- R0015243 ZX5 module A-C-E Frame levelling + (Tap all holes to remove debris from coatin … Tap all holes to remove debris from coating process
Ensure all holes cleaned after tapping with compressed air
ext">...Ensure eye protection is worn when using compressed air</div> </div><br/>) - R0015338 Bench Assemble Serial Plate + (The Correct Stamping and information is vital on the machine serial plate. Please double check with supervisor to confirm data before applied to serial plate !)
- Create a TwinCAT Project from Existing Project + (The build needs to be the same machine typ … The build needs to be the same machine type and have an identical EtherCAT box and drive setup You can create a backup in three ways # Create an archive of an open project (you need to run Visual Studio on the desktop of the machine in question) # Copy the contents of the c:\TwinCAT\Stuga\[BuildNo] folder from the "donor" to your new machine setup # Use VPN to connect to the back end of the machine and upload the project from the target, then save it locally. this needs a good internet connection and Teamviewer remote VPN installed on the remote Beckhoff PCte VPN installed on the remote Beckhoff PC)
- TB0447 ZX5 Setup - X Axis Beam Calibration + (The out and home sensors must be adjusted … The out and home sensors must be adjusted so that the "just" come on at the end of the stroke.
be the fail-safe to ensure the machine stops with an alarm.</div> </div><br/>) - Relay Replacement + (There Are 2 examples shown for this process. There is a clip to be unlatched on each relay shown, once unclipped this releases the relay which can then be pulled out. <br/>)
- ZX5 V Notch Blade Mechanical Setup + (Using a straight edge placed BETWEEN the t … Using a straight edge placed BETWEEN the teeth of the blade (W/I) you can see we have a gap around 2-3mm. On the opposite blade (W/O) we need to turn the setting bolt anti clockwise until the tips of the teeth just touch the straight edge, as seen in the second picture. If the tips of the teeth were overlapping we would need to increase separation by turning the adjusting bolt clockwise.
Transfer the straight edge to the opposite blade (W/O) and adjust W/I as above.
lade (W/O) and adjust W/I as above. <br/>) - Autocut Piece Jammed + (This will dump the air to the cylinders and probably free off the jammed piece)
- Monday - Searching for Jobs at a Customer on Mobile App + (This will filter all the open jobs in the … This will filter all the open jobs in the service board that contain the text you are searching for tions-text">...The same process can be used on the "Service Jobs - Closed" board to search through the history</div> </div>)
- Autocut Taking A Backup + (Through the winSaw software press '[F11] backup')
- Autoflow Mk1-Mk3 Daily Maintenance + (To check the machine is ready for producti … To check the machine is ready for production, a couple of simple tests can be run
# Datum Test
# Pos Test
olerance is +/0.5mm, so there is no need to adjust if an inaccuracy is less than this tolerance (1mm back to back)</div> </div><br/>) - Units of Measure modification CIM50 + (To make the item status of a product inact … To make the item status of a product inactive it needs to comply with all of the following conditions :
Item has 0 in stock
Item has 0 in quarantine
Item does not exist on any live sales orders
Item does not exist on any live purchase orders
Item does not exist on any live works orders
Item does not exist on a bill of material
e re-entered after the unit of measure has been amended and saved.</div> </div><br/>) - R0000088E Stage 1 Spindle assemble + (Linear rail B0000045 needs fitting to each … Linear rail B0000045 needs fitting to each spindle base
1 Orientation of Datum face is as shown Ensure all linear rails and machined grooves in spindle plates are free from debris. Use compressed air. 2 Insert linear rail into each spindle base and drop in m6 x 20 socket caps with adhesive applied into all rail counterbores, do not screw innd drop in m6 x 20 socket caps with adhesive applied into all rail counterbores, do not screw in) - R0015011 Bench assemble Gripper + (check shafts fit correctly into bores of D0015082 gripper bottom bar and D0015083 gripper upper bar)
- R0015299 Install Spindle control pipework and fittings + (Use Loctite 243 on all fasteners Pen mark all fasteners to show finalised)
- R0015060 Bench Assemble Flapper Beam + (Use Loctite 243 on all fasteners Use Loctite 570 on all threaded pneumatic connections Pen mark all bolts when finalised)
- R0000738 Pneumatic Installation + (Use Loctite 243 on all fasteners Use Loctite 572 on all threaded pneumatic connection Pen mark all fasteners to show finalised)
- R0015288 Bench Assemble Transfer slider units and Cylinder Rails + (Use Loctite 243 on all fasteners Use Loctite 570 on all threaded pneumatic connections Pen mark all bolts when finalised)
- R0015275 Fit shafts and pinions + (Use Loctite 243 on all fasteners Use Loctite 572 on all threaded pneumatic connections Pen mark all bolts to show finalised)
- R0015028D ZX5 Hepco Beam Alignment Module C part 2 + (Use Loctite 243 on all fasteners Use Loctite 570 on all threaded pneumatic connections Pen mark all bolts once finalised)
- R0015004 Bench Assemble Gripper + (1 Fit bushes B0001106 (20 off) to 8 off D0015095 link bars 2 off D0015096 link bars 2 Fit bearings B0000034 x 2 into D00015086 grip slide body. Use grease to lubricate bearing before assembly)
- R0015301 Fit terminal holders and Ethercat boxes + (1 Segregate cables and pipes as shown in image 2 Mount D0010806 relay mounting base using 4 off M3x 25 pan head screws 3 Repeat for 7 off other connection boxes)
- R0015035 Bench Assemble V Notch Components + (Use Loctite 243 on all fasteners Use Loctite 572 on all threaded pneumatic connection Pen mark all fasteners to show finalised)
- R0015096 (c) Bench Assemble Transfer Drive Assembly + (Use Loctite 243 on all fasteners Use Loctite 572 on all pneumatic threaded connections Pen mark all bolts to show finalised)
- R0015140 Spindle energy chains and looms + (Use Loctite 243 on all fasteners Pen mark bolts once finalised)
- R0015358 Conveyor chassis + (Use Loctite 243 on all fasteners Use Loctite 572 on all threaded pneumatic connection Pen mark all fasteners to show finalised)
- R0015303 Fit backplates and covers + (Use Loctite 243 on all fasteners Pen mark all bolts to show finalised)
- R0015342 Bench Assemble Outfeed Parts + (Use Loctite 243 on all fasteners Use Loctite 570 on all threaded pneumatic connections Pen mark all bolts when finalised)
- R0015094 Fit shafts and Pinions + (Use Loctite 243 on all fasteners Use Loctite 572 on all threaded pneumatic connections Pen mark all bolts to show finalised)
- R0015096 (e) Bench Assemble Transfer Drive Assembly + (Use Loctite 243 on all fasteners Use Loctite 572 on all pneumatic threaded connections Pen mark all bolts to show finalised)
- R000718E Stage 2 spindle assembly + (Do not add final tension to bolts until al … Do not add final tension to bolts until alignment has been achieved 1 Attach pre built cylinder anchor to end of cylinder 2 Position pre built cylinder on slide base assembly as shown 3 Use 2 off m5 x 25 socket caps with A form washers to attach to slide base 4 Temporarily mount D0007648 with 1 off m6 x 20 socket cap 5 Attach D0007790 cylinder anchor with 4 off M6 x 20 socket caps 6 Attach Cylinder base to anchor with 4 off M6x 20 socket capsse to anchor with 4 off M6x 20 socket caps)
- R0015281 Bench Assemble Transfer Sliders + (Use Loctite 243 on all fasteners Use Loctite 570 on all threaded pneumatic connections Pen mark all bolts when finalised)
- R0015252 Bench Assemble Slider units + (Attach P0000010 elbow fitting to cylinder P0001111 as shown)
- R0015272 1st Stage fitting Saw Outfeed + (Use Loctite 243 on all fasteners Use Loctite 570 on all threaded pneumatic connections Pen mark all bolts when finalised)
- R0000706 Bench assemble Infeed Datum rollers + (Use locktite 243 on all fasteners Use loctite 572 on all threaded pneumatic connection Pen mark all fasteners to show finalised)
- R0015090 Bench Assemble Roller Tables + (Use locktite 243 on all fasteners Use loctite 572 on all threaded pneumatic connection Pen mark all fasteners to show finalised)
 Français
 English
 Deutsch
 Español
 Italiano
 Português