0422 Commissioning ZX5 Software 2018
Sommaire
- 1 Introduction
- 2 Étape 1 - Setup Front End PC
- 3 Étape 2 - Setup Back End PC
- 4 Étape 3 - Install TwinCAT if Required
- 5 Étape 4 - Set up a route
- 6 Étape 5 - Build the Visual Studio Project
- 7 Étape 6 - Select Auto-start boot project for BOTH projects
- 8 Étape 7 - Log on to the machine into tc3Multi and PLCreset
- 9 Étape 8 - Set the PLC to Run Mode on Boot
- 10 Étape 9 - TwinCAT NetId
- 11 Étape 10 - Customer and Build No
- 12 Étape 11 - Reset Parameters
- 13 Étape 12 - Reset userVariables
- 14 Commentaires
Introduction
Étape 1 - Setup Front End PC
Follow technical bulletin 409 to setup PC with correct naming conventions and TeamViewer.
Étape 3 - Install TwinCAT if Required
Install TwinCAT 3.16 from the mainserver (G:\Design\TwinCAT3\TC31-Full-Setup.3.1.4022.16). Go through the wizard and when prompted restart the PC. (2019 PCs will have this)
Étape 4 - Set up a route
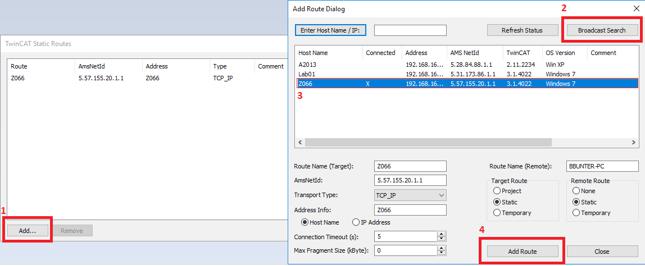
Once restarted the TwinCAT icon will appear in the bottom right toolbar. We can now set up a route. Left click the TwinCAT icon once. There will be a menu, go to "Route" then "Add Route...". This is where the machine and the program can be linked. Making sure the machine infeed is on and connected to the local network,
- Press on add in the bottom left of the window (1).
- From here perform a broadcast search (2), this will search for any Beckhoff devices on the network.
- When the machine is found select it (3)
- and press add route (4).
Étape 5 - Build the Visual Studio Project
There are two ways to approach this
- Use an existing project from a similar, older machine. This is a shortcut method but relies on having a copy of the setup from a machine with the same EtherCAT setup
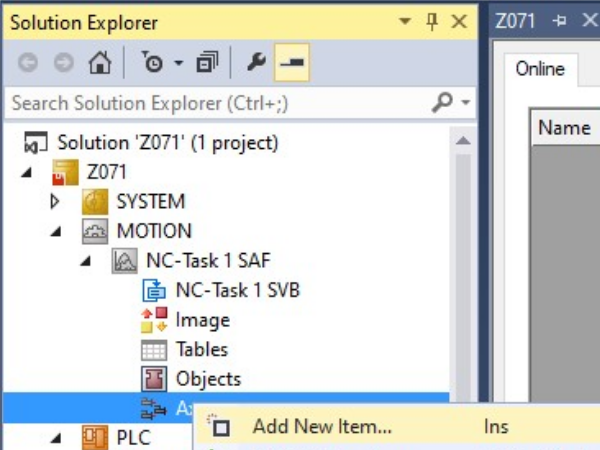
- Build a new project from scratch - use this method if this is the first machine of its type
Étape 6 - Select Auto-start boot project for BOTH projects
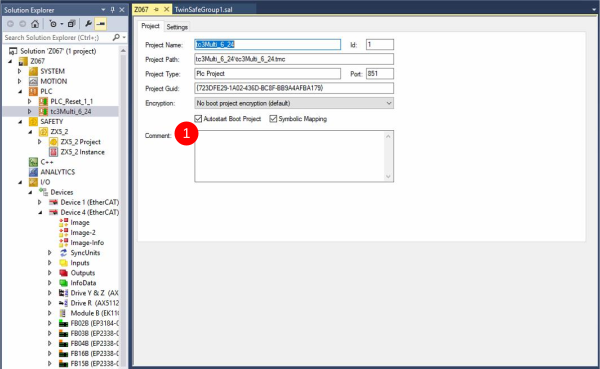
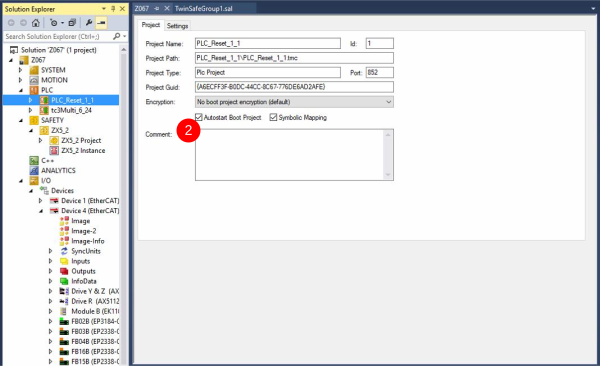
Select Auto-start boot project. This can be found under
- PLC > tc3Multi_6_24
- PLC > PLC_Reset_1_1 and
Étape 7 - Log on to the machine into tc3Multi and PLCreset
Make sure to log onto the machine in tc3Multi AND PLCreset
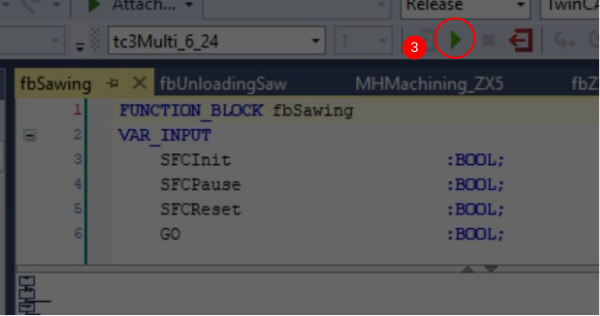
Select from the dropdown box at the top (1) and click the green Download icon (2)
You may need to run the program (if this is the first time download) click the green play triangle (3)
Étape 8 - Set the PLC to Run Mode on Boot
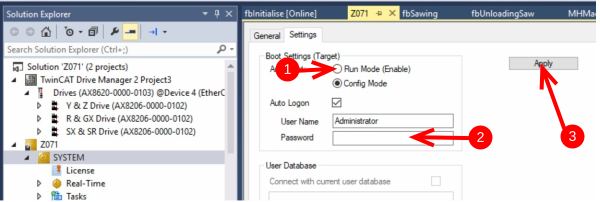
- Select Run Mode radio button
- Type the password (Stuga001)
- Click Apply
Étape 9 - TwinCAT NetId
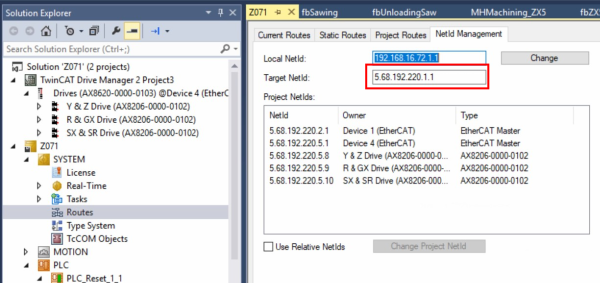
Find the target NetId from System->Routes
Copy it
Paste it into two parameters in c:\ddrive\params.saw
amsNetId=5.68.192.220.1.1
...
twinCATAddress=5.68.192.220.1.1
Étape 10 - Customer and Build No
Set these parameters in c:\ddrive\params.saw according to the customer and build number
buildNo=Z071
...
customer=WindowPlas
Étape 11 - Reset Parameters
Set these parameters in c:\ddrive\params.saw to ensure any old customer data will not "get in the way"
autoLoadLength=5500
beamStrokeLength=700
bladeOffset/=67.5
bladeOffset\=67.5
networkdir=c:\batches\
password=none
printerIPAddress=[IP Address of printer]
productionRecipients=none
remakesPassword=none
sawSYType=2
throwaway=320
throwawayChunkSize=100
usePLCEstop=0                         (1 is for TwinSAFE systems)
zTurretSawType=2
Étape 12 - Reset userVariables
Set these parameters in c:\ddrive\uservariables.mul to reset mechanical adjustments to zero
DOFFSETWO=0
DOFFSETWI=0
DOFFSETVO=0
DOFFSETVI=0
xOFFSETWO=560
xOFFSETWI=560
xOFFSETVO=560
xOFFSETVI=560
tool1XOffset=0.0
tool2XOffset=0.0
tool3XOffset=0.0
tool4XOffset=0.0
tool7XOffset=0.0
tool8XOffset=0.0
tool1SPDOffset=0
tool2SPDOffset=0
tool3SPDOffset=0
tool4SPDOffset=0
tool7SPDOffset=0
tool8SPDOffset=0Draft



 Français
 English
 Deutsch
 Español
 Italiano
 Português