This Dokit will give a step by step guide on how to use the Monday.com form to fill out a daily timesheet.

Difficulté
Facile
Durée
1 minute(s)
Introduction
We are using Monday.com to handle daily timesheet entries. The layout of the form has been designed to make data input as minimal as possible. We are looking to improve accuracy of time capture, cut down administration time and to make historical data available without the need to store paperwork or take pictures. You will only be able to view and edit your timesheet when logged into your Monday.com account. Other employees are unable to see your data.
Étape 1 - Creating a Desktop Shortcut
You will receive a link via email that will open up your timesheet. Copy the link from the email and paste it into a new shortcut on the desktop of the device you are using. The shortcut should be labelled 'Timesheet' for clarity.
To create the shortcut, right-click on a spare area on your desktop and hover over 'New'. This will open a selection panel. Select 'Shortcut'. A text box will appear and this is where you need to paste the link from the email. Once you have pasted the link, select 'Next'. A prompt will will then ask you to name the shortcut. I would suggest that it is named 'Timesheet'. After naming the shortcut, click 'Finish' and the shortcut will appear on your desktop. Double-click on the shortcut to open up your timesheet form.


Étape 2 - Filling Out the Timesheet
The form that you open up linked to a Monday.com board. The answers that you place in the form are used as information for lines in the board. This information is then used to calculate data surrounding production hours. It is important that the information used when filling out this board is accurate.
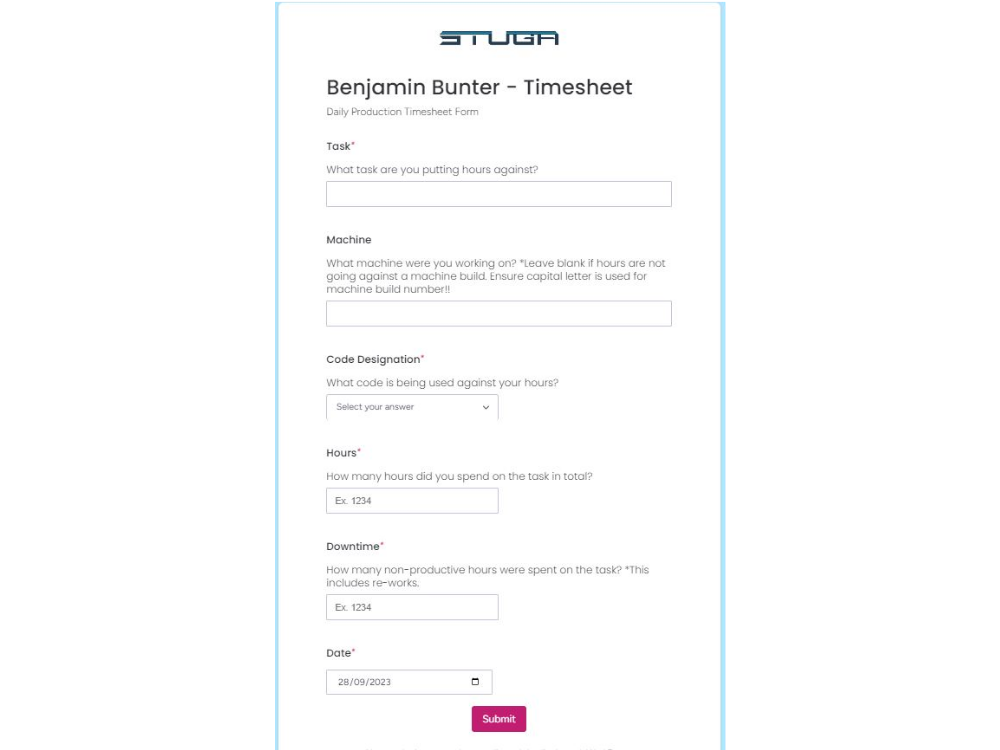
Section 1:
Task - This is where you add the information about what task you are putting hours against. For example: Piping Saw or Building Multihead or Wiring Infeed. This box has potential to be used for assembly numbers in the future, however, to start off with, a simple task name will is adequate.
Section 2:
Machine - This field must only be used if the hours you are logging are going against a machine. If the hours you are logging are for other tasks such as 'Tidying' or 'Sales Orders', leave this field empty!
When adding a machine number, the full number must be used and a capital letter must be used. For example, Z097 not z097, Z97 or z97. If you are unsure about the full machine number, ask your supervisor.
Section 3:
Code Designation - This is a drop down box and contains the module codes that are used in production. Select the code that best relates to the overall task. For example, for 'Piping Saw', I selected 'F - Saw'.
Section 4:
Hours - This is a very important field. It is important to note that the hours that are entered into this box are the TOTAL amount of hours you spent on the task irregardless if any or all of that time was downtime! The downtime is logged later.
Section 5:
Downtime - This field is used for logging how many hours of the overall task were 'Downtime'. This includes re-works and looking for parts etc. This box should NOT be used for Tidying or Misc tasks. They need to be logged as a seperate task, via another entry. In the example, I have stated that during my 4 hours spent 'Piping Saw', 1 hour of that was downtime.
Section 6:
Date - The date section will automatically be populated with 'Todays' date. However, if you forgot to do or need to re-do a timesheet from another day, the date field can be changed to your need. Just click the calender symbol and select the required date.
Section 7:
Submit - Once all fields have been checked for accuracy, click on the Submit button at the bottom of the page. This sends your timesheet to your supervisor on data tracking board for approval.
You will also be given a pop-up screen that allows you to submit another timesheet (if required). Otherwise, the pop up screen can be closed.


Draft
 Français
 English
 Deutsch
 Español
 Italiano
 Português