Cette page fournit une simple interface de navigation pour trouver des entités décrites par une propriété et une valeur nommée. D’autres interfaces de recherche disponibles comprennent la page recherche de propriété, et le constructeur de requêtes ask.
Liste de résultats
- R0015292 Install Cylinder Rails and Align + (19/09/2025 Moved to Confluance Click [https://stuga-ltd.atlassian.net/wiki/external/MjM0NmI0YzNjOGFhNGVlNGJmMmVjODc0MjIzODFmZTY Here])
- R0015242 Level and Adjust Roller beds module C and E + (19/09/2025 Moved to Confluance Click [https://stuga-ltd.atlassian.net/wiki/external/OWQ1OWJjOTcyMGVhNGUyYmJlYzM3MjY1ZTA1YTVmM2M Here])
- R0015027 Install Pneumatic Connection rail and Air Feeds + (19/09/2025 Moved to Confluance Click [https://stuga-ltd.atlassian.net/wiki/external/NWRmM2M4OGViYzg4NDU2MWE0ZGVhYWI0YTM3M2RiZWQ Here] <br/>)
- ZX5 V Notch Blade Mechanical Setup + (19/11/2025 Moved to Confluence Click [https://stuga-ltd.atlassian.net/wiki/external/ZDY2YWRmZmUyNTY5NDY4NDg2YTA0NTQ3MzA3MDUzOTY here])
- ZX5 Adjusting V Notch Depth and Position + (19/11/2025 Moved to Confluence Click [https://stuga-ltd.atlassian.net/wiki/spaces/~5570585b7bb5d1bc31430e886883cbc774c182/pages/69927040/ACC016+ZX5+Adjusting+V+Notch+Depth+and+Position here] <br/>)
- Commissioning - Off-Cut Laser Sensor + (21/08/2025 Moved to confluence [https://stuga-ltd.atlassian.net/wiki/external/NWQyMzdiNGUxZjNlNGQ5NzhmZGY2YTQ3YTRiZDMzMDM Click here])
- WinDelay for Twincat Startup + (21/08/25 Moved to Confluence Click [https://stuga-ltd.atlassian.net/wiki/external/MjVkNzJhYjMzNzRiNGQ1NjkyNzZhMGI4OGQzZjhkNGI here])
- Setting Infeed Loading Wheel + (21/08/25 Moved to confluence [https://stuga-ltd.atlassian.net/wiki/external/ZTIwZTg2MDVmN2Y1NDEyZGE0ZTQxZjJiMGZjODM5NTI Click here])
- Accessing Raw Production Data from Diagnostic SQLite Database + (23/07/2025 Moved to Confluence [https://stuga-ltd.atlassian.net/wiki/external/OWFkZjI3ZjIxNDUwNDEyYzhiZDYwMTJhNGJiMzFkMmQ Click here] <br/>)
- R0000572 Bench Assemble Centralise Assembly + (25/09/2025 Moved to Confluance Click [https://stuga-ltd.atlassian.net/wiki/external/MzI5NWVmMTQwMThlNGI0OWJhYWM3NDlhYTYzOWFlMTc Here] <br/>)
- R0015286B Bench Assemble X axis Energy Chain + (25/09/2025 Moved to Confluance Click [https://stuga-ltd.atlassian.net/wiki/external/Mjg4YTUwMzA4MjgxNDQwZGJiZTE0NzliYzQ2OTk1Mjg Here])
- R0000713E Bench Assemble R Axis Limit Assembly + (25/09/2025 Moved to Confluance Click [https://stuga-ltd.atlassian.net/wiki/external/NGFjMmU0MTI3YzEwNGIxNDk5ZmZlYTVmYjVjZDE0YWU Here] <br/>)
- R0015119 Mount Assemblies + (25/09/2025 Moved to Confluance Click [https://stuga-ltd.atlassian.net/wiki/external/Yjk0ZjM3NTNmMzNkNGViZThkMjRjZDA5MzFjZDE0Y2E Here] <br/>)
- Setting Up SageHookup Database + (25/09/2025 Moved to confluence Click [https://stuga-ltd.atlassian.net/wiki/pages/resumedraft.action?draftId=35880964&draftShareId=5d2516ce-f1e4-4d00-9d08-1de52c40e590 here])
- Parts Identification Local Setup + (25/09/2025 Moved to confluence Click [https://stuga-ltd.atlassian.net/wiki/pages/resumedraft.action?draftId=35880964&draftShareId=5d2516ce-f1e4-4d00-9d08-1de52c40e590 here])
- Determining Zero Pulse position For Beckhoff Axis + (26/08/25 Moved to Confluence [https://stuga-ltd.atlassian.net/wiki/external/ZDU5YjQwZDc3ZTZmNDEwNjhjNWMyMzM3OWQ4ODljMTU Click Here])
- R0000571 Fit and Level Cut Tables , Finalise Eject + (27/08/2025 Moved to Confluence Click [https://stuga-ltd.atlassian.net/wiki/external/MmM3NTNhNjMxMDc2NDJjZDkzNzIyYjE0Y2VhNTg4OGY Here])
- R0015030B Bench assemble loader wheel + (27/08/2025 Moved to Confluence. Click [https://stuga-ltd.atlassian.net/wiki/x/EYDE Here])
- R0015121 Bench assemble Infeed arms + (27/08/2025 Moved to Confluence Click [https://stuga-ltd.atlassian.net/wiki/external/YzI3NDdiZWMyYWE0NDFiM2JjMzE4NTAxNWMwZDFlY2I Here] <br/>)
- ZX5 Datum and Grip Pin Setup + (27/08/25 Moved to confluence [https://stuga-ltd.atlassian.net/wiki/external/YWEyMTA5ODU5NWE2NGY2YjhhMTlmOTI4YTM5OTVlOTI Click Here])
- R0015268 Pneumatic module Test + (28/08/2025 Moved to Confluance Click [https://stuga-ltd.atlassian.net/wiki/external/MDZkMzA2NGQzNjVhNGJjOThkYzI5MjM4ZjlkMTA2M2E Here])
- R0015078B Module A infeed arm alignment + (28/08/2025 Moved to Confluance Click [https://stuga-ltd.atlassian.net/wiki/external/NTJhZjc4MDE2MWY4NDNlNTk1NmY4OWViNGIwMTA4ZWU Here])
- R0015007 Bench Assemble Roller Tables Machining Outfeed + (28/08/2025 Moved to Confluence Click [https://stuga-ltd.atlassian.net/wiki/external/YzgxYThhYmIxM2MzNGQ4Zjg5YTliYmY5NTQ3ZjAxOGU Here])
- R0015079 Infeed extension assembly + (28/08/2025 Moved to Confluance Click [https://stuga-ltd.atlassian.net/wiki/external/ZDIwZGFjYThlNGUwNDU3ZWEzMTY1OTg3MGU5ZmMyZDI Here])
- Air Pressure Switch Setup + (28/08/25 Moved to Confluence [https://stuga-ltd.atlassian.net/wiki/external/Zjk2Nzk0MGU2Mzc3NDRiMmJhZmU4NzQ0YjMyNjkyY2M Click Here])
- Ecoline Clamp Clamp Reinstatement + (28/10/2025 Moved to Confluence Click [https://stuga-ltd.atlassian.net/wiki/external/NjgxMjFlMzQ4OGUwNGNlMzlkYTUzYzA0M2YzNzNiNWY here])
- Recording a Video Clip Using Windows 11 Snip Tool + (30/10/2025 Moved to Confluence [https://stuga-ltd.atlassian.net/wiki/pages/resumedraft.action?draftId=55803952&draftShareId=34646438-8e8d-4b90-a74a-fc9fb499173f Click here])
- OBSOLETE DM - Updating Resources + (<div class="icon-instructions caution-i …
All information provided to the service engineers on Device Magic can all be linked to a single Excel document. This document provides all customer names, machine numbers, emails and employee information. Linking this document with Device Magic provides fields that make it easier for engineers to fill out the form.
used internally at Stuga and not be sent to engineers or customers in coordination with Data Protection standards.</div> </div><br/>) - TB0409 Setting Up Windows 10 PC 2018 + (<div class="icon-instructions caution-i … Please use [[Setting Up Windows PC C0000422-KIT 2023]][[Setting Up Windows PC C0000422-KIT 2023]])
- OBSOLETE Installing SourceTree Version Control Software + (<div class="icon-instructions caution-i … Use this [https://stuga.dokit.app/wiki/Changing_Version_Control_to_Visual_Studio link] From Jan 2020, Sourcetree will be increasingly used to properly maintain changes to the Stuga source code. Each machine with TwinCAT3 will need the Sourcetree program installed, and a change to where and how the source code is stored This tutorial deals with installing the Sourcetree program from Atlassian code is stored This tutorial deals with installing the Sourcetree program from Atlassian)
- TB0426 Replacement Zebra Printer Setup + (<div class="icon-instructions caution-i … [https://stuga.dokit.app/wiki/TB0452_ZD620_Zebra_Printer_Setup ZD620 Instructions]iv> [https://stuga.dokit.app/wiki/TB0452_ZD620_Zebra_Printer_Setup ZD620 Instructions])
- Setting Up Windows PC C0000422-KIT 2023 + (<div class="icon-instructions idea-icon … stuga.dokit.app/wiki/Setting_Up_C0000422-KIT_-_Full_Hardware_2023</div> </div>)
- R0015066 Bench Assemble Saw Motor Assembly + (<u>'''Tool Required'''</u>
… '''Tool Required'''
Standard hex key set
Standard spanner set
Cutting disc
Standard hand taps
'''Parts Required'''
A0000013 32mm Conduit Adaptorx 1
A0000027 Flexible Conduit Ø32mm x 1
D0004079 Saw Motor (Modified Front Flange) x 1
D0004437 Motor Conduit Bracket x 2
D0004835 Flex conduit plate x 1
D0004997 Connector Support Block (5360) x 1
D0004999 Reed Switch Terminal Box x 1
D0005219 Turntable Nozzle x 1
D0008198 Chute Flap x 1
H0008200 Chute Flap Bracket x 1
P0000295 Elbow Adaptor 6mm - 1/8 BSPT (Metal type) x 1
1 P0000295 Elbow Adaptor 6mm - 1/8 BSPT (Metal type) x 1 <br/>) - R0015284 Frame ancillaries + (<u>'''Tools Required'''</u> … '''Tools Required''' 115mm disc cutter Standard Hex key set Standard spanner set Standard tape measure Standard Tap set Standard HSS drill set '''Parts Required''' A0001060 Support bracket :Cable basket Tray x 5 A0001061 Retainer: Wire Basket Cable Tray x 7 A0001065 Wire cable tray 3m length x 2.5 D0015611 Reference Levelling Bracket x 2ble tray 3m length x 2.5 D0015611 Reference Levelling Bracket x 2)
- R0015274 Fit X Axis Gearbox and Motor + (<u>'''Tools Required'''</u> … '''Tools Required''' Feeler gauge set Standard hex key set Standard Tap set Torque wrench (0-50nm) Extended 4mm hex bit 1/8 drive '''Parts Require''' D0015073B x 1 C0001212 x 1 H0008301 x 1 C0001122K x 1 D0015290 x 2 M0001087 x 201212 x 1 H0008301 x 1 C0001122K x 1 D0015290 x 2 M0001087 x 2)
- R0015290 Bench Assemble Top guard + (<u>'''Tools Required'''</u>
… '''Tools Required'''
Standard hex key set
Acoustic foam cutting edge and Back board
Stanley blade
Standard HSS drill set
Standard tap set
Step drill
'''Parts Required'''
D0001352 Printer Shelf TLP2844-Z x 1
D0004719E Cut Bar Guard Mk5 (5476E) x 1
E0000249 Sounder Beacon x 1
M0000002 12mm Grey Acoustic Foam with Black PVC Facing x 1
M0001127 Cable Tie Base (m6) x 1
with Black PVC Facing x 1 M0001127 Cable Tie Base (m6) x 1 <br/>) - R0015324 Install pipe and cable looms + (<u>'''Tools Required'''</u>
… '''Tools Required'''
Standard hex key set
6mm black Air pipe
Pipe identification numbers
Pneumatic Pipe cutters
W0001002 cable (from consumable stock )
'''Parts Required'''
M0001127 Cable Tie Base (m6) (from consumable stock)
P0000046 Fitting: 'Y' Adaptor 6mm x 2
m consumable stock) P0000046 Fitting: 'Y' Adaptor 6mm x 2 <br/>) - R0015294 Fitment of wire basket and feed pipes + (19/09/2025 Moved to Confluance Click [https://stuga-ltd.atlassian.net/wiki/external/MGRmNThkNzU1OGUwNDlkY2FiYTU0NTFhYjY3NDFlYTg Here])
- TB0444 Renewing CF Card on TwinCAT2 Systems + (<u>Problem</u> These machines … Problem These machines use a CX5020 PC with a 2Gb CF card running TwinCAT2 PLC system. The CF card can fail, which is effectively the windows operating system. The CF card has a very small capacity, so needs to be created from an image. This TB outlines the steps in the process to ensure a successful conclusion. 1. Create a new CF card at stuga using the beckhoff imaging tool on a CX5020 2. Boot up with the CX5020 3. Ensure PLC is set to Enable on start-up (default is config mode) 4. Rename the PC 5. Install TeamViewer host v10 or less from a USB stick 6. If you have a copy of the version of winMulti it was running, copy this in to the c:\ multi folder. If not, a “'''''new version install'''''” will be needed so copy in data from the g:\builds\PC Installs\Autoflow\Multi folder 7. Set up and customer specific network parameters to ensure TeamViewer will work when it is plugged in on site 8. Send to customer Once on site, follow procedure A if the winMulti version is preserved, or B if it is a '''''new version install'''''eserved, or B if it is a '''''new version install''''')
- TB0449 Ecoline Clearing out Old Archived Data + (= Problem = Software takes a long period of time to find bar after scanning barcode.)
- TB0415 Method to Prevent Loosening of Saw Blade + (==Problem==
On Z063 the bolt holding the s … ==Problem==
On Z063 the bolt holding the saw blade onto the spindle has regularly been loosening during use.
==Solution==
The M16 bolt will be replaced with a stud and castle nut that can be locked with a cotter pin.
==Tool List==
Drill with Ø5.0 bit
24mm Spanner
C Spanner
= Parts List =
0000549 </td><td width="319">Split Pin 4mm x 32 </td><td width="302">1 </td></tr><tr valign="TOP"> <td width="76">F0000550 </td><td width="319">Castle Nut M16x1.5 </td><td width="302">1 </td></tr></table>)D0004031B Saw Washer 3mm 1 D0015560 Spindle Stud 1 F0000273 Spirol Pin Ø6 x 30 1 F0000549 Split Pin 4mm x 32 1 F0000550 Castle Nut M16x1.5 1 - Monday - Getting Started For Engineers + (==Why Change?==
*mHelpdesk limitations
** … ==Why Change?==
*mHelpdesk limitations
**Cludgy to use
**Slow response
**Cannot connect to other apps or emails
*Monday advantages
**Easier and more elegant to use
**More configurable
**easy to email into
**Better searching
**Expandable to whole business
**Cheaper
==Similarities to mHELPDESK==
*Monday consists of a set of user definable “Boards” that contain a list of “Pulses”.
*The “pulses” can be configured however we like.
*I have created a “Board” called “Service Jobs”
*On the Service Jobs Board, I have designed the “Pulses” to mimic the service jobs, so this will include the machine, the status, the type classification, etc
*Any pulse has associated “Updates”. These are just like the “items” on an mHelpDesk job, but is much more flexible than the plain text of mHelpdesk
*The service team will assign jobs as before
*The job should be updated by yourself during your visit
*The database of jobs is searchable so you can find the machine history
so you can find the machine history <br/>) - B0000025 B0001175 Belt Identification + (A Guide to correctly identify the variant of drive belt required for ZX5, ZX4 ,ZX3 S-65 and Flowline saw modules Belts will vary across blade sizes and Pully diameters Key indicator is pulley size, over blade size)
- Setting up TwinCAT Drive Manager for AX8000 Drives + (AX8000 drives require a Measurement projec … AX8000 drives require a Measurement project to be added which gives you a specialised drive manager screen for these drives This needs to be installed separately form a file that can be downloaded from Beckhoff or is in g:\design\TwinCAt3 TE5950-TC3-Drive-Manager-2.zipn\TwinCAt3 TE5950-TC3-Drive-Manager-2.zip)
- ZX5 - ZX3 Hepco alignment Module E Saw Infeed + (Alignment and check procedure for mounting … Alignment and check procedure for mounting of hepco rail To main frame Parts required B0001102 hepco rail D0015492 5 off vertical adjustment plate D0015493 5 off Lateral adjustment plate D0015072 1 off Carriage Plate B0000184 journal wiper 4 off B0000185 journal 2 off B0000186 journal 2off Hepco Levelling Jig Hepco rail v block jigs Hepco rail Drive rack pitching jigk jigs Hepco rail Drive rack pitching jig)
- Monday - Obtaining Customer or Machine Address from a Job + (All machines in the Monday database have their locations stored to make it easy for an engineer to navigate to site using the map features in Android or Apple phones However, it is not intuitively clear how to get to this information)
- Autocut Taking A Backup + (Backing up is vital to ensure your data is safe in case there is a failure of the PC or Hard Disk Drive)
- R0000711 Rotary Base Assembly REV2 + (Detailed steps to correctly install rotary … Detailed steps to correctly install rotary gear and journals Checks for correct installation of oil feed system Tolerance limits and requirements '''Tools Required''' Standard hex key set 0-25mm micrometer Ring support blocks for assembly Work Table Mag Base and D.T.I Hepco flat spanner 17mm socket Torque Wrench '''Parts required''' D0006423-2mod Drive ring x 1 D0007651 Face plate x 1 B0000185 journal x 6 B0000186journal x 2 D0006503 Journal washer x 8 D00007692 wiper x 4 D0006521 x2 D0007693 x 2 D0007713 rotary ring cap x 1iper x 4 D0006521 x2 D0007693 x 2 D0007713 rotary ring cap x 1)
- Placing a TwinCAT3 Machine Under Source Control + (<div class="icon-instructions caution-i … Click [https://stuga.dokit.app/wiki/Changing_Version_Control_to_Visual_Studio here] for the latest procedure For many years, the source code for the PLCs has resided on the G:\drive and then a copy on each and every one of the PCs used to edit the code, so at least one on each machine. This is a recipe for disaster because maintaining all the copies and version numbers is incredibly difficult and adds a lot of time overhead to fixes and changes. This has worked because there has been only one developer, but this is set to change in future as more programmers will be trained and tracking versions becomes more difficult From 2020, the PLC code version control has been improved by using an industry standard source control system called "Git" along with "BitBucket" to store the PLC code in the cloud. The program "SourceTree" is used to commit, push and pull the changes [https://www.atlassian.com/git/tutorials/what-is-version-control Click here] for an introduction to version control using Git This tutorial is a step by step guide to setting up an existing machine or diagnostic PC to a standard uses on all Stuga machines to enable quick, easy and stress free version control.standard uses on all Stuga machines to enable quick, easy and stress free version control.)
- Setting Ultrasonic Sensor - Vertical + (Move to Confluence 15/12/2025 [https://stuga-ltd.atlassian.net/wiki/spaces/~5570585b7bb5d1bc31430e886883cbc774c182/pages/87162885/Setting+Ultrasonic+Sensor+-+Vertical Setting Ultra Sonic Sensor - Vertical]<br/>)
- Upgrading Project File on TwinCAT2 System + (How to upgrade the .pro file (project) on … How to upgrade the .pro file (project) on a Beckhoff TwinCAT2 system
ram called "TwinCAT PLC Control" to download the PLC project</div> </div><br/>) - Full Version Upgrade TwinCAT3 WinMulti + (If a PC fails on a machine in the field an … If a PC fails on a machine in the field and the hard drive data cannot be recovered, it is necessary to replace the PC. This may create a version conflict, as the new PC will have later versions of twinCAT installed than the original
This tutorial outlines the steps required to bring all the machine systems up to the latest level to ensure compatibility
ions-text">...This is a one-way process that cannot be reversed</div> </div><br/>) - Ecoline - Disabling V axis To Swap Faulty Drive + (If a drive fails on an Ecoline, the V axis … If a drive fails on an Ecoline, the V axis can be utilised to enable the Ecoline to still run as a machining centre, albeit with V notching now disabled. This is a better situation than no machining at all, as all factories have V notching capability in addition to an Ecolineching capability in addition to an Ecoline)
- Disabling a Tool Home or Tool Out Sensor + (If there is a failure of a tool out or too … If there is a failure of a tool out or tool home sensor on the Stuga spindle ring, it is important to be able to quickly disable the input so the machine can continue production until the problem can be properly resolved. The software has an inbuilt functionality to do this - this tutorial takes you through the necessary stepsrial takes you through the necessary steps)
- Create a TwinCAT Project from Existing Project + (If you are confident and proficient in usi … If you are confident and proficient in using the Visual Studio editor to create TwinCAT projects, you can shortcut a lot of the data inputting by copying and modifying an existing project. This will keep the naming conventions and links exactly the same
ne has exactly the same EtherCAT box, drive and module setup</div> </div><br/>) - TB450 - CMOS Battery replacement + (Internal CMOS batteries are used in PCs to … Internal CMOS batteries are used in PCs to keep a constant power supply to BIOS memory while the main power supply is switched off. These batteries should last up to 5 years when a PC has been left idle. Sometimes these batteries can fall flat before this time either due to being low when sent out or extended use on older machines. The main symptom of a CMOS battery faulting on a Stuga machine is the PC not booting up when mains power is switched on which will be indicated by a “No Signal Detected” message being displayed on the screen. This is due to the BIOS setting “Restore AC Power Loss” going back to its default value of OFF due to the battery faulting. Restoring the BIOS to its original settings is a temporary fix in this situation as it is most likely this will happen again a couple of months down the line (See TB 376 or 213). The battery required is a '''CR2032'''. In the case of the Antec PC, and most commonly, the battery is held in an open housing that can be pushed to release and easily replaced. In PCs such as the Acer Revo the battery needs to be pre-wired with a plug but still easily unclipped and replacedug but still easily unclipped and replaced)
- Monday - Putting Customer Machines On Stop + (It is important that everyone does this th … It is important that everyone does this the same way or confusion and frustration will follow. It is also important to understand how the relationship between a Machine and it’s contract works * Each machine on the “Machine” board needs to link to a “Contract” on the “Service Contracts” board * This allows multiple Machines to have the same “Contract” – eg Customade group contract * The “Contract” is the electronic version or equivalent to the bit of paper that the customer has signed, and contains the start and end dates, etc * For machines that have no contract, I have set up some other “General” contract types. These General Types are not machine specific – ** PAYG – General Pay as you go ** OnStop – Customer is on stop and nothing should be supplied ** AskFirst – Ask KG or management first before supplying goods and services ** Proforma – Payment required before supply of goods and services ** PreDelivery – Before warranty startses ** PreDelivery – Before warranty starts)
- Stuertz Infeed - Check GY Position Parallelism + (It is important that the parallelism of th … It is important that the parallelism of the GY axis to the backfence is set and maintained along the length of the rack. This tutorial describes how to check this parallelism without the need for measuring equipment
'''General Procedure'''
#Find range of adjustment required
#Zero GY axis to ensure range adjustment can be met
#Move to straight edge resting points, Adjust rollers at these points
#Use straight edge between resting points to adjust the other rollers to a fixed datum
'''Potential Symptoms of a problem'''
*Gripper cannot pick up offcuts
*Gripper /profile end forced away from backfence
*Accuracy problems
*Gripper wobbles after it has released profile
Use the laptop to enable you to control the Service screen whilst inside the infeed table
The gripper setting jig is used to give an accurate and reliable zero to locate the gripper jaw to. Any piece of aluminium reinforcing box section will also work
the gripper jaw to. Any piece of aluminium reinforcing box section will also work <br/>) - Monday - Emails to Updates + (Mondays has changed the way it deals with … Mondays has changed the way it deals with the way it writes updates via email, in a very useful way for us. This will save a lot of time cutting and pasting information from emails. Simply put, * when you send an email, cc: the unique email address for the item in your email you are sending. This is standard practice to get your email into Mondays. * When your contact replies (with reply all) * their reply will now magically appear in the Monday update for the item. * It even strips out the email trail, leaving just the important reply It used to be the case that only members of Stuga.co.uk could send an email directly to an update, but this has now changed…ly to an update, but this has now changed…)
- Setting Arrow Heads on ZX5 or ZX5-E + (Moved to Confluence 11/12/2025 <br/>[https://stuga-ltd.atlassian.net/wiki/spaces/~5570585b7bb5d1bc31430e886883cbc774c182/pages/82706473/ACC017+-+Arrow+Head+Adjustment+on+Saw+with+SY+Axis Setting Arrowheads])
- Recovery of Bar Queue following winMulti Crash + (Moved to Confluence 11/12/2025 [https://stuga-ltd.atlassian.net/wiki/spaces/~5570585b7bb5d1bc31430e886883cbc774c182/pages/84607023/Recovery+of+Bar+Queue+following+winMulti+Crash Recovery of Bar Que] <br/>)
- TM017 Setting Cut Length on Saw + (Moved to Confluence 11/12/2025 [https://stuga-ltd.atlassian.net/wiki/spaces/~5570585b7bb5d1bc31430e886883cbc774c182/pages/82542638/ACC018+-+Adjusting+Saw+Cut+Lengths+on+ZX5-S+and+ZX5-E Setting saw Cut Lengths])
- TB0447 ZX5 Setup - X Axis Beam Calibration + (Moved to Confluence 17/12/2025 [https://stuga-ltd.atlassian.net/wiki/spaces/~5570585b7bb5d1bc31430e886883cbc774c182/pages/89423875/TB0447+ZX5+Setup+-+X+Axis+Beam+Calibration ZX5 Setup - X Axis Beam Calibration] <br/>)
- TM016 Arrow Head Adjustment on Saw + (Moved to Confluence 27/11/2025 [https://stuga-ltd.atlassian.net/wiki/spaces/~5570585b7bb5d1bc31430e886883cbc774c182/pages/75268141/TM016+Arrow+Head+Adjustment+on+Saw Here]<br/>)
- Setting Ultrasonic Sensor - Horizontal + (Moved to Conlfuence 15/12/2025 [https://stuga-ltd.atlassian.net/wiki/spaces/~5570585b7bb5d1bc31430e886883cbc774c182/pages/85524503/Setting+Ultrasonic+Sensor+-+Horizontal Setting Ultrasonic Sensor - Horizontal])
- Ensuring Mapped Drives Connect Every Time on Startup + (Never found out why but seems Windows tries to manage the Mapped Drives before The Network Service is up and running)
- Updating Teamviewer Host + (Older versions of Teamviewer are being pha … Older versions of Teamviewer are being phased out by the Teamviewer company from September 15th 2021. The advice on the website suggests you need to upgrade to version 15. However, v15 is not compatible with the older Windows XP machines in the field. The latest XP compatible downloadable version of the Host program is 13.2 and is available [https://download.teamviewer.com/download/version_13x/TeamViewer_Host_Setup.exe here] Regrettably, the update process on older versions is not simple, and frustratingly cannot be done remotely. It needs intervention from an operator at the machine with a small amount of technical know-how with a small amount of technical know-how)
- TB0301 Autoflow Saw Head Reinforcement - Additional Enhancements + (On Autoflow 2 Sawing Centres following 5 y … On Autoflow 2 Sawing Centres following 5 years of use., it has been found that the internal saw centre framework can lose its rigidity. this is probably due to "bruising" or denting of the aluminium joints introducing a slight amount of play. This is exacerbated by the design where it is attached and driven on from the base up A retrofit kit of parts has previously been created to allow additional reinforcement to be introduced within the structural framework. This kit builds upon the first kit to provide further accuracy enhancements by #Adding left right stability with additional slide rails at the top of the subframe #Adding front / back stability by moving the SY axis leadscrew to the same height as the saw table ====Parts required: ==== R0010272 Kit: Saw Frame Rigidity Pt 2 This kit consists of 2 carriage assemblies, specifically designed to provide further rigidity to the top of the Saw Head Assembly. In addition, 2 mounting blocks required to relocate the Saw Y Axis Assembly are also included. This allows the Saw Y Axis Assembly to continue to operate accurately, but improves the life of associated components. See also [[TB0259 Autoflow Saw Head Reinforcement]][[TB0259 Autoflow Saw Head Reinforcement]])
- Move SR Datum Sensor to Higher Level R0019217 + (On a Mk4 Autoflow, The SR axis daum sensor … On a Mk4 Autoflow, The SR axis daum sensor is originally located at the rear and to the base of the SR axis. This area is prone to offcuts, so a new location has been designed at the top, with the following design parameters
*Easy to retrofit
*Sensor is protected in a case
*Short distance to connection box
*Uses existing mounting holes
*Easy to adjust and maintain
*Sensing end location should be vertical onto a plate, not horizontal on to a radiused surface
*Can use E0000336 2mm range sensor reliably
*Incorporate a front fence to help deflect offcuts down the chute and to protect the sensor
The parts are supplied in Kit R0019217B
illustrated here are from a Right to Left feed machine. Parts are unhanded so can be fitted to either hand machine</div> </div><br/>) - StuertzCloud - Creating Local SQL Database + (See [[StuertzCloud - Setup Overview]] … See [[StuertzCloud - Setup Overview]] for an overview of the setup.
This tutorial covers the setup of the Local SQL Express database instance and creating a "ProOpt" database structure on it.
*This database installed on the 'Location' local network. *The 'Machines' write their production data to it *The 'Gateway' software uploads this data to the StuertzCloud server See Also [https://stuga.dokit.app/wiki/StuertzCloud_-_Installing_Gateway StuertzCloud - Installing Gateway] [https://stuga.dokit.app/wiki/StuertzCloud_-_Setting_up_Stuga_Machine_to_Write_Production_Data StuertzCloud - Setting up Stuga Machine to Write Production Data] [https://stuga.dokit.app/wiki/StuertzCloud_-_Creating_a_Customer_Location StuertzCloud - Creating a Customer Location]
SQL Server Management Studio (SSMS) installed to manage the databases</div> </div> <br/>) - Changing Main Saw Blade + (Stuga recommends this blade be changed aft … Stuga recommends this blade be changed after 1-2 weeks of cutting - symptoms to determine if the blade needs changing:
* Awful cutting sound / smell
* Profile dragging (sizes too short)
* Brown burnt swarf
* Smoke coming out of profile end while cutting
p and can be awkward to manouver out of the saw, please be careful</div> </div><br/>) - ACEpc Changing IP address using netedit + (The ACEpcs use two different systems for c … The ACEpcs use two different systems for connecting a network #NETBeui - this was used on earlier machines but reliability depends on the customer network setup. Reconfiguration after initial setup is difficult #IP addressing - A setup system was written using IP addresses to connect. This is a little harder to set up, but is easier to change later. A special program called netedit was written which updates all the correct files in the backgroundes all the correct files in the background)
- Adding TwinSAFE projects to AMI Motors + (The AMI8xxx-3100 motor series is a TwinSAF … The AMI8xxx-3100 motor series is a TwinSAFE enabled motor. To enable this motor to work with a non-TwinSAFE system, a TWINSAFE project needs to be placed into the Safety Logic circuit on board the motor. This dokit describes this process.
====Prerequisites==== *TwinCAT machine project connected, scanned and debugged *Drive Manager 2 Project installed *AMI motors connected and powered up *Latest Device Description (ESI) updates - see Updating Device Description Tables *AMI Motor TwinSAFE Project from [https://stugaltd.monday.com/boards/4881973586 Software Versions Board] For instructions on how to create the AMI Motor twinSAFE project from scratch, see [[AMI TwinSAFE Workaround - Safety Project Creation]]
[[AMI TwinSAFE Workaround - Safety Project Creation]]<br/>) - R0019228 Autoflow R Axis Ring Seal Protection + (The Autoflow R axis uses a slewing ring which has a seal that is subject to ingress of swarf. Over time, this seal can become dislodged, resulting in a major failure of the machine.)
- Replacing Baldor Microflex Drive with RS Automation + (The Baldor Microflex drive with Beckhoff m … The Baldor Microflex drive with Beckhoff motor was a drive system combination that has now been superseded with a better performance system using an RS Automation Drive and motor combination The Part number for the upgrade is R0019052X Kit: X Axis Replacement using RS Automationit: X Axis Replacement using RS Automation)
- Guide to Fitting Eject Push Sensors on ZX Machines + (The Eject Push bar on the Saw Outfeed on t … The Eject Push bar on the Saw Outfeed on the ZX machines does not have sensors fitted to monitor the position of the cylinders. This causes an issue when the bar is obstructed and either does not fully extend or not fully extract. The cycle is not aware of the position of the cylinders and the machine will continue to run, often resulting in a collision. Not having sensors fitted also means that the Eject Push cycle is run via a timer. However, using a timer means that the system does not know the actual position of the cylinders. Having sensors fitted to the cylinders will allow us to have a cycle that monitors the position of the cylinders and we can determine the cycle has finished before allowing another operation to proceed. We can also use the sensors as feedback to stop the machine if the cycle fails. This will result in fewer collisions and damage to parts or products.
s and damage to parts or products. <br/>) - Beckhoff AX8000 Flowline Upgrade + (The Flowline range (Mk3, ZX3, ZX4) are Stu … The Flowline range (Mk3, ZX3, ZX4) are Stuga built and designed machines for prepping and cutting uPVC windows and doors. The Flowline is the first machine of the Stuga 'U' shaped machines which has prepping and cutting working in the same machine package. The Flowline is still a fantastic machine for the industry, however, due to the age of the machines and older control systems becoming obsolescent, we have had to find an upgrade route that does not only keep the machine going, but also provides improvements from the original model and up-to-date technology to future proof the machine. The upgrade that we have developed for the Flowline is supplied from an automation supplier named Beckhoff. We also use Beckhoff on our new build machines. This gives us better lead times, more understanding of the products and better diagnostics/ support for our customers. The drive system that we use is called the AX8000 series. These drives are a compact multi axis servo system that use an EtherCAT interface and STO safety functions. These servo drives, coupled with Beckhoff AM8*** series OCT servo motors provide quicker installations and all round performance increases from any system we have previously used. To drive all of the new system, we are using a Beckhoff IPC controller that runs TwinCAT 3. This links into the system via EtherCAT. All of the machine can now link together via EtherCAT to provide quick and stable communications. This tutorial will give you step by step guides on the physical upgrade requirements needed when upgrading a Flowline Mk3 to a Flowline Mk3 with Beckhoff AX8000 Control. Each step will provide you with written information and pictures to guide you through the upgrade. Each step will contain necessary information which will also provide you with rationale for the design and an idea of the benefits over using different methods. Please always feel free to provide Stuga with any feedback on this document or its contents.feedback on this document or its contents.)
- PC Recovery Process + (The PCs are now shipped with a memory stick that includes a full recovery image. If the system fails in future, this allows a full recovery of the initial setup of the entire drive. Mouse and Keyboard are required for recovery process.)
- Stuga Product Database - Edit Product Data + (The Stuga website has a parts database, much like a shop front for helping identify Stuga Machine parts. Keeping the data updated and logging nuggets of useful information is invaluable in helping identify parts on machines)
- Updating Beckhoff TwinCAT3 Backend Version + (The TwinCAT3 beckhoff systems have a speci … The TwinCAT3 beckhoff systems have a special version of TwinCAT installed - the "Runtime" version XAR (eXtended Automation Runtime). This differs from the full "Engineering version XAE that is installed in the front end and camera PCs in that it is the bare bones of TwinCAT for machine running purposes. '''It does not have the Visual Studio editor in it.''' The runtime version may need updating to 3.4024.xx to allow the latest front end and PLC code to work the latest front end and PLC code to work)
- Upgrade ZX Machine to Beckhoff Drives and Control + (The ZX3 and ZX4 machines that have control … The ZX3 and ZX4 machines that have control systems that pre-date the Beckhoff hardware now have an upgrade available. The upgrade will bring up-to-date hardware to the machines control system and drives. The control system and drives will be changed to Beckhoff. TwinCAT 3 PLC and AX8000 series drives.f. TwinCAT 3 PLC and AX8000 series drives.)
- TM018B Microline and ZX3 V Notch Blade Setup + (The engineer will need a reasonable mechan … The engineer will need a reasonable mechanical knowledge, and a working knowledge of the operation of the machine. You will need callipers (+/-0.05mm) and an accurate rule The setting of the V notch blades on a ZX3 Ring revolves around the setting of two groups of parameters: *V and W axis positions *Blade offsets for each blade The rough position of V and W axes is set first, then the individual blade offsets are set, and finally a test is run to tweak the accuracy to gain perfection. There are two “tweaking” parameters for each blade. The two parameters are: *Depth offset – how deep into the bar *X axis offset – position of point of blade relative to the spindle centrelinef blade relative to the spindle centreline)
- TB0422 Commissioning ZX5 Software 2018 + (The first step in commissioning a new mach … The first step in commissioning a new machine is to get the basic software setup correctly installed. Because the software is designed to be very flexible across many machine types, the simplest way to do this is to copy from a recently built similar machine.opy from a recently built similar machine.)
- ZX5 Gripper Energy Chain & Tray Setup + (<div class="icon-instructions caution-i … The main problems we’ve had during commissioning with these energy chains is that if they are not positioned well enough , the chain will clip the button heads that hold the trays to the L brackets To get over this the brackets sometimes need adjusting on the slots along with possibly bending into a better shape or by adjusting the chain bracket position on the slots in the ‘finger’ bracket Things to look out for: *There should be three links which are reversed at the bracket end of the energy chain. *Servo cable and the pipes and cables from the energy chain are fixed with cable ties to the fingers on the bracket to minimise possible movement and twisting which changes where the energy chain sits in the trays, meaning it could start clipping the button heads. *Tray heights and energy chain length, there should be a consistent gap all the way along between the energy chain and the top tray (viewed from inside the tray) and when at the full travel either end the chain shouldn’t be tight hitting the fence too much at the end. *It is also worth checking if all of the links fitted are the same radius type, as we have had occasions where some have been a smaller radius meaning at certain points down the rack the radius of the bend becomes smaller and falls out from the support of the top tray, especially when the gripper is at either end of the rack. There is a code on the side of each link in the energy chain. *A last thing to be weary of is is the end corners of the trays may require bending out, there have been occasions where one chain tray has been slightly more bent in than the other meaning when the chain moves from one tray to the next it clips the corner of the next tray We normally get the gripper on a reversing cycle movement to test this through the twincat project at different speeds, starting slow and working up to higher speeds.gh the twincat project at different speeds, starting slow and working up to higher speeds.)
- Upgrade - R0000173 Conveyor Motor + (The original style of conveyor is used on many machines, but the motor that powers it is no longer available. This guide will allow a different motor/gearbox to be used.)
- X252 Forward Clamp Out Sensor Setup Stuertz Infeed + (The out sensor used for the vorlaufwagen c … The out sensor used for the vorlaufwagen cannot be a standard reed switch because the cylinder that drives this output is a telescoping version. It is impossible to detect the out position. Therefore, a sensor is fitted that must be programmed to set a high output when it detects the full range has been reached The sensor is a [https://www.pepperl-fuchs.com/global/en/classid_53.htm?view=productdetails&prodid=42559#overview Pepperl+Fuchs VDM28-8-L] Datasheet can be downloaded [https://files.pepperl-fuchs.com/webcat/navi/productInfo/45/452859n.pdf?v=20220926110229 here] '''Function''' The distance measurement device contains one transmitter and one receiver incorporated into a single housing. The transmitter light is reflected back to the receiver from a target. The sensor determines the distance to the target and triggers a switching function or supplies the relevant measured value for processing. '''Assembly instructions''' The sensor can be mounted by means of through holes or by using a mounting bracket or mounting clamp Ensure that the surface is level in order to prevent the housing from becoming distorted when the fittings are tightened. It is advisable to secure the nuts and screws using spring washers in order to prevent the sensor from being incorrectly adjusted. '''Connection''' Connect the device in accordance with the connection diagram in the datasheet. '''Adjustment''' The green LED lights up when the operating voltage is switched on. Adjust the sensor so that the laser point is on the gripper bodyso that the laser point is on the gripper body)
- WinMulti - Changing The Colour Identification Box + (The version 6 software has a feature to id … The version 6 software has a feature to identify the colour of the profile and also to help operators load foiled profile in the correct orientation.
Updating the colours is a very simple job that can be done in 2 ways
# Via the Machine Settings->Colours Tab # From Bar Queue whenever a new colour is encountered.
Queue whenever a new colour is encountered. <br/>) - Gripper Push Speed on Flowline and ZX + (There is a cylinder called Grip push, when … There is a cylinder called Grip push, when bar is moved to its unload position the Gripper Comes OFF then Grip push is activated to push the profile of the gripper to clear ready for the Eject push onto transfer Table. The video shows what happens if the grip push is set too fast. The speed of the cylinder is Far too Fast and is Throwing/punching back down machine. -- This needs to be slowed Down. machine. -- This needs to be slowed Down.)
- PLC Source Control - Working with GIT and TcXaeShell + (These steps outline typical actions that make up a development cycle for changing code on a machine, saving changes locally and saving to the cloud repository using Git as the Source control tool.)
- Fitting R0019199 Upgrade: Autoflow Slewing Ring Guard Kit + (This area is prone to collect sharp - cornered offcuts which can pull the seal from the SR axis bearing. The kit will help prevent damage. Use Kit R0019199 Upgrade: Autoflow Slewing Ring Guard Kit <br/>)
- ACEpc Installing netedit with NetSetGo disk + (This procedure will completely overwrite a … This procedure will completely overwrite any data on the hard drive of the ACEpc.
This is not a problem on a flowline where the data resides on the main MH hard drive in a shared directory c:\saw.
If this process is to be carried out on a standalone saw or router, make sure the data is backed up first.
e sure the data is backed up first. <br/>) - Setting Up C0000422-KIT - Full Hardware 2023 + (This process takes the components to creat … This process takes the components to create a standard "C000422-KIT". This kit can then be stored and pulled off the shelf when required. It will then need to be set up for the particular customer machine using [[Setting Up Windows PC C0000422-KIT 2023]] =Notes= *There are two PCs running on the same hardware, The Host PC and the Virtual machine. **'''Host PC''' (For support) ***The base Windows install running directly on the hardware installed to Dell NVME drive. ***Has its own OEM Windows license supplied by Dell linked directly to the hardware (no product code – stored in the Dell hardware) ***Imaged by Macrium reflect. **'''Virtual PC – Stuga VM''' ***Used for Stuga software - the VM can run on any PC without changing drivers, etc. Host OS version / hardware unimportant as long as it runs Hyper-V. ***A second install of Windows running on a virtual machine, hosted by the Host PC above. It has a dedicated SSD (the Kingston Drive) stored on [:Fichier:///D:/VMPC.vhdx D:\VMPC.vhdx], with 8GB RAM. ***Has its own dedicated Windows 11 PRO license present in the kit, product code stored on Monday and on the license. ***Copied to host and setup manually during install. There is a setup program for the specific client after this process has completed: '''P_Stuga_P… '''on the desktop of the host.'P_Stuga_P… '''on the desktop of the host.)
- Safety Circuit Principles + (Moved to Confluence 13/12/2025 [https://stuga-ltd.atlassian.net/wiki/spaces/~5570585b7bb5d1bc31430e886883cbc774c182/pages/86442039/Safety+Circuit+Principles Safety Circuit Principles])
- Fitting Zx5 Crank Upgrade + (This upgrade replaces the crank arm assemb … This upgrade replaces the crank arm assemblies on Z065, Z066 and Z067 with a direct drive system to improve reliability
This procedure involves mechanical fitting, electrical wiring and help from a TwinCAT3 competent engineer at HQ for software changes
></div> <div class="icon-instructions-text">...Motors must be rewired for Delta and NOT Star</div> </div> <br/>) - B0000082b Motor replacement For Obsolete part B0000082 + (To rectify the obsoletion of B0000082 driv … To rectify the obsoletion of B0000082 drive motor, the following replacement kit has been designed to enable continued support of older assemblies within stuga machines . The kit consists of a new motor and appropriate gearbox, adapter plate and new fasteners . Also details are included here for a small modification to enable the upgrade to function correctly Following parts are required for this upgrade B0000082b load motor and gearbox 1 off D0008225b adapter plate F0000189 M6 x 25 set bolts 4 off F0000058 A form washer 4 off F0000190 M8 x 40 set bolts 2 off F0000007 M5 x 16 cap head bolt 4 off off F0000007 M5 x 16 cap head bolt 4 off)
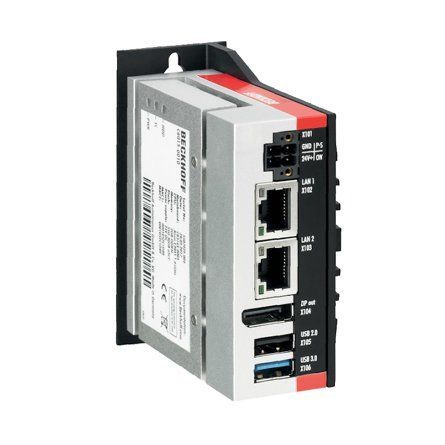
- Replacing Beckhoff PC + (To replace a broken PLC requires the installation of the original project. This project needs to be made aware of the new hardware, along with the Stuga software)
- R0010309 Ecoline Ultrasonic Material Loaded Upgrade + (Upgrade of load sensor For infeed table on … Upgrade of load sensor For infeed table on Ecoline machines
'''Component list'''
A0001046 P Clip 6mm Steel / Rubber Liner x 2
D0010973 Material Loaded Sensor Plate x 1
E0001104 PreMade Cable: M8 Socket 4 Way Cable 5m x 1
E0001120 Sensor: Ultrasonic M8 20-150mm x 1
M0001053 Copper Tube 6mm x 4.4mm 10m Coil x 0.3
P0000046 Fitting: 'Y' Adaptor 6mm x 1
P0000069 Tube to tube fitting 6mm x 1
P0000160 Fitting: Flow Controller In Line 6mm x 1
000160 Fitting: Flow Controller In Line 6mm x 1 <br/>) - Upgrade Autoflow to Windows 11 + ('''Update 2024''' - Upgrades now consist o … '''Update 2024''' - Upgrades now consist of a new Windows 11 PC with VM for the front end and a C6017 PC for the back end.
Upgrading an Autoflow to Windows 11 involves upgrading two PCS
#The Beckhoff control PC - replaced with a C0001225-KIT
#The Camera PC - replaced with a C0000422-KIT with a VM setup. this now becomes the front end PC
===For Historical reference, these are the pre-2024 notes: === ''Upgrading an Autoflow to Windows 10 on site involves upgrading two PCS'' #''The Beckhoff control PC'' #''The Camera PC'' ''
'' The Beckhoff PC is not upgradable so needs to be completely replaced. We use the miniature [https://www.beckhoff.com/english.asp?industrial_pc/c6017.htm Beckhoff C6017] for this ''It is not cost effective to upgrade and old camera PC, so a new one is supplied'' ===''Notes''=== *''The Beckhoff PC is now powerful enough to run the front end and back end.'' *''The camera PC is there to replace the camera PC on site and contains the storage for the machine cameras'' *''Because the Beckhoff PC has limited hard drive space, the DDRIVE will be on the cameraPC''hard drive space, the DDRIVE will be on the cameraPC'') - TwinCat Connection Faults + (We are quite often faced with multiple Axi … We are quite often faced with multiple Axis/Door Open/ Estop faults all being reported at the same time. More often than not this is caused by a bad connection on the TwinCat system somewhere. If there is any dropout of connection at any point in the system it will result in this error. You could spend some time crawling about on your hands and knees, opening electrical cabinets and trying to find the fault manualy, but by using TwinCat we can save some time and effort, and pinpoint the cause almost immediately.and pinpoint the cause almost immediately.)
- Removing TwinCAT3 Interpolation Licence + (Wen creating a new project on conversion f … Wen creating a new project on conversion from a TwinCAT2 to TwinCAT3 system, there may be a reference to a an unrequired NCi licence (interpolation)
variable speeds to create a shape, like a diagonal line or circle</div> </div><br/>)
- Programming RS Automation Servo Drive Parameters + (The RS Automation drives are used on refurb Stuga machines to drive axes. They are set up electronically for each axis using a software tool called RSWare and programmed with a USB cable)
- Upgrading Autoflow TwinCAT2 to Win10 and TwinCAT3 + (<div class="annotatedImageDiv" typeof=" … Autoflows from A2001 to A2015 were initially produced with TwinCAT2 software. This has now been superseded with TwinCAT3 which then has the benefit of compatibility with version 6 front end software.
The original PC cannot be used because
*It is not powerful enough to run v6 front end
*The operating system cannot be upgraded to Windows 10
*It cannot be upgraded to TwinCAT3
The Beckhoff C6015 PC has been chosen to be the replacement PC. It is compact, yet powerful enough to run the v6 front end and TwinCAT in the same
. It has an upgrade to 1.9Ghz 4 core processor.
Because it has a limited 40Gb SSD memory, a compact 64Gb memory stick is inserted into the USB 3.0 port. This acts as a separate drive for the DDRIVE dynamic storage for all machine setup. The internat drive is for the Operating System only. This mimics the current Autoflow setup of a remote Camera PC, hence the camera PC can be retired after the upgrade
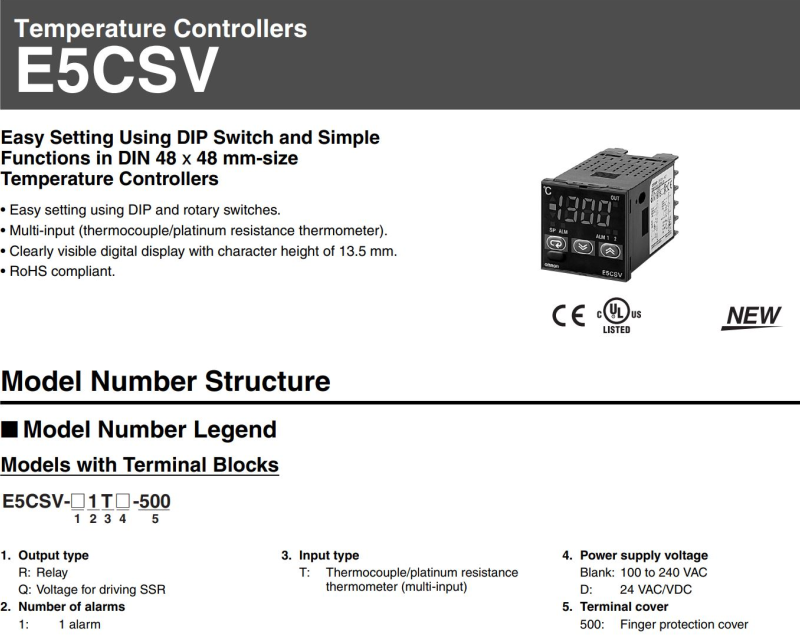
era PC, hence the camera PC can be retired after the upgrade<br/>) - Omron E5CVS PV Shift + (<div class="annotatedImageDiv" typeof=" …
) - R0015316 V notch Final Assembly Part 2 + (15/09/2025 Moved to Confluance Click [https://stuga-ltd.atlassian.net/wiki/external/NTcwZDVkYWY1NWI0NGQwM2IyZTQ0ZTQ4NjQ3OWYzMDE Here])
- R0000963E Bench Assemble Z axis Components + (03/09/2025 Moved to Confluance Click [https://stuga-ltd.atlassian.net/wiki/external/NzA1MmFjYThjZTMxNGM4Zjg3MzkyZmUyZWE0YjlhNTQ Here]<br/>)
- R0015303 Fit backplates and covers + ('''<u>Tools Required</u>''' Standard screw driver set Standard hex key set Countersink tool '''<u>Parts Required</u>''' D0007777 Back plate x 2 D0007844E Connection box lid x 8 <br/>)
- R0002913E Install and Align Rotary head Subframe PART 2 + (04/09/2025 Moved to Confluance Click [https://stuga-ltd.atlassian.net/wiki/external/YmUzNjU5YzI3NzdmNDE2YmE0MTdjN2M3ZmNhZGY4NzY Here])
- R0015278 Mount Completed Assemblies + ('''<u>Tools Required</u>'''
… '''Tools Required'''
Standard Hex key set
Standard spanner set
300 mm rule
1000mm rule
'''Parts Required'''
D0008288 Takeup Pad Left (D7339) (Wet/P F Matt) x 1
D0015583 Take Up Beam Joiner x 1
D0015598 Datum Flag: Saw Infeed x 1
D0015717 Energy Chain Angle Bracket Lower x 5
D0015718 Energy Chain Angle Bracket Upper x 5
D0015720 Carriage Bracket x 1
D0015721 Energy Chain Tray Deep Long x 1
D0015723 Energy Chain Tray Shallow x 1
D0015724 Energy Chain Tray Deep x 1
D0015725 Energy Chain Tray Shallow Medium x 1
D0015742 Takeup Pad Right ZX5 x 1
E0000336 Sensor: M8; 2mm, PNP N/O, M8 conn x 1
R0015011 Bench Assemble Gripper
R0015063 Bench Assemble Roller Tables
R0015096 Bench Assemble Transfer Drive Assembly
R0015101 Bench assembly take up assembly
R0015286 Bench Assemble X axis components and energy chain
R0015286 Bench Assemble X axis components and energy chain <br/>) - R0000558E Bench Assemble Base and Turntable Part 2 + ('''<u>Tools Required</u>''' … '''Tools Required''' Standard hex key set Standard spanner set Heat gun Large Internal Circlip pliers Standard circlip pliers 8mm hand reamer Grease gun Torque wrench '''Parts Required''' B0000028 Thrust Bearing 140 I/D 180 O/D 31 Long (FAG) x 1 B0000032 Linear Bearing: Ø30 x 50 Compact (Metal Case Only) x 4 B0001087 Angular Contact Bearing 70 I/D 125 O/D 24 Long x 1 B0001088 Circlip 125mm Internal x 1 C0001122K Servo Motor: Beckhoff AM8032-1E10 (Keyed) x 1 C0001179-100 Gearbox NPTO 100-1 x 1 D0004019E Turntable Mk5 (5334E) x 1 D0004033E Alignment Disc Mk5 x 1 D0004147E Turntable Shaft Mk5 x 1 D0004320E Thrust Bearing Housing Mk5 x 1 D0004336 Stay Bar x 2 D0004514E Turntable Base Mk5 x 1 D0004516 Front Bearing Block (5294) x 2 D0010778 Turntable Stop Arm x 1 D0010796 Turntable Housing Cover x 1 H0004631 Shaft 30mm: Base Slide x 2 M0001176 M6 Stainless lock washer x 4 D0015663 SR Axis Motor Guard x 1176 M6 Stainless lock washer x 4 D0015663 SR Axis Motor Guard x 1)
- R0000558E Bench Assemble Base and Turntable + ('''<u>Tools Required</u>'''
… '''Tools Required'''
Standard hex key set
Standard spanner set
Heat gun
Large Internal Circlip pliers
Standard circlip pliers
8mm hand reamer
Grease gun
Torque wrench
'''Parts Required'''
B0000028 Thrust Bearing 140 I/D 180 O/D 31 Long (FAG) x 1
B0000032 Linear Bearing: Ø30 x 50 Compact (Metal Case Only) x 4
B0001087 Angular Contact Bearing 70 I/D 125 O/D 24 Long x 1
B0001088 Circlip 125mm Internal x 1
C0001122K Servo Motor: Beckhoff AM8032-1E10 (Keyed) x 1
C0001179-100 Gearbox NPTO 100-1 x 1
D0004019E Turntable Mk5 (5334E) x 1
D0004033E Alignment Disc Mk5 x 1
D0004147E Turntable Shaft Mk5 x 1
D0004320E Thrust Bearing Housing Mk5 x 1
D0004336 Stay Bar x 2
D0004514E Turntable Base Mk5 x 1
D0004516 Front Bearing Block (5294) x 2
D0010778 Turntable Stop Arm x 1
D0010796 Turntable Housing Cover x 1
H0004631 Shaft 30mm: Base Slide x 2
M0001176 M6 Stainless lock washer x 4
D0015663 SR Axis Motor Guard x 1
ainless lock washer x 4 D0015663 SR Axis Motor Guard x 1 <br/>) - R0015278 Mount Completed Assemblies Section two + ('''<u>Tools Required</u>''' … '''Tools Required''' Standard Hex key set Standard spanner set 300 mm rule 1000mm rule '''Parts Required''' D0008288 Takeup Pad Left (D7339) (Wet/P F Matt) x 1 D0015583 Take Up Beam Joiner x 1 D0015598 Datum Flag: Saw Infeed x 1 D0015717 Energy Chain Angle Bracket Lower x 5 D0015718 Energy Chain Angle Bracket Upper x 2 D0015718B Energy Chain Angle Bracket Double Deck x 3 D0015720 Carriage Bracket x 1 D0015721 Energy Chain Tray Deep Long x 1 D0015723 Energy Chain Tray Shallow x 1 D0015724 Energy Chain Tray Deep x 2 D0015725 Energy Chain Tray Shallow Medium x 1 D0015742 Takeup Pad Right ZX5 x 1 D0015862 Energy Chain Tray Deep Long x 1 E0000336 Sensor: M8; 2mm, PNP N/O, M8 conn x 1 R0015011 Bench Assemble Gripper R0015063 Bench Assemble Roller Tables R0015096 Bench Assemble Transfer Drive Assembly R0015101 Bench assembly take up assembly R0015286 Bench Assemble X axis components and energy chainsembly R0015286 Bench Assemble X axis components and energy chain)
- R0000574 Fit Motor and Swarf Chute + ('''<u>Tools Required</u>''' … '''Tools Required''' standard hex keys Standard spanner set 1 meter steel rule Copper slip Chute flap template jig Standard Hss drills Standard taps Ratchet 3/8 drive and 13mm socket Copper/hide hammer '''Parts Required''' B0000048 Taperlock Set SPZ 80-2 1210-24 x 1 B0001175 Saw V-belt (special size 987mm) for 500mm blade x 2 D0005628 Saw chute infill panel x 1 H0004637 Offcut Chute (H0005333) x 1 H0004660 Chute Bracket x 1 P0000609 Reed Switch Mount (Tie Bar) x 3004660 Chute Bracket x 1 P0000609 Reed Switch Mount (Tie Bar) x 3)
- R0015037 Bench Assemble SY Assembly Part 2 + ('''<u>Tools Required</u>''' S … '''Tools Required''' Standard Hex Key set Standard Spanner set 1 Meter straight edge Feeler Gauges '''Parts Required''' B0000044 Linear Rail MSB25 260mm Long (AMT) x 2 B0000046 Slide Base Bearing Block (Straight Grease Nipple) x 4 B0000173 blanking cap x 10 B0000234 Straight Grease Nipple M6 ST/ST x 4 B0000245 Needle Bearing 12 D 16 D 10 Long (ENA) x 12 B0001060 Grease Fitting M6x0.75 to Ø4 x 4 B0001061 Grease fitting M6 x 1 to 4mm x 4 B0001123 Double angular contact bearing 6 I/D 17 O/D 9 long x 2 B0001185 Leadscrew nut Igus x 1 C0001005 Stepper Motor AS1050 x 1 D0005184 Guide Roller x 6 D0005186 Guide Pin Washer x 6 D0015172 Centralise Plate (with SY) x 1 D0015173 Saw SY Saddle Brace x 1 D0015174 Roller Fence (With SY) x 2 D0015175 Saw Saddle Carriage Block x 2 D0015176 Cylinder Mount Block x 2 D0015178 Z Block x 2 D0015207 Outer Bearing Housing x 1 D0015208 Leadscrew Bearing Block x 1 D0015209 Leadscrew Attachment Bracket x 1 D0015222 SY Grease Manifold x 2 D0015240 Collar Clamp: SY Axis ZX5 x 1 D0015316 Leadscrew Bearing Block Cover x 1 D0015415 Turret Pickup Arm ZX5 x 2 D0015416 Bracket: Turret Stop RH ZX5 x 1 D0015417 Bracket: Turret Stop LH ZX5 x 1 D0015698 Flag Block x 1 D0015777 Leadscrew SY x 1 D0016336 SY table blower x 1 E0000336 Sensor: M8; 2mm, PNP N/O, M8 conn x 1 H0005185 Shaft 12mm: 90.5 Saw Fence Roller Pin x 6 M0001209 Bracket m8 proximity sensor 90 degree x 1 P0000200 Elbow Adaptor 6mm - M5 x 7 P0001127 Guide cylinder 20 x 30 compact x 2 P0001157 Turret Stop: 6 Station Right Handed Somatec x 1 P0001158 Turret Stop: 6 Station Left Handed Somatec x 1matec x 1 P0001158 Turret Stop: 6 Station Left Handed Somatec x 1)
- R0000962E Bench assemble Y axis Components + (03/09/2025 Moved to Confluance Click [https://stuga-ltd.atlassian.net/wiki/external/YWVjMGU3NWE2YTA1NDgyNWI4YzExYjJiMjFmNGIxOWU Here])
- R0015037 Bench Assemble SY Assembly + ('''<u>Tools Required</u>'''
… '''Tools Required'''
Standard Hex Key set
Standard Spanner set
1 Meter straight edge
Feeler Gauges
'''Parts Required'''
B0000044 Linear Rail MSB25 260mm Long (AMT) x 2
B0000046 Slide Base Bearing Block (Straight Grease Nipple) x 4
B0000173 blanking cap x 10
B0000234 Straight Grease Nipple M6 ST/ST x 4
B0000245 Needle Bearing 12 D 16 D 10 Long (ENA) x 12
B0001060 Grease Fitting M6x0.75 to Ø4 x 4
B0001061 Grease fitting M6 x 1 to 4mm x 4
B0001123 Double angular contact bearing 6 I/D 17 O/D 9 long x 2
B0001185 Leadscrew nut Igus x 1
C0001005 Stepper Motor AS1050 x 1
D0005184 Guide Roller x 6
D0005186 Guide Pin Washer x 6
D0015172 Centralise Plate (with SY) x 1
D0015173 Saw SY Saddle Brace x 1
D0015174 Roller Fence (With SY) x 2
D0015175 Saw Saddle Carriage Block x 2
D0015176 Cylinder Mount Block x 2
D0015178 Z Block x 2
D0015207 Outer Bearing Housing x 1
D0015208 Leadscrew Bearing Block x 1
D0015209 Leadscrew Attachment Bracket x 1
D0015222 SY Grease Manifold x 2
D0015240 Collar Clamp: SY Axis ZX5 x 1
D0015316 Leadscrew Bearing Block Cover x 1
D0015415 Turret Pickup Arm ZX5 x 2
D0015416 Bracket: Turret Stop RH ZX5 x 1
D0015417 Bracket: Turret Stop LH ZX5 x 1
D0015698 Flag Block x 1
D0015777 Leadscrew SY x 1
D0016336 SY table blower x 1
E0000336 Sensor: M8; 2mm, PNP N/O, M8 conn x 1
H0005185 Shaft 12mm: 90.5 Saw Fence Roller Pin x 6
M0001209 Bracket m8 proximity sensor 90 degree x 1
P0000200 Elbow Adaptor 6mm - M5 x 7
P0001127 Guide cylinder 20 x 30 compact x 2
P0001157 Turret Stop: 6 Station Right Handed Somatec x 1
P0001158 Turret Stop: 6 Station Left Handed Somatec x 1
1 P0001158 Turret Stop: 6 Station Left Handed Somatec x 1 <br/>) - R0002916 Install Machine Trunking + (04/09/2025 Moved to Confluance Click [https://stuga-ltd.atlassian.net/wiki/external/MTM4YmQ3NmY0NjBiNDFkYWFlZDI4MDhjOThmMTZhZjU Here] <br/>)
- R0015255 Mount Assemblies to Main Frame + (17/09/2025 Moved to Confluance Click [https://stuga-ltd.atlassian.net/wiki/external/MzUxNGRlOWVlMGI4NGU5MzhkYmI2MTk5ZmRlZWI0YTk Here])
- R0000971E Bench Assemble R Axis Gearbox + (03/09/2025 Moved to Confluance Click [https://stuga-ltd.atlassian.net/wiki/external/NDE2NGQzYjdiNzhlNDBiOTg2ZGUyMzg0MWMyNWM0MzU Here] <br/>)
- R0015041 Bench Assemble Top Hood Assembly + ('''<u>Tools Required</u>'''
… '''Tools Required'''
Standard hex key set
Standard spanner set
Standard Hss drill set
Standard tap set
Acoustic foam cutting board and straight edge
Utility Blade
'''Parts Required'''
Pre wired light, beacon and network cable from electrical department
C0001152 Camera: HikVision DS-2CD2343G0-I-2.8mm x 1
C0001239 Micro SD Card 32Gb Class 10 x 1
D0000770 Door Hinge (M0016) x 2
D0001877 Saw Top Door Mk4 x 1
D0004641 Hinge Pin Block (D7445) x 1
D0004642 Flap Counterbalance Bar x 1
D0004645 Safety Flap Hinge Pin x 1
D0004679 Flap Stiffening Bar x 1
D0004705 Flap Hinge Bar x 1
D0004747B top door screen x 1
D0004807 Flap x 1
D0007445 Hinge Pin Block OH (D4641) x 1
D0016251 Saw Hood Switch Mount Plate (Bernstein) x 1
E0000275 Button: Base Fixing 1 N/C x 1
E0001072 Emergency Stop Module Bevelled 1NO 1NC x 1
E0001569 Guard Lock Switch: Bernstein Radius Actuator (Key) x 1
H0004643 4mm Axxis Clear 145mm x 690mm x 1
M0000002 12mm Grey Acoustic Foam with Black PVC Facing x 1 (consumable stock )
M0000036 Sign - Ear Protection x 1
M0000048 Gas Spring 15mm x 100mm x 1
M0000539 Handle Black Nylon 200mm M8 Fixings x 1
100mm x 1 M0000539 Handle Black Nylon 200mm M8 Fixings x 1 <br/>) - R0015337 Bench Assemble Guarding Components + ('''<u>Tools Required</u>'''
… '''Tools Required'''
Standard hex key set
Standard spanner set
Standard HSS drill set
Acoustic mat cutting board and straight edge
Utility blade
'''Parts Required'''
D0000770 Door Hinge (M0016) x 2
D0001886 Front Door Saw Mk 4 x 1
M0000002 12mm Grey Acoustic Foam with Black PVC Facing x 1
M0000539 Handle Black Nylon 200mm M8 Fixings x 1
M0000031 panel edging ( consumable stock )
M0000150 Stuga sticker clear x 1
M0000154 Stuga service sticker x 1
uga sticker clear x 1 M0000154 Stuga service sticker x 1 <br/>) - Stuertz Infeed - Freeing Roller under Gripper Arm + ('''Applies to: A2026-A2030 Autoflow Mk4 wi … '''Applies to: A2026-A2030 Autoflow Mk4 with Jetta Locking motors'''
In certain circumstances, the forward clamp roller arm has stuck itself under the gripper arm. Freeing from this situation requires a set process because the GZ axis motor is braked and probably in an overload condition
nfident in using TwinCAT on the VM machine to navigate to settings</div> </div><br/>) - GY GZ axis setup with Jetter Motors + ('''WARNING:''' '''The Jetter motor on th … '''WARNING:''' '''The Jetter motor on the GZ axis has a brake. Releasing the brake without control could be harmful/dangerous.''' '''Use the Air Counterbalance rig to assist if necessary.''' This assumes that the motors are connected to the Beckhoff drive and are free to move.o the Beckhoff drive and are free to move.)
- TB0314 Updating Mint File in Workbench + ( * Updating software can be very complicat … * Updating software can be very complicated, so care must be taken and always ensure there is a route to retrace your steps in the event of a failure – with Baldor .mnt files this is easy because each version is a separate file and therefore easy to load the old one back in again * In general, the Baldor (.mnt) software has been designed to be backwards compatible, but there are a few steps that needed to be taken that made this impossible. In these cases, the front end software (winMulti or winSaw) also needs to be updated – you will get an error to tell you that this is the case * Version numbers have always followed a numerical order, so the higher the number, the later the version * Mnt files should always be stored in ** c:\multi on MH side – called Multi X.xxx.mnt ** c:\saw on Saws or Saw side of flowline – called IgSaw X.xx.mnt aw side of flowline – called IgSaw X.xx.mnt )
- R0015262 Drive shaft fitting + (01/09/2025 Moved to Confluance Click [https://stuga-ltd.atlassian.net/wiki/external/ZGNjNDNmZTNmNjc2NDU1ZDhlNjAxMGI5Y2NmMzVmMWE Here]<br/>)
- R0015081 Bench Assemble Single Roller Table + (01/09/2025 Moved to Confluance Click [https://stuga-ltd.atlassian.net/wiki/external/ZmJiZjg2OTVmZmY4NDNhZTk3MWUxNjFkODkwOGE2MTU Here])
- R0015266B mount completed assemblies + (01/09/2025 Moved to Confluance Click [https://stuga-ltd.atlassian.net/wiki/external/ZmVjY2VjZTA2ZGM0NDAwYjgyNjU5NzU4YzZhNzExNWU Here])
- R0015263 Mount drive motor for load shaft + (01/09/2025 Moved to Confluance Click [https://stuga-ltd.atlassian.net/wiki/external/ZDVlZjFhN2Y4NmM1NGRkNGJiMmUwNDY5ZmYxN2JkZWI Here])
- R0015356 Assemble Pneumatics on to electrical cabinet + (01/09/2025 Moved to Confluance Click [https://stuga-ltd.atlassian.net/wiki/external/NjZiNGYxNzJhMTgzNDU1OTllZDBhMTY5NTMxMzY2NjI Here]<br/>)
- R0015264 Fit Loader chains to arms + (01/09/2025 Moved to Confluance Click [https://stuga-ltd.atlassian.net/wiki/external/OTM0MjJkMmRiMmM4NDQxYjgzMzRmZTQ2NmJlMTI0ZDA Here])
- R0015351 Mount monitor to Frame + (01/09/2025 Moved to Confluance Click [https://stuga-ltd.atlassian.net/wiki/external/NzkzNzUzZWIyZjk4NGRlMWIzYTI0NDZlMDdmZWYzNDU Here])
- R0015259 Mount roller beds to mainframe + (01/09/2025 Moved to Confluance Click [https://stuga-ltd.atlassian.net/wiki/external/MTY2ZWNjZWUzOTIwNDRlODlkZGNlODI4MDUxMTEzY2Y Here])
- R0015270 Bench assemble Shafts, bearings and sprockets + (01/09/2025 Moved to Confluance Click [https://stuga-ltd.atlassian.net/wiki/external/MTgxYmRhYTZmN2NhNGMyMGJjM2JkOTBiZTMyZWRhZjI Here])
- R0015265 Mount Infeed arm covers and End guards + (01/09/2025 Moved to Confluance Click [https://stuga-ltd.atlassian.net/wiki/external/ZmU3ZjE0NzY1MWFiNGNkMGE1OWM2ZDA1OTIwMmYzMjg Here])
- R0015267 Assemble Backfences, Fit and Align + (01/09/2025 Moved to Confluance Click [https://stuga-ltd.atlassian.net/wiki/external/NjA2NjcxYjc1ZDk1NDYyY2FmMTFkZGYyMzBlYTNkOGM Here]<br/>)
- R0015269 Fit Frame ancillaries + (01/09/2025 Moved to Confluance Click [https://stuga-ltd.atlassian.net/wiki/external/MGFkOGQ2ZWFkODU4NDdhOWFhMDUxYzc5YTk2YjlmODU Here])
- R0015086 Pneumatic connections + (01/09/2025 Moved to Confluance Cleck [https://stuga-ltd.atlassian.net/wiki/external/ZGRiZGYzYTJlNDI1NDVlNGI3N2MyM2NiNzIwN2U4YWM Here])
- R0000738 Pneumatic Installation Part 2 + (02/09/2025 Moved to Confluance Click [https://stuga-ltd.atlassian.net/wiki/external/OTliMTMwZmVmMDViNGJiMjlhNzgzYjJiNmViMDBhYTc Here<br/>])
- R0000699B Bench Assemble Drive chains + (02/09/2025 Moved to Confluance Click [https://stuga-ltd.atlassian.net/wiki/external/N2YyYmU0ODg2OTI4NDM1YjkzZjU3NTNlMTBmZDRjN2U Here])
- R0000738 Pneumatic Installation Part 3 + (02/09/2025 Moved to Confluance Click [https://stuga-ltd.atlassian.net/wiki/external/OTliMTMwZmVmMDViNGJiMjlhNzgzYjJiNmViMDBhYTc Here])
- R0000738 Pneumatic Installation + (02/09/2025 Moved to Confluance Click [https://stuga-ltd.atlassian.net/wiki/external/OTliMTMwZmVmMDViNGJiMjlhNzgzYjJiNmViMDBhYTc Here]<br/>)
- R0000706 Bench assemble Infeed Datum rollers + (02/09/2025 Moved to Confluance Click [https://stuga-ltd.atlassian.net/wiki/external/ZWEwNjliYjNlYTBiNDgxMTkwMWQ3NGFmNDIxMTYyMmI Here])
- R0002794E Mount Width sensor + (03/09/2025 Moved to Confluance Click [https://stuga-ltd.atlassian.net/wiki/external/NDJiNTI4ZTJiYmU1NDU5MGE2MmZkMDM4MGM0NWU0Mzc Here])
- R0015034B ZX5 Module B Wiring Loom installation Part 2 + (04/09/2025 Moved to Confluance Click [https://stuga-ltd.atlassian.net/wiki/external/ZDlmNDI0ZTA1ODg0NDViNDk4MDg4ZTgxMzEyZWMwZjQ Here])
- R0010260 Bench Assemble Tool Break Sensor + (04/09/2025 Moved to Confluance Click [https://stuga-ltd.atlassian.net/wiki/external/NjNlNDFmN2YyNGU3NDhlZTk1OWYzMTMwYjMxZjJjZmI Here])
- R0015035 Bench Assemble V Notch Components + (04/09/2025 Moved to Confluance Click [https://stuga-ltd.atlassian.net/wiki/external/NmFjMzQxNTBmODgxNDllY2EzODE5ZTNjOTU4ODRlMjA Here])
- R0002913E Install and Align Rotary head Subframe + (04/09/2025 Moved to Confluance Click [https://stuga-ltd.atlassian.net/wiki/external/YmUzNjU5YzI3NzdmNDE2YmE0MTdjN2M3ZmNhZGY4NzY Here]<br/>)
- R0015034B ZX5 Module B Wiring Loom installation + (04/09/2025 Moved to Confluance Click [https://stuga-ltd.atlassian.net/wiki/external/ZDlmNDI0ZTA1ODg0NDViNDk4MDg4ZTgxMzEyZWMwZjQ Here])
- TB0428 Connecting To Yaskawa with Silex USB + (04/12/2025 Moved to confluence [https://stuga-ltd.atlassian.net/wiki/external/Mzk5NGY2Y2NiY2VjNGJkODkyMjVkZDIzMGIzYzFmNzY Click here])
- Create a TwinCAT Project from Scratch + (05/08/25 Converted to confluence See [https://stuga-ltd.atlassian.net/wiki/external/N2E0YjlkNzUyNzc5NDY1NThiOTY1NzcxYmNmNmJkNTU COM01-04 Create TwinCAT Project from Scratch on Virtual Machine])
- R0015334 Fit Centralise Front Table + (07/08/2025 Moved to Confluence Click [https://stuga-ltd.atlassian.net/wiki/external/MzdmYjYzYTM2NTE0NGI5ZmJlNzg1MmU2MDAxMGE5NmY Here])
- Commissioning a Beckhoff Axis + (07/08/25 Moved to [https://stuga-ltd.atlas … 07/08/25 Moved to [https://stuga-ltd.atlassian.net/wiki/external/MDUwNjIyY2UyZDcxNGRjMjk1NTI3ZDFkMDE4NjRmMmY Confluence]er motor drives will need the EP7041 drive to be programmed first</div> </div>)
- R0015046 Bench Assemble Infeed Clamps + (09/09/2025 Moved to Confluance Click [https://stuga-ltd.atlassian.net/wiki/external/YTEzZTdkZmZjMjc0NGE2NDkxNDNlOTk5MzA5MmNhODM Here] <br/>)
- R0015084 Bench assemble and Drill Off Swarf chutes + (09/09/2025 Moved to Confluance Click [https://stuga-ltd.atlassian.net/wiki/external/MjJmN2I4N2VhNWE0NGI3ZWE5NzFkN2RlZmJmN2NjNzg Here])
- R0015042 Install Infeed Datum Rollers + (09/09/2025 Moved to Confluance Click [https://stuga-ltd.atlassian.net/wiki/external/YTRiMDU5MTdmMDVhNDA3NGExODAwNzVhOTg5ZjQyYzg Here])
- R0015298 Bench Assemble V notch Clamps + (09/09/2025 Moved to Confluance Click [https://stuga-ltd.atlassian.net/wiki/external/ZGEyYjE5MTFmMjczNDI0MGIwYTgwMjExOTE0M2M4ODI Here] <br/>)
- R0015038 Bench Assemble V notch Datum Rollers + (09/09/2025 Moved to Confluance Click [https://stuga-ltd.atlassian.net/wiki/external/NGRhNzQ4MTViOGU3NGNmOGFmYWY3MGZhM2ZiMWMxOGE Here] <br/>)
- R0015346 Conveyor blower system + (10/09/2025 Moved to Confluance Click [https://stuga-ltd.atlassian.net/wiki/external/YzRhMjQ5YTQ5OTRiNDU0Njg0YjAwYmYzMzBkNTUxYjc Here] <br/>)
- R0015343 Waste Guidance Installation + (10/09/2025 Moved to Confluance Click [https://stuga-ltd.atlassian.net/wiki/external/M2I0ZmNhMjRhZDcyNDkwOWI5MzJmOTNmZTQ5MDQ3MDk Here]<br/>)
- R0015358 Conveyor chassis + (10/09/2025 Moved to Confluance Click [https://stuga-ltd.atlassian.net/wiki/external/YzI4OWNiOWM2ZWMwNDU0YWFiNzY5ZDJhODg4YTFhZDg Here])
- R0015345 Conveyor Mounting Brackets + (10/09/2025 Moved to Confluance Click [https://stuga-ltd.atlassian.net/wiki/external/OWVjMjQwYWM2NDc5NGFiZjhjZTc4YTM2Yzk0ODg0YzY Here])
- R0015310 Install V Notch Subframe + (11/09/2025 Moved to Confluance Click [https://stuga-ltd.atlassian.net/wiki/external/MDQ1OWQzZTNlNGE2NDExYTgzMTE5MjdhMTc3MTQzMzY Here])
- R0015347 Bench Assemble Duplex extraction unit + (11/09/2025 Moved to Confluance Click [https://stuga-ltd.atlassian.net/wiki/external/MWNmY2NkOTYyMDFmNDU3ZmI2OTUzOGE2OTExZWMwZjI Here]<br/>)
- R0015029D Hepco Beam Alignment + (11/09/2025 Moved to Confluance Click [https://stuga-ltd.atlassian.net/wiki/external/ZGFlNmNhNDc3YTJlNDRiMzk1NDMxMGRhYWZkODFkMTE Here])
- R0015029D Hepco Beam Alignment Part 2 + (11/09/2025 Moved to Confluance Click [https://stuga-ltd.atlassian.net/wiki/external/ZGFlNmNhNDc3YTJlNDRiMzk1NDMxMGRhYWZkODFkMTE Here])
- R0015028D ZX5 Hepco Beam Alignment Module C part 2 + (11/09/2025 Moved to Confluance Click [https://stuga-ltd.atlassian.net/wiki/external/Mzc1ZTdlODZiYjFiNGE5MGFjYzlmNjlmYWQyOWRiODU Here])
- R0015028D ZX5 Hepco Beam Alignment Module C + (11/09/2025 Moved to Conluance Click [https://stuga-ltd.atlassian.net/wiki/external/Mzc1ZTdlODZiYjFiNGE5MGFjYzlmNjlmYWQyOWRiODU Here])
- Diagnosing EtherCAT Issues - Advanced + (11/11/2025 Moved to Confluence [https://stuga-ltd.atlassian.net/wiki/external/OTE4YTQ5MzQyYzViNDJjZTg4MjVkNDYzYTgxNGI5Y2Q Click here])
- SR Axis Torque Adjustment + (14/08/25 Moved to Confluence Click [https://stuga-ltd.atlassian.net/wiki/external/YzFiODc3ODY3NjVlNDZmZjg1ODJhOGJkZTQzZWU1MjA here])
- R0015317 Install Rotary Ring + (15/09/2025 Moved to Confluance Click [https://stuga-ltd.atlassian.net/wiki/external/NjEwOWI1NDZhZWQwNDcxNmFmYTdkZjA5YzBiOGNjYjc Here] <br/>)
- R0015321 Bench Assemble Guards and Doors + (15/09/2025 Moved to Confluance Click [https://stuga-ltd.atlassian.net/wiki/external/Njk2YmQ5ZjRlNmYwNGJlYjk4YmZkMjNhNDc3YzlkYWY Here] <br/>)
- R0015311 Install and Align Datum rollers + (15/09/2025 Moved to Confluance Click [https://stuga-ltd.atlassian.net/wiki/external/OTg5YmU5YTczZTM1NGU1NTliNDQyZDdjMzIwZTE5YmY Here])
- R0015320 Pneumatic Output Test + (15/09/2025 Moved to Confluance Click [https://stuga-ltd.atlassian.net/wiki/external/YTRmMjYyZjA3MGVmNDYzMDk1ZDdlNTM0Y2VlMzk0Y2Q Here])
- R0015313 Material Clamp Alignment + (15/09/2025 Moved to Confluance Click [https://stuga-ltd.atlassian.net/wiki/external/ODYzMTQ2ODRlNzc2NDdmMWI3MDVkZDcwNTk1NDY3Mjg Here])
- R0015314 Fit Z Axis Drive components + (15/09/2025 Moved to Confluance Click [https://stuga-ltd.atlassian.net/wiki/external/NTJiNzE1OThmZWVjNDRhNmIzZDQyNDE1MjU3ZDUwOWY Here])
- R0015340 Drill, Assemble and Mount Electrical Cabinet + (15/09/2025 Moved to Confluance Click [https://stuga-ltd.atlassian.net/wiki/external/OTFlYWE1OGE4ZGJhNDE0MWI4ZDkwODlhMjBmNmJhMTE Here]<br/>)
- R0015114 Bench Assemble Valve Banks and Regulators + (15/09/2025 Moved to Confluance Click [https://stuga-ltd.atlassian.net/wiki/external/OGM5MzI3NDQ3NDM0NGQxZThiMTEwNGExNTFlZGEzNzI Here])
- R0015316 V notch Final Assembly + (15/09/2025 Moved to Confluance Click [https://stuga-ltd.atlassian.net/wiki/external/NTcwZDVkYWY1NWI0NGQwM2IyZTQ0ZTQ4NjQ3OWYzMDE Here] <br/>)
- R0015323 Mount Electrical Cabinet + (15/09/2025 Moved to Confluance Click [https://stuga-ltd.atlassian.net/wiki/external/MGNmYWQ3NTZiMzY4NGJkNWJiYWNjNjY1ZDBkNzU4ZGE Here] <br/>)
- R0015318 Fit Swarf Chutes + (15/09/2025 Moved to Confluance Click [https://stuga-ltd.atlassian.net/wiki/external/M2FlZTMxNDdkODdkNGYyOWIzNmY2MGMxOTM5OTE4MTM Here])
- R0015325 Mount Infeed Clamp + (15/09/2025 Moved to Confluance Click [https://stuga-ltd.atlassian.net/wiki/external/OTZmMWM0OTU2ZmVlNDMxNTgzNDliZWFlNWI2Yzk4Y2Y Here])
- R0015322 Remove Electrical Control Cabinet Assembly + (15/09/2025 Moved to Confluance Click [https://stuga-ltd.atlassian.net/wiki/external/OTc4ZmEyZmZlZmFjNDhlNTk0Y2NhYjFmNDAwYTE5Mjk Here])
- R0015319 Fit Guards and Doors + (15/09/2025 Moved to Confluance Click [https://stuga-ltd.atlassian.net/wiki/external/OTc1M2UzNWE1ZWY0NGZkNWFkZTA4ZDgyZTEwYWE5NjU Here])
- R0015315 Fit Y Axis Drive components + (15/09/2025 Moved to Confluance Click [https://stuga-ltd.atlassian.net/wiki/external/ZDU5ZWQ2ODgyOGE3NDcyZDljNTRlZWJjMzI2NjZhZTY Here]<br/>)
- R0015312 Finalise V Notch Subframe + (15/09/29025 Moved to Confluance Click [https://stuga-ltd.atlassian.net/wiki/external/OGFkMjk1YThiNjQwNGNhZjgxOTc0ZmIxMzUzNzJjYzU Here])
- TB0442 Removing Slot Overrun on Beckhoff AX8000 Drives + (15/10/2025 Moved to [https://stuga-ltd.atl … 15/10/2025 Moved to [https://stuga-ltd.atlassian.net/wiki/spaces/~5570585b7bb5d1bc31430e886883cbc774c182/pages/7373002/COM01-06+Specialised+Settings+for+Beckhoff+Drives?atlOrigin=eyJpIjoiM2ZmM2ExNTFiYzBkNDU4MzgxMTliOGNjYjA1ZGFmMmMiLCJwIjoiYyJ9 Confluence] Click [https://stuga-ltd.atlassian.net/wiki/external/MGFhZTU3Njg1MTEzNDQ0YzkxNzQzNTczZDdlYzJlODI here]3Njg1MTEzNDQ0YzkxNzQzNTczZDdlYzJlODI here])
- R0015094 Fit shafts and Pinions + (16/09/2025 Moved to Confluance Click [https://stuga-ltd.atlassian.net/wiki/external/NTNiNjVjNGU1YjU3NDI3N2JjZDQzOTAzM2EzZmRmYjI Here])
- R0015071 Bench Assemble Pneumatics Rail + (16/09/2025 Moved to Confluance Click [https://stuga-ltd.atlassian.net/wiki/external/MjMzNmUxNDU1NWRhNDEzMjhjMDUzNzBiMjgyODdhNDk Here])
- R0015096 (c) Bench Assemble Transfer Drive Assembly + (16/09/2025 Moved to Confluance Click [https://stuga-ltd.atlassian.net/wiki/external/YjQ2YTYyOTkxYzNhNGY5OTgxNjI0YTJlYWNlMWNjNjY Here])
- R0015251B Bench Assemble X Axis Energy chain + (16/09/2025 Moved to Confluance Click [https://stuga-ltd.atlassian.net/wiki/external/NTg5NzFiMjUxOWVjNDg2YTkxMjI3NTI0MDA5MTJhNGM Here]<br/>)
- R0015245 Module C support arm alignment + (16/09/2025 Moved to Confluance Click [https://stuga-ltd.atlassian.net/wiki/external/MzUyYmEzOTU0YWNiNDY4Njk0Yjc4NzcxMmY1ZmI3MjY Here]<br/>)
- R0015244 Frame ancillaries Fitting + (16/09/2025 Moved to Confluance Click [https://stuga-ltd.atlassian.net/wiki/external/NGYzMGFhNGExYTkxNGE0OThmNmU3N2YzYmFhNDk0ZWM Here])
- R0015247 Fit X axis gearbox and Motor + (16/09/2025 Moved to confluance Click [https://stuga-ltd.atlassian.net/wiki/external/ZmM5OWU4NDM1YTZiNDY4MWI0MDBlYzU1MWMzN2FmYzA Here])
- R0015248 Line up slider units and mesh racks + (16/09/2025 Moved to confluance Click [https://stuga-ltd.atlassian.net/wiki/external/YzU4Njg5ODQ4NmQyNGQ1ZDgwM2E1ZDhiNjFjMTVlOTI Here] <br/>)
- R0015246 Fit Hepco Drive Beam Cylinder + (16/09/2025 Moved to confluance Click [https://stuga-ltd.atlassian.net/wiki/external/MDdlYTdjMTM3NjIyNDI5Zjg4ODVmMGM0OTViNGQyNzQ Here])
- R0015257 Module C Pneumatic Tests + (17/09/2025 Moved to Confluance Click [https://stuga-ltd.atlassian.net/wiki/external/MjUyZDc0MGM1MzExNGU2NjgyNTk1NDc0NDg2ZDYwNDg Here])
- R0015060 Bench Assemble Flapper Beam + (17/09/2025 Moved to Confluance Click [https://stuga-ltd.atlassian.net/wiki/external/NGUzYjA1NWQ5Y2UxNDUwM2E2YjYxNzNjMjEwMDZmMzU Here])
- R0015256 Pneumatic Connections + (17/09/2025 Moved to Confluance Click [https://stuga-ltd.atlassian.net/wiki/external/MGY1YjdjNjhjNmZlNDNmYWI2NjhhM2QxNjE2MmI0Mzg Here])
- R0015279 Align Backfences + (17/09/2025 Moved to Confluance Click [https://stuga-ltd.atlassian.net/wiki/external/YTM4MDMyYWE3YjM3NDZiODg4ZGI0MDE4MzZkNTQ0MGE Here])
- R0015093 Bench Assemble Transfer Beam + (17/09/2025 Moved to Confluance Click [https://stuga-ltd.atlassian.net/wiki/external/MTY4NWZhNWRlZDRjNDBiNTg2NGVhMzQ2YjFkMDA2Nzc Here] <br/>)
- R0015250 Bench Assemble Support Arms + (17/09/2025 Moved to Confluance Click [https://stuga-ltd.atlassian.net/wiki/external/MGQ4ODQyMGU5Y2YwNDViN2FjOThlOWFhOTAwODQzZjI Here]<br/>)
- R0015252 Bench Assemble Slider units + (17/09/2025 Moved to Confluance Click [https://stuga-ltd.atlassian.net/wiki/external/NWQ1ODlmMDlkYWIxNGI2ZDg4M2Y1ZGVmMjY0ZDE4ZTE Here])

 Français
 English
 Deutsch
 Español
 Italiano
 Português