TB0444 Renewing CF Card on TwinCAT2 Systems
Sommaire
- 1 Introduction
- 2 Étape 1 - Procedure A- Original Version
- 3 Étape 2 - Procedure B- New Version Install
- 4 Étape 3 - Copy latest tcMulti.pro file
- 5 Étape 4 - Copy a similar .tsm file to the machine
- 6 Étape 5 - Open System Manager
- 7 Étape 6 - Open System Manager again
- 8 Étape 7 - Save
- 9 Étape 8 - Update the EtherCAT Device hardware
- 10 Étape 9 - Display side-by-side
- 11 Étape 10 - Check all IO mapping one by one
- 12 Étape 11 - Activate Configuration
- 13 Étape 12 - Login PLC_Reset
- 14 Étape 13 - Login tcMulti
- 15 Étape 14 - Reverse datum direction if required
- 16 Commentaires
Introduction
Problem
These machines use a CX5020 PC with a 2Gb CF card running TwinCAT2 PLC system. The CF card can fail, which is effectively the windows operating system. The CF card has a very small capacity, so needs to be created from an image. This TB outlines the steps in the process to ensure a successful conclusion.
1. Create a new CF card at stuga using the beckhoff imaging tool on a CX5020
2. Boot up with the CX5020
3. Ensure PLC is set to Enable on start-up (default is config mode)
4. Rename the PC
5. Install TeamViewer host v10 or less from a USB stick
6. If you have a copy of the version of winMulti it was running, copy this in to the c:\ multi folder. If not, a “new version install” will be needed so copy in data from the g:\builds\PC Installs\Autoflow\Multi folder
7. Set up and customer specific network parameters to ensure TeamViewer will work when it is plugged in on site
8. Send to customer
Once on site, follow procedure A if the winMulti version is preserved, or B if it is a new version installÉtape 1 - Procedure A- Original Version
1. From Camera PC, use System Manager to activate original configuration
2. From Camera PC, use PLC Editor to login both original projects – PLC_Reset in Port 811, and the other main PLC control project in Port 801.
Étape 2 - Procedure B- New Version Install
Connect to camera PC
Étape 3 - Copy latest tcMulti.pro file
Copy the latest tcMulti.pro file from g:\design\twinCAT to camera PC:\twinCAT\
Étape 4 - Copy a similar .tsm file to the machine
Copy a similar .tsm file to the machine from g:\design\twinCAT\TSMs to camera PC:\twinCAT\. This is the system Manager file, and you will need this for the following reasons:
- The latest tcMulti and front end software have a different mapping for the IO
- You can’t update an old mapping without loosing all the IO links
- Using a similar file gets to a result quicker
Étape 5 - Open System Manager
On Camera PC, open System Manager – this should open the previously used version
Étape 6 - Open System Manager again
Open System manager again and load the recently copied TSM
Étape 7 - Save
Save as “[BuildNo] tcMulti.TSM"
Étape 8 - Update the EtherCAT Device hardware
Update the EtherCAT Device hardware (the TSM will be set up for the MAC address of the machine that this TSM was copied from)
Étape 9 - Display side-by-side
Display the two system managers side by side
Étape 10 - Check all IO mapping one by one
Using the old TSM as a blueprint, carefully check all IO mapping one by one. Make sure the new TSM matches precisely the old TSM
Étape 11 - Activate Configuration
Activate Configuration
Étape 12 - Login PLC_Reset
Using PLC Editor, login PLC_Reset in Port 811Étape 13 - Login tcMulti
Using PLC Editor, login latest tcMulti in Port 801
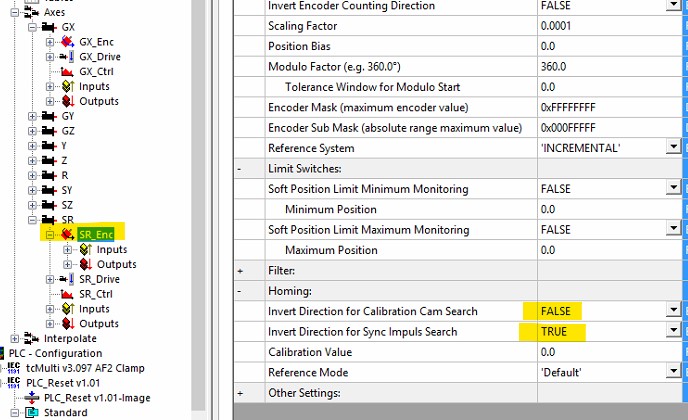
Étape 14 - Reverse datum direction if required
It is likely that the datum direction on some axes will have reversed. You need to enter setup mode and test each axis homes correctly. If an axis needs to be reversed, invert the two Homing parameters in Encoder Parameters->Homing Tab. Use the download button to save
Draft

 Français
 English
 Deutsch
 Español
 Italiano
 Português