Cette page fournit une simple interface de navigation pour trouver des entités décrites par une propriété et une valeur nommée. D’autres interfaces de recherche disponibles comprennent la page recherche de propriété, et le constructeur de requêtes ask.
Liste de résultats
- Viewing Camera Footage from Hikvision Cameras + (The video footage from a Hikvision camera … The video footage from a Hikvision camera can only be viewed via Windows "Internet Explorer". The camera web page also has the facility to playback and download the recorded images stored on the memory card in the camera.
sion. For reasons unknown, Hikvision have not kept this up to date for the latest drivers (Edge and Chrome)</div> </div> <br/>)
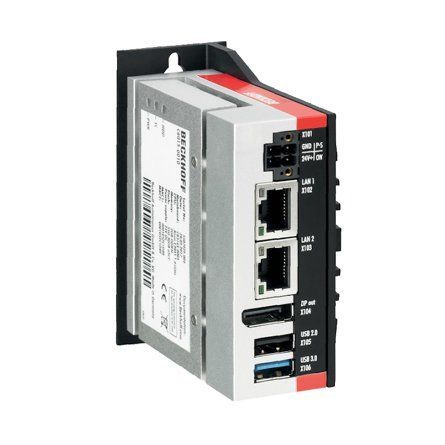
- Upgrading Autoflow TwinCAT2 to Win10 and TwinCAT3 + (<div class="annotatedImageDiv" typeof=" … Autoflows from A2001 to A2015 were initially produced with TwinCAT2 software. This has now been superseded with TwinCAT3 which then has the benefit of compatibility with version 6 front end software.
The original PC cannot be used because
*It is not powerful enough to run v6 front end
*The operating system cannot be upgraded to Windows 10
*It cannot be upgraded to TwinCAT3
The Beckhoff C6015 PC has been chosen to be the replacement PC. It is compact, yet powerful enough to run the v6 front end and TwinCAT in the same
. It has an upgrade to 1.9Ghz 4 core processor.
Because it has a limited 40Gb SSD memory, a compact 64Gb memory stick is inserted into the USB 3.0 port. This acts as a separate drive for the DDRIVE dynamic storage for all machine setup. The internat drive is for the Operating System only. This mimics the current Autoflow setup of a remote Camera PC, hence the camera PC can be retired after the upgrade
era PC, hence the camera PC can be retired after the upgrade<br/>) - Omron E5CVS PV Shift + (<div class="annotatedImageDiv" typeof=" …

) - Autoflow Maintenance - Gripper + (<nowiki>The following preventative m …
The following preventative maintenance tasks should be carried out regularly on the machine. The frequency depends on the machine use, but as a guide: i-Weekly<br />20 Hrs/Week Monthly</pre></div></nowiki>)2-3 Shifts Weekly
40 Hrs/Week Bi-Weekly
20 Hrs/Week Monthly - Autoflow Maintenance - Infeed + (<nowiki>The following preventative m …
The following preventative maintenance tasks should be carried out regularly on the machine. The frequency depends on the machine use, but as a guide: kly<br />20 Hrs/Week Monthly</pre></div><br/></nowiki>)2-3 Shifts Weekly
40 Hrs/Week Bi-Weekly
20 Hrs/Week Monthly - R0002913E Install and Align Rotary head Subframe PART 2 + ('''<u>Tools Required</u>''' … '''Tools Required''' 300mm engineers level 2 meter straight edge 1 meter straight edge Standard hex key set Standard spanner set Z support jigs '''Parts Required''' D0000095 Bottom Plate x 2 D0006484 Front Tiebeam x 1 D0006485 Rear Tiebeam x 1 D0007681 Shaft Adjust Plate x 2 D0007683 Lower Beam Mount x 1 D0007684 Lower Beam Mount - Mirror x 1 D0007695 Platform (D8714) x 1 D0007787 Upper Beam Mount x 1 D0007835 Hard Stop x 2 D0008087 Z Servo Housing x 2 H0006025 Shaft 40mm: 939mm Flowline Y-axis x 2 H0007711 Shaft 40mm: 1350mm Microline Z (c/w M16 x 45 bolts) x 2 R0015296 Bench Assemble bearings AssembliesM16 x 45 bolts) x 2 R0015296 Bench Assemble bearings Assemblies)
- R0002913E Install and Align Rotary head Subframe + ('''<u>Tools Required</u>'''
… '''Tools Required'''
300mm engineers level
2 meter straight edge
1 meter straight edge
Standard hex key set
Standard spanner set
Z support jigs
'''Parts Required'''
D0000095 Bottom Plate x 2
D0006484 Front Tiebeam x 1
D0006485 Rear Tiebeam x 1
D0007681 Shaft Adjust Plate x 2
D0007683 Lower Beam Mount x 1
D0007684 Lower Beam Mount - Mirror x 1
D0007695 Platform (D8714) x 1
D0007787 Upper Beam Mount x 1
D0007835 Hard Stop x 2
D0008087 Z Servo Housing x 2
H0006025 Shaft 40mm: 939mm Flowline Y-axis x 2
H0007711 Shaft 40mm: 1350mm Microline Z (c/w M16 x 45 bolts) x 2
R0015296 Bench Assemble bearings Assemblies
bolts) x 2 R0015296 Bench Assemble bearings Assemblies <br/>) - R0015028D ZX5 Hepco Beam Alignment Module C + ('''<u>Tools Required</u>''' … '''Tools Required''' Engineers level Hepco flat spanner T0000491 Hepco Box spanner T0000492 Standard hex key set Incremental shim pack '''Parts Required''' B0000046 Slide Base Bearing Block (Straight Grease Nipple) x 6 B0000184 Journal Cap Seal 34 x 4 B0000185 Double Row Long Stud Journal Eccentric x 2 B0000186 Double Row Long Stud Journal Concentric x 2 B0000234 Straight Grease Nipple M6 ST/ST x 6 B0001006 Linear rail 25mm x 820mm x 6 B0001102 Double edge spacer slide and beam 7600mm x 1 D0015072 Carriage Plate x 1 D0015492 Vertical Beam Adjustment Plate x 5 D0015493 Lateral Beam Adjustment Plate x 5 P0000200 Elbow Adaptor 6mm - M5 x 2 B0000173 blanking cap x 90 F0000331 M6 threaded plate x 120 x 2 B0000173 blanking cap x 90 F0000331 M6 threaded plate x 120)
- R0015028D ZX5 Hepco Beam Alignment Module C part 2 + ('''<u>Tools Required</u>''' … '''Tools Required''' Engineers level Hepco flat spanner T0000491 Hepco Box spanner T0000492 Standard hex key set Incremental shim pack '''Parts Required''' B0000046 Slide Base Bearing Block (Straight Grease Nipple) x 6 B0000184 Journal Cap Seal 34 x 4 B0000185 Double Row Long Stud Journal Eccentric x 2 B0000186 Double Row Long Stud Journal Concentric x 2 B0000234 Straight Grease Nipple M6 ST/ST x 6 B0001006 Linear rail 25mm x 820mm x 6 B0001102 Double edge spacer slide and beam 7600mm x 1 D0015072 Carriage Plate x 1 D0015492 Vertical Beam Adjustment Plate x 5 D0015493 Lateral Beam Adjustment Plate x 5 P0000200 Elbow Adaptor 6mm - M5 x 2 B0000173 blanking cap x 90 F0000331 M6 threaded plate x 120 x 2 B0000173 blanking cap x 90 F0000331 M6 threaded plate x 120)
- R0015082B fencing and guards + ('''<u>Tools Required</u>'''
… '''Tools Required'''
Standard hex key set
standard spanner set
Standard HSS drill set
Standard Tap set
1 meter level
Tape measure
Steel rule
'''Parts Required'''
D0008330 Double Door Keep x 2
D0015326 Transfer Gate Upright x 6
D0015333 ZX5 Fence Hinge Spacer x 6
D0015340 Profile Support Plate (Short) x 1
D0015341 Profile support plate mount x 1
D0015349 Safety Hinge Mounting Plate x 6
D0015517 Fence Mounting Section x 28
D0015526 ZX5 Saw Fence Infill x 1
D0015601 ZX5 Saw Fence Support Beam (40x80x550) x 1
D0015606 Fence 10 Support Beam F Slot Fixings. x 2
D0015771 Double Door Keep Spacer x 1
D0015914 Saw Infeed Profile Deflector x 1
D0015962 ZX5 Fence 11 - 1100 x 1850 x 2
D0015963 ZX5 Fence 1 1450 x 1850 x 12
D0015964 ZX5 Fence 3 - 1450 x 1850 Cutout x 1
D0015965 ZX5 Fence 2 820 x 1850 x 1
D0015966 ZX5 Fence 10 927 x 1850 x 2
D0015967 ZX5 Transfer Gate x 3
D0015968 ZX5 Fence 7 642x 1850 extraction holes x 1
D0015969 ZX5 Fence 8 - 1105 x 105 Saw Corner x 1
D0015970 ZX5 Fence 820 x 1105 x 1
D0015972 ZX5 Fence Infill - 65 x 1850 x 1
D0015974 ZX5 Fence 13 - 820 x 1105 Hole for Gate x 1
D0015986 Multi Head Waste Bin Guard x 2
D0016018 ZX5 Saw Cabinet Infill Guard x 1
D0016036 Compliance Guard around Cabinet x 1
D0016037 Compliance Guard - MH to MH Infeed x 1
D0016038 Compliance Guard - MH to MH Out x 1
D0016051 Fence Guard (Crank) x 4
D0016171 Compliance Guard - MH to Transfer Gate x 1
D0016172 Compliance Guard - Saw to Transfer Gate x 1
E0001176 Safety Hinge Switch x 3
E0001177 Hinge (works with E1176 Safety Switch) x 3
F0000299 T Nut Sub Insert M6 (Fat) x 83
M0000029 Cabinet Lock (Triangular) x 4
M0000515 Floor Mouting Angle 200x87x42x 7
M0000516 Adjustable Foot Ø60 M14 x 6
M0001016 Angle 74 x 38 x 6
M0001202 Bruehl Fence Panel 1825 x 2200 x 4
M0001204 Bruehl 2.0m Transit Post x 5
M0001207 Bruehl Fence Clip x 31
R0000901 ZX4 Local Gate x 1
01207 Bruehl Fence Clip x 31 R0000901 ZX4 Local Gate x 1 <br/>) - R0015078B Module A infeed arm alignment + ('''<u>Tools Required</u>''' … '''Tools Required''' Standard spanner set Standard Hex key set Pedestal stand Adjustable jack 1 meter straight edge 300mm engineers level Lever bar Standard tap set Standard hss drill set Hammer Tape measure Wire line Clamps '''Parts Required''' D0015038B x 1 D0015039B x 1 D0015257 x 1 D0015035B x 1 D0015036B x 1 D0015037B x 139B x 1 D0015257 x 1 D0015035B x 1 D0015036B x 1 D0015037B x 1)
- R0015242 Level and Adjust Roller beds module C and E + ('''<u>Tools Required</u>''' Standard hex key set Standard spanner set Engineers level 2mm shim spacer 2 meter straight edge '''<u>Parts Required</u>''' Installed transfer beam assemblies)
- R0000571 Fit and Level Cut Tables , Finalise Eject + ('''<u>Tools Required</u>''' … '''Tools Required''' 1 meter straight edge 500mm rule Standard hex key Standard spanner set Feeler gauges Engineers level Adjustment shim '''Parts Required''' A0001069 Energy Chain Series B15.050 (48mm radius) Openable x 0.5 A0001070 Igus Mounting Br Set for A0001069 Non-Pivot x 1 A0001074 igus mounting bracket set x 1 D0004551 Cylinder Spacer x 1 D0004553 Cover Fixing Bar x 1 D0004554 Bar Spacer Short x 1 D0004555 Bar Spacer Long x 1 D0004769 Ejector Clamp Pad to be made in conjuction with D5121 (5305) x 1 D0004770 Infeed Clamp Pad to be made in conjunction with D5122 (5299) x 1 D0005121 Ejector Clamp Stainless Pads (5306) x 1 D0005122 Infeed Clamp Pad (5300)x 1 D0005199 Ejector Cover x 1 D0005412 Energy Chain Adapter Plate x 1 H0004556 Fixing Bar Gap Cover (5297) x 1 H0004656 Material Trip Stripx 1 P0000368 Extension 1/8 bsp x 22 long x 1 P0000443 Cleanline Cylinder 32 x 450 PN11246 x 1 P0000444 Reed Switch: Pneumax 1580U (5.0m Lead) x 2 P0001198 flow controller 6mm elbow 1/8 x 2580U (5.0m Lead) x 2 P0001198 flow controller 6mm elbow 1/8 x 2)
- R0015038 Bench Assemble V notch Datum Rollers + ('''<u>Tools Required</u>'''
… '''Tools Required'''
Standard Hex key set
External circlip pliers
1 meter straight edge
Feeler gauges
'''Parts Required'''
B0000062 Circlip 20mm External x 13
B0000415 Ball Bearing 20 I/D 32 O/D 7 Long + shields (INA) x 26
B0001176 washer : bearing shim x 16
D0010060 Roller Shaft Ø20 x 37.5 x 7
D0010061 Datum Roller Ø40 x 20 x 6
D0010396 Datum Roller Ø40 x 150mm x 7
D0010397 Shaft 20mm: 195mm Autoflow Roller x 7
D0015214 Roller Support Bar - Short x 1
D0015217 Profile Support Pad x 2
D0015218 Roller Support Bar - Long x 1
D0015220 Outfeed Roller Bed Support Frame x 1
D0015221 Outfeed Roller Bed Mounting Plate x 1
D0015348 MC Outfeed Roller Mounting Plate x 1
M0001006 Threaded insert M14/M8 30 long x 8
ting Plate x 1 M0001006 Threaded insert M14/M8 30 long x 8 <br/>) - R0015326 Bench Assemble Roller Backfences + ('''<u>Tools Required</u>'''
… '''Tools Required'''
Standard hex key set
1 meter straight edge
Feeler gauges
Bearing dolly for B0000245 Needle Bearing
'''Parts Required'''
B0000245 Needle Bearing 12 D 16 D 10 Long (ENA) x 20
D0005183 Roller Backfence (D7443) x 1
D0005184 Guide Roller x 10
D0005186 Guide Pin Washer x 10
D0007443 Roller Backfence OH (D5183) x 1
H0005185 Shaft 12mm: 90.5 Saw Fence Roller Pin x 10
3) x 1 H0005185 Shaft 12mm: 90.5 Saw Fence Roller Pin x 10 <br/>) - R0015035 Bench Assemble V Notch Components + ('''<u>Tools Required</u>'''
… '''Tools Required'''
Standard hex key set
Standard spanner set
Standard HSS drill set
Vernier 150mm
2 meter straight edge
40mm shaft pin jigs
Feeler gauge set
Internal circlip pliers
External circlip pliers
8mm hand reamer
'''Parts Required'''
B0000041 5 x 5 x 19 key x 1
B0000109 Linear Bearing (IKO) 40 D x 62 D x 80 L x 8
B0000427 Leadscrew Ø25x10 435 Long x 1
B0001047 Fixed Bearing Support Block Ø17 x 1
B0001120 Circlip 62mm External x 16
B0001127 ROTEX GS Coupling Ø14/Ø15 Bore & Key (98 Shore Spider) x 1
B0001134 Ball Bearing 15ID 35OD 11 Long x 10
C0001122K Servo Motor: Beckhoff AM8032-1E10 (Keyed) x 1
D0010132 SZ Drive Mount Plate x 1
D0010563 Y Axis Servo Mount x 1
D0015147 V Notch Upper Support Bar x 1
D0015148 V Notch Lower Support Bar x 1
D0015149 VZ Shaft End Plate x 4
D0015152 V-Notch Upper Moving Bar x 1
D0015153 V-Notch Rear Moving Bar x 1
D0015154 V-Notch Front Moving Barx1
D0015157 Saw Motor Bar x 4
D0015158 Shaft 40mm: 190mm ZX V Notch Saw Motor Slide x 8
D0015159B Saw Motor Adjustment Screwx 4
D0015160 Saw Motor Block x 4
D0015164 VY Leadscrew Block x 1
D0015166 VY Motor Mounting Plate x1
D0015258 Upper Link Mount 1 x 1
D0015259 Upper Link Mount 2 x 1
D0015260 Upper Link x 2
D0015261 Lower Link x 2
D0015262 Lower Link Mount x 2
D0015263 Mid Link Shaft x 2
D0015264 Lower Link Shaft x 2
M0001093 Shaft Clamping Element (Ø15-20 shafts) x 16
haft x 2 M0001093 Shaft Clamping Element (Ø15-20 shafts) x 16 <br/>) - R0015037 Bench Assemble SY Assembly + ('''<u>Tools Required</u>'''
… '''Tools Required'''
Standard Hex Key set
Standard Spanner set
1 Meter straight edge
Feeler Gauges
'''Parts Required'''
B0000044 Linear Rail MSB25 260mm Long (AMT) x 2
B0000046 Slide Base Bearing Block (Straight Grease Nipple) x 4
B0000173 blanking cap x 10
B0000234 Straight Grease Nipple M6 ST/ST x 4
B0000245 Needle Bearing 12 D 16 D 10 Long (ENA) x 12
B0001060 Grease Fitting M6x0.75 to Ø4 x 4
B0001061 Grease fitting M6 x 1 to 4mm x 4
B0001123 Double angular contact bearing 6 I/D 17 O/D 9 long x 2
B0001185 Leadscrew nut Igus x 1
C0001005 Stepper Motor AS1050 x 1
D0005184 Guide Roller x 6
D0005186 Guide Pin Washer x 6
D0015172 Centralise Plate (with SY) x 1
D0015173 Saw SY Saddle Brace x 1
D0015174 Roller Fence (With SY) x 2
D0015175 Saw Saddle Carriage Block x 2
D0015176 Cylinder Mount Block x 2
D0015178 Z Block x 2
D0015207 Outer Bearing Housing x 1
D0015208 Leadscrew Bearing Block x 1
D0015209 Leadscrew Attachment Bracket x 1
D0015222 SY Grease Manifold x 2
D0015240 Collar Clamp: SY Axis ZX5 x 1
D0015316 Leadscrew Bearing Block Cover x 1
D0015415 Turret Pickup Arm ZX5 x 2
D0015416 Bracket: Turret Stop RH ZX5 x 1
D0015417 Bracket: Turret Stop LH ZX5 x 1
D0015698 Flag Block x 1
D0015777 Leadscrew SY x 1
D0016336 SY table blower x 1
E0000336 Sensor: M8; 2mm, PNP N/O, M8 conn x 1
H0005185 Shaft 12mm: 90.5 Saw Fence Roller Pin x 6
M0001209 Bracket m8 proximity sensor 90 degree x 1
P0000200 Elbow Adaptor 6mm - M5 x 7
P0001127 Guide cylinder 20 x 30 compact x 2
P0001157 Turret Stop: 6 Station Right Handed Somatec x 1
P0001158 Turret Stop: 6 Station Left Handed Somatec x 1
1 P0001158 Turret Stop: 6 Station Left Handed Somatec x 1 <br/>) - R0015337 Bench Assemble Guarding Components + ('''<u>Tools Required</u>'''
… '''Tools Required'''
Standard hex key set
Standard spanner set
Standard HSS drill set
Acoustic mat cutting board and straight edge
Utility blade
'''Parts Required'''
D0000770 Door Hinge (M0016) x 2
D0001886 Front Door Saw Mk 4 x 1
M0000002 12mm Grey Acoustic Foam with Black PVC Facing x 1
M0000539 Handle Black Nylon 200mm M8 Fixings x 1
M0000031 panel edging ( consumable stock )
M0000150 Stuga sticker clear x 1
M0000154 Stuga service sticker x 1
uga sticker clear x 1 M0000154 Stuga service sticker x 1 <br/>) - R0015041 Bench Assemble Top Hood Assembly + ('''<u>Tools Required</u>'''
… '''Tools Required'''
Standard hex key set
Standard spanner set
Standard Hss drill set
Standard tap set
Acoustic foam cutting board and straight edge
Utility Blade
'''Parts Required'''
Pre wired light, beacon and network cable from electrical department
C0001152 Camera: HikVision DS-2CD2343G0-I-2.8mm x 1
C0001239 Micro SD Card 32Gb Class 10 x 1
D0000770 Door Hinge (M0016) x 2
D0001877 Saw Top Door Mk4 x 1
D0004641 Hinge Pin Block (D7445) x 1
D0004642 Flap Counterbalance Bar x 1
D0004645 Safety Flap Hinge Pin x 1
D0004679 Flap Stiffening Bar x 1
D0004705 Flap Hinge Bar x 1
D0004747B top door screen x 1
D0004807 Flap x 1
D0007445 Hinge Pin Block OH (D4641) x 1
D0016251 Saw Hood Switch Mount Plate (Bernstein) x 1
E0000275 Button: Base Fixing 1 N/C x 1
E0001072 Emergency Stop Module Bevelled 1NO 1NC x 1
E0001569 Guard Lock Switch: Bernstein Radius Actuator (Key) x 1
H0004643 4mm Axxis Clear 145mm x 690mm x 1
M0000002 12mm Grey Acoustic Foam with Black PVC Facing x 1 (consumable stock )
M0000036 Sign - Ear Protection x 1
M0000048 Gas Spring 15mm x 100mm x 1
M0000539 Handle Black Nylon 200mm M8 Fixings x 1
100mm x 1 M0000539 Handle Black Nylon 200mm M8 Fixings x 1 <br/>) - R0015311 Install and Align Datum rollers + ('''<u>Tools required</u>''' Standard hex key set 2 meter straight edge 1 meter straight edge 12" engineers level 12" inch engineers square Feeler gauge set '''<u>Parts Required</u>''' R0015297 Mount V Notch Datum rollers)
- Stuertz Infeed - Freeing Roller under Gripper Arm + ('''Applies to: A2026-A2030 Autoflow Mk4 wi … '''Applies to: A2026-A2030 Autoflow Mk4 with Jetta Locking motors'''
In certain circumstances, the forward clamp roller arm has stuck itself under the gripper arm. Freeing from this situation requires a set process because the GZ axis motor is braked and probably in an overload condition
nfident in using TwinCAT on the VM machine to navigate to settings</div> </div><br/>) - TB0314 Updating Mint File in Workbench + ( * Updating software can be very complicat … * Updating software can be very complicated, so care must be taken and always ensure there is a route to retrace your steps in the event of a failure – with Baldor .mnt files this is easy because each version is a separate file and therefore easy to load the old one back in again * In general, the Baldor (.mnt) software has been designed to be backwards compatible, but there are a few steps that needed to be taken that made this impossible. In these cases, the front end software (winMulti or winSaw) also needs to be updated – you will get an error to tell you that this is the case * Version numbers have always followed a numerical order, so the higher the number, the later the version * Mnt files should always be stored in ** c:\multi on MH side – called Multi X.xxx.mnt ** c:\saw on Saws or Saw side of flowline – called IgSaw X.xx.mnt aw side of flowline – called IgSaw X.xx.mnt )
- TB0390 Fitting SR Datum Sensor + (<br/>
<table class="wikitable" bo …
3" valign="top">F0000059 </td><td width="359" valign="top">M8 Washer </td><td width="73" valign="top">2 </td></tr><tr> <td width="104" valign="top">'''9''' </td><td width="123" valign="top">F0000014 </td><td width="359" valign="top">M6 x 20 SKT CAP SCREW </td><td width="73" valign="top">2 </td></tr><tr> <td width="104" valign="top">'''10''' </td><td width="123" valign="top">F0000028 </td><td width="359" valign="top">M8 x 50 SKT CAP SCREW </td><td width="73" valign="top">2 </td></tr></table>)'''Item Number''' '''Part Number''' '''Description''' '''Qty''' '''1''' D0015489 Saw Turntable Sensor Bar 1 '''2''' D0015490 Saw Turntable Sensor Flag 1 '''3''' D0015491 Saw Turntable Flag Bracket 1 '''4''' E0000336 8mm Threaded Proximity Sensor 1 '''5''' E0000337 M8 90° Lead 1 '''6''' F0000543 U Bolt 3” with Nuts 1 '''8''' F0000059 M8 Washer 2 '''9''' F0000014 M6 x 20 SKT CAP SCREW 2 '''10''' F0000028 M8 x 50 SKT CAP SCREW 2 - Create a TwinCAT Project from Scratch + (<br/><div class="icon-instructions info-icon"> <div class="icon-instructions-icon"><i class="fa fa-info-circle"></i></div> <div class="icon-instructions-text">...Beckhoff Technical help is available on 01491 410539 option 3</div> </div> <br/>)
- TB0426 Replacement Zebra Printer Setup + (<div class="icon-instructions caution-i … [https://stuga.dokit.app/wiki/TB0452_ZD620_Zebra_Printer_Setup ZD620 Instructions]iv> [https://stuga.dokit.app/wiki/TB0452_ZD620_Zebra_Printer_Setup ZD620 Instructions])
- ZX5 Installation Procedure + (<div class="icon-instructions caution-icon"> <div class="icon-instructions-icon"><i class="fa fa-exclamation-triangle"></i></div> <div class="icon-instructions-text">...Read the risk assessment and method statements before proceeding.</div> </div>)
- OBSOLETE Installing SourceTree Version Control Software + (<div class="icon-instructions caution-i … Use this [https://stuga.dokit.app/wiki/Changing_Version_Control_to_Visual_Studio link] From Jan 2020, Sourcetree will be increasingly used to properly maintain changes to the Stuga source code. Each machine with TwinCAT3 will need the Sourcetree program installed, and a change to where and how the source code is stored This tutorial deals with installing the Sourcetree program from Atlassian code is stored This tutorial deals with installing the Sourcetree program from Atlassian)
- DM - Updating Resources + (<div class="icon-instructions caution-i …
All information provided to the service engineers on Device Magic can all be linked to a single Excel document. This document provides all customer names, machine numbers, emails and employee information. Linking this document with Device Magic provides fields that make it easier for engineers to fill out the form.
used internally at Stuga and not be sent to engineers or customers in coordination with Data Protection standards.</div> </div><br/>) - TB0409 Setting Up Windows 10 PC 2018 + (<div class="icon-instructions caution-i … Please use [[Setting Up Windows PC C0000422-KIT 2023]][[Setting Up Windows PC C0000422-KIT 2023]])
- Updating winStugaSaw Software to v4 + (<div class="icon-instructions caution-i …
With the upgrade of the source code editor to Visual Studio 2017, and the associated security changes to Windows, many thing changed with the Windows .net libraries. In order to maintain the code, it needed to be upgraded.
This upgrade had major consequential effects:
# It was not compatible with windows XP any more due to security issues
# A new version of Workbench needs to be installed
any more due to security issues # A new version of Workbench needs to be installed <br/>) - Commissioning a Beckhoff Axis + (<div class="icon-instructions dont-icon"> <div class="icon-instructions-icon"><i class="fa fa-hand-paper-o"></i></div> <div class="icon-instructions-text">...Any stepper motor drives will need the EP7041 drive to be programmed first</div> </div>)
- Setting Up Windows PC C0000422-KIT 2023 + (<div class="icon-instructions idea-icon … stuga.dokit.app/wiki/Setting_Up_C0000422-KIT_-_Full_Hardware_2023</div> </div>)
- R0015312 Finalise V Notch Subframe + (<u>'''Tools Required'''</u> … '''Tools Required''' 2 off 2 meter straight edge 1 meter straight edge Engineers level Engineers 12" square Feeler gauges Standard hex key set Standard HSS drill set Standard tap set Clamp blocks 600m steel rule Vernier 300mm parallels 1" parallels '''Parts required''' R0015310 install v notch subframe''Parts required'''</u> R0015310 install v notch subframe)
- R0015029D Hepco Beam Alignment Part 2 + (<u>'''Tools Required'''</u> … '''Tools Required''' Engineers level Hepco flat spanner Hepco Box spanner Standard hex key set Incremental shim pack Torque wrench '''Parts Required''' B0000184 Journal Cap Seal 34 x 4 B0000185 Double Row Long Stud Journal Eccentric x 2 B0000186 Double Row Long Stud Journal Concentric x2 B0001102 Double Edge Spacer Slide and Beam 7600mm x 1 D0015072 Carriage Plate x 1 D0015492 Vertical Beam Adjustment Plate x5 D0015493 Lateral Beam Adjustment Plate x 5 P0000200 Elbow Adaptor 6mm - M5 x 2 F0000529 T-Nut M6 (slot 10) x 3 F0000530 T-nut M8 (slot 10) x12 F0000529 T-Nut M6 (slot 10) x 3 F0000530 T-nut M8 (slot 10) x1)
- R0015029D Hepco Beam Alignment + (<u>'''Tools Required'''</u> … '''Tools Required''' Engineers level Hepco flat spanner Hepco Box spanner Standard hex key set Incremental shim pack Torque wrench '''Parts Required''' B0000184 Journal Cap Seal 34 x 4 B0000185 Double Row Long Stud Journal Eccentric x 2 B0000186 Double Row Long Stud Journal Concentric x2 B0001102 Double Edge Spacer Slide and Beam 7600mm x 1 D0015072 Carriage Plate x 1 D0015492 Vertical Beam Adjustment Plate x5 D0015493 Lateral Beam Adjustment Plate x 5 P0000200 Elbow Adaptor 6mm - M5 x 1 F0000529 T-Nut M6 (slot 10) x 3 F0000530 T-nut M8 (slot 10) x11 F0000529 T-Nut M6 (slot 10) x 3 F0000530 T-nut M8 (slot 10) x1)
- R0015332 Mount Backfences and Align + (<u>'''Tools Required'''</u> Standard hex key set 1 Meter straight edge Feeler gauges engineers square Shim pack <u>'''Parts Required'''</u> R0000559 Bench assemble machined parts R0015326 Bench Assemble Roller Backfences <br/>)
- R0015243 ZX5 module A-C-E Frame levelling + (<u>'''Tools Required'''</u> … '''Tools Required''' Standard taps set standard spanner set 2 meter straight edge 1" parallel blocks 300mm engineers level '''Parts Required''' D0015265 Frame M0000224 100x 100 frame cap 10 off F0000234 M16 x 1.5 nut 10 off F0000266 M16 x 1.5 set bolt x 10 off0000234 M16 x 1.5 nut 10 off F0000266 M16 x 1.5 set bolt x 10 off)
- R0015290 Bench Assemble Top guard + (<u>'''Tools Required'''</u>
… '''Tools Required'''
Standard hex key set
Acoustic foam cutting edge and Back board
Stanley blade
Standard HSS drill set
Standard tap set
Step drill
'''Parts Required'''
D0001352 Printer Shelf TLP2844-Z x 1
D0004719E Cut Bar Guard Mk5 (5476E) x 1
E0000249 Sounder Beacon x 1
M0000002 12mm Grey Acoustic Foam with Black PVC Facing x 1
M0001127 Cable Tie Base (m6) x 1
with Black PVC Facing x 1 M0001127 Cable Tie Base (m6) x 1 <br/>) - R0015279 Align Backfences + (<u>'''Tools Required'''</u> Standard hex key set Standard spanner set Wire Line setting equipment 600mm rule Workshop Gripper setting jig 2 meter straight edge <u>'''Parts Required'''</u> Fitted and Levelled roller bed assemblies)
- R0015310 Install V Notch Subframe + (<u>'''Tools Required'''</u> … '''Tools Required''' Standard hex key set Standard Spanner set Parallel setting blocks 600mm rule 1 meter straight edge 2 meter straight edge 12 " engineers level 12" engineers square '''Parts Required''' D0015151 Shaft End Washer x 8 D0015155 Vertical Spacer Bar x 4 D0015150 shaft 40mm zx v notch x 4 D0015169B cylinder rod bracket x 2 R0015035 Bench Assemble V Notch Componentsinder rod bracket x 2 R0015035 Bench Assemble V Notch Components)
- R0015327 Level Frame and quality Check + (<u>'''Tools Required'''</u> … '''Tools Required''' 2 meter straight edge 1 meter steel rule 300mm engineers level Standard spanner set Copper grease Standard tap set Tape Measure Standard ratchet/socket set '''Parts Required''' Workshop consumable floor pads D0004576e frame x 1 M12 x 100 set bolts x 4 M12 Standard nut x 4004576e frame x 1 M12 x 100 set bolts x 4 M12 Standard nut x 4)
- R000562 Bench Assemble Centralise Top Table + (<u>'''Tools Required'''</u>
… '''Tools Required'''
Standard hex key set
Consumable M8 studding
Hacksaw and file
16mm hand reamer
1 meter straight edge
'''Parts Required'''
B0000034 Linear Bearing: Ø16 x 30 Compact (Metal Case Only) x 4
D0004138 Centralising Bearing Block x 4
D0004337 Slide Bar Holder x 1
D0004338 Slide Support Bar x 1
D0004545 Slide Support End x 2
D0005235 Support Post x 2
D0005236 Support Post x 2
H0004624 Shaft 16mm: 343 Centralise x 2
6 Support Post x 2 H0004624 Shaft 16mm: 343 Centralise x 2 <br/>) - R0015321 Bench Assemble Guards and Doors + (<u>'''Tools Required'''</u>
… '''Tools Required'''
Standard hex key set
Standard spanner set
Dymo label printer
'''Parts Required'''
C0001152 Camera: HikVision DS-2CD2343G0-I-2.8mm x 3
C0001239 Micro SD Card 32Gb Class 10 x 3
D0007643B Perspex Glazing - Door x 4
D0007644B Machining Centre Door 1 x 2
D0007645B Machining Centre Door 2 x 2
D0007654B Perspex Glazing - Front Guard MkB x 1
H0015747 8mm diameter rod x 1 ( in process of changing to D0015747 x 4 )
M0000036 Sign - Ear Protection x 1
M0000201 T Handle Cabinet Lock x 2
gn - Ear Protection x 1 M0000201 T Handle Cabinet Lock x 2 <br/>) - R0015333 Fit Clamp Assembly + (<u>'''Tools Required'''</u> Standard hex key set Standard spanner set 1 meter straight edge Feeler gauges Soft hammer Engineers square <u>'''Parts Required'''</u> R0015064 Bench Assemble Clamp Assy ZX5)
- R0015334 Fit Centralise Front Table + (<u>'''Tools Required'''</u> … '''Tools Required''' Standard hex keyset 1 meter straight edge Large parallels 150mm engineers square Engineers level 300mm '''Parts Required''' H0004543 Gap cover saw finger guard R0000562 Bench assemble centralise top table R0015037 Bench assemble SY Assemblyssemble centralise top table R0015037 Bench assemble SY Assembly)
- TB0444 Renewing CF Card on TwinCAT2 Systems + (<u>Problem</u> These machines … Problem These machines use a CX5020 PC with a 2Gb CF card running TwinCAT2 PLC system. The CF card can fail, which is effectively the windows operating system. The CF card has a very small capacity, so needs to be created from an image. This TB outlines the steps in the process to ensure a successful conclusion. 1. Create a new CF card at stuga using the beckhoff imaging tool on a CX5020 2. Boot up with the CX5020 3. Ensure PLC is set to Enable on start-up (default is config mode) 4. Rename the PC 5. Install TeamViewer host v10 or less from a USB stick 6. If you have a copy of the version of winMulti it was running, copy this in to the c:\ multi folder. If not, a “'''''new version install'''''” will be needed so copy in data from the g:\builds\PC Installs\Autoflow\Multi folder 7. Set up and customer specific network parameters to ensure TeamViewer will work when it is plugged in on site 8. Send to customer Once on site, follow procedure A if the winMulti version is preserved, or B if it is a '''''new version install'''''eserved, or B if it is a '''''new version install''''')
- TB0428 Connecting To Yaskawa with Silex USB + (== What is the Silex DS-510? == The Silex … == What is the Silex DS-510? == The Silex unit is a USB server, allowing a PC to have a USB port anywhere over an ethernet network. This is useful to connect the PC to a Yaskawa inverter when they are located in different cabinets. The software sets up a virtual USB port which can then be used to run the Yaskawa DriveWorks software.ed to run the Yaskawa DriveWorks software.)
- TB0415 Method to Prevent Loosening of Saw Blade + (==Problem==
On Z063 the bolt holding the s … ==Problem==
On Z063 the bolt holding the saw blade onto the spindle has regularly been loosening during use.
==Solution==
The M16 bolt will be replaced with a stud and castle nut that can be locked with a cotter pin.
==Tool List==
Drill with Ø5.0 bit
24mm Spanner
C Spanner
= Parts List =
0000549 </td><td width="319">Split Pin 4mm x 32 </td><td width="302">1 </td></tr><tr valign="TOP"> <td width="76">F0000550 </td><td width="319">Castle Nut M16x1.5 </td><td width="302">1 </td></tr></table>)D0004031B Saw Washer 3mm 1 D0015560 Spindle Stud 1 F0000273 Spirol Pin Ø6 x 30 1 F0000549 Split Pin 4mm x 32 1 F0000550 Castle Nut M16x1.5 1 - Correcting Linearity with Rack Offset File + (Accuracy problem on A2001 was traced to a … Accuracy problem on A2001 was traced to a non-linear rack. This tutorial demonstrates how to test the linearity of a rack and the systems in place to correct the linearity. machine in the 20 year history that has needed these alterations</div> </div>)
- Monday - Obtaining Customer or Machine Address from a Job + (All machines in the Monday database have their locations stored to make it easy for an engineer to navigate to site using the map features in Android or Apple phones However, it is not intuitively clear how to get to this information)
- VM Upgrade Software + (As an alternative to having a separate camera PC. Adding a VM (Virtual Machine) to the Front end allows access to the BE and cameras without interrupting the operator.)
- Device Magic Clearing Android RAM and Cache + (Device magic has been know to get stuck de … Device magic has been know to get stuck delivering finished forms. Symptoms will be - -Once a form is completed it gets moved to the 'submissions' section. Once there it can take hours or days for it to finally upload. -Unless you manually go into submissions it all seems like it has uploaded ok as it gets moved from 'drafts', but it hasn't. -This happens whether on 4g+ or fibre optic WiFi at home -I eventually give up or forget to keep refreshing it on the submissions page, then if I go back on the app a few days later that is sometimes when it finally sendser that is sometimes when it finally sends)
- Upgrading Project File on TwinCAT2 System + (How to upgrade the .pro file (project) on … How to upgrade the .pro file (project) on a Beckhoff TwinCAT2 system
ram called "TwinCAT PLC Control" to download the PLC project</div> </div><br/>) - Full Version Upgrade TwinCAT3 WinMulti + (If a PC fails on a machine in the field an … If a PC fails on a machine in the field and the hard drive data cannot be recovered, it is necessary to replace the PC. This may create a version conflict, as the new PC will have later versions of twinCAT installed than the original
This tutorial outlines the steps required to bring all the machine systems up to the latest level to ensure compatibility
ions-text">...This is a one-way process that cannot be reversed</div> </div><br/>) - Create a TwinCAT Project from Existing Project + (If you are confident and proficient in usi … If you are confident and proficient in using the Visual Studio editor to create TwinCAT projects, you can shortcut a lot of the data inputting by copying and modifying an existing project. This will keep the naming conventions and links exactly the same
ne has exactly the same EtherCAT box, drive and module setup</div> </div><br/>) - Changing Version Control to Visual Studio + (In March 2022 the password policy of the s … In March 2022 the password policy of the system behind SourceTree / Bitbucket and Atlassian changed - [https://community.atlassian.com/t5/Bitbucket-articles/Announcement-Bitbucket-Cloud-account-password-usage-for-Git-over/ba-p/1948231 link]. This meant all machine would need a complex password login change for the SourceTree program used for version control of the PLC code. This was not straight-forward to resolve, so the decision was made to change the version control system to the one that is packaged with the Visual Studio system by default. This is a better method anyway, but it needs the "TcXaeShell" installed. Visual Studio that includes Source control, rebadged for TwinCAT3</div> </div>)
- TB450 - CMOS Battery replacement + (Internal CMOS batteries are used in PCs to … Internal CMOS batteries are used in PCs to keep a constant power supply to BIOS memory while the main power supply is switched off. These batteries should last up to 5 years when a PC has been left idle. Sometimes these batteries can fall flat before this time either due to being low when sent out or extended use on older machines. The main symptom of a CMOS battery faulting on a Stuga machine is the PC not booting up when mains power is switched on which will be indicated by a “No Signal Detected” message being displayed on the screen. This is due to the BIOS setting “Restore AC Power Loss” going back to its default value of OFF due to the battery faulting. Restoring the BIOS to its original settings is a temporary fix in this situation as it is most likely this will happen again a couple of months down the line (See TB 376 or 213). The battery required is a '''CR2032'''. In the case of the Antec PC, and most commonly, the battery is held in an open housing that can be pushed to release and easily replaced. In PCs such as the Acer Revo the battery needs to be pre-wired with a plug but still easily unclipped and replacedug but still easily unclipped and replaced)
- Stuertz Infeed - Check GY Position Parallelism + (It is important that the parallelism of th … It is important that the parallelism of the GY axis to the backfence is set and maintained along the length of the rack. This tutorial describes how to check this parallelism without the need for measuring equipment
Potential Symptoms of a problem
*Gripper cannot pick up offcuts
*Gripper /profile end forced away from backfence
*Accuracy problems
*Gripper wobbles after it has released profile
Use the laptop to enable you to control the Service screen whilst inside the infeed table
Ther gripper setting jig is used to give an accurate and reliable zero to locate the gripper jaw to. Any piece of aluminium reinforcing box section will also work
Create a spreadsheet or a table to log your results,.
ng box section will also work Create a spreadsheet or a table to log your results,. <br/>) - Autocut Piece Jammed + (Let's say a small piece has become wedged … Let's say a small piece has become wedged between the eject table and the outfeed table frame.
ach into the machine until it is safe to do so - Press ESTOP</div> </div><br/>) - Ensuring Mapped Drives Connect Every Time on Startup + (Never found out why but seems Windows tries to manage the Mapped Drives before The Network Service is up and running)
- Updating Teamviewer Host + (Older versions of Teamviewer are being pha … Older versions of Teamviewer are being phased out by the Teamviewer company from September 15th 2021. The advice on the website suggests you need to upgrade to version 15. However, v15 is not compatible with the older Windows XP machines in the field. The latest XP compatible downloadable version of the Host program is 13.2 and is available [https://download.teamviewer.com/download/version_13x/TeamViewer_Host_Setup.exe here] Regrettably, the update process on older versions is not simple, and frustratingly cannot be done remotely. It needs intervention from an operator at the machine with a small amount of technical know-how with a small amount of technical know-how)
- Move SR Datum Sensor to Higher Level R0019217 + (On a Mk4 Autoflow, The SR axis daum sensor … On a Mk4 Autoflow, The SR axis daum sensor is originally located at the rear and to the base of the SR axis. This area is prone to offcuts, so a new location has been designed at the top, with the following design parameters
*Easy to retrofit
*Sensor is protected in a case
*Short distance to connection box
*Uses existing mounting holes
*Easy to adjust and maintain
*Sensing end location should be vertical onto a plate, not horizontal on to a radiused surface
*Can use E0000336 2mm range sensor reliably
*Incorporate a front fence to help deflect offcuts down the chute and to protect the sensor
The parts are supplied in Kit R0019217B
illustrated here are from a Right to Left feed machine. Parts are unhanded so can be fitted to either hand machine</div> </div><br/>) - ZX5 V Notch Blade Mechanical Setup + (On previous models the V notch separation … On previous models the V notch separation was set via the software. This could be quite time consuming and required multiple tests and measurements to get it right. Four variables were used for each V notch and it is not straight-forward to get the shape, depth and position correct. On the new ZX5 the '''shape''' of the V notch is set mechanically and once set it should never need changed again, but remember that some customers sharpen their V notch blades instead of replacing them. The following was carried out on the rear V notches using some standard outerframe but the process is exactly the same for the front. Once set you can use the usual software settings to increase/decrease depth and to align back to back. The overall process is: # Set the shape of the V notch (Mechanical adjustment) # Set the Depth of the V notch (Software adjustment in Notching Tab) # Set the Position of the V notch (Software adjustment in Notching Tab) you will be in close proximity to the V notch blades and tooling.</div> </div>)
- Device Magic - Adding a Device Email Address + (PM service and service call reports will b … PM service and service call reports will be sent to the engineer's own email address automatically, but '''''only if''''' the device "Email" property is set up correctly.
This needs to be done separately using a device magic account.
's device is renewed or needs to be re-added in Device Magic</div> </div><br/>) - CX5120 Replacement + (Replacement of Beckhoff CX5120 Skill Lev … Replacement of Beckhoff CX5120 Skill Level: Experience with Twincat & Visual Studio n’t Switch CF cards around. Keep them in the CX5120’s they came with.</div> </div>)
- Setting Infeed Loading Wheel + (Setting the pressure and clutch tension on … Setting the pressure and clutch tension on the loading wheel is critical for the reliable and accurate running of the machine If set incorrectly, the profile will slip and not load correctly or will not give an accurate start position for the datum holes The goal is to set the system to a "goldilocks" zone where there is enough pressure and clutch tension to reliably load a bar, but not too much so the clutch limits any correctional movement from the gripper arm on loading e video demonstrates how easy it is for the wheel to become loose</div> </div>)
- Setting Profile Detection Laser Sensor + (Setting the profile sensor correctly is im … Setting the profile sensor correctly is important as it will lead to incorrect offcut measurement.
ensure the sensor is set for the range of different colours</div> </div><br/>) - Updating Baldor ESB Firmware 2022 + (Since 2022 ABB have removed the simple lin … Since 2022 ABB have removed the simple link from workbench to allow firmware download. This makes it trickier to upgrade an ESB unit on a saw side of a flowline to allow CANopen communication. This is needed on a Windows update. The procedure demonstrates where to find the firmware file and how to download to the ESB manuallyle and how to download to the ESB manually)
- Changing Main Saw Blade + (Stuga recommends this blade be changed aft … Stuga recommends this blade be changed after 1-2 weeks of cutting - symptoms to determine if the blade needs changing:
* Awful cutting sound / smell
* Profile dragging (sizes too short)
* Brown burnt swarf
* Smoke coming out of profile end while cutting
p and can be awkward to manouver out of the saw, please be careful</div> </div><br/>) - Installing VNC Server and Viewer + (Teamviewer are withdrawing support and are … Teamviewer are withdrawing support and are very dismissive of helping out with teamviewer issues for older operating systems. Sometimes the problem just has to be solved, so there are other tools that can be used to "piggy back" onto a teamviewer connection to an office PC. A reliable, free and simple method is to use VNC. This involves #Installing VNC Server on the old PC that you want to control #Installing VNC Viewer on the Piggy-back PC VNC Viewer can be downloaded [https://archive.realvnc.com/download/get/786/eula/ here] VNC Server can be downloaded [https://archive.realvnc.com/download/get/775/eula/ here]e.realvnc.com/download/get/775/eula/ here])
- ACEpc Changing IP address using netedit + (The ACEpcs use two different systems for c … The ACEpcs use two different systems for connecting a network #NETBeui - this was used on earlier machines but reliability depends on the customer network setup. Reconfiguration after initial setup is difficult #IP addressing - A setup system was written using IP addresses to connect. This is a little harder to set up, but is easier to change later. A special program called netedit was written which updates all the correct files in the backgroundes all the correct files in the background)
- Beckhoff AX8000 Flowline Upgrade + (The Flowline range (Mk3, ZX3, ZX4) are Stu … The Flowline range (Mk3, ZX3, ZX4) are Stuga built and designed machines for prepping and cutting uPVC windows and doors. The Flowline is the first machine of the Stuga 'U' shaped machines which has prepping and cutting working in the same machine package. The Flowline is still a fantastic machine for the industry, however, due to the age of the machines and older control systems becoming obsolescent, we have had to find an upgrade route that does not only keep the machine going, but also provides improvements from the original model and up-to-date technology to future proof the machine. The upgrade that we have developed for the Flowline is supplied from an automation supplier named Beckhoff. We also use Beckhoff on our new build machines. This gives us better lead times, more understanding of the products and better diagnostics/ support for our customers. The drive system that we use is called the AX8000 series. These drives are a compact multi axis servo system that use an EtherCAT interface and STO safety functions. These servo drives, coupled with Beckhoff AM8*** series OCT servo motors provide quicker installations and all round performance increases from any system we have previously used. To drive all of the new system, we are using a Beckhoff IPC controller that runs TwinCAT 3. This links into the system via EtherCAT. All of the machine can now link together via EtherCAT to provide quick and stable communications. This tutorial will give you step by step guides on the physical upgrade requirements needed when upgrading a Flowline Mk3 to a Flowline Mk3 with Beckhoff AX8000 Control. Each step will provide you with written information and pictures to guide you through the upgrade. Each step will contain necessary information which will also provide you with rationale for the design and an idea of the benefits over using different methods. Please always feel free to provide Stuga with any feedback on this document or its contents.feedback on this document or its contents.)
- ZX5 MH Infeed Basic IO Test and Setup + (The MH infeed on a ZX5 is a module which c … The MH infeed on a ZX5 is a module which can be tested individually away from the fully installed machine. Once build stage is complete, to be able to test individually, the Infeed Module needs: - To be connected to mains power & be powered on - An air supply to the main blue line - Network connection (Network Cube) - HDMI & Keyboard dongle to be plugged into the Beckhoff PLC inside the cabinet. Input and output activation when testing the sole module is done through the Twincat project rather than through WinMulti The above is only required If the Machine is not fully installed and connected with power air and network already. The below guide is specifically for a fully installed and connected infeed.ically for a fully installed and connected infeed.)
- PC Recovery Process + (The PCs are now shipped with a memory stick that includes a full recovery image. If the system fails in future, this allows a full recovery of the initial setup of the entire drive. Mouse and Keyboard are required for recovery process.)
- Updating Beckhoff TwinCAT3 Backend Version + (The TwinCAT3 beckhoff systems have a speci … The TwinCAT3 beckhoff systems have a special version of TwinCAT installed - the "Runtime" version XAR (eXtended Automation Runtime). This differs from the full "Engineering version XAE that is installed in the front end and camera PCs in that it is the bare bones of TwinCAT for machine running purposes. '''It does not have the Visual Studio editor in it.''' The runtime version may need updating to 3.4024.xx to allow the latest front end and PLC code to work the latest front end and PLC code to work)
- Upgrade ZX Machine to Beckhoff Drives and Control + (The ZX3 and ZX4 machines that have control … The ZX3 and ZX4 machines that have control systems that pre-date the Beckhoff hardware now have an upgrade available. The upgrade will bring up-to-date hardware to the machines control system and drives. The control system and drives will be changed to Beckhoff. TwinCAT 3 PLC and AX8000 series drives.f. TwinCAT 3 PLC and AX8000 series drives.)
- Setting Arrow Heads on ZX5 or ZX5-E + (The Zx5 and Zx5e have an upgraded system o … The Zx5 and Zx5e have an upgraded system on the saw centralising which takes the best mechanical features of the standard saw centralising, yet adds an ability to move the central point for Y notches.
In general, this makes it easier to set up, because the overall centralise position can be changed in software , rather than adjusting a cylinder offset, and also to fine tune the centralise position for different profiles
the arrow head position permanently will also alter Y notch depths</div> </div><br/>) - ZX5 Gripper Energy Chain & Tray Setup + (<div class="icon-instructions caution-i … The main problems we’ve had during commissioning with these energy chains is that if they are not positioned well enough , the chain will clip the button heads that hold the trays to the L brackets To get over this the brackets sometimes need adjusting on the slots along with possibly bending into a better shape or by adjusting the chain bracket position on the slots in the ‘finger’ bracket Things to look out for: *There should be three links which are reversed at the bracket end of the energy chain. *Servo cable and the pipes and cables from the energy chain are fixed with cable ties to the fingers on the bracket to minimise possible movement and twisting which changes where the energy chain sits in the trays, meaning it could start clipping the button heads. *Tray heights and energy chain length, there should be a consistent gap all the way along between the energy chain and the top tray (viewed from inside the tray) and when at the full travel either end the chain shouldn’t be tight hitting the fence too much at the end. *It is also worth checking if all of the links fitted are the same radius type, as we have had occasions where some have been a smaller radius meaning at certain points down the rack the radius of the bend becomes smaller and falls out from the support of the top tray, especially when the gripper is at either end of the rack. There is a code on the side of each link in the energy chain. *A last thing to be weary of is is the end corners of the trays may require bending out, there have been occasions where one chain tray has been slightly more bent in than the other meaning when the chain moves from one tray to the next it clips the corner of the next tray We normally get the gripper on a reversing cycle movement to test this through the twincat project at different speeds, starting slow and working up to higher speeds.gh the twincat project at different speeds, starting slow and working up to higher speeds.)
- X252 Forward Clamp Out Sensor Setup Stuertz Infeed + (The out sensor used for the vorlaufwagen c … The out sensor used for the vorlaufwagen cannot be a standard reed switch because the cylinder that drives this output is a telescoping version. It is impossible to detect the out position. Therefore, a sensor is fitted that must be programmed to set a high output when it detects the full range has been reached The sensor is a [https://www.pepperl-fuchs.com/global/en/classid_53.htm?view=productdetails&prodid=42559#overview Pepperl+Fuchs VDM28-8-L] Datasheet can be downloaded [https://files.pepperl-fuchs.com/webcat/navi/productInfo/45/452859n.pdf?v=20220926110229 here] '''Function''' The distance measurement device contains one transmitter and one receiver incorporated into a single housing. The transmitter light is reflected back to the receiver from a target. The sensor determines the distance to the target and triggers a switching function or supplies the relevant measured value for processing. '''Assembly instructions''' The sensor can be mounted by means of through holes or by using a mounting bracket or mounting clamp Ensure that the surface is level in order to prevent the housing from becoming distorted when the fittings are tightened. It is advisable to secure the nuts and screws using spring washers in order to prevent the sensor from being incorrectly adjusted. '''Connection''' Connect the device in accordance with the connection diagram in the datasheet. '''Adjustment''' The green LED lights up when the operating voltage is switched on. Adjust the sensor so that the laser point is on the gripper bodyso that the laser point is on the gripper body)
- Viewing Camera Footage from Hikvision Cameras +
- Diagnosing EtherCAT Issues - Advanced + (There are many tools available to help tra … There are many tools available to help trace EtherCAT faults. This document describes some more advanced features that can help pinpoint an intermittent or hard to find issue. You will need a good working knowledge of the machine and the basis of EtherCAT networking See Also [[TwinCat Connection Faults]][[TwinCat Connection Faults]])
- Gripper Push Speed on Flowline and ZX + (There is a cylinder called Grip push, when … There is a cylinder called Grip push, when bar is moved to its unload position the Gripper Comes OFF then Grip push is activated to push the profile of the gripper to clear ready for the Eject push onto transfer Table. The video shows what happens if the grip push is set too fast. The speed of the cylinder is Far too Fast and is Throwing/punching back down machine. -- This needs to be slowed Down. machine. -- This needs to be slowed Down.)
- Hikvision Camera Setup + (These are the Hikvision DS-2CD2343G0-I Cameras (C0001152) that will replace the obsolete UCAMs that have been used on previous machines. Connected via a multi way PoE injector (C0001238). And with SD card (C0001239).)
- Autocut Regular Maintenance + (This checklist needs to be carried out at … This checklist needs to be carried out at regular intervals, in conjunction with the daily maintenance.
gt; <td>Single Shift Full Time </td><td>Bi-Weekly </td></tr><tr> <td>Up to 50% utilisation </td><td>Monthly </td></tr></table>)Use Profile Regularity 2-3 Shifts per day Weekly Single Shift Full Time Bi-Weekly Up to 50% utilisation Monthly - Allocations + issuing received parts + (This involves splitting down received orde … This involves splitting down received orders into the JC/Pick bins the parts have been allocated to by Sage. If there are parts to be allocated, after filling in the 'this delivery' column and pressing save, if there are parts to be allocated a list will appear. this list is in order of part number and in the sub-screen after highlighting each part number the specific Job card numbers will show quantities required for each bin and also the quantity to be allocated from the order received.y to be allocated from the order received.)
- Ecoline - Setting V Notches on winMulti Software + (This is the full setup procedure for V not … This is the full setup procedure for V notches on an Ecoline. This should only be needed on initial commissioning or if the shape of the notch has changed due to some physical intervention, for example -
- Blade Change
- Blade buckled
here is no sense carrying on because you cannot complete this setup unless the machine is consistent and reliable</div> </div> <br/>) - Setting Up C0000422-KIT - Full Hardware 2023 + (This process takes the components to creat … This process takes the components to create a standard "C000422-KIT". This kit can then be stored and pulled off the shelf when required. It will then need to be set up for the particular customer machine using [[Setting Up Windows PC C0000422-KIT 2023]] =Notes= *There are two PCs running on the same hardware, The Host PC and the Virtual machine. **'''Host PC''' (For support) ***The base Windows install running directly on the hardware installed to Dell NVME drive. ***Has its own OEM Windows license supplied by Dell linked directly to the hardware (no product code – stored in the Dell hardware) ***Imaged by Macrium reflect. **'''Virtual PC – Stuga VM''' ***Used for Stuga software - the VM can run on any PC without changing drivers, etc. Host OS version / hardware unimportant as long as it runs Hyper-V. ***A second install of Windows running on a virtual machine, hosted by the Host PC above. It has a dedicated SSD (the Kingston Drive) stored on [:Fichier:///D:/VMPC.vhdx D:\VMPC.vhdx], with 8GB RAM. ***Has its own dedicated Windows 11 PRO license present in the kit, product code stored on Monday and on the license. ***Copied to host and setup manually during install. There is a setup program for the specific client after this process has completed: '''P_Stuga_P… '''on the desktop of the host.'P_Stuga_P… '''on the desktop of the host.)
- Dokit - Creating A Work Instruction + (This tutorial guides you in how to create … This tutorial guides you in how to create Work Instructions in Dokit and to avoid the pitfalls.
If the Work Instruction is already created, follow the process [[Dokit - Editing Work Instructions]]
= Warnings =
a fa-exclamation-triangle"></i></div> <div class="icon-instructions-text">...Do not publish anything inflammatory, offensive or illegal</div> </div><br/>) - Setting Up New Printer - GX420d + (This tutorial requires a basic knowledge o … This tutorial requires a basic knowledge of IP addresses - what are they and what are they forork. This is contained in the Saw Parameters - printerIPAddress. </div> </div>)
- Dokit - Editing Work Instructions + (This tutorial shows you how to edit the co … This tutorial shows you how to edit the content of a work instruction, allowing you to
*Add New Steps
*Add numbering and bullets to the text
*Add and crop Photos
*Annotate photos with arrows, numbers and text
*Change step sequence and insert steps
*Add Call-outs and warnings
*Add Links to other websites or other Dokit pages
=Warnings=
a fa-exclamation-triangle"></i></div> <div class="icon-instructions-text">...Do not publish anything inflammatory, offensive or illegal</div> </div><br/>) - Fitting Zx5 Crank Upgrade + (This upgrade replaces the crank arm assemb … This upgrade replaces the crank arm assemblies on Z065, Z066 and Z067 with a direct drive system to improve reliability
This procedure involves mechanical fitting, electrical wiring and help from a TwinCAT3 competent engineer at HQ for software changes
></div> <div class="icon-instructions-text">...Motors must be rewired for Delta and NOT Star</div> </div> <br/>) - Upgrade Autoflow to Windows 10 + (Update 2024 - Upgrades now consist of a ne … Update 2024 - Upgrades now consist of a new Windows 11 PC with VM for the front end and a C6017 PC for the back end.
Upgrading an Autoflow to Windows 10 involves upgrading two PCS
#The Beckhoff control PC - replaced with a C0001225-KIT
#The Camera PC - replaced with a C0000422-KIT with a VM setup. this now becomes the front end PC
=== For Historical reference, these are the pre-2024 notes: === ''Upgrading an Autoflow to Windows 10 on site involves upgrading two PCS'' #''The Beckhoff control PC'' #''The Camera PC'' ''
The Beckhoff PC is not upgradable so needs to be completely replaced. We use the miniature [https://www.beckhoff.com/english.asp?industrial_pc/c6017.htm Beckhoff C6017] for this'' ''It is not cost effective to upgrade and old camera PC, so a new one is supplied'' ===''Notes''=== *''The Beckhoff PC is now powerful enough to run the front end and back end.'' *''The camera PC is there to replace the camera PC on site and contains the storage for the machine cameras'' *''Because the Beckhoff PC has limited hard drive space, the DDRIVE will be on the cameraPC''hard drive space, the DDRIVE will be on the cameraPC'') - Filling Out An Online Daily Timesheet Form + (We are using Monday.com to handle daily ti … We are using Monday.com to handle daily timesheet entries. The layout of the form has been designed to make data input as minimal as possible. We are looking to improve accuracy of time capture, cut down administration time and to make historical data available without the need to store paperwork or take pictures. You will only be able to view and edit your timesheet when logged into your Monday.com account. Other employees are unable to see your data.her employees are unable to see your data.)
- Removing TwinCAT3 Interpolation Licence + (Wen creating a new project on conversion f … Wen creating a new project on conversion from a TwinCAT2 to TwinCAT3 system, there may be a reference to a an unrequired NCi licence (interpolation)
variable speeds to create a shape, like a diagonal line or circle</div> </div><br/>) - WinDelay for Twincat Startup + (When Windows Boots up and WinMulti is star … When Windows Boots up and WinMulti is started the TwinCat PLC is not in Run mode ready for the application. The Run mode of Twin cat normally takes between 70 to 90 seconds.
WinStartDelay is a piece of software which delays Winmulti Starting up until the Amount of Time Delay needed has been run.
of Time Delay needed has been run. <br/>) - Ecoline - Datum and MitreOffset Tests + (When an Ecoline is commissioned, the posit … When an Ecoline is commissioned, the positional accuracy needs to be set up.
These are also useful tests to check if the machine is maintaining positional accuracy
tent, repeatable results before making any parameter changes</div> </div><br/>) - PLC Source Control - Git Credential Manager for Windows Install + (When connecting to the tc3Multi repository … When connecting to the tc3Multi repository on BitBucket.org, some times the validation credentials are not accepted. Check that the password you have is correct, if the problem persists , install or update Git Credential manager for windows to the latest version.manager for windows to the latest version.)

 Français
 English
 Deutsch
 Español
 Italiano
 Português