Cette page fournit une simple interface de navigation pour trouver des entités décrites par une propriété et une valeur nommée. D’autres interfaces de recherche disponibles comprennent la page recherche de propriété, et le constructeur de requêtes ask.
Liste de résultats
- Changing the Flowline Ops Password + (A password can be set up within FlowlineOps that limits access to the Edit Machining and Edit Profiles buttons, This tutorial will explain how to setup or change this password.)
- Upgrading Autoflow TwinCAT2 to Win10 and TwinCAT3 + (<div class="annotatedImageDiv" typeof=" … Autoflows from A2001 to A2015 were initially produced with TwinCAT2 software. This has now been superseded with TwinCAT3 which then has the benefit of compatibility with version 6 front end software.
The original PC cannot be used because
*It is not powerful enough to run v6 front end
*The operating system cannot be upgraded to Windows 10
*It cannot be upgraded to TwinCAT3
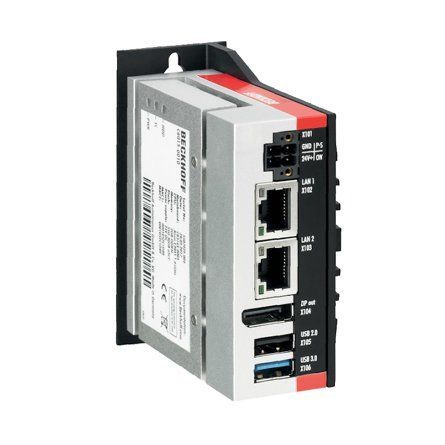
The Beckhoff C6015 PC has been chosen to be the replacement PC. It is compact, yet powerful enough to run the v6 front end and TwinCAT in the same
. It has an upgrade to 1.9Ghz 4 core processor.
Because it has a limited 40Gb SSD memory, a compact 64Gb memory stick is inserted into the USB 3.0 port. This acts as a separate drive for the DDRIVE dynamic storage for all machine setup. The internat drive is for the Operating System only. This mimics the current Autoflow setup of a remote Camera PC, hence the camera PC can be retired after the upgrade
era PC, hence the camera PC can be retired after the upgrade<br/>) - R0000712E Rotary Trunking + ('''<u>Tools Required</u>''' … '''Tools Required''' Standard set Hex keys Standard socket set Countersink bit and drill Copper/hide hammer Standard hss drill set '''Parts Required''' D0006210 pre assembled energy chain D0003929 Access panel D0003930 Circular guide D0003985 Upper circular guard D0007817 Circular guard D0001171 plug bracket P0001023 6mm y adapter x 9 P0000401 non return valveug bracket P0001023 6mm y adapter x 9 P0000401 non return valve)
- R0000712F Rotary Trunking + ('''<u>Tools Required</u>'''
S … '''Tools Required'''
Standard set Hex keys
Standard socket set
Countersink bit and drill
Copper/hide hammer
Standard hss drill set
Hack saw
File
'''Parts Required'''
D0006210 pre assembled energy chain
D0003929 Access panel
D0003930 Circular guide
D0003985 Upper circular guard
D0007817 Circular guard
D0001171 plug bracket
cular guard D0007817 Circular guard D0001171 plug bracket <br/>) - Laser Setup on Flowline/ZX3 for Laser Holes + ('''How to Setup .'''
This will Cover the … '''How to Setup .'''
This will Cover the Basic Alignment of the receiver and Sender setup.
Focusing the Laser and Setting up the Receiver Sensitivity.
Always Make sure Laser Sender and Receiver are clean and both lenses have been wiped with a soft cloth first.
en wiped with a soft cloth first. <br/>) - TB0426 Replacement Zebra Printer Setup + (<div class="icon-instructions caution-i … [https://stuga.dokit.app/wiki/TB0452_ZD620_Zebra_Printer_Setup ZD620 Instructions]iv> [https://stuga.dokit.app/wiki/TB0452_ZD620_Zebra_Printer_Setup ZD620 Instructions])
- OBSOLETE Installing SourceTree Version Control Software + (<div class="icon-instructions caution-i … Use this [https://stuga.dokit.app/wiki/Changing_Version_Control_to_Visual_Studio link] From Jan 2020, Sourcetree will be increasingly used to properly maintain changes to the Stuga source code. Each machine with TwinCAT3 will need the Sourcetree program installed, and a change to where and how the source code is stored This tutorial deals with installing the Sourcetree program from Atlassian code is stored This tutorial deals with installing the Sourcetree program from Atlassian)
- Monday - Getting Started For Engineers + (==Why Change?==
*mHelpdesk limitations
** … ==Why Change?==
*mHelpdesk limitations
**Cludgy to use
**Slow response
**Cannot connect to other apps or emails
*Monday advantages
**Easier and more elegant to use
**More configurable
**easy to email into
**Better searching
**Expandable to whole business
**Cheaper
==Similarities to mHELPDESK==
*Monday consists of a set of user definable “Boards” that contain a list of “Pulses”.
*The “pulses” can be configured however we like.
*I have created a “Board” called “Service Jobs”
*On the Service Jobs Board, I have designed the “Pulses” to mimic the service jobs, so this will include the machine, the status, the type classification, etc
*Any pulse has associated “Updates”. These are just like the “items” on an mHelpDesk job, but is much more flexible than the plain text of mHelpdesk
*The service team will assign jobs as before
*The job should be updated by yourself during your visit
*The database of jobs is searchable so you can find the machine history
so you can find the machine history <br/>) - Changing the Flowline Ops Password +
- Saje uPVC Unloading Process + (Access for machinery is limited at the Saj … Access for machinery is limited at the Saje factory.
The machine will be delivered in the following modules, that should be unloaded from the lorry in this order
#Electrical Cabinet
#Machining centre base module (1.8 x 2.2m)
#Infeed module (2.4 x 9.0m)
x 2.2m) #Infeed module (2.4 x 9.0m) <br/>) - Correcting Linearity with Rack Offset File + (Accuracy problem on A2001 was traced to a … Accuracy problem on A2001 was traced to a non-linear rack. This tutorial demonstrates how to test the linearity of a rack and the systems in place to correct the linearity. machine in the 20 year history that has needed these alterations</div> </div>)
- VM Upgrade Software + (As an alternative to having a separate camera PC. Adding a VM (Virtual Machine) to the Front end allows access to the BE and cameras without interrupting the operator.)
- Commissioning - Z-Block Calibration + (Commonly used during sawing on Z transoms, … Commonly used during sawing on Z transoms, the Z block operation is used to fasten the profile, making sure it does not move during sawing. There are 6 possible states the z block can be in. Each of these can have a different length of protrusion for different profiles. 12 x M8 Screws 12 x M8 Nuts 12 x wire numbers 1 - 6ws 12 x M8 Nuts 12 x wire numbers 1 - 6)
- R0000711 Rotary Base Assembly REV2 + (Detailed steps to correctly install rotary … Detailed steps to correctly install rotary gear and journals Checks for correct installation of oil feed system Tolerance limits and requirements '''Tools Required''' Standard hex key set 0-25mm micrometer Ring support blocks for assembly Work Table Mag Base and D.T.I Hepco flat spanner 17mm socket Torque Wrench '''Parts required''' D0006423-2mod Drive ring x 1 D0007651 Face plate x 1 B0000185 journal x 6 B0000186journal x 2 D0006503 Journal washer x 8 D00007692 wiper x 4 D0006521 x2 D0007693 x 2 D0007713 rotary ring cap x 1iper x 4 D0006521 x2 D0007693 x 2 D0007713 rotary ring cap x 1)
- Placing a TwinCAT3 Machine Under Source Control + (<div class="icon-instructions caution-i … Click [https://stuga.dokit.app/wiki/Changing_Version_Control_to_Visual_Studio here] for the latest procedure For many years, the source code for the PLCs has resided on the G:\drive and then a copy on each and every one of the PCs used to edit the code, so at least one on each machine. This is a recipe for disaster because maintaining all the copies and version numbers is incredibly difficult and adds a lot of time overhead to fixes and changes. This has worked because there has been only one developer, but this is set to change in future as more programmers will be trained and tracking versions becomes more difficult From 2020, the PLC code version control has been improved by using an industry standard source control system called "Git" along with "BitBucket" to store the PLC code in the cloud. The program "SourceTree" is used to commit, push and pull the changes [https://www.atlassian.com/git/tutorials/what-is-version-control Click here] for an introduction to version control using Git This tutorial is a step by step guide to setting up an existing machine or diagnostic PC to a standard uses on all Stuga machines to enable quick, easy and stress free version control.standard uses on all Stuga machines to enable quick, easy and stress free version control.)
- Installation Procedure - Autoflow Mk4 + (General Procedure is * Prepare Area * Unload from Transport * Locate and level infeed table * Locate, level and align machining module * Locate, level and align outfeed table * Fix to floor * Locate waste conveyor system * Guard fencing assembly)
- TEST JAMIE B + (How To Change A Nappy......Without Further A-Poo Lets Skid Right In)
- Full Version Upgrade TwinCAT3 WinMulti + (If a PC fails on a machine in the field an … If a PC fails on a machine in the field and the hard drive data cannot be recovered, it is necessary to replace the PC. This may create a version conflict, as the new PC will have later versions of twinCAT installed than the original
This tutorial outlines the steps required to bring all the machine systems up to the latest level to ensure compatibility
ions-text">...This is a one-way process that cannot be reversed</div> </div><br/>) - Ecoline - Disabling V axis To Swap Faulty Drive + (If a drive fails on an Ecoline, the V axis … If a drive fails on an Ecoline, the V axis can be utilised to enable the Ecoline to still run as a machining centre, albeit with V notching now disabled. This is a better situation than no machining at all, as all factories have V notching capability in addition to an Ecolineching capability in addition to an Ecoline)
- Disabling a Tool Home or Tool Out Sensor + (If there is a failure of a tool out or too … If there is a failure of a tool out or tool home sensor on the Stuga spindle ring, it is important to be able to quickly disable the input so the machine can continue production until the problem can be properly resolved. The software has an inbuilt functionality to do this - this tutorial takes you through the necessary stepsrial takes you through the necessary steps)
- Create a TwinCAT Project from Existing Project + (If you are confident and proficient in usi … If you are confident and proficient in using the Visual Studio editor to create TwinCAT projects, you can shortcut a lot of the data inputting by copying and modifying an existing project. This will keep the naming conventions and links exactly the same
ne has exactly the same EtherCAT box, drive and module setup</div> </div><br/>) - Changing Version Control to Visual Studio + (In March 2022 the password policy of the s … In March 2022 the password policy of the system behind SourceTree / Bitbucket and Atlassian changed - [https://community.atlassian.com/t5/Bitbucket-articles/Announcement-Bitbucket-Cloud-account-password-usage-for-Git-over/ba-p/1948231 link]. This meant all machine would need a complex password login change for the SourceTree program used for version control of the PLC code. This was not straight-forward to resolve, so the decision was made to change the version control system to the one that is packaged with the Visual Studio system by default. This is a better method anyway, but it needs the "TcXaeShell" installed. Visual Studio that includes Source control, rebadged for TwinCAT3</div> </div>)
- Stuertz Infeed - Check GY Position Parallelism + (It is important that the parallelism of th … It is important that the parallelism of the GY axis to the backfence is set and maintained along the length of the rack. This tutorial describes how to check this parallelism without the need for measuring equipment
'''General Procedure'''
#Find range of adjustment required
#Zero GY axis to ensure range adjustment can be met
#Move to straight edge resting points, Adjust rollers at these points
#Use straight edge between resting points to adjust the other rollers to a fixed datum
'''Potential Symptoms of a problem'''
*Gripper cannot pick up offcuts
*Gripper /profile end forced away from backfence
*Accuracy problems
*Gripper wobbles after it has released profile
Use the laptop to enable you to control the Service screen whilst inside the infeed table
The gripper setting jig is used to give an accurate and reliable zero to locate the gripper jaw to. Any piece of aluminium reinforcing box section will also work
the gripper jaw to. Any piece of aluminium reinforcing box section will also work <br/>) - IP Camera Viewer exe Setup + (It is useful to be able to see a quick vie … It is useful to be able to see a quick view of all cameras on a machine at once. A freeware program is available to do this IP Camera Viewer.exe
Ensure you have the IP address of the cameras to hand, and that the cameras are active and setup to [[Hikvision Camera Setup]].
The cameras should have a fixed IP address
ras should have a fixed IP address <br/>) - TB0447 ZX5 Setup - X Axis Beam Calibration + (Moved to Confluence 17/12/2025 [https://stuga-ltd.atlassian.net/wiki/spaces/~5570585b7bb5d1bc31430e886883cbc774c182/pages/89423875/TB0447+ZX5+Setup+-+X+Axis+Beam+Calibration ZX5 Setup - X Axis Beam Calibration] <br/>)
- Updating Teamviewer Host + (Older versions of Teamviewer are being pha … Older versions of Teamviewer are being phased out by the Teamviewer company from September 15th 2021. The advice on the website suggests you need to upgrade to version 15. However, v15 is not compatible with the older Windows XP machines in the field. The latest XP compatible downloadable version of the Host program is 13.2 and is available [https://download.teamviewer.com/download/version_13x/TeamViewer_Host_Setup.exe here] Regrettably, the update process on older versions is not simple, and frustratingly cannot be done remotely. It needs intervention from an operator at the machine with a small amount of technical know-how with a small amount of technical know-how)
- StuertzCloud - Creating Local SQL Database + (See [[StuertzCloud - Setup Overview]] … See [[StuertzCloud - Setup Overview]] for an overview of the setup.
This tutorial covers the setup of the Local SQL Express database instance and creating a "ProOpt" database structure on it.
*This database installed on the 'Location' local network. *The 'Machines' write their production data to it *The 'Gateway' software uploads this data to the StuertzCloud server See Also [https://stuga.dokit.app/wiki/StuertzCloud_-_Installing_Gateway StuertzCloud - Installing Gateway] [https://stuga.dokit.app/wiki/StuertzCloud_-_Setting_up_Stuga_Machine_to_Write_Production_Data StuertzCloud - Setting up Stuga Machine to Write Production Data] [https://stuga.dokit.app/wiki/StuertzCloud_-_Creating_a_Customer_Location StuertzCloud - Creating a Customer Location]
SQL Server Management Studio (SSMS) installed to manage the databases</div> </div> <br/>) - ACEpc Changing IP address using netedit + (The ACEpcs use two different systems for c … The ACEpcs use two different systems for connecting a network #NETBeui - this was used on earlier machines but reliability depends on the customer network setup. Reconfiguration after initial setup is difficult #IP addressing - A setup system was written using IP addresses to connect. This is a little harder to set up, but is easier to change later. A special program called netedit was written which updates all the correct files in the backgroundes all the correct files in the background)
- Decommissioning - Autoflow Mk4 1 + (The Autoflow Mk4.1 machine has been design … The Autoflow Mk4.1 machine has been designed to separate into modules for safe transport
The '''infeed table''' gripper carriage and conveyor split into two sections
The '''machining head''' and '''saw''' split apart like a cam shell. They are joined with a dowel system in joining blocks at the base
The '''outfeed''' splits in to a rear bed and front tray
See Also [[Safe Moving of Top Heavy Machine Modules]]
[[Safe Moving of Top Heavy Machine Modules]]<br/>) - Convert TC2 Project to TC3 + (The Beckhoff system provides a system for upgrading to TC3 from a TC2 project. This tutorial goes through the steps required to ensure the links and setup of the original TC2 project are copied through to TC3.)
- Beckhoff AX8000 Flowline Upgrade + (The Flowline range (Mk3, ZX3, ZX4) are Stu … The Flowline range (Mk3, ZX3, ZX4) are Stuga built and designed machines for prepping and cutting uPVC windows and doors. The Flowline is the first machine of the Stuga 'U' shaped machines which has prepping and cutting working in the same machine package. The Flowline is still a fantastic machine for the industry, however, due to the age of the machines and older control systems becoming obsolescent, we have had to find an upgrade route that does not only keep the machine going, but also provides improvements from the original model and up-to-date technology to future proof the machine. The upgrade that we have developed for the Flowline is supplied from an automation supplier named Beckhoff. We also use Beckhoff on our new build machines. This gives us better lead times, more understanding of the products and better diagnostics/ support for our customers. The drive system that we use is called the AX8000 series. These drives are a compact multi axis servo system that use an EtherCAT interface and STO safety functions. These servo drives, coupled with Beckhoff AM8*** series OCT servo motors provide quicker installations and all round performance increases from any system we have previously used. To drive all of the new system, we are using a Beckhoff IPC controller that runs TwinCAT 3. This links into the system via EtherCAT. All of the machine can now link together via EtherCAT to provide quick and stable communications. This tutorial will give you step by step guides on the physical upgrade requirements needed when upgrading a Flowline Mk3 to a Flowline Mk3 with Beckhoff AX8000 Control. Each step will provide you with written information and pictures to guide you through the upgrade. Each step will contain necessary information which will also provide you with rationale for the design and an idea of the benefits over using different methods. Please always feel free to provide Stuga with any feedback on this document or its contents.feedback on this document or its contents.)
- GE Control Components Changeover + (The GE control components are now obsolete … The GE control components are now obsolete and we have had to find a new manufacture to use. We have decided to go with Eaton control equipment for this. We are using the same supplier for these products and we have the added benefit if the supplier holding these parts in there stores. We had a choice to use either ABB, Eaton or Schneider components. Although all of the individual Eaton components are a direct replacement for the GE components, there are certain situation that we may be tripped up. This includes times when we need to change a motor breaker that has an auxiliary block connected to it. We can change the breaker but the GE auxiliary block will not fit on the new Eaton one. This means that the Eaton components need to have different part numbers to the GE components. This document will layout the new part numbers and what they relate to and instructions on how they are added and changed in the Sage system. are added and changed in the Sage system.)
- PC Recovery Process + (The PCs are now shipped with a memory stick that includes a full recovery image. If the system fails in future, this allows a full recovery of the initial setup of the entire drive. Mouse and Keyboard are required for recovery process.)
- TB0422 Commissioning ZX5 Software 2018 + (The first step in commissioning a new mach … The first step in commissioning a new machine is to get the basic software setup correctly installed. Because the software is designed to be very flexible across many machine types, the simplest way to do this is to copy from a recently built similar machine.opy from a recently built similar machine.)
- VM Upgrade Hardware + (The upgrade is to prep the machine ready for adding a Virtual Mahine (VM) to the setup.)
- Units of Measure modification CIM50 + (This guide is to show how to amend units o … This guide is to show how to amend units of measure of existing stock items. If a new product is created please ensure the Units of measure is always set up correctly from the beginning . The CIM50 guide for Units of Measure setup is [https://cimservices.sharepoint.com/:w:/s/Cim50PartnerMarketing/EZhA_HF6SFJLmkVO5WANYXIBZdMx4hbVnuY3cdIF78p7lg?rtime=FcNQz7GE2Ug here]4hbVnuY3cdIF78p7lg?rtime=FcNQz7GE2Ug here])
- Ecoline - Setting V Notches on winMulti Software + (This is the full setup procedure for V not … This is the full setup procedure for V notches on an Ecoline. This should only be needed on initial commissioning or if the shape of the notch has changed due to some physical intervention, for example -
- Blade Change
- Blade buckled
here is no sense carrying on because you cannot complete this setup unless the machine is consistent and reliable</div> </div> <br/>) - Importing Picking List from Sage To Monday + (This procedure demonstrates how to use the … This procedure demonstrates how to use the "Sage Hooks" MS Access database to grab the data created in Sage and exort to a spreadsheet. The spreadsheet is then imported into a new Monday board, then copied across to the correct Picking List for the machine build.
Picking List for the machine build. <br/>) - Flowline 6 to 6o5m Extension + (This procedure describes how to upgrade a … This procedure describes how to upgrade a flowline to increase the standard capacity from 6.0m to 6.5m. The procedure involves extending the machining centre outfeed travel and saw infeed travel base to 6.0m to cope with a longer rail on each side. These are generally supplied as a new part. It is also 2 People 3 days. Requires the 4 x G clamps Other ancillary parts that will need extending *Cables *Energy Chainsill need extending *Cables *Energy Chains)
- Setting Up C0000422-KIT - Full Hardware 2023 + (This process takes the components to creat … This process takes the components to create a standard "C000422-KIT". This kit can then be stored and pulled off the shelf when required. It will then need to be set up for the particular customer machine using [[Setting Up Windows PC C0000422-KIT 2023]] =Notes= *There are two PCs running on the same hardware, The Host PC and the Virtual machine. **'''Host PC''' (For support) ***The base Windows install running directly on the hardware installed to Dell NVME drive. ***Has its own OEM Windows license supplied by Dell linked directly to the hardware (no product code – stored in the Dell hardware) ***Imaged by Macrium reflect. **'''Virtual PC – Stuga VM''' ***Used for Stuga software - the VM can run on any PC without changing drivers, etc. Host OS version / hardware unimportant as long as it runs Hyper-V. ***A second install of Windows running on a virtual machine, hosted by the Host PC above. It has a dedicated SSD (the Kingston Drive) stored on [:Fichier:///D:/VMPC.vhdx D:\VMPC.vhdx], with 8GB RAM. ***Has its own dedicated Windows 11 PRO license present in the kit, product code stored on Monday and on the license. ***Copied to host and setup manually during install. There is a setup program for the specific client after this process has completed: '''P_Stuga_P… '''on the desktop of the host.'P_Stuga_P… '''on the desktop of the host.)
- A2001 - Light Curtain Timer + (This step by step guide will explain how to wire a timer relay into the light curtain and estop circuit on the A2001 Autoflow.)
- Dokit - Creating A Work Instruction + (This tutorial guides you in how to create … This tutorial guides you in how to create Work Instructions in Dokit and to avoid the pitfalls.
If the Work Instruction is already created, follow the process [[Dokit - Editing Work Instructions]]
= Warnings =
a fa-exclamation-triangle"></i></div> <div class="icon-instructions-text">...Do not publish anything inflammatory, offensive or illegal</div> </div><br/>) - Setting Up New Printer - GX420d + (This tutorial requires a basic knowledge o … This tutorial requires a basic knowledge of IP addresses - what are they and what are they forork. This is contained in the Saw Parameters - printerIPAddress. </div> </div>)
- Dokit - Editing Work Instructions + (This tutorial shows you how to edit the co … This tutorial shows you how to edit the content of a work instruction, allowing you to
*Add New Steps
*Add numbering and bullets to the text
*Add and crop Photos
*Annotate photos with arrows, numbers and text
*Change step sequence and insert steps
*Add Call-outs and warnings
*Add Links to other websites or other Dokit pages
=Warnings=
a fa-exclamation-triangle"></i></div> <div class="icon-instructions-text">...Do not publish anything inflammatory, offensive or illegal</div> </div><br/>) - Safety Circuit Principles + (Moved to Confluence 13/12/2025 [https://stuga-ltd.atlassian.net/wiki/spaces/~5570585b7bb5d1bc31430e886883cbc774c182/pages/86442039/Safety+Circuit+Principles Safety Circuit Principles])
- ZX5 Transfer Table Crank set up + (15/12/2025 Moved to Confluence Click [https://stuga-ltd.atlassian.net/wiki/external/OTE4MTgyN2RlYjQ2NGRlYTgyZjRhMDc5ZmIyY2MyMTg here])
- Filling Out An Online Daily Timesheet Form + (We are using Monday.com to handle daily ti … We are using Monday.com to handle daily timesheet entries. The layout of the form has been designed to make data input as minimal as possible. We are looking to improve accuracy of time capture, cut down administration time and to make historical data available without the need to store paperwork or take pictures. You will only be able to view and edit your timesheet when logged into your Monday.com account. Other employees are unable to see your data.her employees are unable to see your data.)
- Autocut Cutting Tall Profiles + (What to do when cutting tall profiles; such as VS outerframe and patio outerframe)
- PLC Source Control - Git Credential Manager for Windows Install + (When connecting to the tc3Multi repository … When connecting to the tc3Multi repository on BitBucket.org, some times the validation credentials are not accepted. Check that the password you have is correct, if the problem persists , install or update Git Credential manager for windows to the latest version.manager for windows to the latest version.)
- Upgrade Flowline Opto Sensors to Ultrasonic + (With the development of full colour ranges for profiles, the older flowline opto sensors often have trouble "seeing" the darker profiles. An upgrade kit is available (R0019014) to replace the optical sensors with an ultrasonic version <br/>)
- Easily resizable forms for any screen resolution in Visual Studio + (if you have issues with certain screen resolutions cropping off buttons and need to design a form which works at all resolutions, and also allows the user to resize parts of the form, then this tutorial will help.)

 Français
 English
 Deutsch
 Español
 Italiano
 Português