This tutorial takes the developer through a way to create resizable forms in Visual Studio with NO CODING Required.

Difficulté
Facile
Durée
10 minute(s)
Sommaire
- 1 Introduction
- 2 Étape 1 - Create a new project
- 3 Étape 2 - Project Type
- 4 Étape 3 - Project Name
- 5 Étape 4 - Create the First Panel
- 6 Étape 5 - Dock the Panel
- 7 Étape 6 - Add a sub-panel
- 8 Étape 7 - Create a Header
- 9 Étape 8 - Create A Right Panel with a Splitter
- 10 Étape 9 - Fill the Rest
- 11 Étape 10 - Run The Project
- 12 Commentaires
Introduction
if you have issues with certain screen resolutions cropping off buttons and need to design a form which works at all resolutions, and also allows the user to resize parts of the form, then this tutorial will help.
Étape 1 - Create a new project
On the start screen in Visual Studio, click on the "Create a New Project" button.

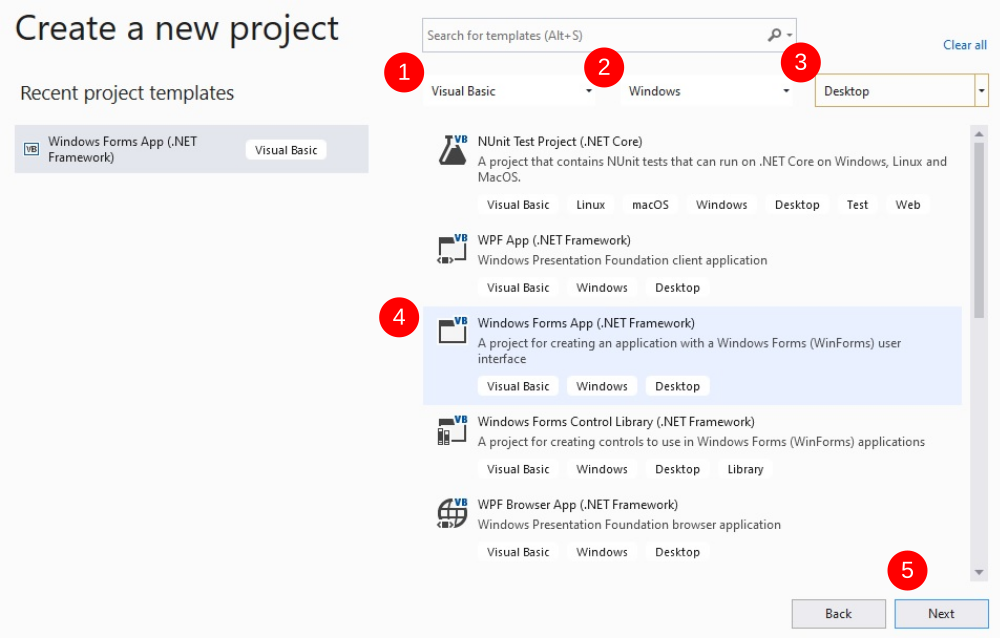
Étape 2 - Project Type
From the next screen
- 1. Select Visual Basic from the First Drop Down
- 2. Select Windows from the Second Drop Down
- 3. Select Desktop from the Third Drop Down
- 4. Click on the Windows forms app to Highlight it
- 5. Click Next
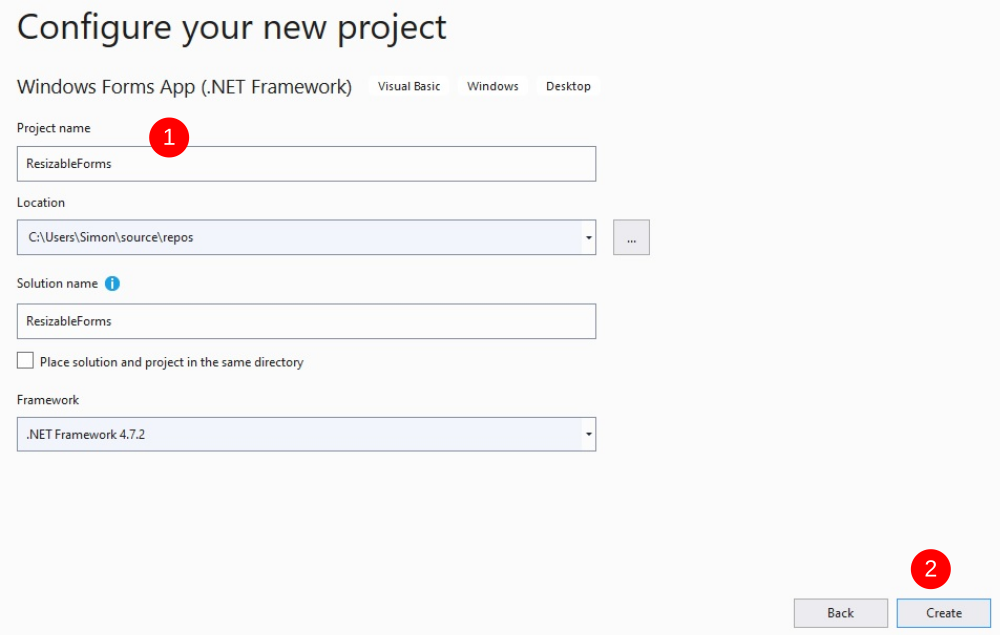
Étape 3 - Project Name
Give your project a name, then click on Create
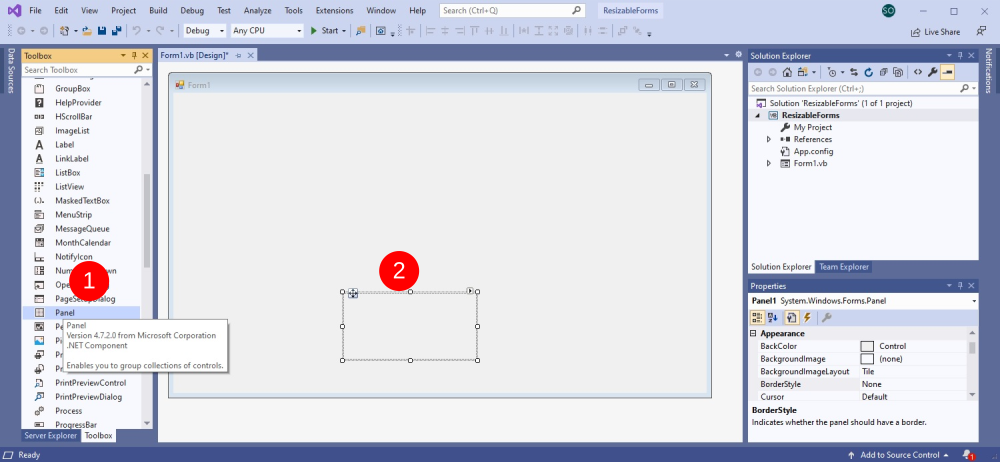
Étape 4 - Create the First Panel
Add your first panel to the page by clicking on the panel option in the toolbox area, then clicking anywhere on the form.
Étape 5 - Dock the Panel
Within the Layout section of the panel 1 properties, select Dock Bottom as in picture 1, your screen should look like picture 2


Étape 6 - Add a sub-panel
Add a new panel inside the existing panel by clicking on panel in the toolbox and clicking anywhere within panel 1, this will create panel 2, in its format properties, dock this to the right. then add a button into panel 2.
Your screen should be similar to the picture shown.

Étape 7 - Create a Header
Add a panel in the main portion of the form, and dock it to the top, Insert a label into this panel (panel 3) and set properties as follows
Dock: Fill, (the centre box)
AutoSize: False
Text Align: Middle Centre
Border Style: Fixed Single
you should see your form as the picture

Étape 8 - Create A Right Panel with a Splitter
create another panel in the area between the header and footer, dock it to the right. Note that because this panel was placed after the header and footer panels, it only fills the area between them. Being to Front and Send to back will amend this.
To the left of this, add a splitter, then dock that to the right as well
Add a label into the right hand panel

Étape 9 - Fill the Rest
Add a label to the left of the splitter and set the properties as follows
AutoSize: False
Text Align: Middle Centre
Border Style: Fixed Single
Back Colour: Control Dark
Dock: Fill

Étape 10 - Run The Project
Compile and run the project by clicking on the start button
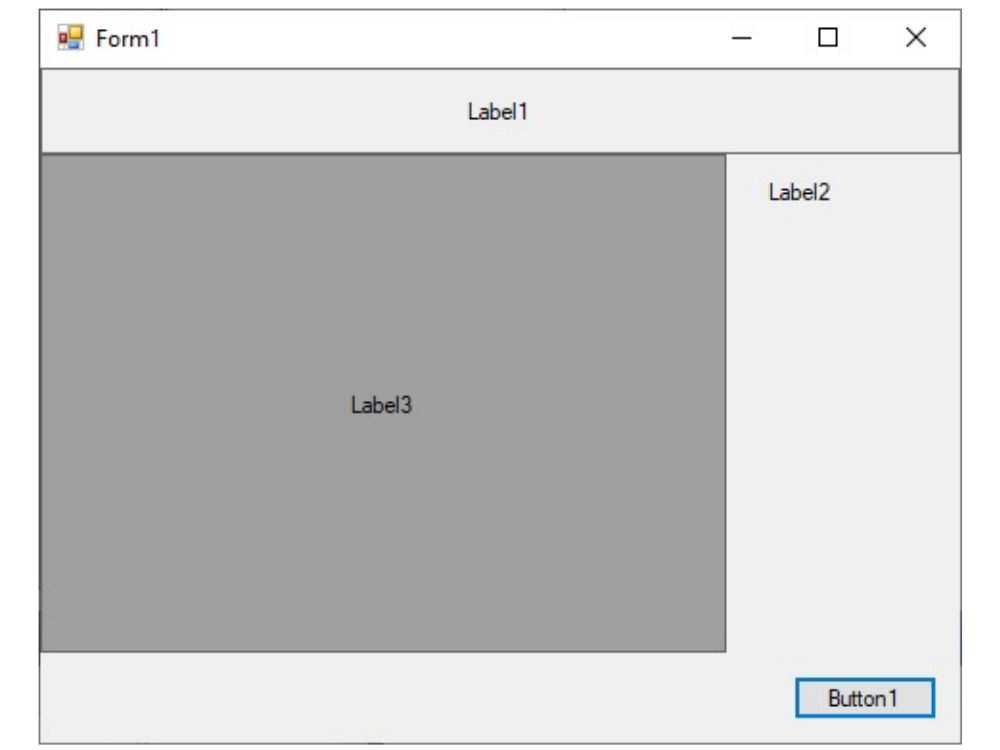
resize the running form, note how the button stays in the bottom corner and everything resizes and centralizes to suit the form
position your mouse on the line between the right panel and label 2, click the left mouse button and you will see the icon change to a splitter icon, you can resize the right hand panel in the running program by dragging the mouse from left to right while holding the left mouse button.
Was'nt that Easy?

Draft
 Français
 English
 Deutsch
 Español
 Italiano
 Português