Cette page fournit une simple interface de navigation pour trouver des entités décrites par une propriété et une valeur nommée. D’autres interfaces de recherche disponibles comprennent la page recherche de propriété, et le constructeur de requêtes ask.
Liste de résultats
- J0001000H Autoflow Mk4 Mechanical installation-Alignment + (Information to clarify correct process for installation of J0001000H Autoflow Mk4 Levelling tolerance of 0.004" /0.1mm over 300mm (1 division on engineers level) must be adhered to)
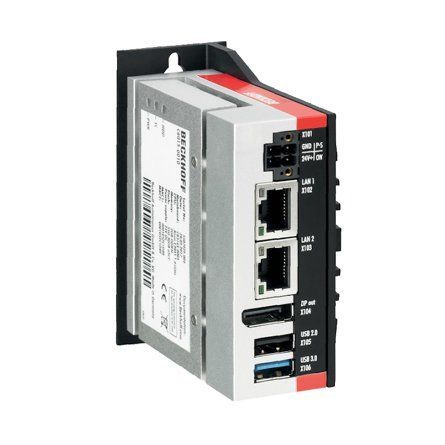
- Upgrading Autoflow TwinCAT2 to Win10 and TwinCAT3 + (<div class="annotatedImageDiv" typeof=" … Autoflows from A2001 to A2015 were initially produced with TwinCAT2 software. This has now been superseded with TwinCAT3 which then has the benefit of compatibility with version 6 front end software.
The original PC cannot be used because
*It is not powerful enough to run v6 front end
*The operating system cannot be upgraded to Windows 10
*It cannot be upgraded to TwinCAT3
The Beckhoff C6015 PC has been chosen to be the replacement PC. It is compact, yet powerful enough to run the v6 front end and TwinCAT in the same
. It has an upgrade to 1.9Ghz 4 core processor.
Because it has a limited 40Gb SSD memory, a compact 64Gb memory stick is inserted into the USB 3.0 port. This acts as a separate drive for the DDRIVE dynamic storage for all machine setup. The internat drive is for the Operating System only. This mimics the current Autoflow setup of a remote Camera PC, hence the camera PC can be retired after the upgrade
era PC, hence the camera PC can be retired after the upgrade<br/>) - Stuertz Infeed - Freeing Roller under Gripper Arm + ('''Applies to: A2026-A2030 Autoflow Mk4 wi … '''Applies to: A2026-A2030 Autoflow Mk4 with Jetta Locking motors'''
In certain circumstances, the forward clamp roller arm has stuck itself under the gripper arm. Freeing from this situation requires a set process because the GZ axis motor is braked and probably in an overload condition
nfident in using TwinCAT on the VM machine to navigate to settings</div> </div><br/>) - OBSOLETE Installing SourceTree Version Control Software + (<div class="icon-instructions caution-i … Use this [https://stuga.dokit.app/wiki/Changing_Version_Control_to_Visual_Studio link] From Jan 2020, Sourcetree will be increasingly used to properly maintain changes to the Stuga source code. Each machine with TwinCAT3 will need the Sourcetree program installed, and a change to where and how the source code is stored This tutorial deals with installing the Sourcetree program from Atlassian code is stored This tutorial deals with installing the Sourcetree program from Atlassian)
- OBSOLETE DM - Updating Resources + (<div class="icon-instructions caution-i …
All information provided to the service engineers on Device Magic can all be linked to a single Excel document. This document provides all customer names, machine numbers, emails and employee information. Linking this document with Device Magic provides fields that make it easier for engineers to fill out the form.
used internally at Stuga and not be sent to engineers or customers in coordination with Data Protection standards.</div> </div><br/>) - R0015338 Bench Assemble Serial Plate + (<u>'''Tools Required'''</u> Serial plate stamping jig Large Alphabetic and Numerical stamps Correct machine build data <u>'''Parts Required'''</u> D0000086B Universal Serial Number Plate (UKCA) x 1 <br/>)
- TB0444 Renewing CF Card on TwinCAT2 Systems + (<u>Problem</u> These machines … Problem These machines use a CX5020 PC with a 2Gb CF card running TwinCAT2 PLC system. The CF card can fail, which is effectively the windows operating system. The CF card has a very small capacity, so needs to be created from an image. This TB outlines the steps in the process to ensure a successful conclusion. 1. Create a new CF card at stuga using the beckhoff imaging tool on a CX5020 2. Boot up with the CX5020 3. Ensure PLC is set to Enable on start-up (default is config mode) 4. Rename the PC 5. Install TeamViewer host v10 or less from a USB stick 6. If you have a copy of the version of winMulti it was running, copy this in to the c:\ multi folder. If not, a “'''''new version install'''''” will be needed so copy in data from the g:\builds\PC Installs\Autoflow\Multi folder 7. Set up and customer specific network parameters to ensure TeamViewer will work when it is plugged in on site 8. Send to customer Once on site, follow procedure A if the winMulti version is preserved, or B if it is a '''''new version install'''''eserved, or B if it is a '''''new version install''''')
- ZX4 Infeed Roller Reinforcement + (A plate has been designed to strengthen the installation of the first roller.)
- Correcting Linearity with Rack Offset File + (Accuracy problem on A2001 was traced to a … Accuracy problem on A2001 was traced to a non-linear rack. This tutorial demonstrates how to test the linearity of a rack and the systems in place to correct the linearity. machine in the 20 year history that has needed these alterations</div> </div>)
- ZX5 Production R0015040 Module F to R0015001B Module E alignment + (Alignment criteria and steps for correct machine installation)
- ZX5 Production R0015139 Module B to R0015000B Module C alignment + (Alignment details and level settings for correct alignment of module B to module C)
- Monday - Obtaining Customer or Machine Address from a Job + (All machines in the Monday database have their locations stored to make it easy for an engineer to navigate to site using the map features in Android or Apple phones However, it is not intuitively clear how to get to this information)
- R0000728 R0000729 Stroke Assembly Dismantling + (Assemblies fitted to MK1 ZX4 will require … Assemblies fitted to MK1 ZX4 will require refurbishment at some point of life cycle.
The following instructions should be followed to ensure that correct assembly and setting are performed
'''Tools Required'''
Standard hex key set
Standard spanner set
Double pin saw flange spanner
Drifts and punches
Ballpein hammer
Soft hammer
Degreasing bath
pein hammer Soft hammer Degreasing bath <br/>) - Saw machining centre alignment and level check points + (Bullet pointed checks to determine correct alignment of key components within Sawing unit)
- ZX5 Installation Procedure 2023 Pneumatic connections + (Connection details for pneumatics on installation)
- R0000711 Rotary Base Assembly REV2 + (Detailed steps to correctly install rotary … Detailed steps to correctly install rotary gear and journals Checks for correct installation of oil feed system Tolerance limits and requirements '''Tools Required''' Standard hex key set 0-25mm micrometer Ring support blocks for assembly Work Table Mag Base and D.T.I Hepco flat spanner 17mm socket Torque Wrench '''Parts required''' D0006423-2mod Drive ring x 1 D0007651 Face plate x 1 B0000185 journal x 6 B0000186journal x 2 D0006503 Journal washer x 8 D00007692 wiper x 4 D0006521 x2 D0007693 x 2 D0007713 rotary ring cap x 1iper x 4 D0006521 x2 D0007693 x 2 D0007713 rotary ring cap x 1)
- ZX5 Production R0015122 Module A to R0015139 Module B alignment + (Details and steps for correct alignment of Module A to Module B '''<u>Tools Required</u>''' Laser Level 300mm rule 1 meter yellow level 24mm spanner Permanent marker Pipe cutters Ring main connection equipment)
- ZX5 Production R0000548E Module G to R0015040 Module F alignment + (11/09/2025 Moved to Confluance Click [https://stuga-ltd.atlassian.net/wiki/external/NzJiMjYxYjM2ZmZjNDA0NWFjZWM1NzM0NGUxMWNkYzk Here])
- R0019264 Autoflow Mk 4,1 Infeed Safe moving equipment + (Due to unbalanced nature of Autoflow 4.1 infeed frame, The following Guidance is for use of supplied parts within Assembly R0019264 for allowing safe movement of Infeed frame)
- R0000204 Notching gear boxes assembly + (For longevity and correct running , it is … For longevity and correct running , it is imperative these units are assembled to the correct tolerances and assembled in the way detailed by this procedure
Tools required
Standard Hex Key Set
Castle nut spanner
Loctite 243 thread lock
Loctite 641 bearing fit
Mandrel jig
Grease applicator
Fe10 solvent spray
ease applicator Fe10 solvent spray <br/>) - Full Version Upgrade TwinCAT3 WinMulti + (If a PC fails on a machine in the field an … If a PC fails on a machine in the field and the hard drive data cannot be recovered, it is necessary to replace the PC. This may create a version conflict, as the new PC will have later versions of twinCAT installed than the original
This tutorial outlines the steps required to bring all the machine systems up to the latest level to ensure compatibility
ions-text">...This is a one-way process that cannot be reversed</div> </div><br/>) - J0001000H Autoflow Mk4 Mechanical installation-Alignment +
- Ecoline Site Installation Guide + (Installation of an Ecoline is quite straig … Installation of an Ecoline is quite straight-forward as all of the main levelling and alignment is taken care of inside the main module housing. Installation involves 3 steps # Levelling main module # Attaching and Levelling Infeed Frame # Refitting Infeed coverling Infeed Frame # Refitting Infeed cover)
- Setting Motor Overload Relays + (It is important to set the Motor Overload … It is important to set the Motor Overload Relays to the correct values according to the motor as if the current is set too low, the motor will continually trip the MCB and if it set too high then the motor will not trip the MCB under fault conditions, leading to the motor burning out.ditions, leading to the motor burning out.)
- ZX5 Installation Procedure 2023 + (Key data for installation of ZX5 Dokit to generate consistency of installation Quality checks for installation Manufacturing data supply)
- ZX5 Installation Procedure 2023 Part 2 + (Key data for installation of ZX5 Dokit to generate consistency of installation Quality checks for installation Manufacturing data supply)
- ZX5 Installation Procedure 2023 Part 3 Guarding Conformity checks + (Key data for installation of ZX5 Dokit to generate consistency of installation Quality checks for installation Manufacturing data supply)
- Monday - Emails to Updates + (Mondays has changed the way it deals with … Mondays has changed the way it deals with the way it writes updates via email, in a very useful way for us. This will save a lot of time cutting and pasting information from emails. Simply put, * when you send an email, cc: the unique email address for the item in your email you are sending. This is standard practice to get your email into Mondays. * When your contact replies (with reply all) * their reply will now magically appear in the Monday update for the item. * It even strips out the email trail, leaving just the important reply It used to be the case that only members of Stuga.co.uk could send an email directly to an update, but this has now changed…ly to an update, but this has now changed…)
- Updating Teamviewer Host + (Older versions of Teamviewer are being pha … Older versions of Teamviewer are being phased out by the Teamviewer company from September 15th 2021. The advice on the website suggests you need to upgrade to version 15. However, v15 is not compatible with the older Windows XP machines in the field. The latest XP compatible downloadable version of the Host program is 13.2 and is available [https://download.teamviewer.com/download/version_13x/TeamViewer_Host_Setup.exe here] Regrettably, the update process on older versions is not simple, and frustratingly cannot be done remotely. It needs intervention from an operator at the machine with a small amount of technical know-how with a small amount of technical know-how)
- TB0301 Autoflow Saw Head Reinforcement - Additional Enhancements + (On Autoflow 2 Sawing Centres following 5 y … On Autoflow 2 Sawing Centres following 5 years of use., it has been found that the internal saw centre framework can lose its rigidity. this is probably due to "bruising" or denting of the aluminium joints introducing a slight amount of play. This is exacerbated by the design where it is attached and driven on from the base up A retrofit kit of parts has previously been created to allow additional reinforcement to be introduced within the structural framework. This kit builds upon the first kit to provide further accuracy enhancements by #Adding left right stability with additional slide rails at the top of the subframe #Adding front / back stability by moving the SY axis leadscrew to the same height as the saw table ====Parts required: ==== R0010272 Kit: Saw Frame Rigidity Pt 2 This kit consists of 2 carriage assemblies, specifically designed to provide further rigidity to the top of the Saw Head Assembly. In addition, 2 mounting blocks required to relocate the Saw Y Axis Assembly are also included. This allows the Saw Y Axis Assembly to continue to operate accurately, but improves the life of associated components. See also [[TB0259 Autoflow Saw Head Reinforcement]][[TB0259 Autoflow Saw Head Reinforcement]])
- Move SR Datum Sensor to Higher Level R0019217 + (On a Mk4 Autoflow, The SR axis daum sensor … On a Mk4 Autoflow, The SR axis daum sensor is originally located at the rear and to the base of the SR axis. This area is prone to offcuts, so a new location has been designed at the top, with the following design parameters
*Easy to retrofit
*Sensor is protected in a case
*Short distance to connection box
*Uses existing mounting holes
*Easy to adjust and maintain
*Sensing end location should be vertical onto a plate, not horizontal on to a radiused surface
*Can use E0000336 2mm range sensor reliably
*Incorporate a front fence to help deflect offcuts down the chute and to protect the sensor
The parts are supplied in Kit R0019217B
illustrated here are from a Right to Left feed machine. Parts are unhanded so can be fitted to either hand machine</div> </div><br/>) - ACEpc Changing IP address using netedit + (The ACEpcs use two different systems for c … The ACEpcs use two different systems for connecting a network #NETBeui - this was used on earlier machines but reliability depends on the customer network setup. Reconfiguration after initial setup is difficult #IP addressing - A setup system was written using IP addresses to connect. This is a little harder to set up, but is easier to change later. A special program called netedit was written which updates all the correct files in the backgroundes all the correct files in the background)
- Adding TwinSAFE projects to AMI Motors + (The AMI8xxx-3100 motor series is a TwinSAF … The AMI8xxx-3100 motor series is a TwinSAFE enabled motor. To enable this motor to work with a non-TwinSAFE system, a TWINSAFE project needs to be placed into the Safety Logic circuit on board the motor. This dokit describes this process.
====Prerequisites==== *TwinCAT machine project connected, scanned and debugged *Drive Manager 2 Project installed *AMI motors connected and powered up *Latest Device Description (ESI) updates - see Updating Device Description Tables *AMI Motor TwinSAFE Project from [https://stugaltd.monday.com/boards/4881973586 Software Versions Board] For instructions on how to create the AMI Motor twinSAFE project from scratch, see [[AMI TwinSAFE Workaround - Safety Project Creation]]
[[AMI TwinSAFE Workaround - Safety Project Creation]]<br/>) - Decommissioning - Autoflow Mk4 1 + (The Autoflow Mk4.1 machine has been design … The Autoflow Mk4.1 machine has been designed to separate into modules for safe transport
The '''infeed table''' gripper carriage and conveyor split into two sections
The '''machining head''' and '''saw''' split apart like a cam shell. They are joined with a dowel system in joining blocks at the base
The '''outfeed''' splits in to a rear bed and front tray
See Also [[Safe Moving of Top Heavy Machine Modules]]
[[Safe Moving of Top Heavy Machine Modules]]<br/>) - R0019228 Autoflow R Axis Ring Seal Protection + (The Autoflow R axis uses a slewing ring which has a seal that is subject to ingress of swarf. Over time, this seal can become dislodged, resulting in a major failure of the machine.)
- Beckhoff AX8000 Flowline Upgrade + (The Flowline range (Mk3, ZX3, ZX4) are Stu … The Flowline range (Mk3, ZX3, ZX4) are Stuga built and designed machines for prepping and cutting uPVC windows and doors. The Flowline is the first machine of the Stuga 'U' shaped machines which has prepping and cutting working in the same machine package. The Flowline is still a fantastic machine for the industry, however, due to the age of the machines and older control systems becoming obsolescent, we have had to find an upgrade route that does not only keep the machine going, but also provides improvements from the original model and up-to-date technology to future proof the machine. The upgrade that we have developed for the Flowline is supplied from an automation supplier named Beckhoff. We also use Beckhoff on our new build machines. This gives us better lead times, more understanding of the products and better diagnostics/ support for our customers. The drive system that we use is called the AX8000 series. These drives are a compact multi axis servo system that use an EtherCAT interface and STO safety functions. These servo drives, coupled with Beckhoff AM8*** series OCT servo motors provide quicker installations and all round performance increases from any system we have previously used. To drive all of the new system, we are using a Beckhoff IPC controller that runs TwinCAT 3. This links into the system via EtherCAT. All of the machine can now link together via EtherCAT to provide quick and stable communications. This tutorial will give you step by step guides on the physical upgrade requirements needed when upgrading a Flowline Mk3 to a Flowline Mk3 with Beckhoff AX8000 Control. Each step will provide you with written information and pictures to guide you through the upgrade. Each step will contain necessary information which will also provide you with rationale for the design and an idea of the benefits over using different methods. Please always feel free to provide Stuga with any feedback on this document or its contents.feedback on this document or its contents.)
- PC Recovery Process + (The PCs are now shipped with a memory stick that includes a full recovery image. If the system fails in future, this allows a full recovery of the initial setup of the entire drive. Mouse and Keyboard are required for recovery process.)
- Stuga Product Database - Edit Product Data + (The Stuga website has a parts database, much like a shop front for helping identify Stuga Machine parts. Keeping the data updated and logging nuggets of useful information is invaluable in helping identify parts on machines)
- ZX5 Alignment Check + (The ZX5 machine can be tricky to align as there are many adjustments designed into the table to offset manufacturing tolerances. This step by step guide follows the correct protocol to ensure the starting point and sequence of alignment is correct)
- Repairing R axis datum pin + (The datum pin on the old ZX4 at Sidey was … The datum pin on the old ZX4 at Sidey was recommended to be changed at my last service visit. Unfortunately there are quite a few different datum spindle plates and we were having problems tracking down the correct one so it was decided that I would be sent out the new replaceable datum pin carrier as Sidey have a small machine shop I could use to modify the existing plate to make it fit. Unfortunately the mounting holes of the new carrier interfered with the mounting holes of the pneumatic cylinder so it couldn't be used. After taking dimensions of the existing plate for identification I realised there was actually a very small and quick repair that could be carried out until the correct parts were identified. All you need is a cordless drill, a 2.5 and a 3.1mm drill, M3 tap and an M3 x 15mm cap head screw.l, M3 tap and an M3 x 15mm cap head screw.)
- R0000299 Stroke assembly rebuild Part 2 + (The following instructions should be follo … The following instructions should be followed to ensure that correct assembly and setting are performed '''Tools / consumables Required''' Standard hex key set Standard spanner set Large adjustable spanner Drifts and punches Ballpein hammer Soft hammer FE10 Solvent Hylomar Gasket '''Parts Required''' Kit R0000299 containing B0000043 Double Angular bearing 15 I?D 35 O?D 15.9 long rubber seal 3 x 2 B0000105 Double Angular Bearing 15 I/D 35 O/D 15.9 Long x 1 B0000335 3ph Brake motor 2 pole 3000rpm x 1 B0000380 Double Angular Bearing 25 I/D 52 O/D 20.6 Long + rubber seal x 2 D0000059 Damper Bridge x 1 D0000062 Damper Bridge Boss x 2 D0007730 ZX4 V Notch Mk1 Spindle Shaft x1 D0007867 Bevel Gear (Left) x 1 D0007868 Bevel Gear (Right ) x 1 D0007873 Motor Gear x 1 D0007874 Pinion Gear x 1 D0007875 Pinion Shaft x 1 P0000165 damper x 174 Pinion Gear x 1 D0007875 Pinion Shaft x 1 P0000165 damper x 1)
- WinMulti - Changing The Colour Identification Box + (The version 6 software has a feature to id … The version 6 software has a feature to identify the colour of the profile and also to help operators load foiled profile in the correct orientation.
Updating the colours is a very simple job that can be done in 2 ways
# Via the Machine Settings->Colours Tab # From Bar Queue whenever a new colour is encountered.
Queue whenever a new colour is encountered. <br/>) - Fitting R0019199 Upgrade: Autoflow Slewing Ring Guard Kit + (This area is prone to collect sharp - cornered offcuts which can pull the seal from the SR axis bearing. The kit will help prevent damage. Use Kit R0019199 Upgrade: Autoflow Slewing Ring Guard Kit <br/>)
- Importing Picking List from Sage To Monday + (This procedure demonstrates how to use the … This procedure demonstrates how to use the "Sage Hooks" MS Access database to grab the data created in Sage and exort to a spreadsheet. The spreadsheet is then imported into a new Monday board, then copied across to the correct Picking List for the machine build.
Picking List for the machine build. <br/>) - ACEpc Installing netedit with NetSetGo disk + (This procedure will completely overwrite a … This procedure will completely overwrite any data on the hard drive of the ACEpc.
This is not a problem on a flowline where the data resides on the main MH hard drive in a shared directory c:\saw.
If this process is to be carried out on a standalone saw or router, make sure the data is backed up first.
e sure the data is backed up first. <br/>) - Setting Up C0000422-KIT - Full Hardware 2023 + (This process takes the components to creat … This process takes the components to create a standard "C000422-KIT". This kit can then be stored and pulled off the shelf when required. It will then need to be set up for the particular customer machine using [[Setting Up Windows PC C0000422-KIT 2023]] =Notes= *There are two PCs running on the same hardware, The Host PC and the Virtual machine. **'''Host PC''' (For support) ***The base Windows install running directly on the hardware installed to Dell NVME drive. ***Has its own OEM Windows license supplied by Dell linked directly to the hardware (no product code – stored in the Dell hardware) ***Imaged by Macrium reflect. **'''Virtual PC – Stuga VM''' ***Used for Stuga software - the VM can run on any PC without changing drivers, etc. Host OS version / hardware unimportant as long as it runs Hyper-V. ***A second install of Windows running on a virtual machine, hosted by the Host PC above. It has a dedicated SSD (the Kingston Drive) stored on [:Fichier:///D:/VMPC.vhdx D:\VMPC.vhdx], with 8GB RAM. ***Has its own dedicated Windows 11 PRO license present in the kit, product code stored on Monday and on the license. ***Copied to host and setup manually during install. There is a setup program for the specific client after this process has completed: '''P_Stuga_P… '''on the desktop of the host.'P_Stuga_P… '''on the desktop of the host.)
- A2001 - Light Curtain Timer + (This step by step guide will explain how to wire a timer relay into the light curtain and estop circuit on the A2001 Autoflow.)
- Dokit - Creating A Work Instruction + (This tutorial guides you in how to create … This tutorial guides you in how to create Work Instructions in Dokit and to avoid the pitfalls.
If the Work Instruction is already created, follow the process [[Dokit - Editing Work Instructions]]
= Warnings =
a fa-exclamation-triangle"></i></div> <div class="icon-instructions-text">...Do not publish anything inflammatory, offensive or illegal</div> </div><br/>) - Dokit - Editing Work Instructions + (This tutorial shows you how to edit the co … This tutorial shows you how to edit the content of a work instruction, allowing you to
*Add New Steps
*Add numbering and bullets to the text
*Add and crop Photos
*Annotate photos with arrows, numbers and text
*Change step sequence and insert steps
*Add Call-outs and warnings
*Add Links to other websites or other Dokit pages
=Warnings=
a fa-exclamation-triangle"></i></div> <div class="icon-instructions-text">...Do not publish anything inflammatory, offensive or illegal</div> </div><br/>) - Safety Circuit Principles + (Moved to Confluence 13/12/2025 [https://stuga-ltd.atlassian.net/wiki/spaces/~5570585b7bb5d1bc31430e886883cbc774c182/pages/86442039/Safety+Circuit+Principles Safety Circuit Principles])
- ZX5 Transfer Table Crank set up + (15/12/2025 Moved to Confluence Click [https://stuga-ltd.atlassian.net/wiki/external/OTE4MTgyN2RlYjQ2NGRlYTgyZjRhMDc5ZmIyY2MyMTg here])
- Replacing Beckhoff PC + (To replace a broken PLC requires the installation of the original project. This project needs to be made aware of the new hardware, along with the Stuga software)
- Upgrade Autoflow to Windows 11 + ('''Update 2024''' - Upgrades now consist o … '''Update 2024''' - Upgrades now consist of a new Windows 11 PC with VM for the front end and a C6017 PC for the back end.
Upgrading an Autoflow to Windows 11 involves upgrading two PCS
#The Beckhoff control PC - replaced with a C0001225-KIT
#The Camera PC - replaced with a C0000422-KIT with a VM setup. this now becomes the front end PC
===For Historical reference, these are the pre-2024 notes: === ''Upgrading an Autoflow to Windows 10 on site involves upgrading two PCS'' #''The Beckhoff control PC'' #''The Camera PC'' ''
'' The Beckhoff PC is not upgradable so needs to be completely replaced. We use the miniature [https://www.beckhoff.com/english.asp?industrial_pc/c6017.htm Beckhoff C6017] for this ''It is not cost effective to upgrade and old camera PC, so a new one is supplied'' ===''Notes''=== *''The Beckhoff PC is now powerful enough to run the front end and back end.'' *''The camera PC is there to replace the camera PC on site and contains the storage for the machine cameras'' *''Because the Beckhoff PC has limited hard drive space, the DDRIVE will be on the cameraPC''hard drive space, the DDRIVE will be on the cameraPC'') - PLC Source Control - Git Credential Manager for Windows Install + (When connecting to the tc3Multi repository … When connecting to the tc3Multi repository on BitBucket.org, some times the validation credentials are not accepted. Check that the password you have is correct, if the problem persists , install or update Git Credential manager for windows to the latest version.manager for windows to the latest version.)
- R0000299 Stroke assembly rebuild + ( The following instructions should be fol … The following instructions should be followed to ensure that correct assembly and setting are performed '''Tools / consumables Required''' Standard hex key set Standard spanner set Large adjustable spanner Drifts and punches Ballpein hammer Soft hammer FE10 Solvent Hylomar Gasket '''Parts Required''' Kit R0000299 containing B0000043 Double Angular bearing 15 I?D 35 O?D 15.9 long rubber seal 3 x 2 B0000105 Double Angular Bearing 15 I/D 35 O/D 15.9 Long x 1 B0000335 3ph Brake motor 2 pole 3000rpm x 1 B0000380 Double Angular Bearing 25 I/D 52 O/D 20.6 Long + rubber seal x 2 D0000059 Damper Bridge x 1 D0000062 Damper Bridge Boss x 2 D0007730 ZX4 V Notch Mk1 Spindle Shaft x1 D0007867 Bevel Gear (Left) x 1 D0007868 Bevel Gear (Right ) x 1 D0007873 Motor Gear x 1 D0007874 Pinion Gear x 1 D0007875 Pinion Shaft x 1 P0000165 damper x 174 Pinion Gear x 1 D0007875 Pinion Shaft x 1 P0000165 damper x 1)

 Français
 English
 Deutsch
 Español
 Italiano
 Português