Cette page fournit une simple interface de navigation pour trouver des entités décrites par une propriété et une valeur nommée. D’autres interfaces de recherche disponibles comprennent la page recherche de propriété, et le constructeur de requêtes ask.
Liste de résultats
- Setting Motor Overload Relays + (It is important to set the Motor Overload … It is important to set the Motor Overload Relays to the correct values according to the motor as if the current is set too low, the motor will continually trip the MCB and if it set too high then the motor will not trip the MCB under fault conditions, leading to the motor burning out.ditions, leading to the motor burning out.)
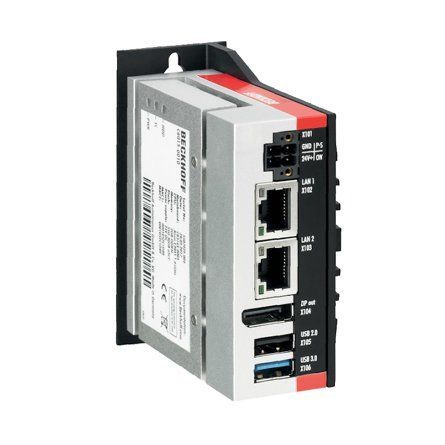
- Upgrading Autoflow TwinCAT2 to Win10 and TwinCAT3 + (<div class="annotatedImageDiv" typeof=" … Autoflows from A2001 to A2015 were initially produced with TwinCAT2 software. This has now been superseded with TwinCAT3 which then has the benefit of compatibility with version 6 front end software.
The original PC cannot be used because
*It is not powerful enough to run v6 front end
*The operating system cannot be upgraded to Windows 10
*It cannot be upgraded to TwinCAT3
The Beckhoff C6015 PC has been chosen to be the replacement PC. It is compact, yet powerful enough to run the v6 front end and TwinCAT in the same
. It has an upgrade to 1.9Ghz 4 core processor.
Because it has a limited 40Gb SSD memory, a compact 64Gb memory stick is inserted into the USB 3.0 port. This acts as a separate drive for the DDRIVE dynamic storage for all machine setup. The internat drive is for the Operating System only. This mimics the current Autoflow setup of a remote Camera PC, hence the camera PC can be retired after the upgrade
era PC, hence the camera PC can be retired after the upgrade<br/>) - R0015316 V notch Final Assembly Part 2 + (<nowiki>'''<u>Tools Required&l …
'''Tools Required''' BJ3-1 x 2<br /><br />P0001133 Cylinder: Ø50 x 500 x 2<br /><br />P0001134 Floating Joint M18x1.5 x 2<br /><br />P0001140 Pilot Check Valve: 8mm to 1/4" BSP x 2<br /><br />P0001141 Fitting: SMC Flow Controller Elbow Ø8-1/4BSP x 1<br /><br />P0001142 Adjustable Damper 150mm stroke (3000N) x 1<br /><br />P0001144 Reed Switch Mounting Band for Ø50 cyl x 2<br /><br />R0015084 Bench assemble and Drill Off Swarf chutes<br /><br />V0000028B-ZX5 Notching Blade: Ø300 x 96 teeth x 2.8mm pl x 3.3mm kf x24mm x 4</nowiki>)
Standard Hex key set
Standard Spanner set
ZX5 Blade tightening tool
Compressed air connection with regulation (for axis support)
'''Parts required'''
A0001069 Energy Chain Series B15.050 (48mm radius) Openable x 2
A0001070 Igus Mounting Br Set for A0001069 Non-Pivot x 2
B0000046 Slide Base Bearing Block (Straight Grease Nipple) x 4
B0000173 Blanking plug foc x 28
B0000426 Linear Rail MSB25 400mm Long (AMT) x 4
D0015156 Saw Bearing Plate x 2
D0015161 Saw Plate x 4
D0015162 Saw Mid Spacer Bar x 1
D0015163 Saw Bearing Spacer Bar x 1
D0015168B Balance Cylinder Bracket x 2
D0015169B Cylinder Rod Bracket x 2
D0015179 Energy Chain Bracket x 2
D0015180 Datum Switch Bracket (VZ) x 1
D0015183 VY Stop x 2
D0015235 VY Datum Switch Bracket x 1
D0015236 VY Energy Chain Bracket - Fixed x 1
D0015237 VY Energy Chain Bracket - Moving x 1
D0015250 Safe Sensor Block x 1
D0015251 Safe Sensor Finger x 1
D0015440 Spacer: Ø12.7 x 36, M6 tap thru x 2
D0015452 Scissor Cable Retainer x 1
D0015541 Energy Chain Deflector x 1
D0015704 Energy Chain Support Plate x 1
E0000336 Sensor: M8; 2mm, PNP N/O, M8 conn x 2
E0001185 Elte Saw motor x 4
M0001087 Rubber Bump Stop M6 Ø20x24 x2
P0000022 Fitting: Brass Reducing Bush 1/4 - 1/8 BSP x 1
P0000023 Fitting: Hex Nipple 1/8 BSP x 1
P0000026 Silencer 1/4 BSP x 1
P0000050 Fitting: Silencer 1/8'' BSP x 1
P0000077 Straight Adaptor 8mm - 1/8BSP x 1
P0000140 Fitting: Quick Exhaust Valve 1/8" x 1
P0001040 Fitting: 1/8BSP Hex Head Silencer x 2
P0001041 SMC Reed Switch Mounting Bracket BJ3-1 x 2
P0001133 Cylinder: Ø50 x 500 x 2
P0001134 Floating Joint M18x1.5 x 2
P0001140 Pilot Check Valve: 8mm to 1/4" BSP x 2
P0001141 Fitting: SMC Flow Controller Elbow Ø8-1/4BSP x 1
P0001142 Adjustable Damper 150mm stroke (3000N) x 1
P0001144 Reed Switch Mounting Band for Ø50 cyl x 2
R0015084 Bench assemble and Drill Off Swarf chutes
V0000028B-ZX5 Notching Blade: Ø300 x 96 teeth x 2.8mm pl x 3.3mm kf x24mm x 4 - R0015316 V notch Final Assembly + (<nowiki>'''<u>Tools Required&l …
'''Tools Required''' BJ3-1 x 2<br /><br />P0001133 Cylinder: Ø50 x 500 x 2<br /><br />P0001134 Floating Joint M18x1.5 x 2<br /><br />P0001140 Pilot Check Valve: 8mm to 1/4" BSP x 2<br /><br />P0001141 Fitting: SMC Flow Controller Elbow Ø8-1/4BSP x 1<br /><br />P0001142 Adjustable Damper 150mm stroke (3000N) x 1<br /><br />P0001144 Reed Switch Mounting Band for Ø50 cyl x 2<br /><br />R0015084 Bench assemble and Drill Off Swarf chutes<br /><br />V0000028B-ZX5 Notching Blade: Ø300 x 96 teeth x 2.8mm pl x 3.3mm kf x24mm x 4<br /><br /><br/></nowiki>)
Standard Hex key set
Standard Spanner set
ZX5 Blade tightening tool
Compressed air connection with regulation (for axis support)
'''Parts required'''
A0001069 Energy Chain Series B15.050 (48mm radius) Openable x 2
A0001070 Igus Mounting Br Set for A0001069 Non-Pivot x 2
B0000046 Slide Base Bearing Block (Straight Grease Nipple) x 4
B0000173 Blanking plug foc x 28
B0000426 Linear Rail MSB25 400mm Long (AMT) x 4
D0015156 Saw Bearing Plate x 2
D0015161 Saw Plate x 4
D0015162 Saw Mid Spacer Bar x 1
D0015163 Saw Bearing Spacer Bar x 1
D0015168B Balance Cylinder Bracket x 2
D0015169B Cylinder Rod Bracket x 2
D0015179 Energy Chain Bracket x 2
D0015180 Datum Switch Bracket (VZ) x 1
D0015183 VY Stop x 2
D0015235 VY Datum Switch Bracket x 1
D0015236 VY Energy Chain Bracket - Fixed x 1
D0015237 VY Energy Chain Bracket - Moving x 1
D0015250 Safe Sensor Block x 1
D0015251 Safe Sensor Finger x 1
D0015440 Spacer: Ø12.7 x 36, M6 tap thru x 2
D0015452 Scissor Cable Retainer x 1
D0015541 Energy Chain Deflector x 1
D0015704 Energy Chain Support Plate x 1
E0000336 Sensor: M8; 2mm, PNP N/O, M8 conn x 2
E0001185 Elte Saw motor x 4
M0001087 Rubber Bump Stop M6 Ø20x24 x2
P0000010 1/8 6mm elbow x 1
P0000022 Fitting: Brass Reducing Bush 1/4 - 1/8 BSP x 1
P0000023 Fitting: Hex Nipple 1/8 BSP x 1
P0000026 Silencer 1/4 BSP x 1
P0000050 Fitting: Silencer 1/8'' BSP x 1
P0000077 Straight Adaptor 8mm - 1/8BSP x 1
P0000140 Fitting: Quick Exhaust Valve 1/8" x 1
P0001040 Fitting: 1/8BSP Hex Head Silencer x 2
P0001041 SMC Reed Switch Mounting Bracket BJ3-1 x 2
P0001133 Cylinder: Ø50 x 500 x 2
P0001134 Floating Joint M18x1.5 x 2
P0001140 Pilot Check Valve: 8mm to 1/4" BSP x 2
P0001141 Fitting: SMC Flow Controller Elbow Ø8-1/4BSP x 1
P0001142 Adjustable Damper 150mm stroke (3000N) x 1
P0001144 Reed Switch Mounting Band for Ø50 cyl x 2
R0015084 Bench assemble and Drill Off Swarf chutes
V0000028B-ZX5 Notching Blade: Ø300 x 96 teeth x 2.8mm pl x 3.3mm kf x24mm x 4 - R0000963E Bench Assemble Z axis Components + (<nowiki><u>'''Tools Required'' …
'''Tools Required''' t;<br />P0000140 Fitting: Quick Exhaust Valve 1/8" x 2<br /><br />P0000145 Tee-Equal 1/4BSP Galvanised x 2<br /><br />P0000200 Elbow Adaptor 6mm - M5 x 2<br /><br />P0000229 Pneumax VDMA 40 x 300 Magnetic x 4<br /><br />P0001038 Fitting: SMC 1/8" BSP to Ø6mm Elbow White x 4<br /><br />P0001174 Fitting: Pilot Check Valve 1/4" (Flow & ZX) x 2<br /><br /><br/></nowiki>)
Standard hex key set
Standard spanner set
Emery tape
Standard HSS drill set
Hand reamer
Standard tap set
'''Part Required'''
B0000086 Ball Bearing 15 D 32 D 9 Long + seals x 4
B0000139 Double Angular Bearing 20 D 47 D 20.6 Long + seals x 2
B0000351 Bearing 40mm O/D 17mm I/D 17.5mm Wide x 2
C0001122K Servo Motor: Beckhoff AM8032-1E10 (Keyed) x 1
D0001926 Servo Drive Coupling M20 (Ø14mm) Beckhoff x 1
D0006501 Z Leadscrew Sleeve x 2
D0007629 Cylinder rod Extension x 4
D0007732 Sprocket Idler Shaft x 2
D0007733 Sprocket Mounting Block x 2
D0008090 Retaining Collar x 1
H0007715 Z Sprocket 33 Teeth 3/8'' pitch x 2
H0007790 Leadscrew Z(Includes Re-balling) x 2
P0000007 Straight Adaptor 6mm - 1/8 BSP tapered thread x 2
P0000010 Elbow Adaptor 6mm - 1/8 BSPT (Taper thread) x 2
P0000023 Fitting: Hex Nipple 1/8 BSP x 2
P0000024 Fitting: Hex Nipple 1/4 BSP x 2
P0000026 Silencer 1/4 BSP x 4
P0000051 Fitting: Straight Adaptor 6mm - 1/4 BSPT x 4
P0000140 Fitting: Quick Exhaust Valve 1/8" x 2
P0000145 Tee-Equal 1/4BSP Galvanised x 2
P0000200 Elbow Adaptor 6mm - M5 x 2
P0000229 Pneumax VDMA 40 x 300 Magnetic x 4
P0001038 Fitting: SMC 1/8" BSP to Ø6mm Elbow White x 4
P0001174 Fitting: Pilot Check Valve 1/4" (Flow & ZX) x 2 - R0015060 Bench Assemble Flapper Beam + ('''<u>Tools Required</u>'''
… '''Tools Required'''
Standard hex key set
Tape measure
Steel rule
Engineers square
'''Parts Required'''
B0001099 Bush flange 10 i/d 12 o/d x 14
C0001018 EP2338-0001 EtherCAT Box 8 Configurable IO x 1
D0010167 Ethercat Mount Plate x 1
D0015353 Sensor Flapper Pivot x 8
D0015355 Sensor Flapper Plate (312) x 6
D0015357 Sensor Flapper Plate (270) x 1
D0015363 Sensor Flapper Support Transfer x 1
E0000336L Sensor: M8; 4mm, PNP N/O, M8 conn x 7
F0000537 dowel pin 10 x 40 x 8
M0001016 Angle 74 x 38 x 2
M0001209 Bracket m8 proximity sensor bracket 90 deg x 7
'''Fastener list'''
M5 x 6 Grubscrew kcp 8 off
10mm x 40 dowel 8 off
M6 x 20 socket cap 8 off
M5 D nut 14 off
M6 D nut 10 off
M8 D nuts 8 off
M5 A form washer 7 off
M5 x 10 socket cap 7 off
M5 x 10 button socket 7 off
M3 x 20 panhead 2 off
M6 x 16 socket cap 2 off
M6 A form washer 2 off
M8 x 20 socket cap 8 off
M8 heavy motor plate washer 8 off
Cable tie bases 7 off
t cap 8 off M8 heavy motor plate washer 8 off Cable tie bases 7 off <br/>) - R0000558E Bench Assemble Base and Turntable + ('''<u>Tools Required</u>'''
… '''Tools Required'''
Standard hex key set
Standard spanner set
Heat gun
Large Internal Circlip pliers
Standard circlip pliers
8mm hand reamer
Grease gun
Torque wrench
'''Parts Required'''
B0000028 Thrust Bearing 140 I/D 180 O/D 31 Long (FAG) x 1
B0000032 Linear Bearing: Ø30 x 50 Compact (Metal Case Only) x 4
B0001087 Angular Contact Bearing 70 I/D 125 O/D 24 Long x 1
B0001088 Circlip 125mm Internal x 1
C0001122K Servo Motor: Beckhoff AM8032-1E10 (Keyed) x 1
C0001179-100 Gearbox NPTO 100-1 x 1
D0004019E Turntable Mk5 (5334E) x 1
D0004033E Alignment Disc Mk5 x 1
D0004147E Turntable Shaft Mk5 x 1
D0004320E Thrust Bearing Housing Mk5 x 1
D0004336 Stay Bar x 2
D0004514E Turntable Base Mk5 x 1
D0004516 Front Bearing Block (5294) x 2
D0010778 Turntable Stop Arm x 1
D0010796 Turntable Housing Cover x 1
H0004631 Shaft 30mm: Base Slide x 2
M0001176 M6 Stainless lock washer x 4
D0015663 SR Axis Motor Guard x 1
ainless lock washer x 4 D0015663 SR Axis Motor Guard x 1 <br/>) - R0000558E Bench Assemble Base and Turntable Part 2 + ('''<u>Tools Required</u>''' … '''Tools Required''' Standard hex key set Standard spanner set Heat gun Large Internal Circlip pliers Standard circlip pliers 8mm hand reamer Grease gun Torque wrench '''Parts Required''' B0000028 Thrust Bearing 140 I/D 180 O/D 31 Long (FAG) x 1 B0000032 Linear Bearing: Ø30 x 50 Compact (Metal Case Only) x 4 B0001087 Angular Contact Bearing 70 I/D 125 O/D 24 Long x 1 B0001088 Circlip 125mm Internal x 1 C0001122K Servo Motor: Beckhoff AM8032-1E10 (Keyed) x 1 C0001179-100 Gearbox NPTO 100-1 x 1 D0004019E Turntable Mk5 (5334E) x 1 D0004033E Alignment Disc Mk5 x 1 D0004147E Turntable Shaft Mk5 x 1 D0004320E Thrust Bearing Housing Mk5 x 1 D0004336 Stay Bar x 2 D0004514E Turntable Base Mk5 x 1 D0004516 Front Bearing Block (5294) x 2 D0010778 Turntable Stop Arm x 1 D0010796 Turntable Housing Cover x 1 H0004631 Shaft 30mm: Base Slide x 2 M0001176 M6 Stainless lock washer x 4 D0015663 SR Axis Motor Guard x 1176 M6 Stainless lock washer x 4 D0015663 SR Axis Motor Guard x 1)
- R0015329 Fit Head Spindle Posts + ('''<u>Tools Required</u>'''
… '''Tools Required'''
Standard hex key set
Standard flat hand file
Emery tape 120
standard hand tap set
Stubby hex key set
Ratchet/hex bit set
Blade flange spanner
'''Parts Required'''
D0004002 Webb x 1
D0004003 Top Shaft Block x 2
D0004004 Brace Support Bar (D7451) x 1
D0004157 Motor plate spacer x 3
D0004342 Damper Bracket (5312) x 1
D0007451 Brace Support Bar OH (D4004) x 1
D0015490 Saw Turntable Sensor Flag x 1
D0015491 Saw Turntable Flag Bracket x 1
H0004024 Infeed Clamp Post x 1
H0004025 Outfeed Clamp Post (5302) x 1
H0004510 Shaft 30mm: 540 Saw Stroke x 2
P0000055 Adjustable Damper 200mm (Saw Stroke) x 1
R0000560 Bench Assemble Spindle x 1
R0000569E Bench Assemble Head Spindle Posts Mk5 x 1
V0000043B Saw Blade: Ø500 x 160 teeth x 3.2mm pl x 4mm kf x 30mm bore x 1
Blade: Ø500 x 160 teeth x 3.2mm pl x 4mm kf x 30mm bore x 1 <br/>) - R0015358 Conveyor chassis + ('''<u>Tools Required</u>'''
… '''Tools Required'''
standard hex key set
Standard spanner set
Standard HSS drill set
Standard tap set
Utility knife
'''Parts Required'''
B0000441 Conveyor 3580mm x 300mm x 1
B0001013 Conveyor Motor SEW - WA 10 x 1
B0001177 Pair conveyor side cheeks and bearings slave x 2
M0000133 Conveyor Belt XL-AS 7350 x 300 B x 1
P0000200 Elbow Adaptor 6mm - M5 x 3
AS 7350 x 300 B x 1 P0000200 Elbow Adaptor 6mm - M5 x 3 <br/>) - R0015263 Mount drive motor for load shaft + ('''<u>Tools Required</u>''' S … '''Tools Required''' Standard Hex key set Standard Spanner set Long nose pliers '''Parts Required''' B0000041 Feather Key 5 x 5 x 18 Long x 1 B0000142 Feather key 5 x 5 x 25 long B0000240 Geared Motor 0.18kW 18RPM Motovario x1 B0001100 Feather Key 8 x 7 x 30 Long x2 D0006714 Index Torque Limiter (B0189 / B0190) x1 D0015460 Infeed Motor Shaft (2018) x1 D0015461 Infeed Motor Mount x1 D0015462 Infeed Motor Platex1 F0000618 m10 x 70 set boltunt x1 D0015462 Infeed Motor Platex1 F0000618 m10 x 70 set bolt)
- R0015037 Bench Assemble SY Assembly Part 2 + ('''<u>Tools Required</u>''' S … '''Tools Required''' Standard Hex Key set Standard Spanner set 1 Meter straight edge Feeler Gauges '''Parts Required''' B0000044 Linear Rail MSB25 260mm Long (AMT) x 2 B0000046 Slide Base Bearing Block (Straight Grease Nipple) x 4 B0000173 blanking cap x 10 B0000234 Straight Grease Nipple M6 ST/ST x 4 B0000245 Needle Bearing 12 D 16 D 10 Long (ENA) x 12 B0001060 Grease Fitting M6x0.75 to Ø4 x 4 B0001061 Grease fitting M6 x 1 to 4mm x 4 B0001123 Double angular contact bearing 6 I/D 17 O/D 9 long x 2 B0001185 Leadscrew nut Igus x 1 C0001005 Stepper Motor AS1050 x 1 D0005184 Guide Roller x 6 D0005186 Guide Pin Washer x 6 D0015172 Centralise Plate (with SY) x 1 D0015173 Saw SY Saddle Brace x 1 D0015174 Roller Fence (With SY) x 2 D0015175 Saw Saddle Carriage Block x 2 D0015176 Cylinder Mount Block x 2 D0015178 Z Block x 2 D0015207 Outer Bearing Housing x 1 D0015208 Leadscrew Bearing Block x 1 D0015209 Leadscrew Attachment Bracket x 1 D0015222 SY Grease Manifold x 2 D0015240 Collar Clamp: SY Axis ZX5 x 1 D0015316 Leadscrew Bearing Block Cover x 1 D0015415 Turret Pickup Arm ZX5 x 2 D0015416 Bracket: Turret Stop RH ZX5 x 1 D0015417 Bracket: Turret Stop LH ZX5 x 1 D0015698 Flag Block x 1 D0015777 Leadscrew SY x 1 D0016336 SY table blower x 1 E0000336 Sensor: M8; 2mm, PNP N/O, M8 conn x 1 H0005185 Shaft 12mm: 90.5 Saw Fence Roller Pin x 6 M0001209 Bracket m8 proximity sensor 90 degree x 1 P0000200 Elbow Adaptor 6mm - M5 x 7 P0001127 Guide cylinder 20 x 30 compact x 2 P0001157 Turret Stop: 6 Station Right Handed Somatec x 1 P0001158 Turret Stop: 6 Station Left Handed Somatec x 1matec x 1 P0001158 Turret Stop: 6 Station Left Handed Somatec x 1)
- R0000571 Fit and Level Cut Tables , Finalise Eject + ('''<u>Tools Required</u>''' … '''Tools Required''' 1 meter straight edge 500mm rule Standard hex key Standard spanner set Feeler gauges Engineers level Adjustment shim '''Parts Required''' A0001069 Energy Chain Series B15.050 (48mm radius) Openable x 0.5 A0001070 Igus Mounting Br Set for A0001069 Non-Pivot x 1 A0001074 igus mounting bracket set x 1 D0004551 Cylinder Spacer x 1 D0004553 Cover Fixing Bar x 1 D0004554 Bar Spacer Short x 1 D0004555 Bar Spacer Long x 1 D0004769 Ejector Clamp Pad to be made in conjuction with D5121 (5305) x 1 D0004770 Infeed Clamp Pad to be made in conjunction with D5122 (5299) x 1 D0005121 Ejector Clamp Stainless Pads (5306) x 1 D0005122 Infeed Clamp Pad (5300)x 1 D0005199 Ejector Cover x 1 D0005412 Energy Chain Adapter Plate x 1 H0004556 Fixing Bar Gap Cover (5297) x 1 H0004656 Material Trip Stripx 1 P0000368 Extension 1/8 bsp x 22 long x 1 P0000443 Cleanline Cylinder 32 x 450 PN11246 x 1 P0000444 Reed Switch: Pneumax 1580U (5.0m Lead) x 2 P0001198 flow controller 6mm elbow 1/8 x 2580U (5.0m Lead) x 2 P0001198 flow controller 6mm elbow 1/8 x 2)
- R0000962E Bench assemble Y axis Components + ('''<u>Tools Required</u>'''
… '''Tools Required'''
Standard hex key set
Fine emery tape
solvent
Standard drill set
'''Parts Required'''
B0000086 Ball Bearing 15 D 32 D 9 Long + seals x 2
B0000139 Double Angular Bearing 20 D 47 D 20.6 Long + seals x 1
B0000236 90 Deg Grease Nipple M6 ST/ST x 1
C0001122K Servo Motor: Beckhoff AM8032-1E10 (Keyed) x 1
D0001926 Servo Drive Coupling M20 (Ø14mm) Beckhoff x 1
D0006488 Y Leadscrew Sleeve x 1
H0007789 Y Leadscrew x 1
0006488 Y Leadscrew Sleeve x 1 H0007789 Y Leadscrew x 1 <br/>) - R000569E Bench Assemble Head Spindle Posts + ('''<u>Tools Required</u>'''
… '''Tools Required'''
Standard Hex key set
Standard spanner set
Internal circlip pliers
Consumable 4mm yellow grease line
Pneumatic pipe cutters
'''Parts Required'''
B0000002 Bearing: 12/28dia x 8mm Sheilded x 2
B0000032 Linear Bearing: Ø30 x 50 Compact (Metal Case Only) x 4
B0001061 Grease fitting x 6
D0004001 Head Bearing Block x 3
D0004021 Upstroke Plate x 1
D0004078 Motor Plate (5311) x 1
D0004099 Cylinder Bearing Block x 1
D0004256 Cylinder rod bar x 1
D0004343 Lower Damper Bracket (5313) x 1
D0004445 Semi circular slit strip (5533) 500mm x 1
D0004634 Chute Sawblade Strip 500mm (5532) x 1
D0004733 Belt Adjuster Pulley x 1
D0004734 Belt Adjusting Bar x 1
D0004735 Belt Adjuster Pin x 1
D0010780 Grease Manifold x 1
H0004444 Semi-circular Guard (5332) x1
P0000009 Fitting: 1/4 BSPT - 6mm Elbow x 2
P0000037 Magnetic Cylinder 40 x 185 with 15mm rod extension x 1
P0000308 Flow Controller In Line 6mm x 1
rod extension x 1 P0000308 Flow Controller In Line 6mm x 1 <br/>) - R0015035 Bench Assemble V Notch Components + ('''<u>Tools Required</u>'''
… '''Tools Required'''
Standard hex key set
Standard spanner set
Standard HSS drill set
Vernier 150mm
2 meter straight edge
40mm shaft pin jigs
Feeler gauge set
Internal circlip pliers
External circlip pliers
8mm hand reamer
'''Parts Required'''
B0000041 5 x 5 x 19 key x 1
B0000109 Linear Bearing (IKO) 40 D x 62 D x 80 L x 8
B0000427 Leadscrew Ø25x10 435 Long x 1
B0001047 Fixed Bearing Support Block Ø17 x 1
B0001120 Circlip 62mm External x 16
B0001127 ROTEX GS Coupling Ø14/Ø15 Bore & Key (98 Shore Spider) x 1
B0001134 Ball Bearing 15ID 35OD 11 Long x 10
C0001122K Servo Motor: Beckhoff AM8032-1E10 (Keyed) x 1
D0010132 SZ Drive Mount Plate x 1
D0010563 Y Axis Servo Mount x 1
D0015147 V Notch Upper Support Bar x 1
D0015148 V Notch Lower Support Bar x 1
D0015149 VZ Shaft End Plate x 4
D0015152 V-Notch Upper Moving Bar x 1
D0015153 V-Notch Rear Moving Bar x 1
D0015154 V-Notch Front Moving Barx1
D0015157 Saw Motor Bar x 4
D0015158 Shaft 40mm: 190mm ZX V Notch Saw Motor Slide x 8
D0015159B Saw Motor Adjustment Screwx 4
D0015160 Saw Motor Block x 4
D0015164 VY Leadscrew Block x 1
D0015166 VY Motor Mounting Plate x1
D0015258 Upper Link Mount 1 x 1
D0015259 Upper Link Mount 2 x 1
D0015260 Upper Link x 2
D0015261 Lower Link x 2
D0015262 Lower Link Mount x 2
D0015263 Mid Link Shaft x 2
D0015264 Lower Link Shaft x 2
M0001093 Shaft Clamping Element (Ø15-20 shafts) x 16
haft x 2 M0001093 Shaft Clamping Element (Ø15-20 shafts) x 16 <br/>) - R0015037 Bench Assemble SY Assembly + ('''<u>Tools Required</u>'''
… '''Tools Required'''
Standard Hex Key set
Standard Spanner set
1 Meter straight edge
Feeler Gauges
'''Parts Required'''
B0000044 Linear Rail MSB25 260mm Long (AMT) x 2
B0000046 Slide Base Bearing Block (Straight Grease Nipple) x 4
B0000173 blanking cap x 10
B0000234 Straight Grease Nipple M6 ST/ST x 4
B0000245 Needle Bearing 12 D 16 D 10 Long (ENA) x 12
B0001060 Grease Fitting M6x0.75 to Ø4 x 4
B0001061 Grease fitting M6 x 1 to 4mm x 4
B0001123 Double angular contact bearing 6 I/D 17 O/D 9 long x 2
B0001185 Leadscrew nut Igus x 1
C0001005 Stepper Motor AS1050 x 1
D0005184 Guide Roller x 6
D0005186 Guide Pin Washer x 6
D0015172 Centralise Plate (with SY) x 1
D0015173 Saw SY Saddle Brace x 1
D0015174 Roller Fence (With SY) x 2
D0015175 Saw Saddle Carriage Block x 2
D0015176 Cylinder Mount Block x 2
D0015178 Z Block x 2
D0015207 Outer Bearing Housing x 1
D0015208 Leadscrew Bearing Block x 1
D0015209 Leadscrew Attachment Bracket x 1
D0015222 SY Grease Manifold x 2
D0015240 Collar Clamp: SY Axis ZX5 x 1
D0015316 Leadscrew Bearing Block Cover x 1
D0015415 Turret Pickup Arm ZX5 x 2
D0015416 Bracket: Turret Stop RH ZX5 x 1
D0015417 Bracket: Turret Stop LH ZX5 x 1
D0015698 Flag Block x 1
D0015777 Leadscrew SY x 1
D0016336 SY table blower x 1
E0000336 Sensor: M8; 2mm, PNP N/O, M8 conn x 1
H0005185 Shaft 12mm: 90.5 Saw Fence Roller Pin x 6
M0001209 Bracket m8 proximity sensor 90 degree x 1
P0000200 Elbow Adaptor 6mm - M5 x 7
P0001127 Guide cylinder 20 x 30 compact x 2
P0001157 Turret Stop: 6 Station Right Handed Somatec x 1
P0001158 Turret Stop: 6 Station Left Handed Somatec x 1
1 P0001158 Turret Stop: 6 Station Left Handed Somatec x 1 <br/>) - Stuertz Infeed - Freeing Roller under Gripper Arm + ('''Applies to: A2026-A2030 Autoflow Mk4 wi … '''Applies to: A2026-A2030 Autoflow Mk4 with Jetta Locking motors'''
In certain circumstances, the forward clamp roller arm has stuck itself under the gripper arm. Freeing from this situation requires a set process because the GZ axis motor is braked and probably in an overload condition
nfident in using TwinCAT on the VM machine to navigate to settings</div> </div><br/>) - GY GZ axis setup with Jetter Motors + ('''WARNING:''' '''The Jetter motor on th … '''WARNING:''' '''The Jetter motor on the GZ axis has a brake. Releasing the brake without control could be harmful/dangerous.''' '''Use the Air Counterbalance rig to assist if necessary.''' This assumes that the motors are connected to the Beckhoff drive and are free to move.o the Beckhoff drive and are free to move.)
- Commissioning a Beckhoff Axis + (<div class="icon-instructions dont-icon"> <div class="icon-instructions-icon"><i class="fa fa-hand-paper-o"></i></div> <div class="icon-instructions-text">...Any stepper motor drives will need the EP7041 drive to be programmed first</div> </div>)
- R0015066 Bench Assemble Saw Motor Assembly + (<u>'''Tool Required'''</u>
… '''Tool Required'''
Standard hex key set
Standard spanner set
Cutting disc
Standard hand taps
'''Parts Required'''
A0000013 32mm Conduit Adaptorx 1
A0000027 Flexible Conduit Ø32mm x 1
D0004079 Saw Motor (Modified Front Flange) x 1
D0004437 Motor Conduit Bracket x 2
D0004835 Flex conduit plate x 1
D0004997 Connector Support Block (5360) x 1
D0004999 Reed Switch Terminal Box x 1
D0005219 Turntable Nozzle x 1
D0008198 Chute Flap x 1
H0008200 Chute Flap Bracket x 1
P0000295 Elbow Adaptor 6mm - 1/8 BSPT (Metal type) x 1
1 P0000295 Elbow Adaptor 6mm - 1/8 BSPT (Metal type) x 1 <br/>) - R0015338 Bench Assemble Serial Plate + (<u>'''Tools Required'''</u> Serial plate stamping jig Large Alphabetic and Numerical stamps Correct machine build data <u>'''Parts Required'''</u> D0000086B Universal Serial Number Plate (UKCA) x 1 <br/>)
- R000718E Stage 2 spindle assembly + (<u>'''Tools Required'''</u>
… '''Tools Required'''
0.05mm feeler gauge
Standard hex key set
Standard spanner set
Rule
6mm punch
Ball pien hammer
'''Parts Required'''
D0007990 cylinder anchor x 7
D0007648 end plate x 4
D0007649 Double slide end plate x 4
D0007686 single motor plate x 4
D0007723 Double slide motor mount x 4
D0007687 Motor mount x 4
D0007600 Cylinder anchor x 4
D0015856 hard stop x 4
t x 4 D0007600 Cylinder anchor x 4 D0015856 hard stop x 4 <br/>) - R0015317 Install Rotary Ring + (<u>'''Tools Required'''</u>
… '''Tools Required'''
Standard Hex Key set
Standard spanner set
Lifting Strop
Overhead crane operation
Torque wrench
Soft hammer
Ring lubrication oil
'''Parts Required'''
A0000309 Domed Blanking Plug 19mm x 3
C0001123 Servo Motor: Beckhoff AM8062 18Nm 3000rpm x 1
D0000263 Stop Y Central x 1
D0002990E Strike Post ZX4 Mk5 x 1
D0002991 Switch carrier x 1
D0006061 Timing Belt cap x 1
D0007861 Y axis hard stop x 2
D0010756 Proximity Switch Mounting Block Reduced Size x 2
D0010894 Ethercat Cover ZX3/ZX4 x 1
D0015542 R Axis Motor Connector Cover x 1
E0000336 Sensor: M8; 2mm, PNP N/O, M8 conn x 2
H0007995 Rotary base cover plate x 2
M0000451 Plug and Elbow x 2
R0000971E Bench Assemble R Axis Gearbox
R0010260 Bench Assemble Tool Break Sensor
R0015138 Machining Head ZX4 Mk5 (Quad Plunge)
Break Sensor R0015138 Machining Head ZX4 Mk5 (Quad Plunge) <br/>) - TB0398 Assembly of ZX4 Screen Cover + (== Problem == The previous design of scree … == Problem == The previous design of screen cover was susceptible to cracking and failing. The new design resolves this by having a metal hinge piece and an additional clear plastic plate, with both being joined by 3M VHB (Very High Bond) tape. Parts: D0010965 x1 D0010966 x1 M0001119 x 550mmD0010965 x1 D0010966 x1 M0001119 x 550mm)
- Correcting Linearity with Rack Offset File + (Accuracy problem on A2001 was traced to a … Accuracy problem on A2001 was traced to a non-linear rack. This tutorial demonstrates how to test the linearity of a rack and the systems in place to correct the linearity. machine in the 20 year history that has needed these alterations</div> </div>)
- ZX5 Production R0015040 Module F to R0015001B Module E alignment + (Alignment criteria and steps for correct machine installation)
- ZX5 Production R0015139 Module B to R0015000B Module C alignment + (Alignment details and level settings for correct alignment of module B to module C)
- R0000728 R0000729 Stroke Assembly Dismantling + (Assemblies fitted to MK1 ZX4 will require … Assemblies fitted to MK1 ZX4 will require refurbishment at some point of life cycle.
The following instructions should be followed to ensure that correct assembly and setting are performed
'''Tools Required'''
Standard hex key set
Standard spanner set
Double pin saw flange spanner
Drifts and punches
Ballpein hammer
Soft hammer
Degreasing bath
pein hammer Soft hammer Degreasing bath <br/>) - Saw machining centre alignment and level check points + (Bullet pointed checks to determine correct alignment of key components within Sawing unit)
- R0000711 Rotary Base Assembly REV2 + (Detailed steps to correctly install rotary … Detailed steps to correctly install rotary gear and journals Checks for correct installation of oil feed system Tolerance limits and requirements '''Tools Required''' Standard hex key set 0-25mm micrometer Ring support blocks for assembly Work Table Mag Base and D.T.I Hepco flat spanner 17mm socket Torque Wrench '''Parts required''' D0006423-2mod Drive ring x 1 D0007651 Face plate x 1 B0000185 journal x 6 B0000186journal x 2 D0006503 Journal washer x 8 D00007692 wiper x 4 D0006521 x2 D0007693 x 2 D0007713 rotary ring cap x 1iper x 4 D0006521 x2 D0007693 x 2 D0007713 rotary ring cap x 1)
- ZX5 Production R0015122 Module A to R0015139 Module B alignment + (Details and steps for correct alignment of Module A to Module B '''<u>Tools Required</u>''' Laser Level 300mm rule 1 meter yellow level 24mm spanner Permanent marker Pipe cutters Ring main connection equipment)
- ZX5 Production R0000548E Module G to R0015040 Module F alignment + (Details for correct alignment of module G to module H To include fitting of front safety tray once module G is installed)
- R0000204 Notching gear boxes assembly + (For longevity and correct running , it is … For longevity and correct running , it is imperative these units are assembled to the correct tolerances and assembled in the way detailed by this procedure
Tools required
Standard Hex Key Set
Castle nut spanner
Loctite 243 thread lock
Loctite 641 bearing fit
Mandrel jig
Grease applicator
Fe10 solvent spray
ease applicator Fe10 solvent spray <br/>) - Disabling a Tool Home or Tool Out Sensor + (If there is a failure of a tool out or too … If there is a failure of a tool out or tool home sensor on the Stuga spindle ring, it is important to be able to quickly disable the input so the machine can continue production until the problem can be properly resolved. The software has an inbuilt functionality to do this - this tutorial takes you through the necessary stepsrial takes you through the necessary steps)
- J0001000H Autoflow Mk4 Mechanical installation-Alignment + (Information to clarify correct process for installation of J0001000H Autoflow Mk4 Levelling tolerance of 0.004" /0.1mm over 300mm (1 division on engineers level) must be adhered to)
- Monday - Putting Customer Machines On Stop + (It is important that everyone does this th … It is important that everyone does this the same way or confusion and frustration will follow. It is also important to understand how the relationship between a Machine and it’s contract works * Each machine on the “Machine” board needs to link to a “Contract” on the “Service Contracts” board * This allows multiple Machines to have the same “Contract” – eg Customade group contract * The “Contract” is the electronic version or equivalent to the bit of paper that the customer has signed, and contains the start and end dates, etc * For machines that have no contract, I have set up some other “General” contract types. These General Types are not machine specific – ** PAYG – General Pay as you go ** OnStop – Customer is on stop and nothing should be supplied ** AskFirst – Ask KG or management first before supplying goods and services ** Proforma – Payment required before supply of goods and services ** PreDelivery – Before warranty startses ** PreDelivery – Before warranty starts)
- Stuertz Infeed - Check GY Position Parallelism + (It is important that the parallelism of th … It is important that the parallelism of the GY axis to the backfence is set and maintained along the length of the rack. This tutorial describes how to check this parallelism without the need for measuring equipment
Potential Symptoms of a problem
*Gripper cannot pick up offcuts
*Gripper /profile end forced away from backfence
*Accuracy problems
*Gripper wobbles after it has released profile
Use the laptop to enable you to control the Service screen whilst inside the infeed table
Ther gripper setting jig is used to give an accurate and reliable zero to locate the gripper jaw to. Any piece of aluminium reinforcing box section will also work
Create a spreadsheet or a table to log your results,.
ng box section will also work Create a spreadsheet or a table to log your results,. <br/>) - Setting Motor Overload Relays +
- Setting Gripper Nose + (It is very important to ensure the gripper nose and heel is correctly set up. This assembly is subject to a lot of wear and tear and maintenance is very important. Incorrect setting or play in this assembly is a major cause of accuracy issues)
- Monday - Emails to Updates + (Mondays has changed the way it deals with … Mondays has changed the way it deals with the way it writes updates via email, in a very useful way for us. This will save a lot of time cutting and pasting information from emails. Simply put, * when you send an email, cc: the unique email address for the item in your email you are sending. This is standard practice to get your email into Mondays. * When your contact replies (with reply all) * their reply will now magically appear in the Monday update for the item. * It even strips out the email trail, leaving just the important reply It used to be the case that only members of Stuga.co.uk could send an email directly to an update, but this has now changed…ly to an update, but this has now changed…)
- ZX5 V Notch Blade Mechanical Setup + (On previous models the V notch separation … On previous models the V notch separation was set via the software. This could be quite time consuming and required multiple tests and measurements to get it right. Four variables were used for each V notch and it is not straight-forward to get the shape, depth and position correct. On the new ZX5 the '''shape''' of the V notch is set mechanically and once set it should never need changed again, but remember that some customers sharpen their V notch blades instead of replacing them. The following was carried out on the rear V notches using some standard outerframe but the process is exactly the same for the front. Once set you can use the usual software settings to increase/decrease depth and to align back to back. The overall process is: # Set the shape of the V notch (Mechanical adjustment) # Set the Depth of the V notch (Software adjustment in Notching Tab) # Set the Position of the V notch (Software adjustment in Notching Tab) you will be in close proximity to the V notch blades and tooling.</div> </div>)
- Setting Profile Detection Laser Sensor + (Setting the profile sensor correctly is im … Setting the profile sensor correctly is important as it will lead to incorrect offcut measurement.
ensure the sensor is set for the range of different colours</div> </div><br/>) - ACEpc Changing IP address using netedit + (The ACEpcs use two different systems for c … The ACEpcs use two different systems for connecting a network #NETBeui - this was used on earlier machines but reliability depends on the customer network setup. Reconfiguration after initial setup is difficult #IP addressing - A setup system was written using IP addresses to connect. This is a little harder to set up, but is easier to change later. A special program called netedit was written which updates all the correct files in the backgroundes all the correct files in the background)
- Replacing Baldor Microflex Drive with RS Automation + (The Baldor Microflex drive with Beckhoff m … The Baldor Microflex drive with Beckhoff motor was a drive system combination that has now been superseded with a better performance system using an RS Automation Drive and motor combination The Part number for the upgrade is R0019052X Kit: X Axis Replacement using RS Automationit: X Axis Replacement using RS Automation)
- GE Control Components Changeover + (The GE control components are now obsolete … The GE control components are now obsolete and we have had to find a new manufacture to use. We have decided to go with Eaton control equipment for this. We are using the same supplier for these products and we have the added benefit if the supplier holding these parts in there stores. We had a choice to use either ABB, Eaton or Schneider components. Although all of the individual Eaton components are a direct replacement for the GE components, there are certain situation that we may be tripped up. This includes times when we need to change a motor breaker that has an auxiliary block connected to it. We can change the breaker but the GE auxiliary block will not fit on the new Eaton one. This means that the Eaton components need to have different part numbers to the GE components. This document will layout the new part numbers and what they relate to and instructions on how they are added and changed in the Sage system. are added and changed in the Sage system.)
- ZX5 Datum and Grip Pin Setup + (The ZX5 has a different and much improved … The ZX5 has a different and much improved grip system where we use the 10mm cutter to put holes in the end of the profile. The profile is then gripped by the grip pins to give a more accurate and reliable grip. Along with better machining accuracy, this also allows the X axis to be run at higher speeds and virtually eliminates gripper slip. For it to work accurately and reliably the system first needs to be set up mechanically on both the X and SX axis. And crucially, if the datum is changed the loading position also has to be changed, and vice versa. This is extremely important for the operator, and any on-site maintenance staff to be aware of as changing either one without compensating the other can lead to accuracy issues and miss grips.an lead to accuracy issues and miss grips.)
- TB0447 ZX5 Setup - X Axis Beam Calibration + (The ZX5 has a moveable Beam on the Z axis. … The ZX5 has a moveable Beam on the Z axis. The design reason behind this is to keep the gripper arm short for reliability and stiffness, yet enable it to move out of the way for rear V notching During the calculations for the machining bar recipe, the software has to work out if and when the beam needs to be moved: · If there are no v notches on the bar, then machine all the operations without moving the beam. Beam moves at the very end when ejecting · If there is a V notch, move the bar during the first X axis position where position > beamStrokeLength Therefore, it is very important for the software to know how far the beam moves physically to offset all the positions to allow for it. The distance is measured and entered into parameter beamStrokeLength. It should be around 700mm. beamStrokeLength. It should be around 700mm.)
- ZX5 Alignment Check + (The ZX5 machine can be tricky to align as there are many adjustments designed into the table to offset manufacturing tolerances. This step by step guide follows the correct protocol to ensure the starting point and sequence of alignment is correct)
- Repairing R axis datum pin + (The datum pin on the old ZX4 at Sidey was … The datum pin on the old ZX4 at Sidey was recommended to be changed at my last service visit. Unfortunately there are quite a few different datum spindle plates and we were having problems tracking down the correct one so it was decided that I would be sent out the new replaceable datum pin carrier as Sidey have a small machine shop I could use to modify the existing plate to make it fit. Unfortunately the mounting holes of the new carrier interfered with the mounting holes of the pneumatic cylinder so it couldn't be used. After taking dimensions of the existing plate for identification I realised there was actually a very small and quick repair that could be carried out until the correct parts were identified. All you need is a cordless drill, a 2.5 and a 3.1mm drill, M3 tap and an M3 x 15mm cap head screw.l, M3 tap and an M3 x 15mm cap head screw.)
- R0000299 Stroke assembly rebuild Part 2 + (The following instructions should be follo … The following instructions should be followed to ensure that correct assembly and setting are performed '''Tools / consumables Required''' Standard hex key set Standard spanner set Large adjustable spanner Drifts and punches Ballpein hammer Soft hammer FE10 Solvent Hylomar Gasket '''Parts Required''' Kit R0000299 containing B0000043 Double Angular bearing 15 I?D 35 O?D 15.9 long rubber seal 3 x 2 B0000105 Double Angular Bearing 15 I/D 35 O/D 15.9 Long x 1 B0000335 3ph Brake motor 2 pole 3000rpm x 1 B0000380 Double Angular Bearing 25 I/D 52 O/D 20.6 Long + rubber seal x 2 D0000059 Damper Bridge x 1 D0000062 Damper Bridge Boss x 2 D0007730 ZX4 V Notch Mk1 Spindle Shaft x1 D0007867 Bevel Gear (Left) x 1 D0007868 Bevel Gear (Right ) x 1 D0007873 Motor Gear x 1 D0007874 Pinion Gear x 1 D0007875 Pinion Shaft x 1 P0000165 damper x 174 Pinion Gear x 1 D0007875 Pinion Shaft x 1 P0000165 damper x 1)
- Upgrade - R0000173 Conveyor Motor + (The original style of conveyor is used on many machines, but the motor that powers it is no longer available. This guide will allow a different motor/gearbox to be used.)
- X252 Forward Clamp Out Sensor Setup Stuertz Infeed + (The out sensor used for the vorlaufwagen c … The out sensor used for the vorlaufwagen cannot be a standard reed switch because the cylinder that drives this output is a telescoping version. It is impossible to detect the out position. Therefore, a sensor is fitted that must be programmed to set a high output when it detects the full range has been reached The sensor is a [https://www.pepperl-fuchs.com/global/en/classid_53.htm?view=productdetails&prodid=42559#overview Pepperl+Fuchs VDM28-8-L] Datasheet can be downloaded [https://files.pepperl-fuchs.com/webcat/navi/productInfo/45/452859n.pdf?v=20220926110229 here] '''Function''' The distance measurement device contains one transmitter and one receiver incorporated into a single housing. The transmitter light is reflected back to the receiver from a target. The sensor determines the distance to the target and triggers a switching function or supplies the relevant measured value for processing. '''Assembly instructions''' The sensor can be mounted by means of through holes or by using a mounting bracket or mounting clamp Ensure that the surface is level in order to prevent the housing from becoming distorted when the fittings are tightened. It is advisable to secure the nuts and screws using spring washers in order to prevent the sensor from being incorrectly adjusted. '''Connection''' Connect the device in accordance with the connection diagram in the datasheet. '''Adjustment''' The green LED lights up when the operating voltage is switched on. Adjust the sensor so that the laser point is on the gripper bodyso that the laser point is on the gripper body)
- Stuertz Infeed - Align and dowel GX rack + (The rack on a Stuertz infeed is a helical … The rack on a Stuertz infeed is a helical type and is supplied unpinned, as the motor is not connected before delivery to Stuga The alignment must be checked then dowelled with 5mm roll pins The racks are already located in the "Y" direction with location pins, this procedure is purely to align the racks to each other in the GX directionhe racks to each other in the GX direction)
- WinMulti - Changing The Colour Identification Box + (The version 6 software has a feature to id … The version 6 software has a feature to identify the colour of the profile and also to help operators load foiled profile in the correct orientation.
Updating the colours is a very simple job that can be done in 2 ways
# Via the Machine Settings->Colours Tab # From Bar Queue whenever a new colour is encountered.
Queue whenever a new colour is encountered. <br/>) - PLC Source Control - Adding a Repository + (These instructions give details of how to … These instructions give details of how to set up a repository so that any changes made to the core project will be tracked. For the git source control to work it is important that GIT has been chosen as the source control program. see Prerequisits. The instructions start from : The project has been created and PLC code has been loaded in to the TwinCAT Xae Shell program.oaded in to the TwinCAT Xae Shell program.)
- ZX3 Counterweight Installation + (This guide explains how to install the counterweight assembly on the current ZX3 ring)
- Importing Picking List from Sage To Monday + (This procedure demonstrates how to use the … This procedure demonstrates how to use the "Sage Hooks" MS Access database to grab the data created in Sage and exort to a spreadsheet. The spreadsheet is then imported into a new Monday board, then copied across to the correct Picking List for the machine build.
Picking List for the machine build. <br/>) - ZX5 Transfer Table Crank set up + (This tutorial will show you how to mechani … This tutorial will show you how to mechanically set up the cranks and sensors so that the correct overlaps between the different cranks are achieved. Crank C is the crank on the Machining Centre Outfeed that controls the single pop up. Crank D is also mounted on the Machining Centre Outfeed and controls the pop ups on the Transfer Table. Crank E is the crank on the Saw Infeed and controls the single pop up that moves the profile in to the channel. that moves the profile in to the channel.)
- B0000082b Motor replacement For Obsolete part B0000082 + (To rectify the obsoletion of B0000082 driv … To rectify the obsoletion of B0000082 drive motor, the following replacement kit has been designed to enable continued support of older assemblies within stuga machines . The kit consists of a new motor and appropriate gearbox, adapter plate and new fasteners . Also details are included here for a small modification to enable the upgrade to function correctly Following parts are required for this upgrade B0000082b load motor and gearbox 1 off D0008225b adapter plate F0000189 M6 x 25 set bolts 4 off F0000058 A form washer 4 off F0000190 M8 x 40 set bolts 2 off F0000007 M5 x 16 cap head bolt 4 off off F0000007 M5 x 16 cap head bolt 4 off)
- TwinCat Connection Faults + (We are quite often faced with multiple Axi … We are quite often faced with multiple Axis/Door Open/ Estop faults all being reported at the same time. More often than not this is caused by a bad connection on the TwinCat system somewhere. If there is any dropout of connection at any point in the system it will result in this error. You could spend some time crawling about on your hands and knees, opening electrical cabinets and trying to find the fault manualy, but by using TwinCat we can save some time and effort, and pinpoint the cause almost immediately.and pinpoint the cause almost immediately.)
- PLC Source Control - Git Credential Manager for Windows Install + (When connecting to the tc3Multi repository … When connecting to the tc3Multi repository on BitBucket.org, some times the validation credentials are not accepted. Check that the password you have is correct, if the problem persists , install or update Git Credential manager for windows to the latest version.manager for windows to the latest version.)
- TM016 Arrow Head Adjustment on Saw + (When in arrow head or centralising mode, t … When in arrow head or centralising mode, the pivot point of the saw blade is moved from the bladetofence position to the central position of the current section. The mechanism that achieves this allows for any width of profile from 45 mm to 130 mm. If the arrow head position is not central to the profile, the centraliser position may need to be adjusted
to close fully, or an issue with the symmetry of the profile</div> </div><br/>) - R0000299 Stroke assembly rebuild + ( The following instructions should be fol … The following instructions should be followed to ensure that correct assembly and setting are performed '''Tools / consumables Required''' Standard hex key set Standard spanner set Large adjustable spanner Drifts and punches Ballpein hammer Soft hammer FE10 Solvent Hylomar Gasket '''Parts Required''' Kit R0000299 containing B0000043 Double Angular bearing 15 I?D 35 O?D 15.9 long rubber seal 3 x 2 B0000105 Double Angular Bearing 15 I/D 35 O/D 15.9 Long x 1 B0000335 3ph Brake motor 2 pole 3000rpm x 1 B0000380 Double Angular Bearing 25 I/D 52 O/D 20.6 Long + rubber seal x 2 D0000059 Damper Bridge x 1 D0000062 Damper Bridge Boss x 2 D0007730 ZX4 V Notch Mk1 Spindle Shaft x1 D0007867 Bevel Gear (Left) x 1 D0007868 Bevel Gear (Right ) x 1 D0007873 Motor Gear x 1 D0007874 Pinion Gear x 1 D0007875 Pinion Shaft x 1 P0000165 damper x 174 Pinion Gear x 1 D0007875 Pinion Shaft x 1 P0000165 damper x 1)

 Français
 English
 Deutsch
 Español
 Italiano
 Português