This page will describe how to generate a Postest (operation position test), and is used to set the distance relationship between the routed holes and the saw blade so that routed pieces line up correctly back to back.

Tolerance
Firstly a word about tolerance. The machine is designed and sold with a positional accuracy of +/-0.5mm.
This means that if you take two identical pieces with an operation in the middle, the difference in the operation positions could be up to 1mm different, and the machine would still be within tolerance. In this case, the machine settings do not need alteration
Postest
To Produce a Postest perform the steps below
- Tap on the F7 Service button on the main toolbar
- This will open the service menu, click on the Tests tab.
- Select your profile from the list
- Select the colour from the Colour Drop Down
- If you are using an offcut, change the standard bar length to the length of the offcut you wish to use.
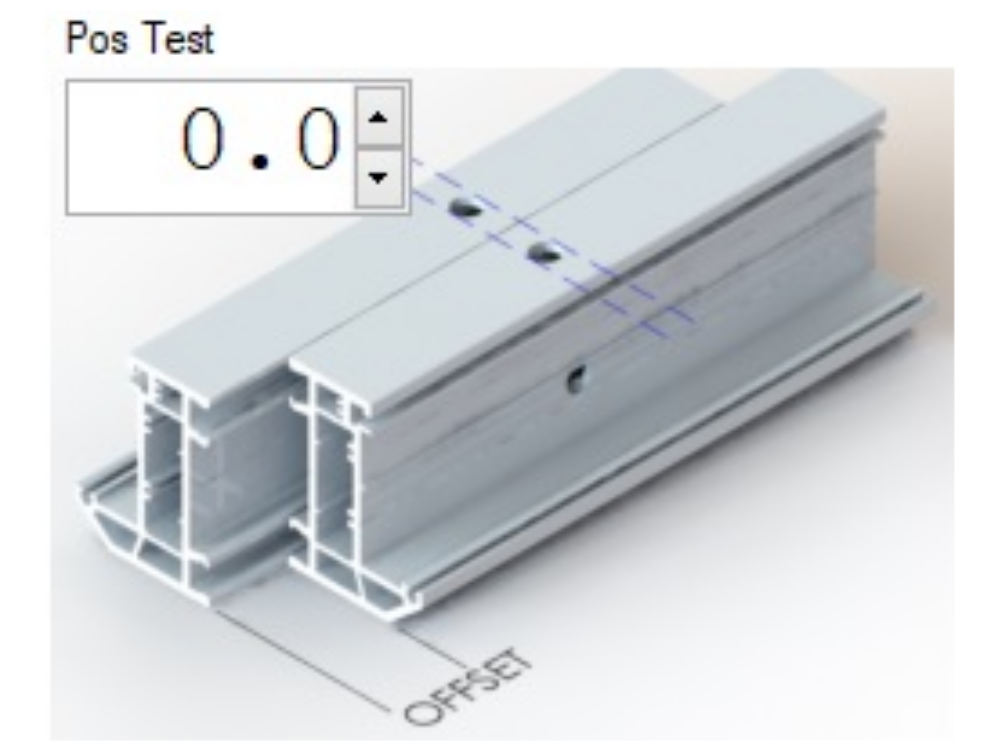
- Tap on the Pos Test Button
This will add 2off 450mm pieces with square ends and a pos test in the middle
| Version | Software Version | Implemented Date | Service Screen |
|---|---|---|---|
| 1 | 5.9.0.0
6.0.0.0 |
2010 |  |
| 2 | 6.7.10.0 | 2025 |  |
Bar Queue
| Version | |
|---|---|
| 1 |  |
| 2 |  |
Above is a depiction of the bar queue, prep and cut these pieces as normal.
Lining up the Pieces
Once the postest pieces have been cut they should be put back-to-back as shown in the pictures below. With the holes / notches lined up, the Offset at the ends of the profile should be measured using accurate callipers. You need to be able to measure to an accuracy of 0.2mm.
| Version | Operation | ||
|---|---|---|---|
| 1 | Datum Holes |  Lining up the Postest Pieces |
|
| 2 | CalNotch |  |
Pass:
If the test shows an error smaller than 1mm, the test is ok.
Fail:
If the error is greater than 1mm, this could affect the accuracy of production. Double check your measurements. Then RUN THE TEST AGAIN two more times preferably on different bar lengths.
If (and Only if) the error is consistent* for all of the tests carried out, you can change the settings to alter the position of the holes in relation to the saw cuts.
Consistent means the range of errors is within 0.5mm
| Measurement 1 | Measurement 2 | Measurement 3 | Action |
|---|---|---|---|
| -0.5 | Not required | Not required | None needed - machine is within tolerance |
| 1 | 1.4 | 1 | Adjustment may be needed
Take the median (1.2) |
| 2 | 0.5 | 0.2 | Inconsistent results.
Do not change the settings Instead consider what may have gone wrong with the first measurement Possibly profile related |
| 3 | -3 | -5 | Results are sporadic, clearly a major root cause failure that needs investigation |
Adjusting Position
- Click into the Settings menu, on the right there will be 2 possibilities, determine which picture best reflects your pieces (either the top piece is to the left or to the right of the bottom piece)
- Enter the offset into the appropriate box. then click the Save button below.
- This will change the appropriate parameter related to your machine.
- Once complete, redo the postest to check that all is now well.
If the error seems to be random, there will be another root cause, and changing the parameters will NOT solve the issue, it will only make the situation worse.
There are many root causes to an accuracy problem. For a full accuracy guide for a competent engineer see General Accuracy Guidelines
Common Issues
| Symptom | Applies To | Root Cause | Potential Solutions |
|---|---|---|---|
| Result inconsistent - cold weather outside | All Machines | Profile expansion due to profile temperature change between machining and sawing | TB0269 Proving Accuracy Variation due to Ambient Temperature
Ensure the test piece is at room temperature befoe testing (do not use a bar from outside) |
| Jumps between +1mm to -1mm | ZX5 | Datum hole too far away from gripper pins |
Accuracy - Check Gripper Datum Hole Position Variance
Rubber clamp pad missing on infeed datum clamp |
| Out on one profile type only | All | Bar end squareness inconsistent | System supplier bar end is out of square.
The ZX5 can cope with a cut squareness tolerance of +/2mm top to bottom (bigger with long range gripper upgrade) Try squaring the end of profile first |
| Out on one pos test measurement, all others are fine | ZX5 | Datum holes already exist on bar in wrong position - second run through elongates holes so they are not circular | Cut off the datum holes |
To Return to the main page, please click WinMulti Software Operating Guide
See Also: TB0269 Proving Accuracy Variation due to Ambient Temperature
Draft
 Français
 English
 Deutsch
 Español
 Italiano
 Português