| [version en cours de rédaction] | [version approuvée] |
| (6 révisions intermédiaires par 2 utilisateurs non affichées) | |||
| Ligne 2 : | Ligne 2 : | ||
|Main_Picture=ZX5_V_Notch_Blade_Mechanical_Setup_Title.jpg | |Main_Picture=ZX5_V_Notch_Blade_Mechanical_Setup_Title.jpg | ||
|Description=<translate>How to mechanically set the V notches on a ZX5.</translate> | |Description=<translate>How to mechanically set the V notches on a ZX5.</translate> | ||
| + | |Categories=Maintenance | ||
|Difficulty=Easy | |Difficulty=Easy | ||
|Duration=30 | |Duration=30 | ||
|Duration-type=minute(s) | |Duration-type=minute(s) | ||
| + | |Tags=ZX5, V notch, Adjustment | ||
}} | }} | ||
{{Introduction | {{Introduction | ||
| − | |Introduction=<translate>On previous models the V notch separation was set via the software. This could be quite time consuming and required | + | |Introduction=<translate>On previous models the V notch separation was set via the software. This could be quite time consuming and required multiple tests and measurements to get it right. Four variables were used for each V notch and it is not straight-forward to get the shape, depth and position correct. |
| − | On the new ZX5 the | + | |
| + | On the new ZX5 the '''shape''' of the V notch is set mechanically and once set it should never need changed again, but remember that some customers sharpen their V notch blades instead of replacing them. The following was carried out on the rear V notches using some standard outerframe but the process is exactly the same for the front. Once set you can use the usual software settings to increase/decrease depth and to align back to back. | ||
| + | |||
| + | |||
| + | The overall process is: | ||
| + | |||
| + | # Set the shape of the V notch (Mechanical adjustment) | ||
| + | # Set the Depth of the V notch (Software adjustment in Notching Tab) | ||
| + | # Set the Position of the V notch (Software adjustment in Notching Tab) | ||
| + | |||
| + | |||
| + | {{Warning|...As you WILL have to stand inside the machining centre I would advise the use of a bump cap and gloves as you will be in close proximity to the V notch blades and tooling.}}</translate> | ||
}} | }} | ||
| − | {{Materials | + | {{Materials}} |
| − | | | + | {{EPI |
| + | |EPI=use-protective-eyewear, use-protective-handwear, use-protective-headgear | ||
}} | }} | ||
| − | |||
{{Tuto Step | {{Tuto Step | ||
|Step_Title=<translate>Carry out first V notch test</translate> | |Step_Title=<translate>Carry out first V notch test</translate> | ||
| − | |Step_Content=<translate>This step isn't really required, I personally like to do it just to see how far out we are to start with</translate> | + | |Step_Content=<translate>This step isn't really required, I personally like to do it just to see how far out we are to start with, and for the purpose of this tutorial it shows how quick it is to go from this to perfect. |
| + | |||
| + | {{Info|...Use a regular sized V notch around 30mm wide for the test}} | ||
| + | |||
| + | <br /></translate> | ||
|Step_Picture_00=ZX5_V_Notch_Blade_Mechanical_Setup_step1.JPG | |Step_Picture_00=ZX5_V_Notch_Blade_Mechanical_Setup_step1.JPG | ||
| + | }} | ||
| + | {{Tuto Step | ||
| + | |Step_Title=<translate>Slacken off locking nut on rear of V notch assembly</translate> | ||
| + | |Step_Content=<translate></translate> | ||
| + | |Step_Picture_00=ZX5_V_Notch_Blade_Mechanical_Setup_1.jpg | ||
| + | }} | ||
| + | {{Tuto Step | ||
| + | |Step_Title=<translate>Slacken off four bolts on adjustment mechanism.</translate> | ||
| + | |Step_Content=<translate></translate> | ||
| + | |Step_Picture_00=ZX5_V_Notch_Blade_Mechanical_Setup_2.jpg | ||
| + | |Step_Picture_00_annotation={"version":"2.4.6","objects":[{"type":"image","version":"2.4.6","originX":"left","originY":"top","left":75,"top":-190,"width":3024,"height":4032,"fill":"rgb(0,0,0)","stroke":null,"strokeWidth":0,"strokeDashArray":null,"strokeLineCap":"butt","strokeDashOffset":0,"strokeLineJoin":"miter","strokeMiterLimit":4,"scaleX":0.15,"scaleY":0.15,"angle":0,"flipX":false,"flipY":false,"opacity":1,"shadow":null,"visible":true,"clipTo":null,"backgroundColor":"","fillRule":"nonzero","paintFirst":"fill","globalCompositeOperation":"source-over","transformMatrix":null,"skewX":0,"skewY":0,"crossOrigin":"","cropX":0,"cropY":0,"src":"https://stuga.dokit.app/images/3/36/ZX5_V_Notch_Blade_Mechanical_Setup_2.jpg","filters":[]}],"height":450,"width":600} | ||
| + | }} | ||
| + | {{Tuto Step | ||
| + | |Step_Title=<translate>Check and set separation</translate> | ||
| + | |Step_Content=<translate>Using a straight edge placed BETWEEN the teeth of the blade (W/I) you can see we have a gap around 2-3mm. On the opposite blade (W/O) we need to turn the setting bolt anti clockwise until the tips of the teeth just touch the straight edge, as seen in the second picture. If the tips of the teeth were overlapping we would need to increase separation by turning the adjusting bolt clockwise. | ||
| + | |||
| + | Transfer the straight edge to the opposite blade (W/O) and adjust W/I as above. | ||
| + | |||
| + | <br /></translate> | ||
| + | |Step_Picture_00=ZX5_V_Notch_Blade_Mechanical_Setup_4.jpg | ||
| + | |Step_Picture_01=ZX5_V_Notch_Blade_Mechanical_Setup_5.jpg | ||
| + | }} | ||
| + | {{Tuto Step | ||
| + | |Step_Title=<translate>Carry out second test V notch.</translate> | ||
| + | |Step_Content=<translate>This step can be skipped but was left in to show how close you get after following the above. | ||
| + | |||
| + | Lock off the four retaining bolts followed by the locking nut. | ||
| + | |||
| + | We should now be pretty close with only a small pip left in the centre of the notch. | ||
| + | |||
| + | <br /></translate> | ||
| + | |Step_Picture_00=ZX5_V_Notch_Blade_Mechanical_Setup_step3.JPG | ||
| + | }} | ||
| + | {{Tuto Step | ||
| + | |Step_Title=<translate>Another 1/4 to 1/2 turn removes the pip.</translate> | ||
| + | |Step_Content=<translate>We can now repeat the process on the front V notches.</translate> | ||
| + | |Step_Picture_00=ZX5_V_Notch_Blade_Mechanical_Setup_step4.JPG | ||
| + | }} | ||
| + | {{Tuto Step | ||
| + | |Step_Title=<translate>Setting V Notch depth and position along bar</translate> | ||
| + | |Step_Content=<translate>[[ZX5 Adjusting V Notch Depth and Position|https://stuga.dokit.app/wiki/ZX5_Adjusting_V_Notch_Depth_and_Position]]</translate> | ||
}} | }} | ||
{{Notes}} | {{Notes}} | ||
Version actuelle datée du 2 octobre 2019 à 12:10
How to mechanically set the V notches on a ZX5.
Sommaire
- 1 Introduction
- 2 Étape 1 - Carry out first V notch test
- 3 Étape 2 - Slacken off locking nut on rear of V notch assembly
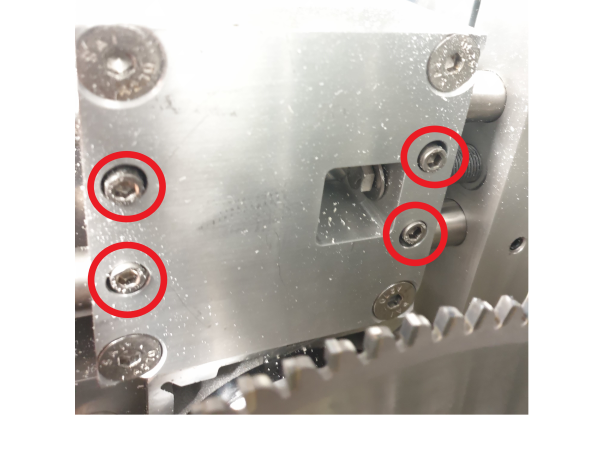
- 4 Étape 3 - Slacken off four bolts on adjustment mechanism.
- 5 Étape 4 - Check and set separation
- 6 Étape 5 - Carry out second test V notch.
- 7 Étape 6 - Another 1/4 to 1/2 turn removes the pip.
- 8 Étape 7 - Setting V Notch depth and position along bar
- 9 Commentaires
Introduction
On previous models the V notch separation was set via the software. This could be quite time consuming and required multiple tests and measurements to get it right. Four variables were used for each V notch and it is not straight-forward to get the shape, depth and position correct.
On the new ZX5 the shape of the V notch is set mechanically and once set it should never need changed again, but remember that some customers sharpen their V notch blades instead of replacing them. The following was carried out on the rear V notches using some standard outerframe but the process is exactly the same for the front. Once set you can use the usual software settings to increase/decrease depth and to align back to back.
The overall process is:
- Set the shape of the V notch (Mechanical adjustment)
- Set the Depth of the V notch (Software adjustment in Notching Tab)
- Set the Position of the V notch (Software adjustment in Notching Tab)
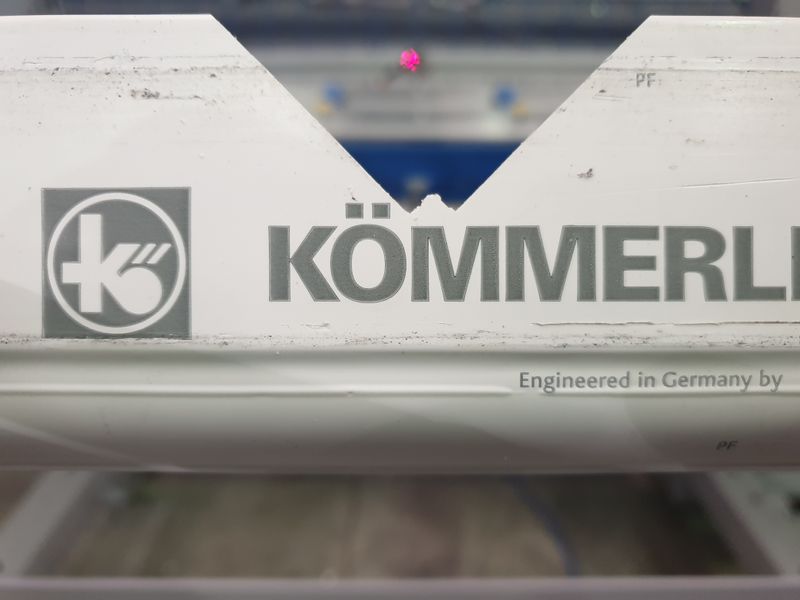
Étape 1 - Carry out first V notch test
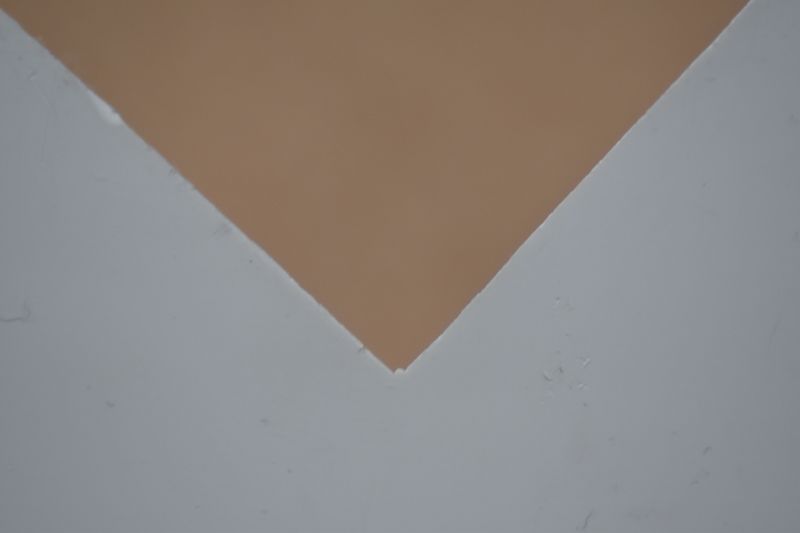
This step isn't really required, I personally like to do it just to see how far out we are to start with, and for the purpose of this tutorial it shows how quick it is to go from this to perfect.
Étape 4 - Check and set separation
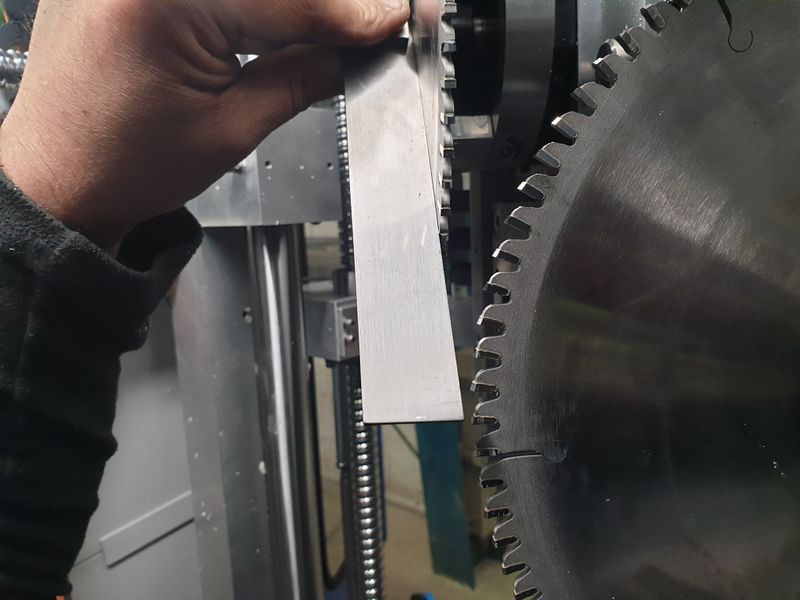
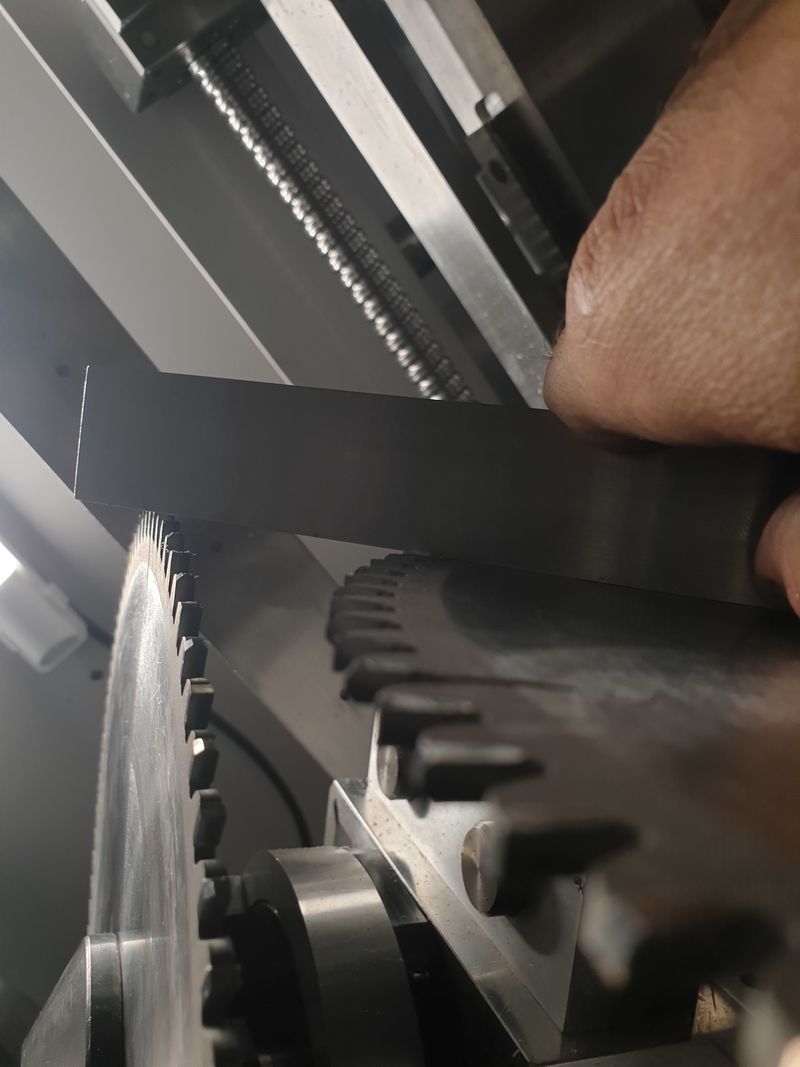
Using a straight edge placed BETWEEN the teeth of the blade (W/I) you can see we have a gap around 2-3mm. On the opposite blade (W/O) we need to turn the setting bolt anti clockwise until the tips of the teeth just touch the straight edge, as seen in the second picture. If the tips of the teeth were overlapping we would need to increase separation by turning the adjusting bolt clockwise.
Transfer the straight edge to the opposite blade (W/O) and adjust W/I as above.
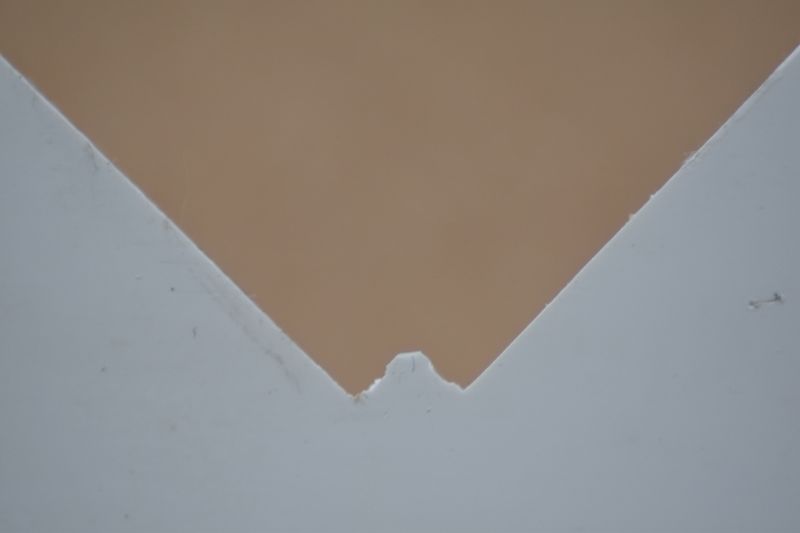
Étape 5 - Carry out second test V notch.
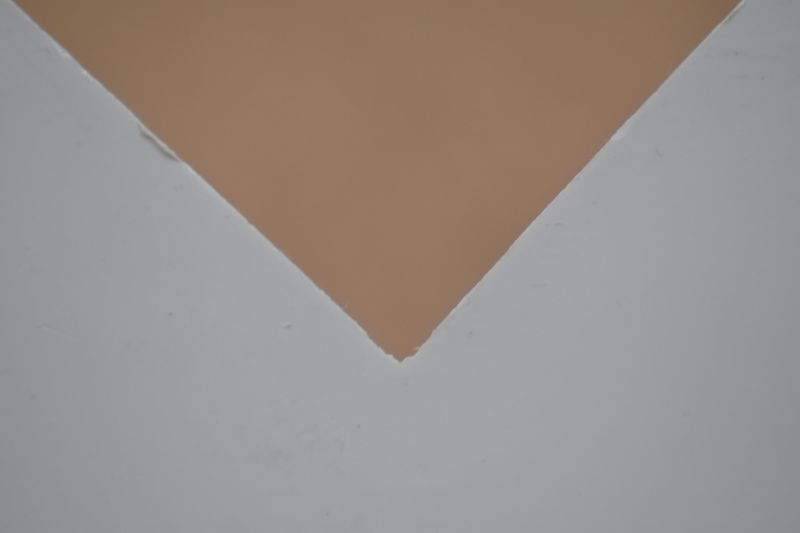
This step can be skipped but was left in to show how close you get after following the above.
Lock off the four retaining bolts followed by the locking nut.
We should now be pretty close with only a small pip left in the centre of the notch.
Étape 6 - Another 1/4 to 1/2 turn removes the pip.
We can now repeat the process on the front V notches.
Étape 7 - Setting V Notch depth and position along bar
https://stuga.dokit.app/wiki/ZX5_Adjusting_V_Notch_Depth_and_Position
Draft
 Français
 English
 Deutsch
 Español
 Italiano
 Português