| [version en cours de rédaction] | [version en cours de rédaction] |
(Page créée avec « {{Tuto Details |Main_Picture=WinMulti_-_Postest_Postest.jpg |Main_Picture_annotation={"version":"2.4.6","objects":[{"type":"image","version":"2.4.6","originX":"left","orig... ») |
|||
| Ligne 6 : | Ligne 6 : | ||
|Tags=winMulti, Postest, Accuracy, Tests | |Tags=winMulti, Postest, Accuracy, Tests | ||
}} | }} | ||
| − | <translate></translate> | + | <translate>=== Postest === |
| + | To Produce a Postest perform the steps below {{#annotatedImageLight:Fichier:WinMulti - Postest Service TestsTab.jpg|0=500px|hash=|jsondata=|mediaClass=Image|type=thumb|align=default|src=https://stuga.dokit.app/images/9/96/WinMulti_-_Postest_Service_TestsTab.jpg|href=./Fichier:WinMulti - Postest Service TestsTab.jpg|resource=./Fichier:WinMulti - Postest Service TestsTab.jpg|caption=|size=500px}}<br /> | ||
| + | |||
| + | # 1.Tap on the F7 Service button on the main toolbar | ||
| + | # 2. This will open the service menu, click on the Tests tab. you will see the screen to the right. | ||
| + | # 3. Select your profile from the list | ||
| + | # 4. Select the colour from the Colour Drop Down | ||
| + | # 5. If you are using an offcut, change the standard bar length to the length of the offcut you wish to use. | ||
| + | # 6. Tap on the Pos Test Button | ||
| + | # | ||
| + | |||
| + | |||
| + | This will add 2 450mm pieces with square ends and a datum test in the middle, to the bar queue as below | ||
| + | <br /> | ||
| + | |||
| + | === Bar Queue === | ||
| + | {{#annotatedImageLight:Fichier:WinMulti - Postest PosTestBarQueue.jpg|0=533px|hash=|jsondata=|mediaClass=Image|type=frameless|align=center|src=https://stuga.dokit.app/images/7/79/WinMulti_-_Postest_PosTestBarQueue.jpg|href=./Fichier:WinMulti - Postest PosTestBarQueue.jpg|resource=./Fichier:WinMulti - Postest PosTestBarQueue.jpg|caption=|size=533px}} | ||
| + | |||
| + | |||
| + | Above is a depiction of the bar queue, prep and cut these pieces as normal. | ||
| + | |||
| + | === Lining up the Pieces === | ||
| + | <br />{{#annotatedImageLight:Fichier:WinMulti - Postest Postest.jpg|0=252px|hash=|jsondata=|mediaClass=Image|type=thumb|align=default|src=https://stuga.dokit.app/images/3/32/WinMulti_-_Postest_Postest.jpg|href=./Fichier:WinMulti - Postest Postest.jpg|resource=./Fichier:WinMulti - Postest Postest.jpg|caption=Lining up the Postest Pieces|size=252px}}Once the postest pieces have been cut they should be put back-to-back as shown to the right | ||
| + | |||
| + | |||
| + | With the holes Lined up the Offset at the ends of the profile should be measured. If prepped on outer frame the bottom piece should have the beadrail toward the tester, and the top piece should have the beadrail away from the tester. | ||
| + | |||
| + | |||
| + | From here click into the Settings menu, on the right there will be 2 possibilities, determine which picture best reflects your pieces (either the top piece is to the left or to the right of the bottom piece) enter the offset into the appropriate box. then click the Save button below. | ||
| + | |||
| + | |||
| + | This will change the appropriate parameter related to your machine. once complete, redo the postest to check that all is now well. | ||
| + | |||
| + | |||
| + | |||
| + | To Return to the main page, please click [[Manual:WinMulti Software Operating Guide|WinMulti Software Operating Guide]] | ||
| + | </translate> | ||
{{PageLang | {{PageLang | ||
| + | |Language=en | ||
|SourceLanguage=none | |SourceLanguage=none | ||
|IsTranslation=0 | |IsTranslation=0 | ||
| − | |||
}} | }} | ||
{{AddComments}} | {{AddComments}} | ||
Version du 27 mars 2020 à 17:30
This page will describe how to generate a Postest (operation position test), and is used to set the distance between the ring and the saw blade so that routed pieces line up correctly back to back.

Postest
To Produce a Postest perform the steps below

- 1.Tap on the F7 Service button on the main toolbar
- 2. This will open the service menu, click on the Tests tab. you will see the screen to the right.
- 3. Select your profile from the list
- 4. Select the colour from the Colour Drop Down
- 5. If you are using an offcut, change the standard bar length to the length of the offcut you wish to use.
- 6. Tap on the Pos Test Button
This will add 2 450mm pieces with square ends and a datum test in the middle, to the bar queue as below
Bar Queue

Above is a depiction of the bar queue, prep and cut these pieces as normal.
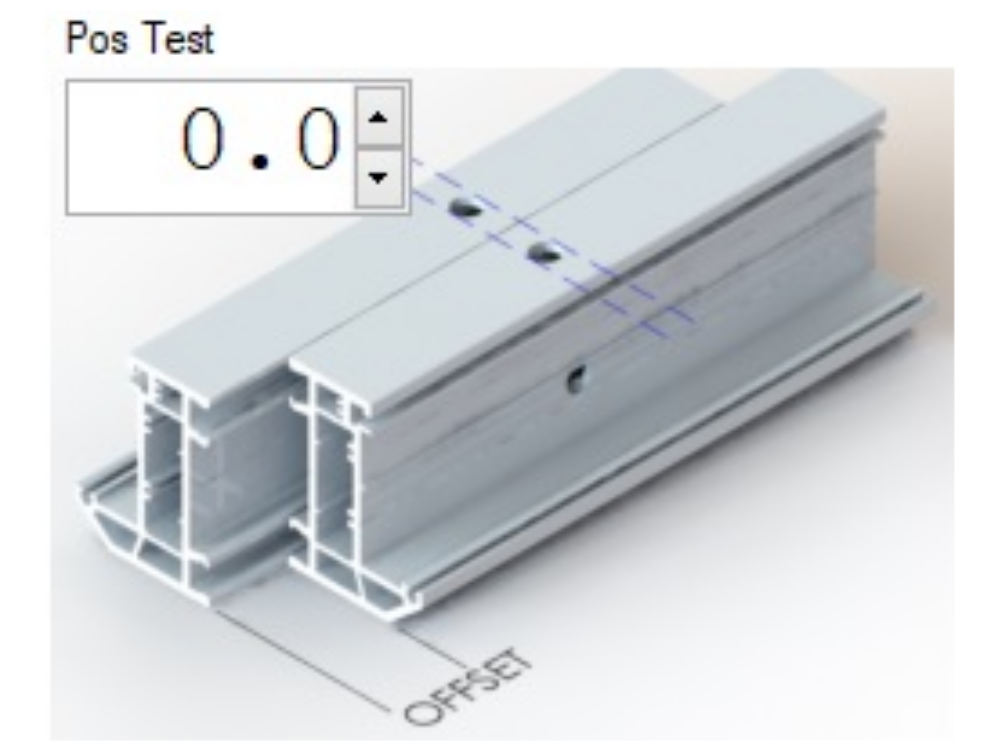
Lining up the Pieces

Lining up the Postest Pieces
Once the postest pieces have been cut they should be put back-to-back as shown to the right
With the holes Lined up the Offset at the ends of the profile should be measured. If prepped on outer frame the bottom piece should have the beadrail toward the tester, and the top piece should have the beadrail away from the tester.
From here click into the Settings menu, on the right there will be 2 possibilities, determine which picture best reflects your pieces (either the top piece is to the left or to the right of the bottom piece) enter the offset into the appropriate box. then click the Save button below.
This will change the appropriate parameter related to your machine. once complete, redo the postest to check that all is now well.
To Return to the main page, please click WinMulti Software Operating Guide
Draft
 Français
 English
 Deutsch
 Español
 Italiano
 Português