|
|
| Ligne 32 : |
Ligne 32 : |
| | {{Tuto Step | | {{Tuto Step |
| | |Step_Title=<translate>Fitting New Valve Slice</translate> | | |Step_Title=<translate>Fitting New Valve Slice</translate> |
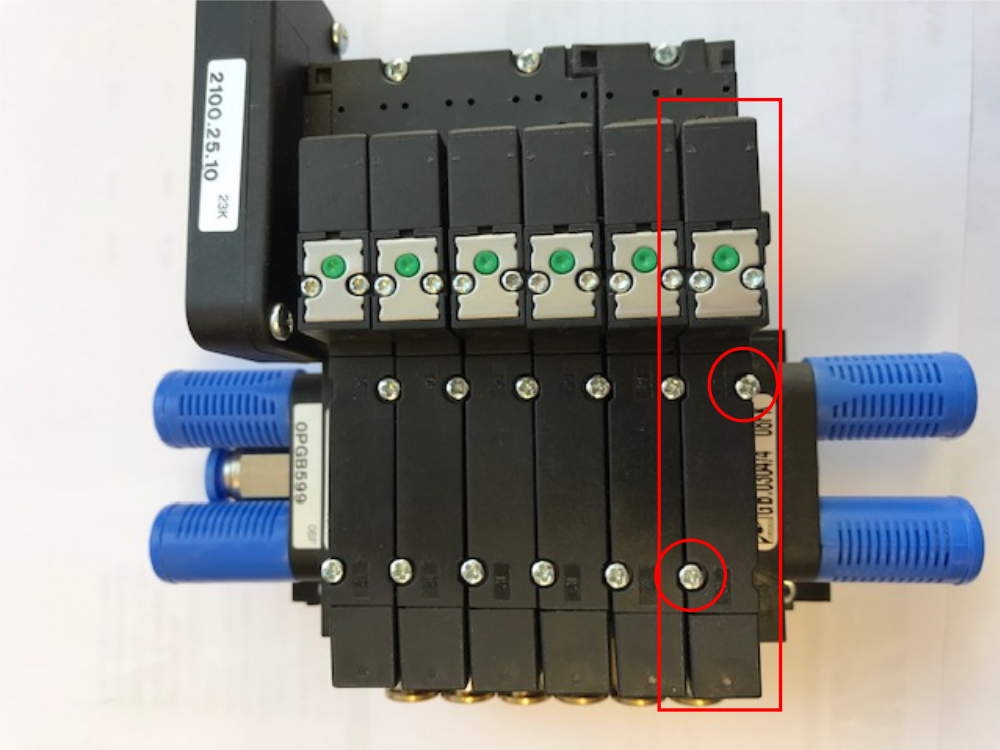
| − | |Step_Content=<translate>Again Please be careful when inserting the Pins</translate> | + | |Step_Content=<translate>Ensure pins line up correctly and are carefully inserted. Push valve slice on. When tightening the screws, screw in 2 turns on each of the side until tight to ensure a square fit. Do not over tighten, the bolts will strip easily.</translate> |
| − | |Step_Picture_00=Changing_Pneumax_Valve_slice_IMG_2488.jpg
| |
| − | |Step_Picture_00_annotation={"version":"2.4.6","objects":[{"type":"image","version":"2.4.6","originX":"left","originY":"top","left":0,"top":0,"width":640,"height":480,"fill":"rgb(0,0,0)","stroke":null,"strokeWidth":0,"strokeDashArray":null,"strokeLineCap":"butt","strokeDashOffset":0,"strokeLineJoin":"miter","strokeMiterLimit":4,"scaleX":0.94,"scaleY":0.94,"angle":0,"flipX":false,"flipY":false,"opacity":1,"shadow":null,"visible":true,"clipTo":null,"backgroundColor":"","fillRule":"nonzero","paintFirst":"fill","globalCompositeOperation":"source-over","transformMatrix":null,"skewX":0,"skewY":0,"crossOrigin":"","cropX":0,"cropY":0,"src":"https://stuga.dokit.app/images/4/44/Changing_Pneumax_Valve_slice_IMG_2488.jpg","filters":[]},{"type":"wfellipse","version":"2.4.6","originX":"center","originY":"center","left":160.83,"top":330.4,"width":168.67,"height":161.22,"fill":"rgba(255,0,0,0)","stroke":"#FF0000","strokeWidth":2,"strokeDashArray":null,"strokeLineCap":"butt","strokeDashOffset":0,"strokeLineJoin":"miter","strokeMiterLimit":4,"scaleX":1,"scaleY":1,"angle":0,"flipX":false,"flipY":false,"opacity":1,"shadow":null,"visible":true,"clipTo":null,"backgroundColor":"","fillRule":"nonzero","paintFirst":"fill","globalCompositeOperation":"source-over","transformMatrix":null,"skewX":0,"skewY":0,"rx":84.33737147555341,"ry":80.60955473738679}],"height":450,"width":600}
| |
| − | |Step_Picture_01=Changing_Pneumax_Valve_slice_IMG_2491.jpg
| |
| − | }}
| |
| − | {{Tuto Step
| |
| − | |Step_Title=<translate>Removing old Valve Slice</translate>
| |
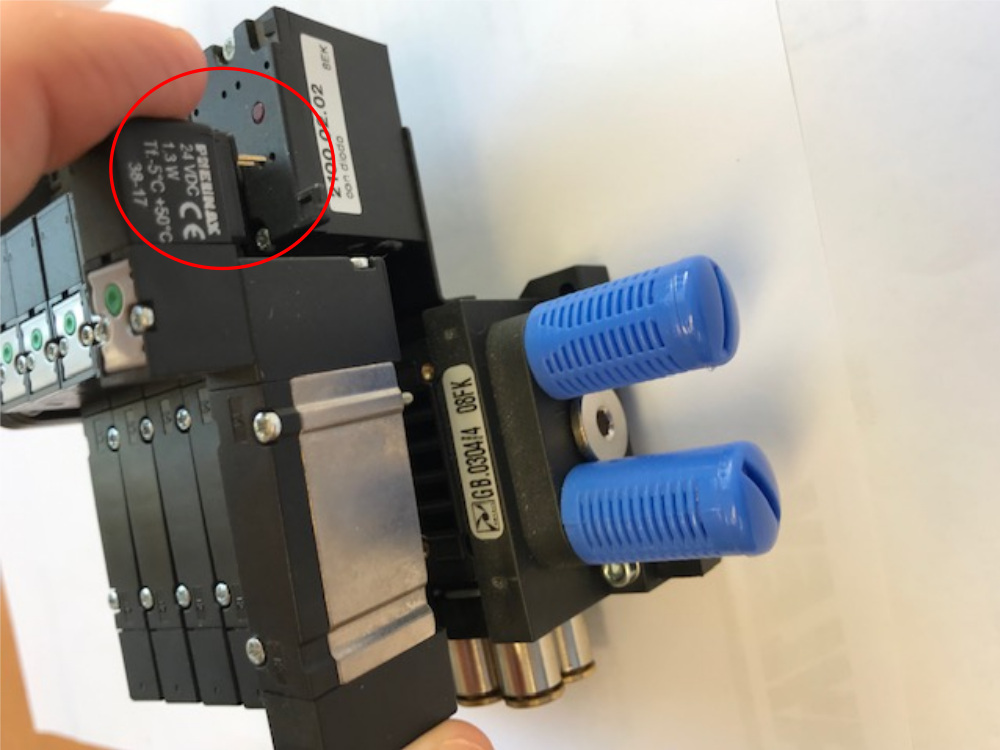
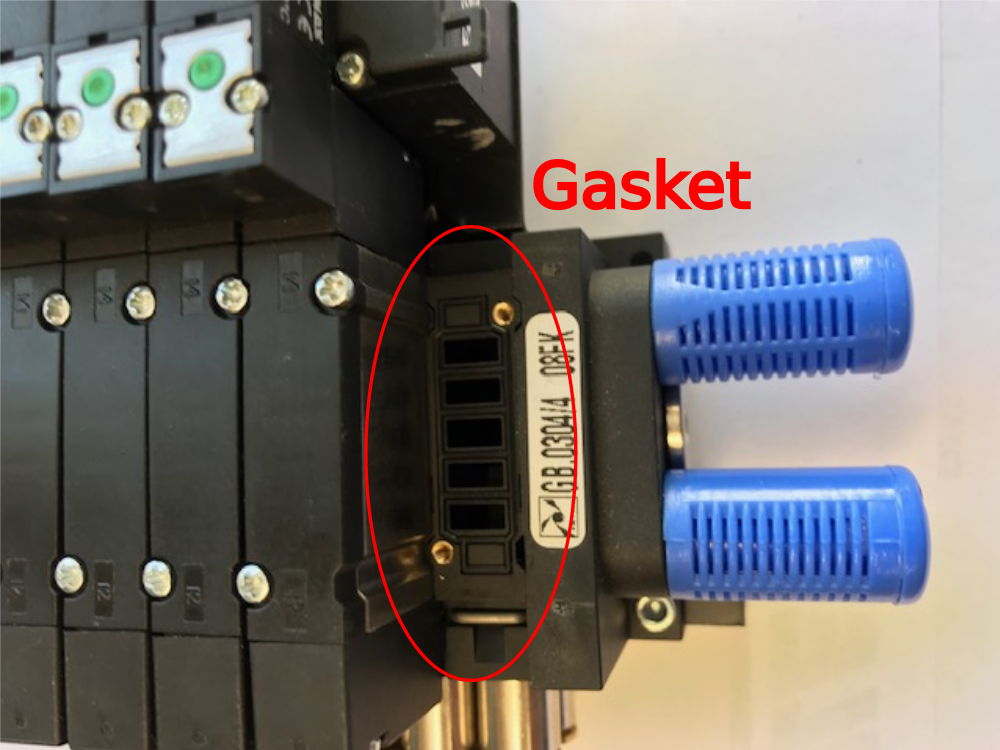
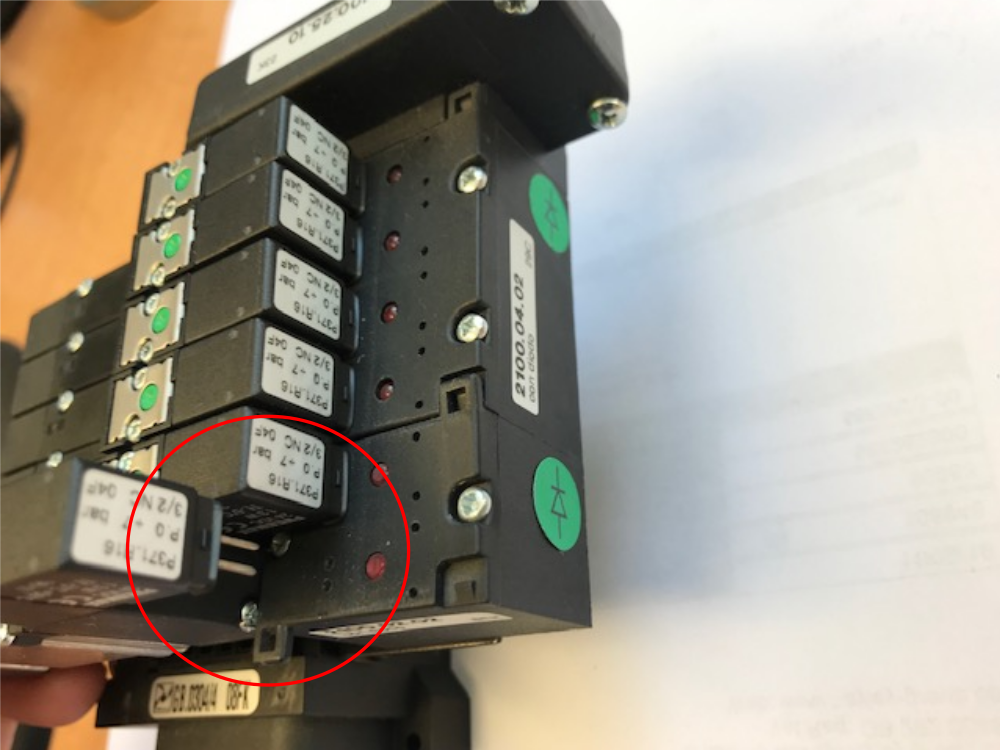
| − | |Step_Content=<translate>When removing the slice be careful not to bend the pins on the slice.
| |
| − | | |
| − | Also make sure the Valve Gasket piece does not fall out or go missing. This is needed to stop leaks.</translate>
| |
| − | |Step_Picture_00=Changing_Pneumax_Valve_slice_IMG_2483.jpg
| |
| − | |Step_Picture_01=Changing_Pneumax_Valve_slice_IMG_2484.jpg
| |
| − | |Step_Picture_01_annotation={"version":"2.4.6","objects":[{"type":"image","version":"2.4.6","originX":"left","originY":"top","left":0,"top":0,"width":640,"height":480,"fill":"rgb(0,0,0)","stroke":null,"strokeWidth":0,"strokeDashArray":null,"strokeLineCap":"butt","strokeDashOffset":0,"strokeLineJoin":"miter","strokeMiterLimit":4,"scaleX":0.94,"scaleY":0.94,"angle":0,"flipX":false,"flipY":false,"opacity":1,"shadow":null,"visible":true,"clipTo":null,"backgroundColor":"","fillRule":"nonzero","paintFirst":"fill","globalCompositeOperation":"source-over","transformMatrix":null,"skewX":0,"skewY":0,"crossOrigin":"","cropX":0,"cropY":0,"src":"https://stuga.dokit.app/images/1/11/Changing_Pneumax_Valve_slice_IMG_2484.jpg","filters":[]},{"type":"wfellipse","version":"2.4.6","originX":"center","originY":"center","left":133.45,"top":101.04,"width":133.89,"height":120.08,"fill":"rgba(255,0,0,0)","stroke":"#FF0000","strokeWidth":2,"strokeDashArray":null,"strokeLineCap":"butt","strokeDashOffset":0,"strokeLineJoin":"miter","strokeMiterLimit":4,"scaleX":1,"scaleY":1,"angle":0,"flipX":false,"flipY":false,"opacity":1,"shadow":null,"visible":true,"clipTo":null,"backgroundColor":"","fillRule":"nonzero","paintFirst":"fill","globalCompositeOperation":"source-over","transformMatrix":null,"skewX":0,"skewY":0,"rx":66.94495890773005,"ry":60.04099512847054}],"height":450,"width":600}
| |
| − | |Step_Picture_02=Changing_Pneumax_Valve_slice_IMG_2486.jpg
| |
| − | |Step_Picture_02_annotation={"version":"2.4.6","objects":[{"type":"image","version":"2.4.6","originX":"left","originY":"top","left":0,"top":0,"width":640,"height":480,"fill":"rgb(0,0,0)","stroke":null,"strokeWidth":0,"strokeDashArray":null,"strokeLineCap":"butt","strokeDashOffset":0,"strokeLineJoin":"miter","strokeMiterLimit":4,"scaleX":0.94,"scaleY":0.94,"angle":0,"flipX":false,"flipY":false,"opacity":1,"shadow":null,"visible":true,"clipTo":null,"backgroundColor":"","fillRule":"nonzero","paintFirst":"fill","globalCompositeOperation":"source-over","transformMatrix":null,"skewX":0,"skewY":0,"crossOrigin":"","cropX":0,"cropY":0,"src":"https://stuga.dokit.app/images/a/a0/Changing_Pneumax_Valve_slice_IMG_2486.jpg","filters":[]},{"type":"wfellipse","version":"2.4.6","originX":"center","originY":"center","left":282.53,"top":272.11,"width":125.96,"height":272.23,"fill":"rgba(255,0,0,0)","stroke":"#FF0000","strokeWidth":2,"strokeDashArray":null,"strokeLineCap":"butt","strokeDashOffset":0,"strokeLineJoin":"miter","strokeMiterLimit":4,"scaleX":1,"scaleY":1,"angle":0,"flipX":false,"flipY":false,"opacity":1,"shadow":null,"visible":true,"clipTo":null,"backgroundColor":"","fillRule":"nonzero","paintFirst":"fill","globalCompositeOperation":"source-over","transformMatrix":null,"skewX":0,"skewY":0,"rx":62.97984371888884,"ry":136.11449337014946},{"type":"textbox","version":"2.4.6","originX":"center","originY":"center","left":379.01,"top":112.64,"width":63.36,"height":22.6,"fill":"#FF0000","stroke":"#FF0000","strokeWidth":1,"strokeDashArray":null,"strokeLineCap":"butt","strokeDashOffset":0,"strokeLineJoin":"miter","strokeMiterLimit":4,"scaleX":1.9,"scaleY":1.9,"angle":0,"flipX":false,"flipY":false,"opacity":1,"shadow":null,"visible":true,"clipTo":null,"backgroundColor":"","fillRule":"nonzero","paintFirst":"fill","globalCompositeOperation":"source-over","transformMatrix":null,"skewX":0,"skewY":0,"text":"Gasket","fontSize":20,"fontWeight":"normal","fontFamily":"sans-serif","fontStyle":"normal","lineHeight":1.16,"underline":false,"overline":false,"linethrough":false,"textAlign":"left","textBackgroundColor":"","charSpacing":0,"minWidth":20,"styles":{} }],"height":450,"width":600}
| |
| − | |Step_Picture_03=Changing_Pneumax_Valve_slice_IMG_2487.jpg
| |
| − | }}
| |
| − | {{Tuto Step
| |
| − | |Step_Title=<translate>Fitting New Valve Slice</translate>
| |
| − | |Step_Content=<translate>Again Please be careful when inserting the Pins. When tightening the Screws, screw in 2 turns on each of the screws until tight to ensure a square fit. Do not over tighten, the bolts will strip easily.</translate>
| |
| | |Step_Picture_00=Changing_Pneumax_Valve_slice_IMG_2488.jpg | | |Step_Picture_00=Changing_Pneumax_Valve_slice_IMG_2488.jpg |
| | |Step_Picture_00_annotation={"version":"2.4.6","objects":[{"type":"image","version":"2.4.6","originX":"left","originY":"top","left":0,"top":0,"width":640,"height":480,"fill":"rgb(0,0,0)","stroke":null,"strokeWidth":0,"strokeDashArray":null,"strokeLineCap":"butt","strokeDashOffset":0,"strokeLineJoin":"miter","strokeMiterLimit":4,"scaleX":0.94,"scaleY":0.94,"angle":0,"flipX":false,"flipY":false,"opacity":1,"shadow":null,"visible":true,"clipTo":null,"backgroundColor":"","fillRule":"nonzero","paintFirst":"fill","globalCompositeOperation":"source-over","transformMatrix":null,"skewX":0,"skewY":0,"crossOrigin":"","cropX":0,"cropY":0,"src":"https://stuga.dokit.app/images/4/44/Changing_Pneumax_Valve_slice_IMG_2488.jpg","filters":[]},{"type":"wfellipse","version":"2.4.6","originX":"center","originY":"center","left":160.83,"top":330.4,"width":168.67,"height":161.22,"fill":"rgba(255,0,0,0)","stroke":"#FF0000","strokeWidth":2,"strokeDashArray":null,"strokeLineCap":"butt","strokeDashOffset":0,"strokeLineJoin":"miter","strokeMiterLimit":4,"scaleX":1,"scaleY":1,"angle":0,"flipX":false,"flipY":false,"opacity":1,"shadow":null,"visible":true,"clipTo":null,"backgroundColor":"","fillRule":"nonzero","paintFirst":"fill","globalCompositeOperation":"source-over","transformMatrix":null,"skewX":0,"skewY":0,"rx":84.33737147555341,"ry":80.60955473738679}],"height":450,"width":600} | | |Step_Picture_00_annotation={"version":"2.4.6","objects":[{"type":"image","version":"2.4.6","originX":"left","originY":"top","left":0,"top":0,"width":640,"height":480,"fill":"rgb(0,0,0)","stroke":null,"strokeWidth":0,"strokeDashArray":null,"strokeLineCap":"butt","strokeDashOffset":0,"strokeLineJoin":"miter","strokeMiterLimit":4,"scaleX":0.94,"scaleY":0.94,"angle":0,"flipX":false,"flipY":false,"opacity":1,"shadow":null,"visible":true,"clipTo":null,"backgroundColor":"","fillRule":"nonzero","paintFirst":"fill","globalCompositeOperation":"source-over","transformMatrix":null,"skewX":0,"skewY":0,"crossOrigin":"","cropX":0,"cropY":0,"src":"https://stuga.dokit.app/images/4/44/Changing_Pneumax_Valve_slice_IMG_2488.jpg","filters":[]},{"type":"wfellipse","version":"2.4.6","originX":"center","originY":"center","left":160.83,"top":330.4,"width":168.67,"height":161.22,"fill":"rgba(255,0,0,0)","stroke":"#FF0000","strokeWidth":2,"strokeDashArray":null,"strokeLineCap":"butt","strokeDashOffset":0,"strokeLineJoin":"miter","strokeMiterLimit":4,"scaleX":1,"scaleY":1,"angle":0,"flipX":false,"flipY":false,"opacity":1,"shadow":null,"visible":true,"clipTo":null,"backgroundColor":"","fillRule":"nonzero","paintFirst":"fill","globalCompositeOperation":"source-over","transformMatrix":null,"skewX":0,"skewY":0,"rx":84.33737147555341,"ry":80.60955473738679}],"height":450,"width":600} |
| Ligne 58 : |
Ligne 39 : |
| | {{Notes}} | | {{Notes}} |
| | {{PageLang | | {{PageLang |
| | + | |Language=en |
| | |SourceLanguage=none | | |SourceLanguage=none |
| | |IsTranslation=0 | | |IsTranslation=0 |
| − | |Language=en
| |
| | }} | | }} |
| | {{Tuto Status | | {{Tuto Status |
| | |Complete=Draft | | |Complete=Draft |
| | }} | | }} |


 Français
 English
 Deutsch
 Español
 Italiano
 Português