| [version en cours de rédaction] | [version en cours de rédaction] |
| Ligne 4 : | Ligne 4 : | ||
|Description=<translate>This page will describe how to perform a Datum Test</translate> | |Description=<translate>This page will describe how to perform a Datum Test</translate> | ||
}} | }} | ||
| − | <translate>The Datum test tab should Ideally be used before production EVERY day. This area is used to ensure once the machine has been initialized that all the routing axes are in the correct place. To use it effectively you need to understand the axes on the machine. The diagram | + | <translate>The Datum test tab should Ideally be used before production EVERY day. This area is used to ensure once the machine has been initialized that all the routing axes are in the correct place. To use it effectively you need to understand the axes on the machine. The diagram to the right illustrates this. |
| − | <br />{{#annotatedImageLight:Fichier:WinMulti - Datum Test Image.png|0= | + | |
| + | <br /> | ||
| + | |||
| + | === Running the Datum Test === | ||
| + | {{#annotatedImageLight:Fichier:WinMulti - Datum Test Image.png|0=235px|hash=1840e1c79b55125cd804b135f7dfcea7|jsondata={"version":"2.4.6","objects":[{"type":"image","version":"2.4.6","originX":"left","originY":"top","left":0,"top":0,"width":235,"height":179,"fill":"rgb(0,0,0)","stroke":null,"strokeWidth":0,"strokeDashArray":null,"strokeLineCap":"butt","strokeDashOffset":0,"strokeLineJoin":"miter","strokeMiterLimit":4,"scaleX":0.5,"scaleY":0.5,"angle":0,"flipX":false,"flipY":false,"opacity":1,"shadow":null,"visible":true,"clipTo":null,"backgroundColor":"","fillRule":"nonzero","paintFirst":"fill","globalCompositeOperation":"source-over","transformMatrix":null,"skewX":0,"skewY":0,"crossOrigin":"","cropX":0,"cropY":0,"src":"https://stuga.dokit.app/images/a/ae/WinMulti_-_Datum_Test_Image.png","filters":[]}],"height":179,"width":235}|mediaClass=Image|type=thumb|alt=|align=default|src=/images/thumb/a/ae/WinMulti_-_Datum_Test_Image.png/ia-1840e1c79b55125cd804b135f7dfcea7-px-WinMulti_-_Datum_Test_Image.png.png|href=./Fichier:WinMulti - Datum Test Image.png|resource=./Fichier:WinMulti - Datum Test Image.png|caption=Ring Axes|size=235px}} | ||
| Ligne 24 : | Ligne 28 : | ||
7. Tap on the Enter Button, this will create a batch on the main screen, which can be cut in the normal manner. | 7. Tap on the Enter Button, this will create a batch on the main screen, which can be cut in the normal manner. | ||
| + | Once this has been cut and prepped you should have your test profile with 4 x 10mm holes prepped, one on each face of the profile. | ||
| + | <br /> | ||
| − | + | === Adjusting the Datums === | |
| − | |||
| − | |||
| − | |||
| − | |||
| − | |||
| − | |||
| + | The holes produced should be measured carefully and the values entered into the screen below. This can be accessed by clicking on the Settings button on the main menu. | ||
| + | <br />{{#annotatedImageLight:Fichier:WinMulti - Datum Test DatumTest.jpg|0=460px|hash=|jsondata=|mediaClass=Image|type=thumb|alt=|align=left|src=https://stuga.dokit.app/images/d/da/WinMulti_-_Datum_Test_DatumTest.jpg|href=./Fichier:WinMulti - Datum Test DatumTest.jpg|resource=./Fichier:WinMulti - Datum Test DatumTest.jpg|caption=Datum Test Adjustment|size=460px}} | ||
| Ligne 50 : | Ligne 52 : | ||
| + | |||
| + | To Return to the main page, please click on [[Manual:WinMulti Software Operating Guide|WinMulti Software Operating Guide]] | ||
<br /></translate> | <br /></translate> | ||
Version du 27 mars 2020 à 16:43
This page will describe how to perform a Datum Test

The Datum test tab should Ideally be used before production EVERY day. This area is used to ensure once the machine has been initialized that all the routing axes are in the correct place. To use it effectively you need to understand the axes on the machine. The diagram to the right illustrates this.
Running the Datum Test
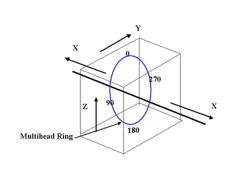
Ring Axes
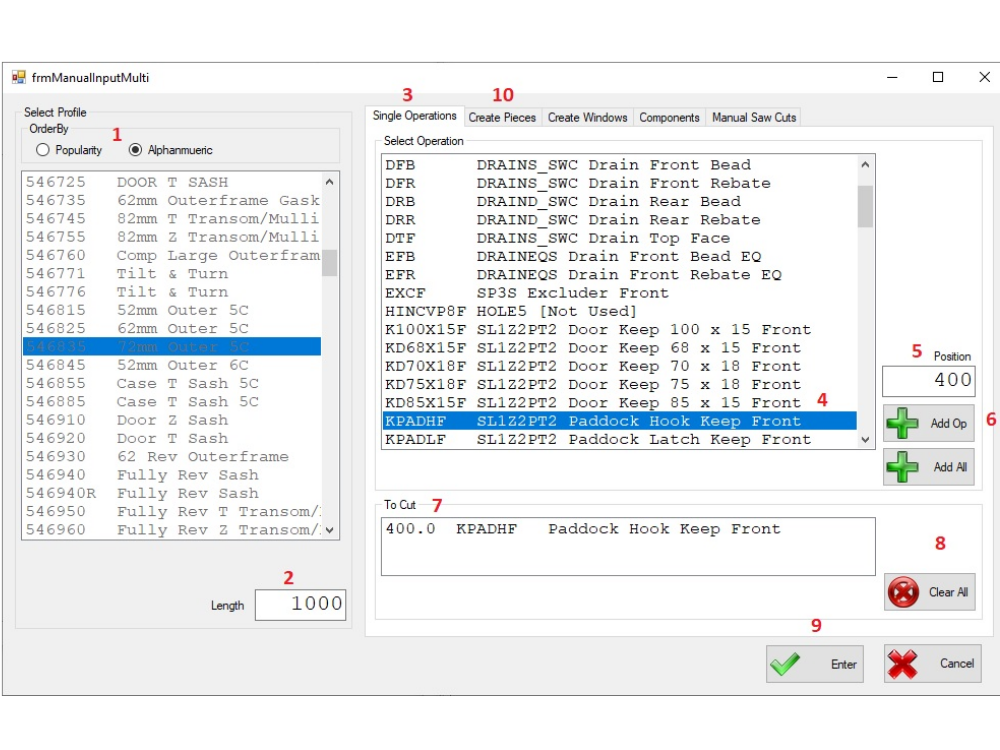
To run a datum test:-
1. Tap the Manual Input Button from the main screen.
2. Select the profile from the list (preferably large outer)
3. Select the datum prep from the operations list
4. Type in the length of the profile into the Length field (ideally 1500mm+)
5. Type in the position of the datum prep into the position field (at least 400mm from either end of the bar.
6. Tap on the Add Op button
7. Tap on the Enter Button, this will create a batch on the main screen, which can be cut in the normal manner.
Once this has been cut and prepped you should have your test profile with 4 x 10mm holes prepped, one on each face of the profile.
Adjusting the Datums
The holes produced should be measured carefully and the values entered into the screen below. This can be accessed by clicking on the Settings button on the main menu.

Datum Test Adjustment
The measurements are as follows
X Axis: Measure from the gripper end of the profile to the centre of the bottom 10mm hole this should measure the same as the figure that was typed into step 5 above, if different determine how far the hole needs moving toward or away from the gripper ends and enter this figure into the appropriate numeric edit box. Once this is done tap on the X Axis Save button.
Y,Z & R: for these you need to measure from the back of the profile to the back of the bottom hole and enter this figure into the Y Measurement of the bottom hole.
Measure from the bottom of the profile to the bottom of the front and rear holes and enter their values into the appropriate boxes.
Once this is done, tap on the Y/Z/R Axis Save Button.
After the datums have been modified tap on the Exit button and re prep the datum test on the same piece in a different position (usually the datum piece is kept for many days with each successive days test being 20mm further down the bar, in this manner a minimum of profile is used. From here you can see if the alterations made were successful.
To Return to the main page, please click on WinMulti Software Operating Guide
Draft
 Français
 English
 Deutsch
 Español
 Italiano
 Português