Installation of the Igus 2500 Energy chain on Stuga machines

Introduction
There have been reliability problems with the use of the energy chain type "B15" (15.050.048..), prompting the sourcing of a more rigid structural type. The following design points have been taken into account
- The 2500 type chain from Igus is the correct system for our application. It is a standard type and generally stocked
- Using the 2500.03 type from this range is has a taller yet narrower cross section, but is ample for the application
- A bend radius of 100mm is specified by Beckhoff for the cable, but the decision has been made to reduce down to 55mm. This decision is based on the success / longevity of upgrades done in the field with 55mm radius and the fact that the 100mm bend radius will not fit in all applications. Using the 55mm bend radius allows a "one size fits all" for all Stuga applications
- The chain should be "Openable Outside" to enable a drag-style application on the inner faces
- Cable separators should be added every 10 links to help keep the cables separate and the Beckhoff cable as central as possible
- Cable tie points on the brackets are 100% essential. These "combs" are a clip on addition
- A rigid chain, coupled with a smaller bend radius removes the need for the "anti-rise" trays and the vertical members holding this assembly in the air
- The Beckhoff cable should be untwisted before feeding into the energy chain
Installation Rules
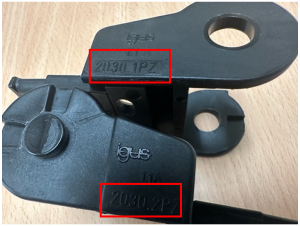
| 1 | Check the correct components have been sent before assembly - the Igus part numbers are moulded into the side |
 |
|
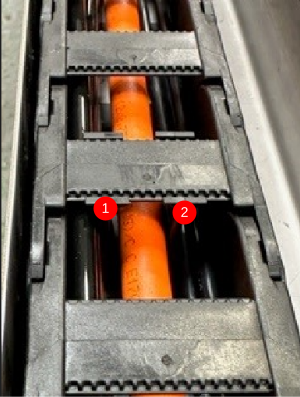
| 2 | Use Cable Separators, two are needed at each location (every 10 links)
Beckhoff cable in centre |
 |
|
| 3 | Untwist the Beckhoff cable before installation |  |
|
| 4 | Fasten the bracket down, NOT the Cable tie comb | 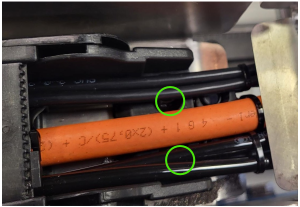 |
|
| 5 | Cable tie all cables and pipes BOTH ends | 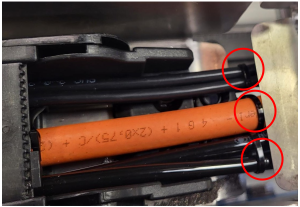 |
|
| 6 | Ensure the first two links are reversed on the servo end | 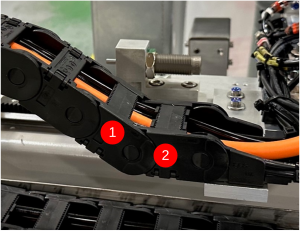 |
| Part No | Igus Code | Photo | Description | Notes |
|---|---|---|---|---|
| A0001113 | 2500.03.055.0 |  |
Energy Chain: Series 2500.03 55mm Bend Radius | Supplied in metre units |
| A0001110 | 2030.12PZB |  |
Energy Chain Bracket Set Non-Pivotable With Cable Tie connection | Supplied as a Pair
Flowline and ZX3/4 uses NON-PIVOTABLE ZX5 uses Pivotable type
|
| A0001114 | 2030.34PZB |  |
Energy Chain Bracket Set Pivotable With Cable Tie connection | |
| A0001112 | 25.1.1 |  |
Energy Chain Separator for 2500 Chain | Two separators required every 10 links |
Installation ZX5 - Machining Centre Side
| Upgrade PartNo | R0015143B |
| Links | 6.0m -111
6.5m - 116 |
| Disposal | Remove the upper "Anti-rise" trays if fitted
The anti-rise system has taller brackets that will need to be cut down level with the tray, as these upstands create a vertical barrier that the chain could feasibly hit. 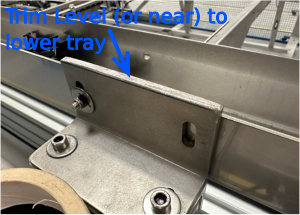 |
| Special Notes | |
| Photos |  |
Installation ZX5 - Saw Centre Side
| Upgrade PartNo | R0015144B |
| Links | 6.0m - 94
6.5m - 99 |
| Disposal | Remove the upper "Anti-rise" trays if fitted |
| Special Notes | Remove anti rise tray and trim taller brackets (see Machining Centre side above) |
| Photos |  |
Installation Flowline - Machining Centre Side
| Upgrade PartNo | R0019175B |
| Links | 6.0m - 87
6.5m - 92 |
| Disposal
ONLY if anti-rise trays fitted |
ONLY IF the anti-rise trays are fitted
Note: this only allies to a specific set of recently upgraded flowlines that have a tray modification and the "B15" energy chain. THIS DOES NOT APPLY TO THE MAJORITY OF FLOWLINES Cut down the upper "Anti-rise" trays if fitted or replace with the original trays from a flowline 6.0mtr H0006746 1 off H0006747 1 off H0006751 1 off
add H0007897 1 off |
| Special Notes | Very important to use the Non-Pivot brackets on this machine to ensure the energy chain passes over the datum switch
 |
| Photos |  |
Installation Flowline / ZX3 / ZX4 - Saw Side
| Upgrade PartNo | R0019176B |
| Links | 6.0m - 87
6.5m - 92 |
| Disposal
ONLY if anti-rise trays fitted |
ONLY IF the anti-rise trays are fitted
Note: this only allies to a specific set of recently upgraded flowlines that have a tray modification and the "B15" energy chain. THIS DOES NOT APPLY TO THE MAJORITY OF FLOWLINES
H0006747 or o/h H0007631 H0006748 or o/h H0007411 H0006751 or o/h h0007363
add H0007897 1 off |
| Special Notes | |
| Photos |  |
Installation ZX3 / ZX4 - Machining Side
| Upgrade PartNo | R0019253 |
| Links | 6.0m - ??
6.5m - 108 |
| Special Notes | |
| Photos |
Draft
 Français
 English
 Deutsch
 Español
 Italiano
 Português