| [version en cours de rédaction] | [version en cours de rédaction] |
| Ligne 6 : | Ligne 6 : | ||
|Tags=Manual, Input, winMulti | |Tags=Manual, Input, winMulti | ||
}} | }} | ||
| − | <translate>#1. Profile Sorting and Selection | + | <translate>{{#annotatedImageLight:Fichier:WinMulti - Preforming a Manual Input WinMulti - Preforming a Manual Input MI-SingleOperation 1 .jpg|0=991px|hash=|jsondata=|mediaClass=Image|type=frameless|align=center|src=https://stuga.dokit.app/images/a/a8/WinMulti_-_Preforming_a_Manual_Input_WinMulti_-_Preforming_a_Manual_Input_MI-SingleOperation_1_.jpg|href=./Fichier:WinMulti - Preforming a Manual Input WinMulti - Preforming a Manual Input MI-SingleOperation 1 .jpg|resource=./Fichier:WinMulti - Preforming a Manual Input WinMulti - Preforming a Manual Input MI-SingleOperation 1 .jpg|caption=|size=991px}} |
| − | + | ||
| − | # | + | #Profile Sorting and Selection. Here you can sort the profiles by Popularity or In Alphanumeric Order. Once that is done, scroll down and select the profile you wish to add to the bar queue. |
| − | + | #Piece Length. This is either the length of the profile you are adding to the queue (at least 700mm), or if you intend to cut the profile in step 10, then this is the length of the cut required. | |
| − | # | + | #Single Operations Tab. This tab is used if you wish to simply add an operation, or multiple operations to the bar you selected in step 1. This will not cut the profile. (cuts can be added in step 10) |
| − | + | #List of Operations. Here is the list of Operations that are available on the selected profile, scroll down and click on the operation you require. | |
| − | # | + | #Position. Type in the position of the operation from the gripper end of the bar, be aware, the position is generally the centre of the prep, try to keep the whole prep at least 300mm from the start and end of the bar to ensure it is clamped securely. this will increase accuracy. if the operation is too close to either end of the bar then it may not be clamped at certain points within the operation. |
| − | + | #Add Op. Once the operation has been selected and a position entered, then click the add Op Button to add it to the list. Steps 4-6 can be repeated for multiple operations, please allow space between the preps, so one does not run into another. | |
| − | # | + | #To Cut. This is the list of operations added to the profile selected |
| − | + | #Clear All. If you have made a mistake click this to clear the 'To Cut' List and return to step 4. | |
| − | # | + | #Enter / Cancel. If you simply wish to rout an operation/operations on the profile without any cuts, then click the Enter Button. this will add the profile to the bar queue. (please note on a Flowline / ZX the piece once prepped will need to be retrieved from the transfer table, it will not be added to the saw cutting list. To abort the process, click on the cancel button. If you wish to perform saw cuts on the profile, then skip this step. |
| − | + | #Create Pieces. Once the operations have been added to the profile, click on the Create Pieces tab and continue with [[WinMulti - Adding Cuts to the Manual Input Piece]] | |
| − | # | + | |
| − | + | ||
| − | # | + | |
| − | + | ||
| − | # | + | To return to the main page click [[Manual:WinMulti Software Operating Guide|WinMulti Software Operating Guide]] |
| − | + | ||
| − | # | + | <br /></translate> |
| − | |||
| − | |||
| − | |||
| − | |||
| − | |||
| − | |||
{{PageLang | {{PageLang | ||
|Language=en | |Language=en | ||
Version actuelle datée du 6 avril 2020 à 10:02
This page will instruct the operator how to add a manual input piece to the bar queue.

Sommaire

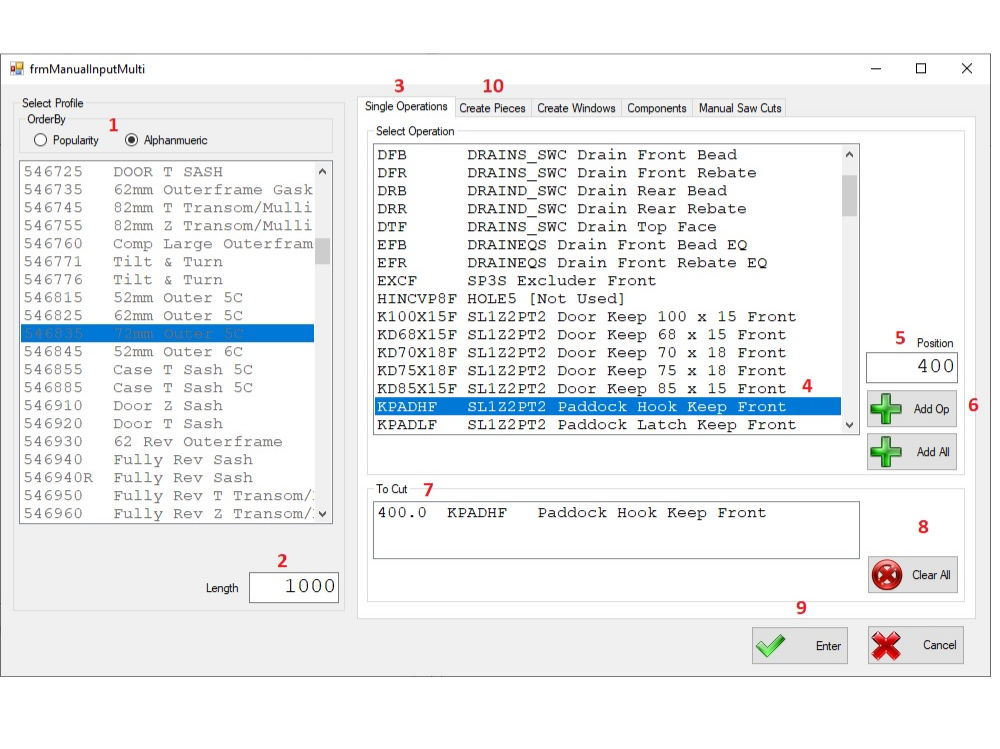
- Profile Sorting and Selection. Here you can sort the profiles by Popularity or In Alphanumeric Order. Once that is done, scroll down and select the profile you wish to add to the bar queue.
- Piece Length. This is either the length of the profile you are adding to the queue (at least 700mm), or if you intend to cut the profile in step 10, then this is the length of the cut required.
- Single Operations Tab. This tab is used if you wish to simply add an operation, or multiple operations to the bar you selected in step 1. This will not cut the profile. (cuts can be added in step 10)
- List of Operations. Here is the list of Operations that are available on the selected profile, scroll down and click on the operation you require.
- Position. Type in the position of the operation from the gripper end of the bar, be aware, the position is generally the centre of the prep, try to keep the whole prep at least 300mm from the start and end of the bar to ensure it is clamped securely. this will increase accuracy. if the operation is too close to either end of the bar then it may not be clamped at certain points within the operation.
- Add Op. Once the operation has been selected and a position entered, then click the add Op Button to add it to the list. Steps 4-6 can be repeated for multiple operations, please allow space between the preps, so one does not run into another.
- To Cut. This is the list of operations added to the profile selected
- Clear All. If you have made a mistake click this to clear the 'To Cut' List and return to step 4.
- Enter / Cancel. If you simply wish to rout an operation/operations on the profile without any cuts, then click the Enter Button. this will add the profile to the bar queue. (please note on a Flowline / ZX the piece once prepped will need to be retrieved from the transfer table, it will not be added to the saw cutting list. To abort the process, click on the cancel button. If you wish to perform saw cuts on the profile, then skip this step.
- Create Pieces. Once the operations have been added to the profile, click on the Create Pieces tab and continue with WinMulti - Adding Cuts to the Manual Input Piece
To return to the main page click WinMulti Software Operating Guide
Published
 Français
 English
 Deutsch
 Español
 Italiano
 Português