0422 Commissioning ZX5 Software 2018

Difficulté
Moyen
Durée
30 minute(s)
Sommaire
- 1 Introduction
- 2 Étape 1 - Setup Front End PC
- 3 Étape 2 - Setup Back End PC
- 4 Étape 3 - Install TwinCAT if Required
- 5 Étape 4 - Set up a route
- 6 Étape 5 - Build the Visual Studio Project
- 7 Étape 6 - Select Auto-start boot project
- 8 Étape 7 - TwinSAFE System
- 9 Étape 8 - Check safety options
- 10 Étape 9 - Check safety
- 11 Étape 10 - Copy serial number
- 12 Étape 11 - Verify Complete Safety Project
- 13 Étape 12 - Verify Complete Safety Project (Hardware Level)
- 14 Étape 13 - Download Safety Project
- 15 Étape 14 - TwinSAFE Wizard
- 16 Étape 15 - Press Safety Goggles Icon
- 17 Étape 16 - Log on to the machine int c3Multi and PLCreset
- 18 Étape 17 - See TB0371 for all parameters that need change
- 19 Étape 18 - Troubleshoot
- 20 Étape 19 - Troubleshoot (2)
- 21 Commentaires
Introduction
The first step in commissioning a new machine is to get the basic software setup correctly installed. Because the software is designed to be very flexible across many machine types, the simplest way to do this is to copy from a recently built similar machine.
Étape 1 - Setup Front End PC
Follow technical bulletin 409 to setup PC with correct naming conventions and TeamViewer.
Étape 3 - Install TwinCAT if Required
Install TwinCAT 3.16 from the mainserver (G:\Design\TwinCAT3\TC31-Full-Setup.3.1.4022.16). Go through the wizard and when prompted restart the PC. (2019 PCs will have this)
Étape 4 - Set up a route
Once restarted the TwinCAT icon will appear in the bottom right toolbar. We can now set up a route. Left click the TwinCAT icon once. There will be a menu, go to "Route" then "Add Route...". This is where the machine and the program can be linked. Making sure the machine infeed is on and connected to the local network,
- Press on add in the bottom left of the window (1).
- From here perform a broadcast search (2), this will search for any Beckhoff devices on the network.
- When the machine is found select it (3)
- and press add route (4).

Étape 5 - Build the Visual Studio Project
There are two ways to approach this
- Use an existing project from a similar, older machine. This is a shortcut method but relies on having a copy of the setup from a machine with the same EtherCAT setup
- Build a new project from scratch - use this method if this is the first machine of its type
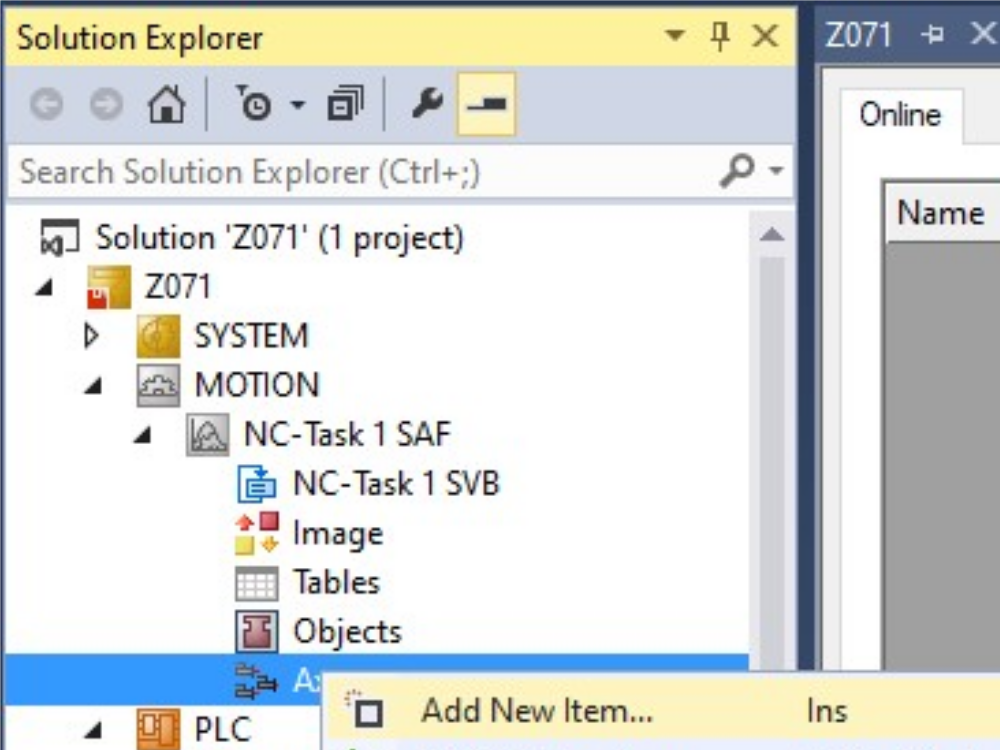
Étape 6 - Select Auto-start boot project
Select Auto-start boot project. This can be found under PLC > PLC_Reset_1_1 and PLC > tc3Multi_6_24


Étape 7 - TwinSAFE System
AmsNetID the same on SYSTEM > Routes > “Target net ID”, must be the same as: SAFETY > ZX5_2_1 > ZX5_2_1 Project > Target System (Figure 1).

Étape 8 - Check safety options
To get the safety toolbar go to: View > Toolbars > Check TwinCAT Safety. This will show the safety options.
Étape 9 - Check safety
Go to: SAFETY > ZX5_2_1 > ZX5_2_1 Project > Target System. Press the refresh button to update the AmsNetID as it will currently have the ID if the machine that the software was copied from.
Étape 10 - Copy serial number
Copy the serial number (Figure 2). (Used in step 17)


Étape 11 - Verify Complete Safety Project
After this Verify Complete Safety Project (Figure 3)
Étape 12 - Verify Complete Safety Project (Hardware Level)
Then Verify Complete Safety Project (Hardware Level) (Figure 3)
Étape 13 - Download Safety Project
Then Download Safety Project (Figure 3)
Étape 14 - TwinSAFE Wizard
TwinSAFE Wizard: When prompted input, username: Administrator, Serial Number: (Copied from step 13), Password: TwinSAFE. Then confirm.
Étape 15 - Press Safety Goggles Icon
Go to SAFETY > ZX5_2_1 > ZX5_2_1 Project > TwinSafeGroup1 > TwinSafeGroup1.sal, and press the Safety Goggles Icon (Figure 3). This should show the Estop circuit in green if working correctly.
Étape 16 - Log on to the machine int c3Multi and PLCreset
Make sure to log onto the machine in tc3Multi AND PLCreset (Figure 4).

Étape 17 - See TB0371 for all parameters that need change
Please see TB0371 for all parameters than need change.
Étape 18 - Troubleshoot
Scanning for devices: not able to copy revision.
Click on Extended Information, check to see if the hardware revision is lower than the one on the software. If so you may need to change this EtherCAT box out.
Étape 19 - Troubleshoot (2)
TwinSafe Error referencing dip switches. This is regarding the physical switches inside the beckhoff drives. This error will not allow you to complete the full TwinSAFE procedure.
Draft
 Français
 English
 Deutsch
 Español
 Italiano
 Português