| [version en cours de rédaction] | [version en cours de rédaction] |
| Ligne 1 : | Ligne 1 : | ||
{{Tuto Details | {{Tuto Details | ||
| + | |Main_Picture=Dell Optiplex 3080.jpg | ||
| + | |Main_Picture_annotation={"version":"2.4.6","objects":[{"type":"image","version":"2.4.6","originX":"left","originY":"top","left":127,"top":-2,"width":328,"height":456,"fill":"rgb(0,0,0)","stroke":null,"strokeWidth":0,"strokeDashArray":null,"strokeLineCap":"butt","strokeDashOffset":0,"strokeLineJoin":"miter","strokeMiterLimit":4,"scaleX":0.99,"scaleY":0.99,"angle":0,"flipX":false,"flipY":false,"opacity":1,"shadow":null,"visible":true,"clipTo":null,"backgroundColor":"","fillRule":"nonzero","paintFirst":"fill","globalCompositeOperation":"source-over","transformMatrix":null,"skewX":0,"skewY":0,"crossOrigin":"","cropX":0,"cropY":0,"src":"https://stuga.dokit.app/images/b/b2/Dell_Optiplex_3080.jpg","filters":[]}],"height":450.295469468155,"width":600} | ||
|Description=<translate>How to recover P.C following a system failure, using the USB recovery stick.</translate> | |Description=<translate>How to recover P.C following a system failure, using the USB recovery stick.</translate> | ||
|Categories=Operation, Software | |Categories=Operation, Software | ||
| Ligne 5 : | Ligne 7 : | ||
|Duration=15 | |Duration=15 | ||
|Duration-type=minute(s) | |Duration-type=minute(s) | ||
| + | |Tags=recovery, dell, image | ||
}} | }} | ||
{{Introduction | {{Introduction | ||
Version du 8 mars 2021 à 16:06
How to recover P.C following a system failure, using the USB recovery stick.

Difficulté
Facile
Durée
15 minute(s)
Introduction
The PCs are now shipped with a memory stick that includes a full recovery image. If the system fails in future, this allows a full recovery of the initial setup of the entire drive.
Mouse and Keyboard are required for recovery process.Étape 1 - Boot selection screen
- Turn off the PC
- Plug in recovery USB.
- Turn the PC back on
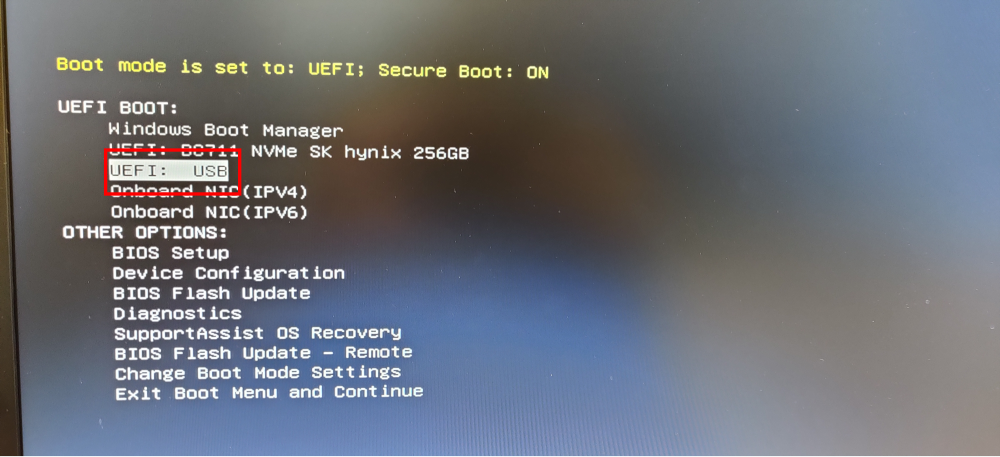
- Keep pressing F12 until the boot selection screen shows.

Étape 2 - Selecting Recovery image.
- Select "UEFI: USB".
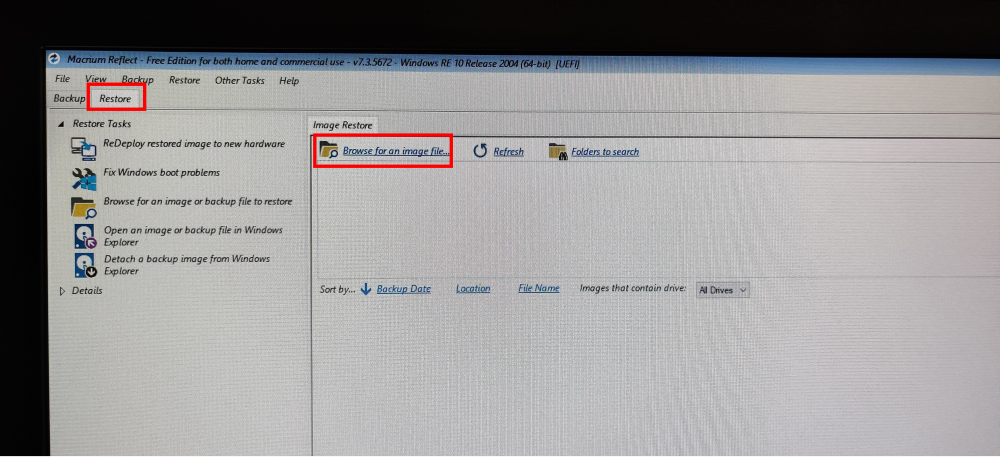
- Once the recovery software has finished loading, make sure the "Restore" tab is selected from the top left.
- Click "Browse for an image file..."
- Select the "RecoveryImage" partition.
- Select the .mrimg file and click "OK"


Étape 3 - Restore Image
- Select "Restore Image" on the right side.
- On the Restore Summary page, click "Finish".
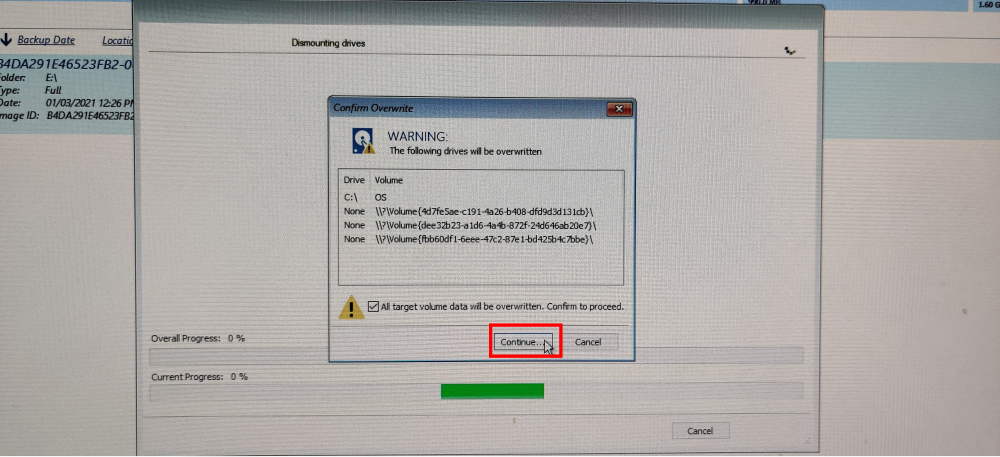
- Tick the "All target data will be overwritten. Confirm to proceed" box and click continue.
- Wait for the restore process to complete.


Étape 4 - Completion
- Once completion is prompted, removed the USB drive.
- Click "File" and then Exit.
- The CNC machine should now reboot and boot into Windows.
Draft
 Français
 English
 Deutsch
 Español
 Italiano
 Português