| [version en cours de rédaction] | [version en cours de rédaction] |
| Ligne 20 : | Ligne 20 : | ||
{{EPI}} | {{EPI}} | ||
{{Tuto Step | {{Tuto Step | ||
| − | |Step_Title=<translate></translate> | + | |Step_Title=<translate>Find First Position on the Turret</translate> |
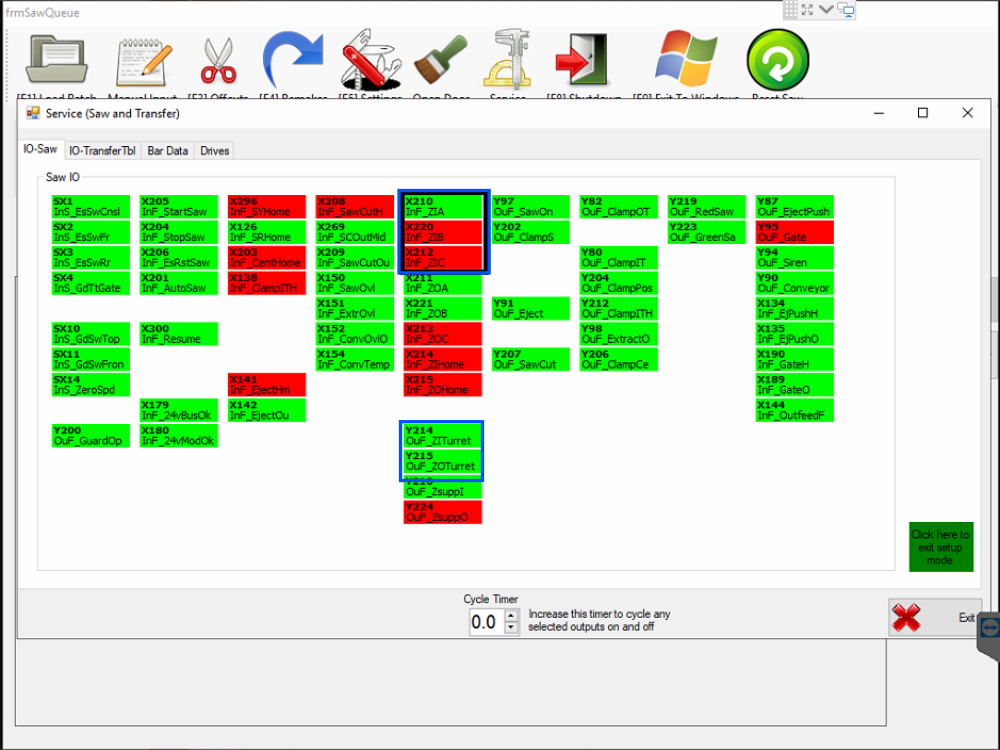
| − | |Step_Content=<translate></translate> | + | |Step_Content=<translate>On the '''Service > IO''' tab use output '''Y214''' and '''Y215''' (ZX5) to turn each of the turrets. Each turn of the turrets will change the binary state of the outputs '''X210, X220''' and '''X212'''.</translate> |
| − | |Step_Picture_00=Commissioning_-_Z- | + | |Step_Picture_00=Commissioning_-_Z-Block_Calibration_ZBLOCK2.png |
| − | |Step_Picture_01=Commissioning_-_Z- | + | |Step_Picture_00_annotation={"version":"2.4.6","objects":[{"type":"image","version":"2.4.6","originX":"left","originY":"top","left":0,"top":0,"width":800,"height":600,"fill":"rgb(0,0,0)","stroke":null,"strokeWidth":0,"strokeDashArray":null,"strokeLineCap":"butt","strokeDashOffset":0,"strokeLineJoin":"miter","strokeMiterLimit":4,"scaleX":0.75,"scaleY":0.75,"angle":0,"flipX":false,"flipY":false,"opacity":1,"shadow":null,"visible":true,"clipTo":null,"backgroundColor":"","fillRule":"nonzero","paintFirst":"fill","globalCompositeOperation":"source-over","transformMatrix":null,"skewX":0,"skewY":0,"crossOrigin":"","cropX":0,"cropY":0,"src":"https://stuga.dokit.app/images/thumb/4/45/Commissioning_-_Z-Block_Calibration_ZBLOCK2.png/800px-Commissioning_-_Z-Block_Calibration_ZBLOCK2.png","filters":[]},{"type":"wfrect","version":"2.4.6","originX":"center","originY":"center","left":264.9,"top":270.67,"width":49.16,"height":35.28,"fill":"rgba(255,0,0,0)","stroke":"#0054FF","strokeWidth":2,"strokeDashArray":null,"strokeLineCap":"butt","strokeDashOffset":0,"strokeLineJoin":"miter","strokeMiterLimit":4,"scaleX":1,"scaleY":1,"angle":0,"flipX":false,"flipY":false,"opacity":1,"shadow":null,"visible":true,"clipTo":null,"backgroundColor":"","fillRule":"nonzero","paintFirst":"fill","globalCompositeOperation":"source-over","transformMatrix":null,"skewX":0,"skewY":0,"rx":0,"ry":0},{"type":"wfrect","version":"2.4.6","originX":"center","originY":"center","left":266.45,"top":139.02,"width":54.07,"height":49.43,"fill":"rgba(255,0,0,0)","stroke":"#0054FF","strokeWidth":2,"strokeDashArray":null,"strokeLineCap":"butt","strokeDashOffset":0,"strokeLineJoin":"miter","strokeMiterLimit":4,"scaleX":1,"scaleY":1,"angle":0,"flipX":false,"flipY":false,"opacity":1,"shadow":null,"visible":true,"clipTo":null,"backgroundColor":"","fillRule":"nonzero","paintFirst":"fill","globalCompositeOperation":"source-over","transformMatrix":null,"skewX":0,"skewY":0,"rx":0,"ry":0}],"height":450,"width":600} |
| − | |Step_Picture_02=Commissioning_-_Z- | + | |Step_Picture_01=Commissioning_-_Z-Block_Calibration_Zblockbinary.png |
| + | |Step_Picture_02=Commissioning_-_Z-Block_Calibration_Z-Transom.png | ||
}} | }} | ||
{{Tuto Step | {{Tuto Step | ||
Version du 4 octobre 2019 à 15:59
Commonly used during sawing on Z transoms, the Z block operation is used to fasten the profile, making sure it does not move during sawing.

Difficulté
Moyen
Durée
30 minute(s)
Introduction
Commonly used during sawing on Z transoms, the Z block operation is used to fasten the profile, making sure it does not move during sawing. There are 6 possible states the z block can be in. Each of these can have a different length of protrusion for different profiles.
12 x M8 Screws
12 x M8 Nuts
12 x wire numbers 1 - 6Étape 1 - Find First Position on the Turret
On the Service > IO tab use output Y214 and Y215 (ZX5) to turn each of the turrets. Each turn of the turrets will change the binary state of the outputs X210, X220 and X212.


Étape 2 -
Draft
 Français
 English
 Deutsch
 Español
 Italiano
 Português