| [version en cours de rédaction] | [version en cours de rédaction] |
(Page créée avec « {{Tuto Details |Description=<translate>500mm Saw Blade Upgrade</translate> |Difficulty=Medium |Duration=4-6 |Duration-type=hour(s) }} {{Introduction |Introduction=<transla... ») |
|||
| Ligne 1 : | Ligne 1 : | ||
{{Tuto Details | {{Tuto Details | ||
|Description=<translate>500mm Saw Blade Upgrade</translate> | |Description=<translate>500mm Saw Blade Upgrade</translate> | ||
| − | |Difficulty= | + | |Difficulty=Easy |
|Duration=4-6 | |Duration=4-6 | ||
|Duration-type=hour(s) | |Duration-type=hour(s) | ||
| Ligne 15 : | Ligne 15 : | ||
}} | }} | ||
{{Tuto Step | {{Tuto Step | ||
| − | |Step_Title=<translate>Remove | + | |Step_Title=<translate>Remove taper lock pulleys</translate> |
|Step_Content=<translate>Remove the two grub screws from the taper lock pulleys and insert one into the hole that was initially empty. Screw in tight to break seal of taperlock and split the two parts. If siezed the outer part can be tapped back with a hammer. These parts are usually very brittle and can shatter with a heavy hammer blow. It can also be useful to have the belts on at this point to stop the pulley from turning.</translate> | |Step_Content=<translate>Remove the two grub screws from the taper lock pulleys and insert one into the hole that was initially empty. Screw in tight to break seal of taperlock and split the two parts. If siezed the outer part can be tapped back with a hammer. These parts are usually very brittle and can shatter with a heavy hammer blow. It can also be useful to have the belts on at this point to stop the pulley from turning.</translate> | ||
|Step_Picture_00=500mm_Saw_Blade_Upgrade_1.JPG | |Step_Picture_00=500mm_Saw_Blade_Upgrade_1.JPG | ||
| Ligne 23 : | Ligne 23 : | ||
|Step_Picture_02_annotation={"version":"2.4.6","objects":[{"type":"image","version":"2.4.6","originX":"left","originY":"top","left":0,"top":0,"width":6000,"height":4000,"fill":"rgb(0,0,0)","stroke":null,"strokeWidth":0,"strokeDashArray":null,"strokeLineCap":"butt","strokeDashOffset":0,"strokeLineJoin":"miter","strokeMiterLimit":4,"scaleX":0.1,"scaleY":0.1,"angle":0,"flipX":false,"flipY":false,"opacity":1,"shadow":null,"visible":true,"clipTo":null,"backgroundColor":"","fillRule":"nonzero","paintFirst":"fill","globalCompositeOperation":"source-over","transformMatrix":null,"skewX":0,"skewY":0,"crossOrigin":"","cropX":0,"cropY":0,"src":"https://stuga.dokit.app/images/4/43/500mm_Saw_Blade_Upgrade_3.JPG","filters":[]},{"type":"wfellipse","version":"2.4.6","originX":"center","originY":"center","left":285.53,"top":189.53,"width":63.33,"height":63.33,"fill":"rgba(255,0,0,0)","stroke":"#FF0000","strokeWidth":2,"strokeDashArray":null,"strokeLineCap":"butt","strokeDashOffset":0,"strokeLineJoin":"miter","strokeMiterLimit":4,"scaleX":1,"scaleY":1,"angle":0,"flipX":false,"flipY":false,"opacity":1,"shadow":null,"visible":true,"clipTo":null,"backgroundColor":"","fillRule":"nonzero","paintFirst":"fill","globalCompositeOperation":"source-over","transformMatrix":null,"skewX":0,"skewY":0,"rx":31.666179512233786,"ry":31.666179512233786}],"height":400,"width":600} | |Step_Picture_02_annotation={"version":"2.4.6","objects":[{"type":"image","version":"2.4.6","originX":"left","originY":"top","left":0,"top":0,"width":6000,"height":4000,"fill":"rgb(0,0,0)","stroke":null,"strokeWidth":0,"strokeDashArray":null,"strokeLineCap":"butt","strokeDashOffset":0,"strokeLineJoin":"miter","strokeMiterLimit":4,"scaleX":0.1,"scaleY":0.1,"angle":0,"flipX":false,"flipY":false,"opacity":1,"shadow":null,"visible":true,"clipTo":null,"backgroundColor":"","fillRule":"nonzero","paintFirst":"fill","globalCompositeOperation":"source-over","transformMatrix":null,"skewX":0,"skewY":0,"crossOrigin":"","cropX":0,"cropY":0,"src":"https://stuga.dokit.app/images/4/43/500mm_Saw_Blade_Upgrade_3.JPG","filters":[]},{"type":"wfellipse","version":"2.4.6","originX":"center","originY":"center","left":285.53,"top":189.53,"width":63.33,"height":63.33,"fill":"rgba(255,0,0,0)","stroke":"#FF0000","strokeWidth":2,"strokeDashArray":null,"strokeLineCap":"butt","strokeDashOffset":0,"strokeLineJoin":"miter","strokeMiterLimit":4,"scaleX":1,"scaleY":1,"angle":0,"flipX":false,"flipY":false,"opacity":1,"shadow":null,"visible":true,"clipTo":null,"backgroundColor":"","fillRule":"nonzero","paintFirst":"fill","globalCompositeOperation":"source-over","transformMatrix":null,"skewX":0,"skewY":0,"rx":31.666179512233786,"ry":31.666179512233786}],"height":400,"width":600} | ||
|Step_Picture_03=500mm_Saw_Blade_Upgrade_DSC_0007.JPG | |Step_Picture_03=500mm_Saw_Blade_Upgrade_DSC_0007.JPG | ||
| + | }} | ||
| + | {{Tuto Step | ||
| + | |Step_Title=<translate>Fit new taper lock pulleys, belts and old 300mm saw blade.</translate> | ||
| + | |Step_Content=<translate>Fit the new pulleys and belts, no need for Loctite on the grub screws | ||
| + | |||
| + | Check alignment of belts and tension. | ||
| + | |||
| + | Fit old blade. The old blade can be used to cut a little clearance in the new slit strip before the 500mm blade is fitted. If this is not done then the motor overload may trip as the 500mm blade can be stalled by the tight gap in the slit strip.</translate> | ||
| + | |Step_Picture_00=500mm_Saw_Blade_Upgrade_DSC_0009.JPG | ||
| + | |Step_Picture_01=500mm_Saw_Blade_Upgrade_DSC_0010.JPG | ||
| + | |Step_Picture_01_annotation={"version":"2.4.6","objects":[{"type":"image","version":"2.4.6","originX":"left","originY":"top","left":0,"top":0,"width":6000,"height":4000,"fill":"rgb(0,0,0)","stroke":null,"strokeWidth":0,"strokeDashArray":null,"strokeLineCap":"butt","strokeDashOffset":0,"strokeLineJoin":"miter","strokeMiterLimit":4,"scaleX":0.1,"scaleY":0.1,"angle":0,"flipX":false,"flipY":false,"opacity":1,"shadow":null,"visible":true,"clipTo":null,"backgroundColor":"","fillRule":"nonzero","paintFirst":"fill","globalCompositeOperation":"source-over","transformMatrix":null,"skewX":0,"skewY":0,"crossOrigin":"","cropX":0,"cropY":0,"src":"https://stuga.dokit.app/images/8/84/500mm_Saw_Blade_Upgrade_DSC_0010.JPG","filters":[]},{"type":"wfellipse","version":"2.4.6","originX":"center","originY":"center","left":257.73,"top":211.73,"width":57.93,"height":57.93,"fill":"rgba(255,0,0,0)","stroke":"#FF0000","strokeWidth":2,"strokeDashArray":null,"strokeLineCap":"butt","strokeDashOffset":0,"strokeLineJoin":"miter","strokeMiterLimit":4,"scaleX":1,"scaleY":1,"angle":0,"flipX":false,"flipY":false,"opacity":1,"shadow":null,"visible":true,"clipTo":null,"backgroundColor":"","fillRule":"nonzero","paintFirst":"fill","globalCompositeOperation":"source-over","transformMatrix":null,"skewX":0,"skewY":0,"rx":28.96640363398602,"ry":28.96640363398602},{"type":"wfellipse","version":"2.4.6","originX":"center","originY":"center","left":371.73,"top":227.73,"width":57.93,"height":57.93,"fill":"rgba(255,0,0,0)","stroke":"#FF0000","strokeWidth":2,"strokeDashArray":null,"strokeLineCap":"butt","strokeDashOffset":0,"strokeLineJoin":"miter","strokeMiterLimit":4,"scaleX":1,"scaleY":1,"angle":0,"flipX":false,"flipY":false,"opacity":1,"shadow":null,"visible":true,"clipTo":null,"backgroundColor":"","fillRule":"nonzero","paintFirst":"fill","globalCompositeOperation":"source-over","transformMatrix":null,"skewX":0,"skewY":0,"rx":28.96640363398602,"ry":28.96640363398602}],"height":400,"width":600} | ||
| + | }} | ||
| + | {{Tuto Step | ||
| + | |Step_Title=<translate>Remove old slit strip</translate> | ||
| + | |Step_Content=<translate>Remove the four countersunk and four dome head allen screws holding the slit strip. These can quite often be siezed and/or be rounded and my need to be drilled out.</translate> | ||
| + | }} | ||
| + | {{Tuto Step | ||
| + | |Step_Title=<translate>Replace bracket for saw stroke cylinder rod</translate> | ||
| + | |Step_Content=<translate>Using the old slit strip you can wedge up the assembly to give easier access. Once wedged up place something underneath the assembly to stop it falling on your hands if the slit strip slides off. | ||
| + | |||
| + | Remove the old bracket and replace with the new one.</translate> | ||
| + | |Step_Picture_00=500mm_Saw_Blade_Upgrade_DSC_0015.JPG | ||
| + | |Step_Picture_01=500mm_Saw_Blade_Upgrade_DSC_0013.JPG | ||
| + | |Step_Picture_01_annotation={"version":"2.4.6","objects":[{"type":"image","version":"2.4.6","originX":"left","originY":"top","left":0,"top":0,"width":6000,"height":4000,"fill":"rgb(0,0,0)","stroke":null,"strokeWidth":0,"strokeDashArray":null,"strokeLineCap":"butt","strokeDashOffset":0,"strokeLineJoin":"miter","strokeMiterLimit":4,"scaleX":0.1,"scaleY":0.1,"angle":0,"flipX":false,"flipY":false,"opacity":1,"shadow":null,"visible":true,"clipTo":null,"backgroundColor":"","fillRule":"nonzero","paintFirst":"fill","globalCompositeOperation":"source-over","transformMatrix":null,"skewX":0,"skewY":0,"crossOrigin":"","cropX":0,"cropY":0,"src":"https://stuga.dokit.app/images/0/0c/500mm_Saw_Blade_Upgrade_DSC_0013.JPG","filters":[]},{"type":"wfrect","version":"2.4.6","originX":"center","originY":"center","left":248.1,"top":129.93,"width":198.8,"height":99.85,"fill":"rgba(255,0,0,0)","stroke":"#FF0000","strokeWidth":2,"strokeDashArray":null,"strokeLineCap":"butt","strokeDashOffset":0,"strokeLineJoin":"miter","strokeMiterLimit":4,"scaleX":1,"scaleY":1,"angle":0,"flipX":false,"flipY":false,"opacity":1,"shadow":null,"visible":true,"clipTo":null,"backgroundColor":"","fillRule":"nonzero","paintFirst":"fill","globalCompositeOperation":"source-over","transformMatrix":null,"skewX":0,"skewY":0,"rx":0,"ry":0},{"type":"wfellipse","version":"2.4.6","originX":"center","originY":"center","left":179.86,"top":222.86,"width":73.68,"height":73.68,"fill":"rgba(255,0,0,0)","stroke":"#FF0000","strokeWidth":2,"strokeDashArray":null,"strokeLineCap":"butt","strokeDashOffset":0,"strokeLineJoin":"miter","strokeMiterLimit":4,"scaleX":1,"scaleY":1,"angle":0,"flipX":false,"flipY":false,"opacity":1,"shadow":null,"visible":true,"clipTo":null,"backgroundColor":"","fillRule":"nonzero","paintFirst":"fill","globalCompositeOperation":"source-over","transformMatrix":null,"skewX":0,"skewY":0,"rx":36.83880428157964,"ry":36.83880428157964},{"type":"wfellipse","version":"2.4.6","originX":"center","originY":"center","left":296.86,"top":222.86,"width":73.68,"height":73.68,"fill":"rgba(255,0,0,0)","stroke":"#FF0000","strokeWidth":2,"strokeDashArray":null,"strokeLineCap":"butt","strokeDashOffset":0,"strokeLineJoin":"miter","strokeMiterLimit":4,"scaleX":1,"scaleY":1,"angle":0,"flipX":false,"flipY":false,"opacity":1,"shadow":null,"visible":true,"clipTo":null,"backgroundColor":"","fillRule":"nonzero","paintFirst":"fill","globalCompositeOperation":"source-over","transformMatrix":null,"skewX":0,"skewY":0,"rx":36.83880428157964,"ry":36.83880428157964}],"height":400,"width":600} | ||
| + | |Step_Picture_02=500mm_Saw_Blade_Upgrade_DSC_0016.JPG | ||
}} | }} | ||
{{Notes}} | {{Notes}} | ||
{{PageLang | {{PageLang | ||
| + | |Language=en | ||
|SourceLanguage=none | |SourceLanguage=none | ||
|IsTranslation=0 | |IsTranslation=0 | ||
| − | |||
}} | }} | ||
{{Tuto Status | {{Tuto Status | ||
|Complete=Draft | |Complete=Draft | ||
}} | }} | ||
Version du 30 janvier 2020 à 20:01
500mm Saw Blade Upgrade

Difficulté
Facile
Durée
4-6 heure(s)
Introduction
Step by step guide of how to carry out the 300mm to 500mm saw blade upgrade including long reach clamps.
Time to complete is very dependant on condition of the machine, ie rusted or rounded off bolts which may need to be drilled out and holes re-tapped.Avertissement des objets pointus et tranchants
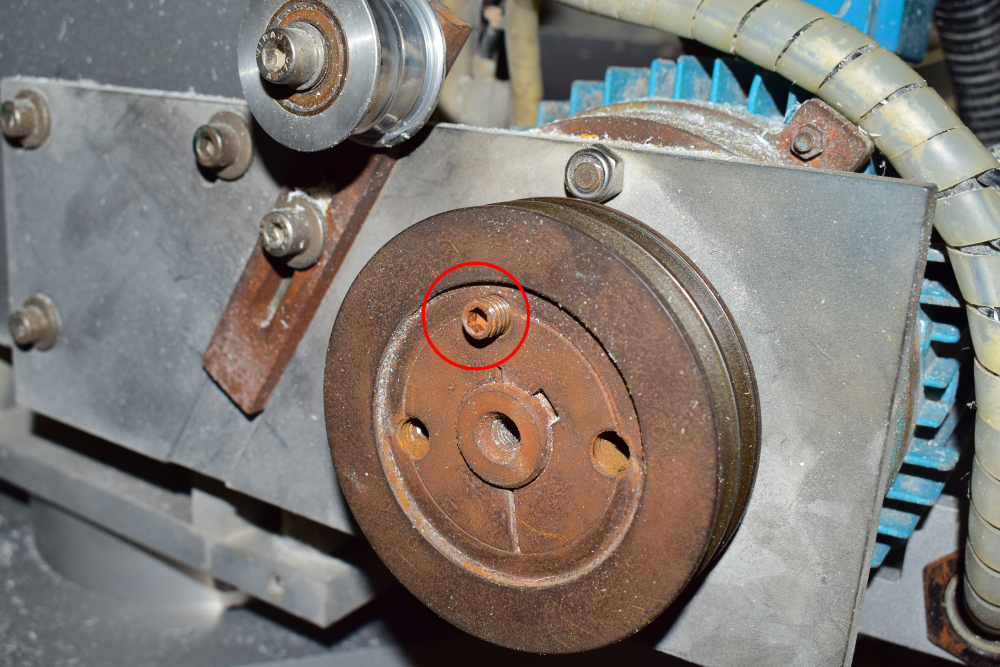
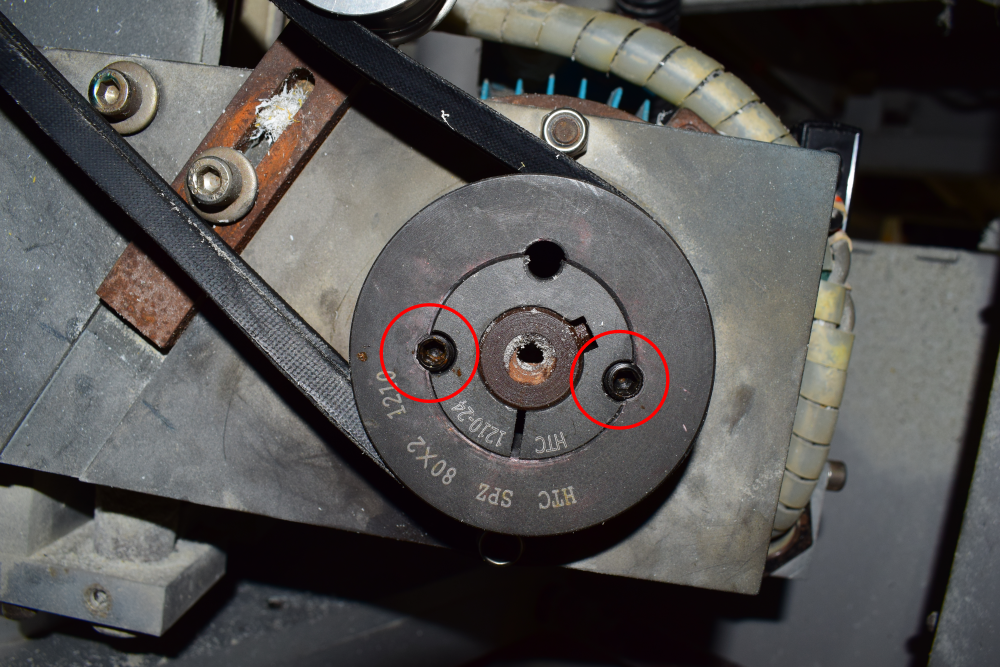
Étape 1 - Remove taper lock pulleys
Remove the two grub screws from the taper lock pulleys and insert one into the hole that was initially empty. Screw in tight to break seal of taperlock and split the two parts. If siezed the outer part can be tapped back with a hammer. These parts are usually very brittle and can shatter with a heavy hammer blow. It can also be useful to have the belts on at this point to stop the pulley from turning.


Étape 2 - Fit new taper lock pulleys, belts and old 300mm saw blade.
Fit the new pulleys and belts, no need for Loctite on the grub screws
Check alignment of belts and tension.
Fit old blade. The old blade can be used to cut a little clearance in the new slit strip before the 500mm blade is fitted. If this is not done then the motor overload may trip as the 500mm blade can be stalled by the tight gap in the slit strip.

Étape 3 - Remove old slit strip
Remove the four countersunk and four dome head allen screws holding the slit strip. These can quite often be siezed and/or be rounded and my need to be drilled out.
Étape 4 - Replace bracket for saw stroke cylinder rod
Using the old slit strip you can wedge up the assembly to give easier access. Once wedged up place something underneath the assembly to stop it falling on your hands if the slit strip slides off.
Remove the old bracket and replace with the new one.


Draft
 Français
 English
 Deutsch
 Español
 Italiano
 Português