| [version en cours de rédaction] | [version en cours de rédaction] |
(Page créée avec « {{Tuto Details |Main_Picture=Hikvision_Camera_Setup_Annotation_2019-09-04_100923.JPG |Main_Picture_annotation={"version":"2.4.6","objects":[{"type":"image","version":"2.4.... ») |
|||
| Ligne 23 : | Ligne 23 : | ||
|Step_Title=<translate></translate> | |Step_Title=<translate></translate> | ||
|Step_Content=<translate>When open, the SADP Tool will display all Hikvision cameras on the connected network. If the IP address has not been modified before going to site the camera needs to be “Activated” , given a password (Stuga001) and an IP address set in an appropriate range (preferably given by the customer IT team). 3.{{#annotatedImageLight:Fichier:Connected Cameras.png|0=976px|hash=|jsondata=|mediaClass=Image|type=frameless|align=center|src=https://stuga.dokit.app/images/6/65/Connected_Cameras.png|href=./Fichier:Connected Cameras.png|resource=./Fichier:Connected Cameras.png|caption=|size=976px}}</translate> | |Step_Content=<translate>When open, the SADP Tool will display all Hikvision cameras on the connected network. If the IP address has not been modified before going to site the camera needs to be “Activated” , given a password (Stuga001) and an IP address set in an appropriate range (preferably given by the customer IT team). 3.{{#annotatedImageLight:Fichier:Connected Cameras.png|0=976px|hash=|jsondata=|mediaClass=Image|type=frameless|align=center|src=https://stuga.dokit.app/images/6/65/Connected_Cameras.png|href=./Fichier:Connected Cameras.png|resource=./Fichier:Connected Cameras.png|caption=|size=976px}}</translate> | ||
| − | | | + | }} |
| − | | | + | {{Tuto Step |
| + | |Step_Title=<translate>Security Questions</translate> | ||
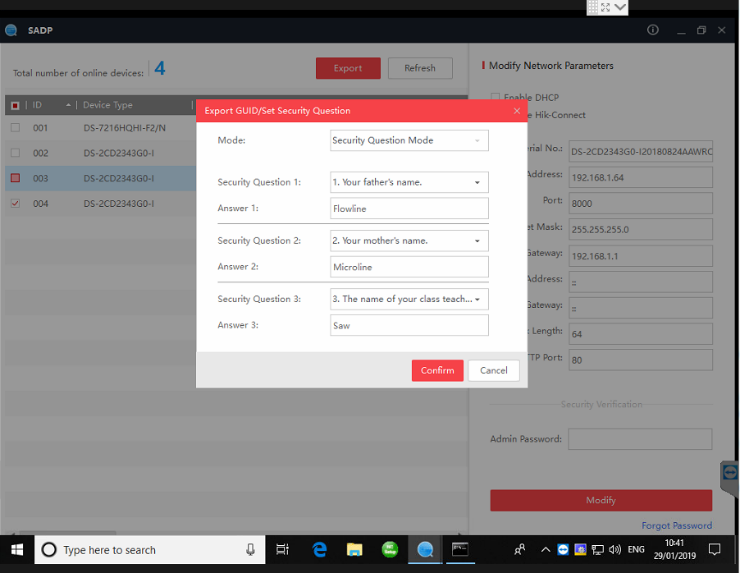
| + | |Step_Content=<translate>Security Question 1:Your Father’s Name? | ||
| + | |||
| + | Answer 1: Flowline | ||
| + | |||
| + | Security Question 2: Your Mother’s Name? | ||
| + | |||
| + | Answer 2: Microline | ||
| + | |||
| + | Security Question 3: Name of your Class Teacher? | ||
| + | |||
| + | Answer 3: Saw | ||
| + | |||
| + | |||
| + | After this, you will be asked to set the ip address in the IP address section.{{#annotatedImageLight:Fichier:Security Answers Hik.png|0=740px|hash=|jsondata=|mediaClass=Image|type=frameless|align=center|src=https://stuga.dokit.app/images/d/d0/Security_Answers_Hik.png|href=./Fichier:Security Answers Hik.png|resource=./Fichier:Security Answers Hik.png|caption=|size=740px}}</translate> | ||
| + | }} | ||
| + | {{Tuto Step | ||
| + | |Step_Title=<translate>Open in Internet Explorer</translate> | ||
| + | |Step_Content=<translate>Using internet explorer (Not chrome or edge) type the IP address into the web address bar.</translate> | ||
| + | }} | ||
| + | {{Tuto Step | ||
| + | |Step_Title=<translate>Download Plugin</translate> | ||
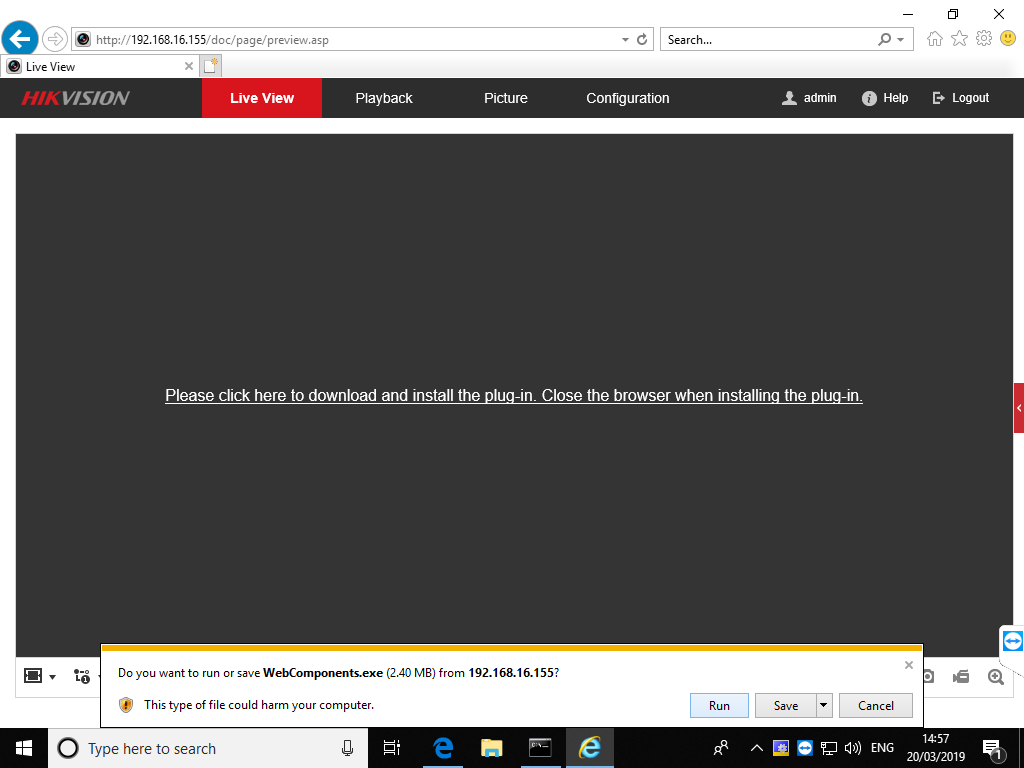
| + | |Step_Content=<translate>Click on the link to download a plugin. When prompted to download click ‘Run’.{{#annotatedImageLight:Fichier:Hikvision Camera Setup Download Plugin.png|0=1024px|hash=|jsondata=|mediaClass=Image|type=frameless|align=center|src=https://stuga.dokit.app/images/3/35/Hikvision_Camera_Setup_Download_Plugin.png|href=./Fichier:Hikvision Camera Setup Download Plugin.png|resource=./Fichier:Hikvision Camera Setup Download Plugin.png|caption=|size=1024px}}<br /></translate> | ||
| + | }} | ||
| + | {{Tuto Step | ||
| + | |Step_Title=<translate></translate> | ||
| + | |Step_Content=<translate></translate> | ||
}} | }} | ||
{{Notes}} | {{Notes}} | ||
{{PageLang | {{PageLang | ||
| + | |Language=en | ||
|SourceLanguage=none | |SourceLanguage=none | ||
|IsTranslation=0 | |IsTranslation=0 | ||
| − | |||
}} | }} | ||
{{Tuto Status | {{Tuto Status | ||
|Complete=Draft | |Complete=Draft | ||
}} | }} | ||
Version du 4 septembre 2019 à 11:26
Setting up the Hikvision cameras and recording system
Difficulté
Moyen
Durée
10 minute(s)
Introduction
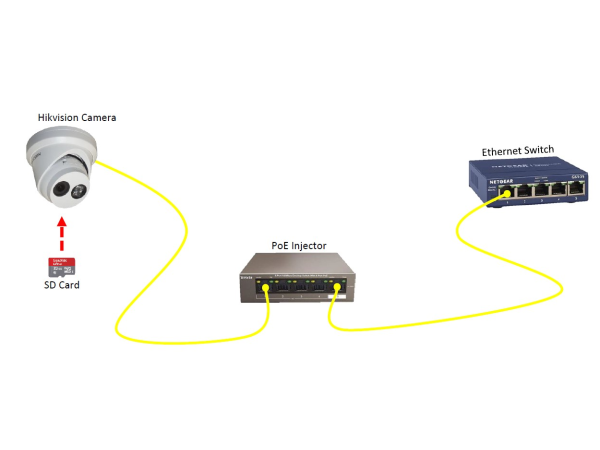
These are the Hikvision DS-2CD2343G0-I Cameras (C0001152) that will replace the obsolete UCAMs that have been used on previous machines.
Connected via a multi way PoE injector (C0001238).
And with SD card (C0001239).Étape 2 -
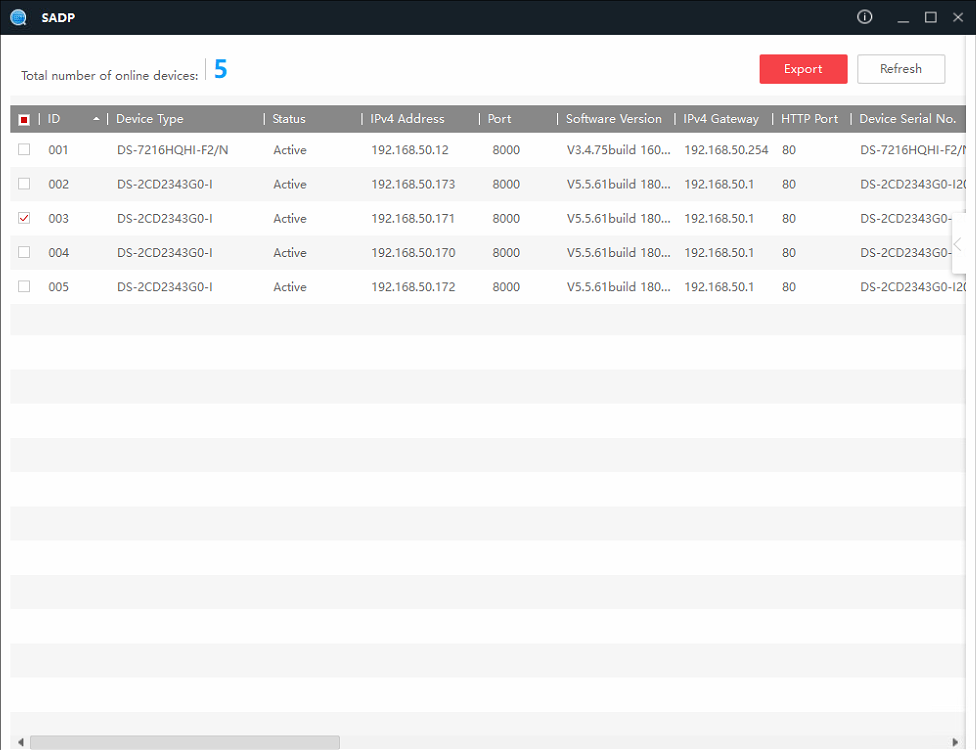
When open, the SADP Tool will display all Hikvision cameras on the connected network. If the IP address has not been modified before going to site the camera needs to be “Activated” , given a password (Stuga001) and an IP address set in an appropriate range (preferably given by the customer IT team). 3.Étape 4 - Open in Internet Explorer
Using internet explorer (Not chrome or edge) type the IP address into the web address bar.
Étape 6 -
Draft


 Français
 English
 Deutsch
 Español
 Italiano
 Português