| [version en cours de rédaction] | [version en cours de rédaction] |
(Page créée avec « {{Tuto Details |Description=<translate>How to change the main saw blade on a Stuga machine</translate> |Categories=Maintenance |Difficulty=Medium |Duration=10 |Duration-ty... ») |
|||
| Ligne 18 : | Ligne 18 : | ||
Brown burnt swarf | Brown burnt swarf | ||
| − | Smoke coming out of profile end while cutting</translate> | + | Smoke coming out of profile end while cutting |
| + | |||
| + | <br />{{Warning|...The 500mm blade is sharp and can be awkward to manouver out of the saw, please be careful}}<br /></translate> | ||
}} | }} | ||
{{Materials | {{Materials | ||
| − | |ItemList={{ItemList}} | + | |ItemList={{ItemList}}{{ItemList |
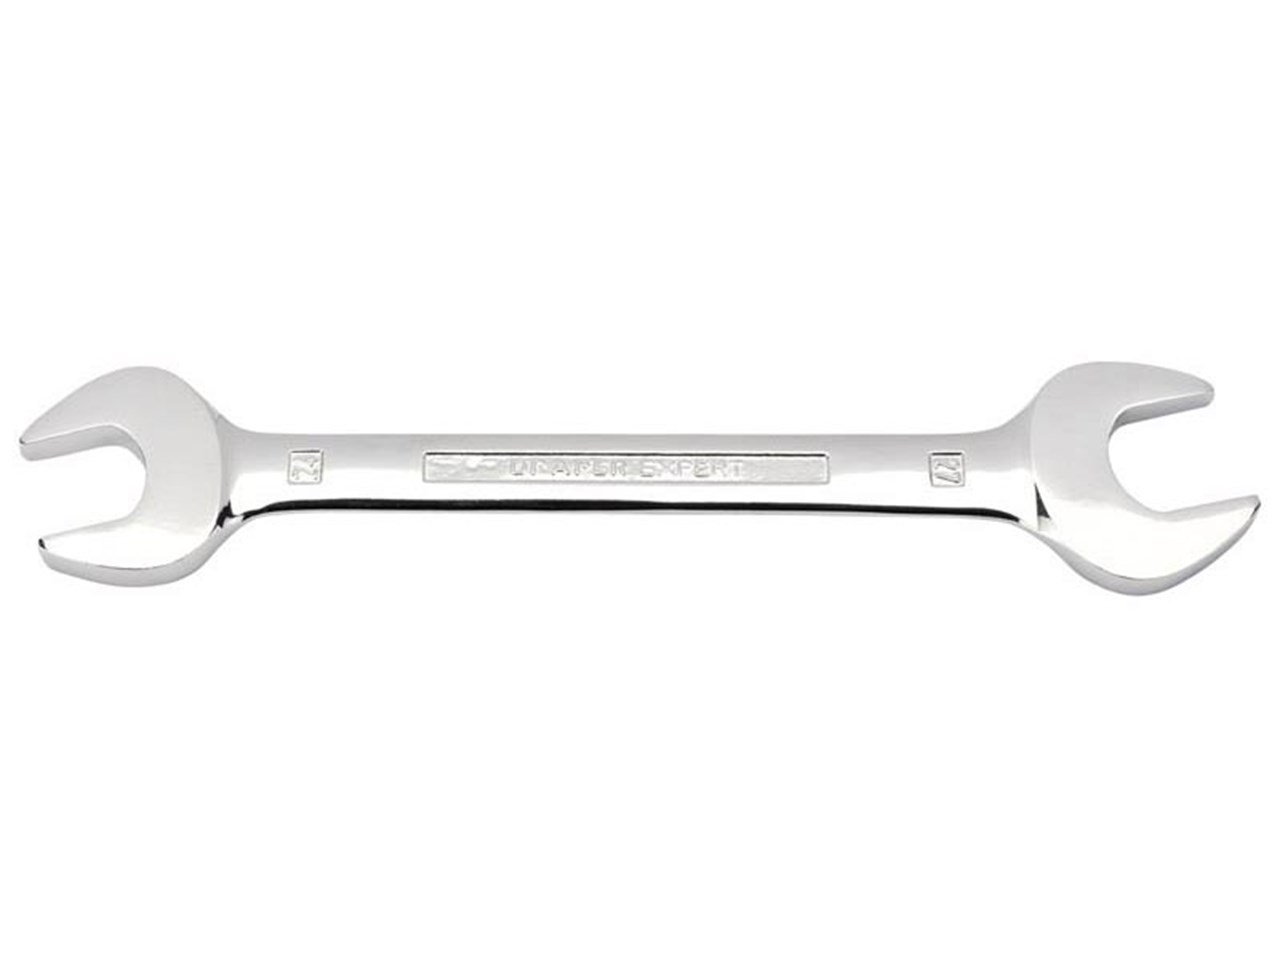
| + | |Item=Spanner 24mm | ||
| + | }}{{ItemList | ||
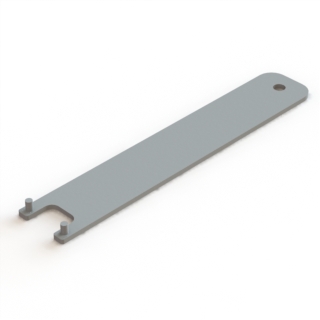
| + | |Item=D0005207 Stuga Flange C Spanner | ||
| + | }} | ||
}} | }} | ||
{{EPI | {{EPI | ||
| Ligne 27 : | Ligne 33 : | ||
}} | }} | ||
{{Tuto Step | {{Tuto Step | ||
| − | |Step_Title=<translate></translate> | + | |Step_Title=<translate>Stop Cutting</translate> |
| − | |Step_Content=<translate></translate> | + | |Step_Content=<translate>Make sure you have stopped cutting and nothing on the machine is moving - press an emergency stop button to ensure this.</translate> |
| + | }} | ||
| + | {{Tuto Step | ||
| + | |Step_Title=<translate>Open the door</translate> | ||
| + | |Step_Content=<translate>Through the winSaw program, press the '[F6] Open Door' button, you may have to wait up to 60 seconds before the guard lock output is on. | ||
| + | |||
| + | Once the timer has finished open the front door (you may have to give the door a slight nudge first | ||
| + | |||
| + | before opening)</translate> | ||
| + | }} | ||
| + | {{Tuto Step | ||
| + | |Step_Title=<translate>Loosen Blade</translate> | ||
| + | |Step_Content=<translate>Using the saw blade 'C' spanner and the 24mm spanner, loosen and remove the main bolt going through the centre of the saw blade - anti-clockwise to loosen.</translate> | ||
| + | }} | ||
| + | {{Tuto Step | ||
| + | |Step_Title=<translate>Remove Fastening</translate> | ||
| + | |Step_Content=<translate>Once the bolt is loose; remove the bolt, washer and plate. | ||
| + | |||
| + | {{Pin|...Remember which order they are in, as this is the order they must go back on.}}</translate> | ||
| + | }} | ||
| + | {{Tuto Step | ||
| + | |Step_Title=<translate>Remove Blade</translate> | ||
| + | |Step_Content=<translate>Now carefully remove the blade, with this blade being 500mm it will be tight. Ensure you take note of which way the blade spins. | ||
| + | |||
| + | {{Info|...The blade cutting direction at the top is towards the rear of the machine}}<br /></translate> | ||
| + | }} | ||
| + | {{Tuto Step | ||
| + | |Step_Title=<translate>Fit New Blade</translate> | ||
| + | |Step_Content=<translate>Fit the new blade ensuring the teeth are facing the same way it was removed</translate> | ||
| + | }} | ||
| + | {{Tuto Step | ||
| + | |Step_Title=<translate>Refit Bolt, Plate and Washer</translate> | ||
| + | |Step_Content=<translate>Now fit the plate, washer and bolt ensuring it's tight</translate> | ||
| + | }} | ||
| + | {{Tuto Step | ||
| + | |Step_Title=<translate>Measure new blade thickness (Kerf)</translate> | ||
| + | |Step_Content=<translate>Measure the thickness of the brand new or sharpened blade - this should be between 3.8mm - 4.1mm</translate> | ||
| + | }} | ||
| + | {{Tuto Step | ||
| + | |Step_Title=<translate>Update kerf Parameter</translate> | ||
| + | |Step_Content=<translate>Through the winSaw software go into '[F5] Settings' and update the 'Kerf' parameter to what the blade thickness is. | ||
| + | |||
| + | Press 'Save'.</translate> | ||
| + | }} | ||
| + | {{Tuto Step | ||
| + | |Step_Title=<translate>Close the door</translate> | ||
| + | |Step_Content=<translate>Press '[F10] Reset Saw', now close the main door and ensure it will not open and that the 'Guard' message clears</translate> | ||
| + | }} | ||
| + | {{Tuto Step | ||
| + | |Step_Title=<translate>Reset Estop</translate> | ||
| + | |Step_Content=<translate>Reset the emergency stop circuit by unlatching emergency stop buttons and pressing the physical blue 'ES RESET' button</translate> | ||
}} | }} | ||
{{Notes}} | {{Notes}} | ||
{{PageLang | {{PageLang | ||
| + | |Language=en | ||
|SourceLanguage=none | |SourceLanguage=none | ||
|IsTranslation=0 | |IsTranslation=0 | ||
| − | |||
}} | }} | ||
{{Tuto Status | {{Tuto Status | ||
|Complete=Draft | |Complete=Draft | ||
}} | }} | ||
Version du 3 octobre 2019 à 15:01
How to change the main saw blade on a Stuga machine
Sommaire
- 1 Introduction
- 2 Pièces et outils
- 3 Étape 1 - Stop Cutting
- 4 Étape 2 - Open the door
- 5 Étape 3 - Loosen Blade
- 6 Étape 4 - Remove Fastening
- 7 Étape 5 - Remove Blade
- 8 Étape 6 - Fit New Blade
- 9 Étape 7 - Refit Bolt, Plate and Washer
- 10 Étape 8 - Measure new blade thickness (Kerf)
- 11 Étape 9 - Update kerf Parameter
- 12 Étape 10 - Close the door
- 13 Étape 11 - Reset Estop
- 14 Commentaires
Introduction
Stuga recommends this blade be changed after 2 weeks of cutting - use the following symptoms to determine if the blade
needs changing:
Awful cutting sound / smell
Profile dragging (sizes too short)
Brown burnt swarf
Smoke coming out of profile end while cutting
- Pièces et outils
Pièces et outils
Étape 1 - Stop Cutting
Make sure you have stopped cutting and nothing on the machine is moving - press an emergency stop button to ensure this.
Étape 2 - Open the door
Through the winSaw program, press the '[F6] Open Door' button, you may have to wait up to 60 seconds before the guard lock output is on.
Once the timer has finished open the front door (you may have to give the door a slight nudge first
before opening)
Étape 3 - Loosen Blade
Using the saw blade 'C' spanner and the 24mm spanner, loosen and remove the main bolt going through the centre of the saw blade - anti-clockwise to loosen.
Étape 4 - Remove Fastening
Once the bolt is loose; remove the bolt, washer and plate.
Étape 5 - Remove Blade
Now carefully remove the blade, with this blade being 500mm it will be tight. Ensure you take note of which way the blade spins.
Étape 6 - Fit New Blade
Fit the new blade ensuring the teeth are facing the same way it was removed
Étape 7 - Refit Bolt, Plate and Washer
Now fit the plate, washer and bolt ensuring it's tight
Étape 8 - Measure new blade thickness (Kerf)
Measure the thickness of the brand new or sharpened blade - this should be between 3.8mm - 4.1mm
Étape 9 - Update kerf Parameter
Through the winSaw software go into '[F5] Settings' and update the 'Kerf' parameter to what the blade thickness is.
Press 'Save'.
Étape 10 - Close the door
Press '[F10] Reset Saw', now close the main door and ensure it will not open and that the 'Guard' message clears
Étape 11 - Reset Estop
Reset the emergency stop circuit by unlatching emergency stop buttons and pressing the physical blue 'ES RESET' button
Draft


 Français
 English
 Deutsch
 Español
 Italiano
 Português