| [version en cours de rédaction] | [version en cours de rédaction] |
(Page créée avec « {{Tuto Details |Description=<translate>Currently, the Flowlines have an m12 barrel sensor fitted for the OCLEAR sensor. After research and updates to new machines, we have... ») |
|||
| (Une révision intermédiaire par le même utilisateur non affichée) | |||
| Ligne 1 : | Ligne 1 : | ||
{{Tuto Details | {{Tuto Details | ||
| + | |Main_Picture=TB0394_Fitting_Ultrasonic_Sensor_to_Flowline_OCLEAR_394-2.jpg | ||
| + | |Main_Picture_annotation={"version":"2.4.6","objects":[{"type":"image","version":"2.4.6","originX":"left","originY":"top","left":-970,"top":-345,"width":594,"height":446,"fill":"rgb(0,0,0)","stroke":null,"strokeWidth":0,"strokeDashArray":null,"strokeLineCap":"butt","strokeDashOffset":0,"strokeLineJoin":"miter","strokeMiterLimit":4,"scaleX":3.09,"scaleY":3.09,"angle":0,"flipX":false,"flipY":false,"opacity":1,"shadow":null,"visible":true,"clipTo":null,"backgroundColor":"","fillRule":"nonzero","paintFirst":"fill","globalCompositeOperation":"source-over","transformMatrix":null,"skewX":0,"skewY":0,"crossOrigin":"","cropX":0,"cropY":0,"src":"https://stuga.dokit.app/images/8/84/TB0394_Fitting_Ultrasonic_Sensor_to_Flowline_OCLEAR_394-2.jpg","filters":[]}],"height":450,"width":600} | ||
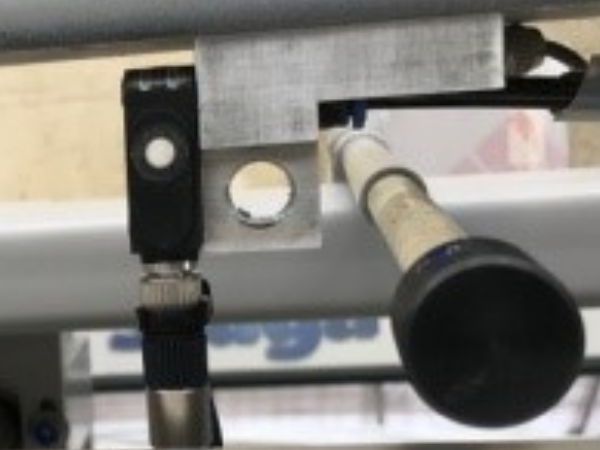
|Description=<translate>Currently, the Flowlines have an m12 barrel sensor fitted for the OCLEAR sensor. After research and updates to new machines, we have found that fitting an ultrasonic sensor is much more reliable and effective at picking up different profile colours. For this reason, we have created an upgrade kit to enhance the functionality of the OCLEAR sensor.</translate> | |Description=<translate>Currently, the Flowlines have an m12 barrel sensor fitted for the OCLEAR sensor. After research and updates to new machines, we have found that fitting an ultrasonic sensor is much more reliable and effective at picking up different profile colours. For this reason, we have created an upgrade kit to enhance the functionality of the OCLEAR sensor.</translate> | ||
| + | |Categories=Maintenance | ||
| + | |Tags=Flowline, Ultrasonic, Fitting, OCLEAR | ||
}} | }} | ||
| − | <translate>= '''Technical Bulletin''' = | + | <translate>='''Technical Bulletin'''= |
{| class="wikitable" border="1" cellspacing="0" cellpadding="0" width="673" | {| class="wikitable" border="1" cellspacing="0" cellpadding="0" width="673" | ||
| width="118" valign="top" |'''TB Number:''' | | width="118" valign="top" |'''TB Number:''' | ||
| Ligne 11 : | Ligne 15 : | ||
|- | |- | ||
| width="118" valign="top" |'''Machine:''' | | width="118" valign="top" |'''Machine:''' | ||
| − | | width="555" valign="top" |Flowline | + | | width="555" valign="top" |Flowline |
|- | |- | ||
| − | | width="118" valign="top" |'''Date:''' | + | | width="118" valign="top" |'''Date:''' |
| width="555" valign="top" |28/03/18 | | width="555" valign="top" |28/03/18 | ||
|- | |- | ||
| Ligne 23 : | Ligne 27 : | ||
|} | |} | ||
| − | = '''What is required?''' = | + | ='''What is required?'''= |
The parts required to fit the new sensor are as follows: | The parts required to fit the new sensor are as follows: | ||
{| class="wikitable" border="1" cellspacing="0" cellpadding="0" | {| class="wikitable" border="1" cellspacing="0" cellpadding="0" | ||
| Ligne 52 : | Ligne 56 : | ||
The tools required to do the job are as follows: | The tools required to do the job are as follows: | ||
| − | 4mm Allen Key | + | * 4mm Allen Key |
| + | * Medium Flat Headed Screwdriver | ||
| + | * Pliers | ||
| + | * Long Nose Pliers | ||
| + | * Wire Cutters | ||
| + | * Knife (Cable Stripping) | ||
| − | + | ='''How to Fit'''= | |
| − | |||
| − | |||
| − | |||
| − | |||
| − | |||
| − | |||
| − | |||
| − | |||
| − | |||
| − | = '''How to | ||
WARNING! PLEASE ENSURE MACHINE IS SWITCHED OFF BEFORE CARRYING OUT ANY WIRING! | WARNING! PLEASE ENSURE MACHINE IS SWITCHED OFF BEFORE CARRYING OUT ANY WIRING! | ||
| Ligne 77 : | Ligne 76 : | ||
· When plug is fitted, simply plug the original cable into the new cable and the sensor will work. | · When plug is fitted, simply plug the original cable into the new cable and the sensor will work. | ||
| − | = ''' | + | ='''Further Information'''= |
| − | Please see photographs below:{{#annotatedImageLight:Fichier:TB0394 Fitting Ultrasonic Sensor to Flowline OCLEAR 394-1.jpg|0=594px|hash=|jsondata=|mediaClass=Image|type=frameless|align=center|src=https://stuga.dokit.app/images/4/4b/TB0394_Fitting_Ultrasonic_Sensor_to_Flowline_OCLEAR_394-1.jpg|href=./Fichier:TB0394 Fitting Ultrasonic Sensor to Flowline OCLEAR 394-1.jpg|resource=./Fichier:TB0394 Fitting Ultrasonic Sensor to Flowline OCLEAR 394-1.jpg|caption=|size=594px}}<br />{{#annotatedImageLight:Fichier:TB0394 Fitting Ultrasonic Sensor to Flowline OCLEAR 394-2.jpg|0=594px|hash=|jsondata=|mediaClass=Image|type=frameless|align=center|src=https://stuga.dokit.app/images/8/84/TB0394_Fitting_Ultrasonic_Sensor_to_Flowline_OCLEAR_394-2.jpg|href=./Fichier:TB0394 Fitting Ultrasonic Sensor to Flowline OCLEAR 394-2.jpg|resource=./Fichier:TB0394 Fitting Ultrasonic Sensor to Flowline OCLEAR 394-2.jpg|caption=|size=594px}}You may also find | + | Please see photographs below:{{#annotatedImageLight:Fichier:TB0394 Fitting Ultrasonic Sensor to Flowline OCLEAR 394-1.jpg|0=594px|hash=|jsondata=|mediaClass=Image|type=frameless|align=center|src=https://stuga.dokit.app/images/4/4b/TB0394_Fitting_Ultrasonic_Sensor_to_Flowline_OCLEAR_394-1.jpg|href=./Fichier:TB0394 Fitting Ultrasonic Sensor to Flowline OCLEAR 394-1.jpg|resource=./Fichier:TB0394 Fitting Ultrasonic Sensor to Flowline OCLEAR 394-1.jpg|caption=|size=594px}}<br />{{#annotatedImageLight:Fichier:TB0394 Fitting Ultrasonic Sensor to Flowline OCLEAR 394-2.jpg|0=594px|hash=|jsondata=|mediaClass=Image|type=frameless|align=center|src=https://stuga.dokit.app/images/8/84/TB0394_Fitting_Ultrasonic_Sensor_to_Flowline_OCLEAR_394-2.jpg|href=./Fichier:TB0394 Fitting Ultrasonic Sensor to Flowline OCLEAR 394-2.jpg|resource=./Fichier:TB0394 Fitting Ultrasonic Sensor to Flowline OCLEAR 394-2.jpg|caption=|size=594px}} |
| + | |||
| + | |||
| + | You may also find [[Setting Ultrasonic Sensor - Horizontal|https://stuga.dokit.app/wiki/Setting_Ultrasonic_Sensor_-_Horizontal]] useful for setting up the sensor for your needs. | ||
| + | <br /></translate> | ||
{{PageLang | {{PageLang | ||
| + | |Language=en | ||
|SourceLanguage=none | |SourceLanguage=none | ||
|IsTranslation=0 | |IsTranslation=0 | ||
| − | |||
}} | }} | ||
{{AddComments}} | {{AddComments}} | ||
Version actuelle datée du 26 septembre 2019 à 13:07
Currently, the Flowlines have an m12 barrel sensor fitted for the OCLEAR sensor. After research and updates to new machines, we have found that fitting an ultrasonic sensor is much more reliable and effective at picking up different profile colours. For this reason, we have created an upgrade kit to enhance the functionality of the OCLEAR sensor.
Technical Bulletin
| TB Number: | 394 |
| Originator: | Benjamin Bunter |
| Machine: | Flowline |
| Date: | 28/03/18 |
| Circulate to: | Service; |
| Title: | Fitting Ultrasonic Sensor to Flowline OCLEAR |
What is required?
The parts required to fit the new sensor are as follows:
| PART NUMBER | PART DESCRIPTION | QUANTITY |
| E0001120 | Ultrasonic Sensor | 1 |
| E0001050 | 4 Way, m8 Female Plug Connector | 2 |
| E0001049 | 4 Way, m8 Male Plug Connector | 1 |
| F0000080 | m3 x 20mm Pan Head Screws | 2 |
| W0001002 | 4Cx0.32mm Flex Cable | 0.1 Metres |
The tools required to do the job are as follows:
- 4mm Allen Key
- Medium Flat Headed Screwdriver
- Pliers
- Long Nose Pliers
- Wire Cutters
- Knife (Cable Stripping)
How to Fit
WARNING! PLEASE ENSURE MACHINE IS SWITCHED OFF BEFORE CARRYING OUT ANY WIRING!
· Firstly, you need to remove current bracket that is fitted on the machine. Please return this bracket to Stuga Machinery so we can reuse the bracket for the next machine.
· You then need to cut the cable off the back of the original sensor. Cut it flush with the back of the sensor as you will need to utilise the cable.
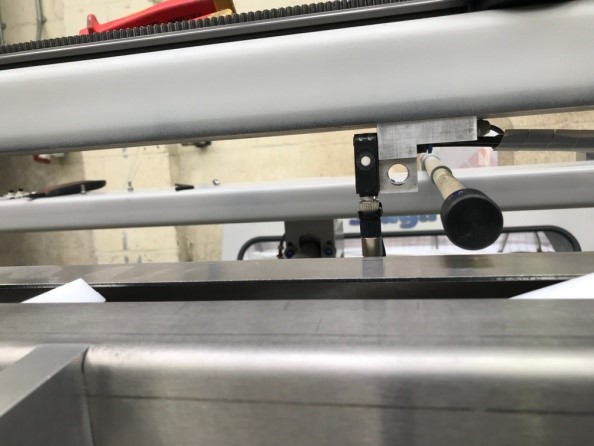
· You then need to put the new bracket in the place of the old one using the original bolts (orientation as per photograph).
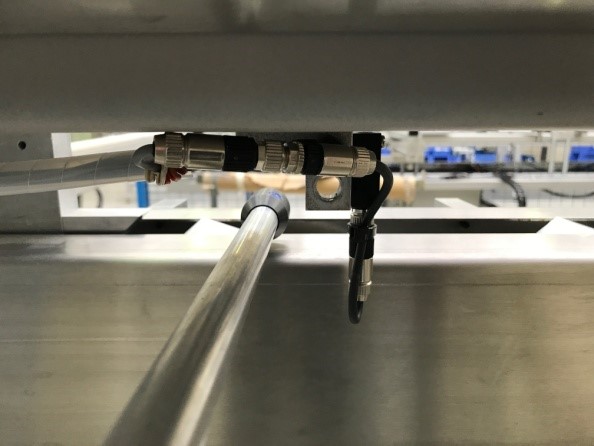
· The bracket supplied will have a sensor mounted to it that has a little cable and plug hanging out. The plug that is on the end of the new sensor needs to be able to plug into the original cable. To do this, you need to fit an E0001050 to the end of the original cable. There are instructions on how to do this supplied with the plug. The wire colours inside the cable match the coloured numbers inside the plug.
· When plug is fitted, simply plug the original cable into the new cable and the sensor will work.
Further Information
Please see photographs below:
You may also find https://stuga.dokit.app/wiki/Setting_Ultrasonic_Sensor_-_Horizontal useful for setting up the sensor for your needs.
Draft


 Français
 English
 Deutsch
 Español
 Italiano
 Português