| [version en cours de rédaction] | [version en cours de rédaction] |
| Ligne 59 : | Ligne 59 : | ||
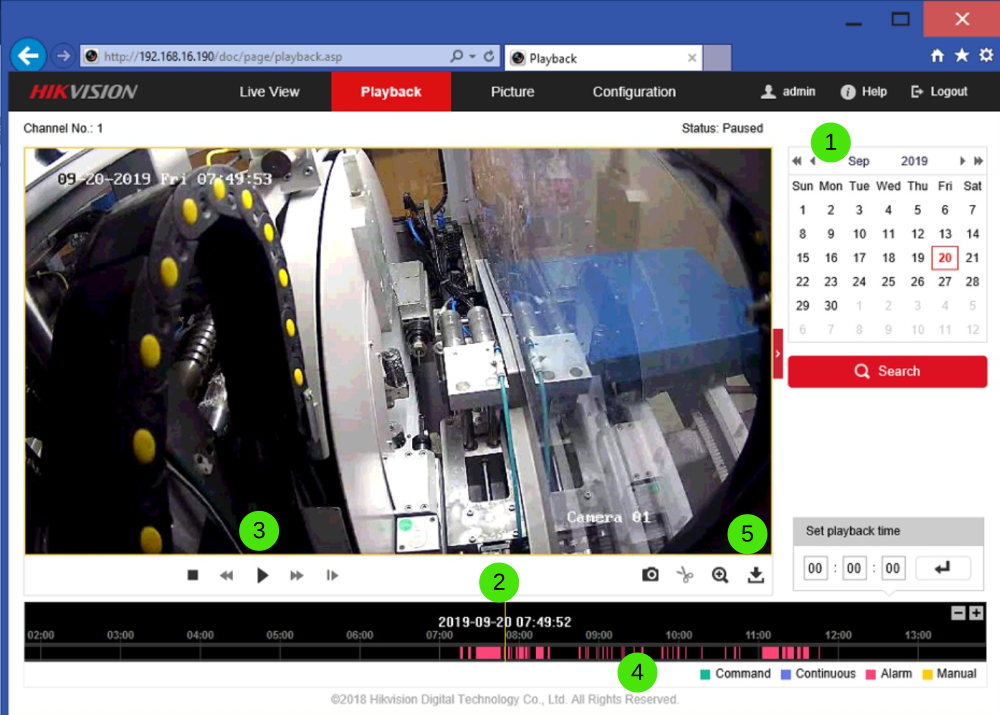
|Step_Content=<translate>Click on Playback to view historical recorded footage | |Step_Content=<translate>Click on Playback to view historical recorded footage | ||
| − | # Select the date you would like to view | + | #Select the date you would like to view |
| − | # Slide the time bar side to side | + | #Slide the time bar side to side |
| − | # Play to playback video at the requested time | + | #Play to playback video at the requested time |
| − | # Coloured areas show where video was recorded | + | #Coloured areas show where video was recorded |
| − | # Click on download to create a copy of the selected video snippet on your hard drive | + | #Click on download to create a copy of the selected video snippet on your hard drive |
{{Info|...Video is only recorded when there is movement in front of the camera}}</translate> | {{Info|...Video is only recorded when there is movement in front of the camera}}</translate> | ||
|Step_Picture_00=Viewing_Camera_Footage_from_Hikvision_Cameras_Annotation_2019-09-20_115115.jpg | |Step_Picture_00=Viewing_Camera_Footage_from_Hikvision_Cameras_Annotation_2019-09-20_115115.jpg | ||
Version du 20 septembre 2019 à 13:38
How to view the live footage and stored data from a Hikvision camera on a Stuga machine

Difficulté
Facile
Durée
5 minute(s)
Introduction
The video footage from a Hikvision camera can be viewed via an internet browser. The camera web page also has the facility to playback and download the recorded images stored on the memory card in the camera.
Étape 1 - Ensure SADP Tool is installed
This tool allows you to "find" the cameras on the network easily. This can be downloaded at

Étape 2 - Run SADP to view cameras on network


Enter the IP address in the explorer address bar

Étape 4 - Allow any Plugins
If this is the first time that this has been attempted on your PC, a Hikvision plugin will be needed. Follow the process to install it
Étape 5 - Log In to Camera
Stuga Cameras are all set up with the following login:
Username: admin
Password: Stuga001

Étape 6 - Live View
This shows you the live view from the camera

Étape 7 - Playback
Click on Playback to view historical recorded footage
- Select the date you would like to view
- Slide the time bar side to side
- Play to playback video at the requested time
- Coloured areas show where video was recorded
- Click on download to create a copy of the selected video snippet on your hard drive
Draft
 Français
 English
 Deutsch
 Español
 Italiano
 Português