Creating the C0000422-KIT from the hardware components ready for stores
Difficulté
Difficile
Durée
1 heure(s)
Sommaire
- 1 Introduction
- 2 Notes
- 2.1 Étape 1 - Parts Required
- 2.2 Étape 2 - Fill in the tracking records and stick labels
- 2.3 Étape 3 - Transfer Items from kit to PC box
- 2.4 Étape 4 - Remove the PC
- 2.5 Étape 5 - Unscrew the cover from the PC and remove
- 2.6 Étape 6 - Add extra RAM
- 2.7 Étape 7 - Add the extra SSD
- 2.8 Étape 8 - Add the VGA Video Card
- 2.9 Étape 9 - Replace Cover
- 2.10 Étape 10 - Plug in host PC
- 2.11 Étape 11 - BIOS setup
- 2.12 Étape 12 - Select Boot Device
- 2.13 Étape 13 - Image the PC
- 2.14 Étape 14 - Boot into Windows
- 2.15 Étape 15 - Initialise the dedicated VM disk
- 2.16 Étape 16 - Copy the virtual machine VHDX
- 2.17 Étape 17 - Setup Hyper-V and Virtual machine
- 2.18 Étape 18 - Finish Virtual Machine setup
- 2.19 Étape 19 - Finally
- 2.20 Commentaires
Introduction
This process takes the components to create a standard "C000422-KIT".
This kit can then be stored and pulled off the shelf when required. It will then need to be set up for the particular customer machine using Setting Up Windows PC C0000422-KIT 2023
Notes
- There are two PCs running on the same hardware, The Host PC and the Virtual machine.
- Host PC (For support)
- The base Windows install running directly on the hardware installed to Dell NVME drive.
- Has its own OEM Windows license supplied by Dell linked directly to the hardware (no product code – stored in the Dell hardware)
- Imaged by Macrium reflect.
- Virtual PC – Stuga VM
- Used for Stuga software - the VM can run on any PC without changing drivers, etc. Host OS version / hardware unimportant as long as it runs Hyper-V.
- A second install of Windows running on a virtual machine, hosted by the Host PC above. It has a dedicated SSD (the Kingston Drive) stored on [:Fichier:///D:/VMPC.vhdx D:\VMPC.vhdx], with 8GB RAM.
- Has its own dedicated Windows 11 PRO license present in the kit, product code stored on Monday and on the license.
- Copied to host and setup manually during install.
- Host PC (For support)
Étape 1 - Parts Required
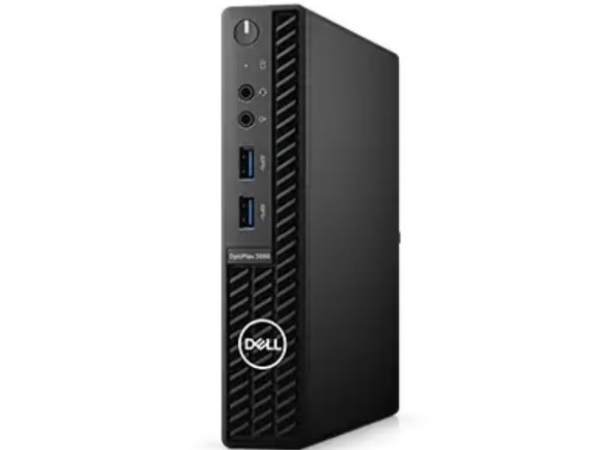
- Dell PC (7010 micro PC at time of writing)
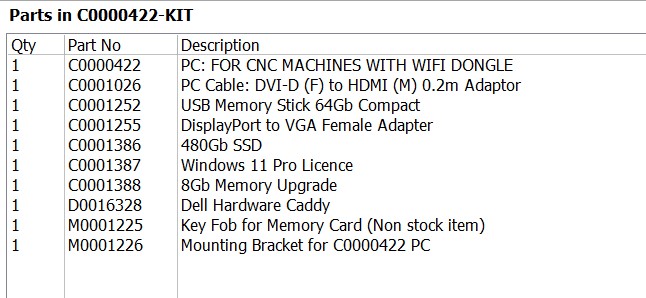
- Modification kit (contains extra RAM, Windows license, cables, extra SSD)
- External USB Hard Drive containing Stuga Images (Currently a black external Maxtor drive)
- Host image (for Macrium Reflect)
- Virtual machine image (for Windows Hyper-V)
- Stuga Asset tags (little blue/silver shiny labels)
- Sticky labels (C0442____) from Zebra Printer.
- Monitor, keyboard, mouse for imaging and setup.
Étape 2 - Fill in the tracking records and stick labels
On Monday spreadsheet: IT Stock Asset Tracking
- Use a currently incomplete entry at the end of the list for an existing kit. (Or create a new entry if kits are not registered yet)
- Fill in the Service Tag field with the Dell service tag number from the box or from the PC. (Dell Silver sticker e.g. ABCD1234)
- Assign a new Stuga Asset Tag Number (just the next number in the list), record in the field and stick the matching blue shiny sticker to the side of the Dell PC.
- From the Kit, get the Windows 11 product code and fill in the Product Code field in the spreadsheet.
- Get a large sticky label with C0422____ fill in the Kit number from spreadsheet and stick to the PC box.
- Change PC status to “In Stock”
Étape 3 - Transfer Items from kit to PC box
- C0001026 Display-port to HDMI cable.
- C0001255 Display-port to VGA cable
- C0001386 SSD (at time of writing 512GB Kingston)
- D0016328 SSD Caddy (small black frame)
- C0001252 USB boot dongle
- M0001226 Large metal mounting frame for PC
- C0001387 Physical Windows 11 license (for virtual machine)
- Get a large sticky label with Machine ID …return to IT Desk and add to physical licence if not on.
Étape 4 - Remove the PC
Remove the PC from the Dell box with power adapter and power cable. Keyboard and mouse (if supplied) can be returned to stores (not needed here)
Étape 5 - Unscrew the cover from the PC and remove
(it slides forward)
Étape 6 - Add extra RAM
- Detach the fan cooling housing covering the processor and RAM sockets. (catch at rear of housing)
- Get RAM module from kit and insert in spare memory socket (already at least one RAM module present)
- Reattach the fan cooling housing as before.
Étape 7 - Add the extra SSD
- Take the SSD and caddy from the kit – snap disk into caddy if its not already.
- Slot the SSD into the spare SATA socket on the motherboard
Étape 8 - Add the VGA Video Card
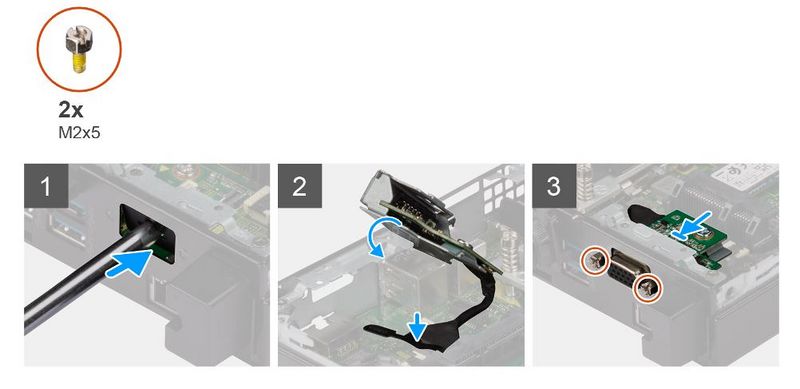
- To remove the dummy metal bracket, insert a flat-head screwdriver in the hole of the bracket. Push the bracket to release the bracket, and then lift the bracket out from the system.
- Insert the optional I/O module (Type-C/HDMI/VGA/DP/Serial) into its slot from the inside of your computer.
- Connect the I/O cable to the connector on the system board.
- Replace the two (M3X3 or M2x5) screws to secure the optional I/O module to the system.
Étape 9 - Replace Cover
- Makes sure fan housing is clamped down correctly
- Replace the PC cover and tighten the screw.
Étape 10 - Plug in host PC
- Plug in PC power, keyboard, mouse. Do not plug in network for now (it causes boot issues). NOTE: USE THE POWER SUPPLY AND POWER PLUG FROM THE PC BOX. (So its tested for use in the field)
- Get USB boot dongle from the kit and insert into a USB3 socket on the PC (blue socket marked SS)
Étape 11 - BIOS setup
- Start the PC – keep pressing ‘F2’ on the keyboard to go into the BIOS setup. (if Windows boots, restart the PC and try again – we don’t want the pre-installed Windows installation)
- Look for the Power Settings menu item within the BIOS
- Change the AC Power Recovery or similar setting to “On” (So PC turns on when power is restored)
- Press the "F10" key to save the BIOS setting changes and exit the BIOS
Étape 12 - Select Boot Device
- Boot PC and keep pressing F12 to get boot menu.
- Select and boot from the USB boot dongle inserted above. Macrium Reflect should load after a minute or so. (Sometimes the screen goes black for 1min+)
- Insert the external HDD into a USB3 port on the PC (USB2 will be very slow to transfer)
Étape 13 - Image the PC
- Select Restore tab.
- SOURCE = Disk image from the external USB drive (*.MRIMG)CANT REMEMBER THE ACTUAL file NAME
- DESTINATION = NVME SSD drive (Careful not to select the USB boot dongle)
- Confirm overwrite when asked.
- Wait ~10 mins for imaging to complete (external disk on USB3)
- Shut down the PC
- Remove the USB boot dongle and return it to the PC box.
- Remove external drive drive for now – but keep ready.
Étape 14 - Boot into Windows
- Boot Dell PC with no USB drives attached. Windows should auto login.
- Reattach the network (LAN) cable to the back of the PC, once booted.
- Check the network connects and the time on the PC is correct. If not launch, Adjust Date and Time, then select Sync Now – it should correct itself.
- Run Windows update and make sure Windows is up to date.
- Ignore warning about an uninitialized drive if it appears (dealt with in next section).
Étape 15 - Initialise the dedicated VM disk
- In Windows, launch Disk Manager
- There should be an uninitialized SSD drive present (the new SSD we inserted earlier)
- Initialize the drive (use GPT (GUID partition table) – not MBR)
- Format the empty space as NTFS – use the full disk.
- Assign drive letter D: Name the disk VMPC
Étape 16 - Copy the virtual machine VHDX
- Insert the External USB Image drive again
- Browse the contents and find a virtual disk named VMPC.VHDX (or similar – may have a date afterward, use most recent version) CANT REMEMBER THE ACTUAL NAME
- Copy this file to the root of the new D:\ (Should take ~10 mins on USB3)
- Rename it to be D:\VMPC.vhdx if it has any dates after the name.
- Disconnect external drive.
Étape 17 - Setup Hyper-V and Virtual machine
- In Windows, launch Hyper-V Manager
- Create a new Hyper-V virtual machine via the Wizard.
- Before you begin: Next
- Virtual Machine Name: “StugaVM”
- Store the Virtual machine in a different location: [:Fichier:///D:/ D:\]
- Generation: 2 (Do not select 1)
- Assign memory: Startup memory = 8192, Use dynamic memory (The RAM we added earlier)
- Network connection: Stuga Switch
- Connect virtual hard disk: Use Existing Disk, Browse, Select VMPC.VHDX from above.
- Finish the Wizard.
- Go to settings on the new StugaVM virtual machine
- CheckPoints → Disable checkpoints
- Integration Services → Enable all checkboxes
- OK.
Étape 18 - Finish Virtual Machine setup
In Hyper-v Manager
- Start the virtual PC StugaVM (RMB, start or from the menu to right hand side)
- Double click its icon to launch Virtual Machine connection
- These instructions are for the VIRTUAL MACHINE (not the host)
- Activate Windows and use the product code from the Windows license in the PC box. (Type “Activation Settings” from start menu search.
- Launch windows update and check everything is up to date.
Étape 19 - Finally
- Shutdown the HOST PC (don’t worry about the VM – it will sleep and should be left running)
- Package it back into its box along with its Power cables.
- On Monday.com, mark PC as In Stock, if it wasn’t before.
Draft


 Français
 English
 Deutsch
 Español
 Italiano
 Português