| [version en cours de rédaction] | [version en cours de rédaction] |
(Page créée avec « {{Tuto Details |Description=<translate>Process for unloading and locating Autoflow Mk4 machine in Saje upvc</translate> |Categories=Maintenance |Difficulty=Hard |Duration=... ») |
|||
| Ligne 1 : | Ligne 1 : | ||
{{Tuto Details | {{Tuto Details | ||
| + | |Main_Picture=Saje_uPVC_Unloading_Process_IMG_7330_1_.jpg | ||
|Description=<translate>Process for unloading and locating Autoflow Mk4 machine in Saje upvc</translate> | |Description=<translate>Process for unloading and locating Autoflow Mk4 machine in Saje upvc</translate> | ||
|Categories=Maintenance | |Categories=Maintenance | ||
| Ligne 11 : | Ligne 12 : | ||
The machine will be delivered in the following modules, that should be unloaded from the lorry in this order | The machine will be delivered in the following modules, that should be unloaded from the lorry in this order | ||
| − | # Machining centre base module (1.8 x 2.2m) | + | #Machining centre base module (1.8 x 2.2m) |
| − | # Machining centre outer guard 2 off (2.0 x 1.5m) | + | #Machining centre outer guard 2 off (2.0 x 1.5m) |
| − | # Infeed module (2.4 x 7.5m) | + | #Infeed module (2.4 x 7.5m) |
| − | # Conveyor modules (4.5 x 0.5m, 2.5 x 0.5m) | + | #Conveyor modules (4.5 x 0.5m, 2.5 x 0.5m) |
| + | |||
<br /></translate> | <br /></translate> | ||
}} | }} | ||
| − | {{Materials}} | + | {{Materials |
| − | {{EPI}} | + | |ItemList={{ItemList}} |
| + | }} | ||
| + | {{EPI | ||
| + | |EPI=use-protective-footwear, use-protective-clothing, use-protective-headgear | ||
| + | }} | ||
{{Tuto Step | {{Tuto Step | ||
|Step_Title=<translate>Remove the Soenen Machine</translate> | |Step_Title=<translate>Remove the Soenen Machine</translate> | ||
| − | |Step_Content=<translate>Wed / Thur before unloading, remove the Soenen machine, leaving the large outfeed conveyor tables | + | |Step_Content=<translate>'''Wed / Thur''' before unloading, remove the Soenen machine, leaving the large outfeed conveyor tables |
The Brackets on the outfeed tables will be used for the Stuga conveyors</translate> | The Brackets on the outfeed tables will be used for the Stuga conveyors</translate> | ||
| Ligne 41 : | Ligne 47 : | ||
|Step_Picture_02=Saje_uPVC_Unloading_Process_Sturtz_Infeed_Inner_Feet_Dims.jpg | |Step_Picture_02=Saje_uPVC_Unloading_Process_Sturtz_Infeed_Inner_Feet_Dims.jpg | ||
|Step_Picture_03=Saje_uPVC_Unloading_Process_Sturtz_Infeed_Inner_Feet_Dims.jpg | |Step_Picture_03=Saje_uPVC_Unloading_Process_Sturtz_Infeed_Inner_Feet_Dims.jpg | ||
| + | |Step_Picture_03_annotation={"version":"2.4.6","objects":[{"type":"image","version":"2.4.6","originX":"left","originY":"top","left":4,"top":-78,"width":471,"height":732,"fill":"rgb(0,0,0)","stroke":null,"strokeWidth":0,"strokeDashArray":null,"strokeLineCap":"butt","strokeDashOffset":0,"strokeLineJoin":"miter","strokeMiterLimit":4,"scaleX":1.1,"scaleY":1.1,"angle":0,"flipX":false,"flipY":false,"opacity":1,"shadow":null,"visible":true,"clipTo":null,"backgroundColor":"","fillRule":"nonzero","paintFirst":"fill","globalCompositeOperation":"source-over","transformMatrix":null,"skewX":0,"skewY":0,"crossOrigin":"","cropX":0,"cropY":0,"src":"https://stuga.dokit.app/images/a/ae/Saje_uPVC_Unloading_Process_Sturtz_Infeed_Inner_Feet_Dims.jpg","filters":[]}],"height":449.6487119437939,"width":600} | ||
| + | |Step_Picture_04=Saje_uPVC_Unloading_Process_Sturtz_Infeed_All_Pads.jpg | ||
}} | }} | ||
{{Tuto Step | {{Tuto Step | ||
|Step_Title=<translate>Triangulation for Infeed Pads</translate> | |Step_Title=<translate>Triangulation for Infeed Pads</translate> | ||
| − | |Step_Content=<translate></translate> | + | |Step_Content=<translate>Pictures show triangulation distances.</translate> |
|Step_Picture_00=Saje_uPVC_Unloading_Process_Sturtz_Infeed_Triangulation_1.jpg | |Step_Picture_00=Saje_uPVC_Unloading_Process_Sturtz_Infeed_Triangulation_1.jpg | ||
|Step_Picture_01=Saje_uPVC_Unloading_Process_Sturtz_Infeed_Triangulation_2.jpg | |Step_Picture_01=Saje_uPVC_Unloading_Process_Sturtz_Infeed_Triangulation_2.jpg | ||
|Step_Picture_02=Saje_uPVC_Unloading_Process_Sturtz_Infeed_Triangulation_3.jpg | |Step_Picture_02=Saje_uPVC_Unloading_Process_Sturtz_Infeed_Triangulation_3.jpg | ||
| + | }} | ||
| + | {{Tuto Step | ||
| + | |Step_Title=<translate>Odd pad</translate> | ||
| + | |Step_Content=<translate>Additional pad needed on infeed "unwrapping" table</translate> | ||
| + | |Step_Picture_00=Saje_uPVC_Unloading_Process_Sturtz_Infeed_Odd_Pad.jpg | ||
}} | }} | ||
{{Tuto Step | {{Tuto Step | ||
|Step_Title=<translate>Prepare the Machine Pads / Piles</translate> | |Step_Title=<translate>Prepare the Machine Pads / Piles</translate> | ||
| − | |Step_Content=<translate>{{Idea|...Using shuttering in the pad holes will enable the height of the pad to be increased to correct the "run off" of the floor.}} | + | |Step_Content=<translate>'''Friday''':{{Idea|...Using shuttering in the pad holes will enable the height of the pad to be increased to correct the "run off" of the floor.}} |
| − | * Pad size 300mm x 300mm (or similar) | + | *Pad size 300mm x 300mm (or similar) |
| − | * Pad Depth 300-500mm | + | *Pad Depth 300-500mm |
| − | * Use shuttering or large diameter soil pipe | + | *Use shuttering or large diameter soil pipe |
| − | * Find the highest point, string a level agcross | + | *Find the highest point, string a level agcross to the other pads |
| − | *</translate> | + | *Fill shuttering with quick set cement to +/- 15mm of level |
| + | {{Idea|...The machining table has levelling feet, but the run off of the current cow shed floor may prove challenging for the range of the levelling. Using the shuttering to create taller plies will solve this problem easily and inexpensively}}<br /></translate> | ||
}} | }} | ||
{{Tuto Step | {{Tuto Step | ||
| Ligne 76 : | Ligne 90 : | ||
}} | }} | ||
{{Tuto Step | {{Tuto Step | ||
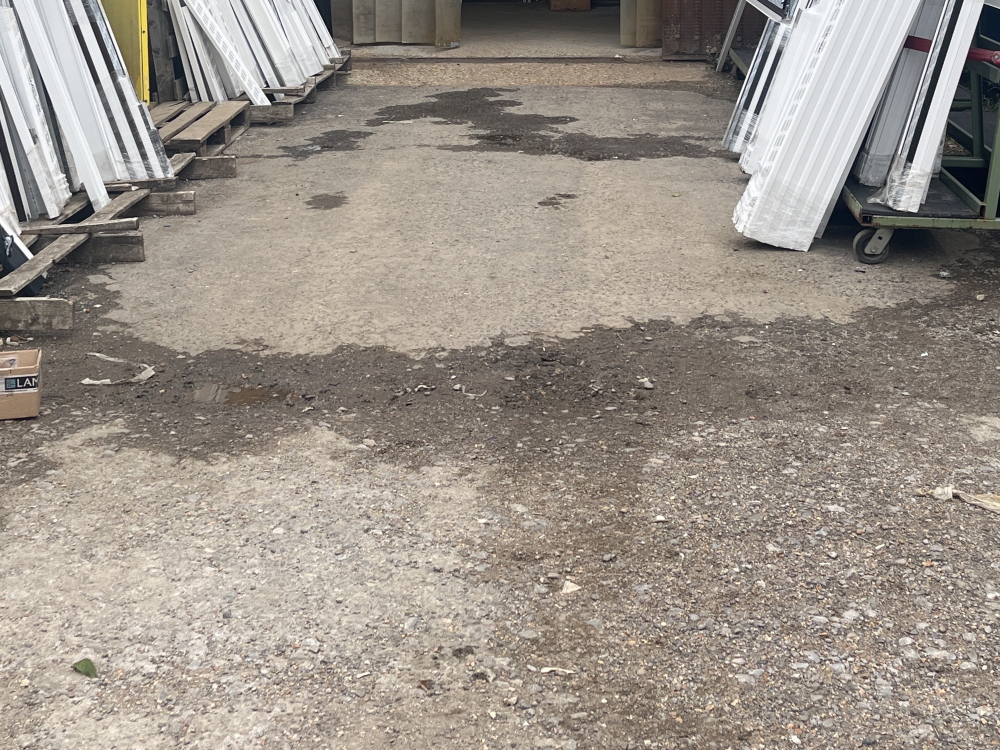
| − | |Step_Title=<translate> | + | |Step_Title=<translate>Clear Outside Unloading Area</translate> |
| − | |Step_Content=<translate></translate> | + | |Step_Content=<translate>The full width of this route will need to be cleared</translate> |
| + | |Step_Picture_00=Saje_uPVC_Unloading_Process_Saje_Rear.jpg | ||
| + | }} | ||
| + | {{Tuto Step | ||
| + | |Step_Title=<translate>Imporvements to step into building</translate> | ||
| + | |Step_Content=<translate>If possible, improve the access pathway. | ||
| + | |||
| + | Potentially find a ramp system for the step into the unit</translate> | ||
| + | |Step_Picture_00=Saje_uPVC_Unloading_Process_Step_into_Saje_Rear.jpg | ||
| + | |Step_Picture_01=Saje_uPVC_Unloading_Process_Saje_Rear.jpg | ||
| + | |Step_Picture_01_annotation={"version":"2.4.6","objects":[{"type":"image","version":"2.4.6","originX":"left","originY":"top","left":-316,"top":-396,"width":4032,"height":3024,"fill":"rgb(0,0,0)","stroke":null,"strokeWidth":0,"strokeDashArray":null,"strokeLineCap":"butt","strokeDashOffset":0,"strokeLineJoin":"miter","strokeMiterLimit":4,"scaleX":0.3,"scaleY":0.3,"angle":0,"flipX":false,"flipY":false,"opacity":1,"shadow":null,"visible":true,"clipTo":null,"backgroundColor":"","fillRule":"nonzero","paintFirst":"fill","globalCompositeOperation":"source-over","transformMatrix":null,"skewX":0,"skewY":0,"crossOrigin":"","cropX":0,"cropY":0,"src":"https://stuga.dokit.app/images/c/c0/Saje_uPVC_Unloading_Process_Saje_Rear.jpg","filters":[]}],"height":449.75922953451044,"width":600} | ||
| + | }} | ||
| + | {{Tuto Step | ||
| + | |Step_Title=<translate>Lorry to reverse along LHS of building</translate> | ||
| + | |Step_Content=<translate>'''Monday''': | ||
| + | |||
| + | Lorry to reverse along left side of building (when viewed from front) | ||
| + | |||
| + | This allow easy unloading access for forklift to unload to ground, and align components with door | ||
| + | |||
| + | <br /></translate> | ||
| + | |Step_Picture_00=Saje_uPVC_Unloading_Process_Saje_Rear_LHS.jpg | ||
| + | |Step_Picture_01=Saje_uPVC_Unloading_Process_Saje_Unloading_area.jpg | ||
| + | }} | ||
| + | {{Tuto Step | ||
| + | |Step_Title=<translate>Machining Centre</translate> | ||
| + | |Step_Content=<translate>The machining centre</translate> | ||
| + | }} | ||
| + | {{Tuto Step | ||
| + | |Step_Title=<translate>Machining Centre Guard</translate> | ||
| + | |Step_Content=<translate>The guar is a clam shell design that encases the machine in 2 pars from front and rear</translate> | ||
}} | }} | ||
{{Notes}} | {{Notes}} | ||
{{PageLang | {{PageLang | ||
| + | |Language=en | ||
|SourceLanguage=none | |SourceLanguage=none | ||
|IsTranslation=0 | |IsTranslation=0 | ||
| − | |||
}} | }} | ||
{{Tuto Status | {{Tuto Status | ||
|Complete=Draft | |Complete=Draft | ||
}} | }} | ||
Version du 3 octobre 2022 à 11:04
Process for unloading and locating Autoflow Mk4 machine in Saje upvc


Difficulté
Difficile
Durée
4 jour(s)
Sommaire
- 1 Introduction
- 2 Pièces et outils
- 3 Étape 1 - Remove the Soenen Machine
- 4 Étape 2 - Prepare the floor
- 5 Étape 3 - Triangulation for Infeed Pads
- 6 Étape 4 - Odd pad
- 7 Étape 5 - Prepare the Machine Pads / Piles
- 8 Étape 6 - Prepare unloading bogeys
- 9 Étape 7 - Clear the inside area
- 10 Étape 8 - Clear Outside Unloading Area
- 11 Étape 9 - Imporvements to step into building
- 12 Étape 10 - Lorry to reverse along LHS of building
- 13 Étape 11 - Machining Centre
- 14 Étape 12 - Machining Centre Guard
- 15 Commentaires
Introduction
Access for machinery is limited at the Saje factory.
The machine will be delivered in the following modules, that should be unloaded from the lorry in this order
- Machining centre base module (1.8 x 2.2m)
- Machining centre outer guard 2 off (2.0 x 1.5m)
- Infeed module (2.4 x 7.5m)
- Conveyor modules (4.5 x 0.5m, 2.5 x 0.5m)
- Pièces et outils
Pièces et outils
[[Item:|]] A fatal error occurred in the #info parser function
Utiliser des chaussures de protection
Porter des vêtements de protection
Utiliser un casque protecteur
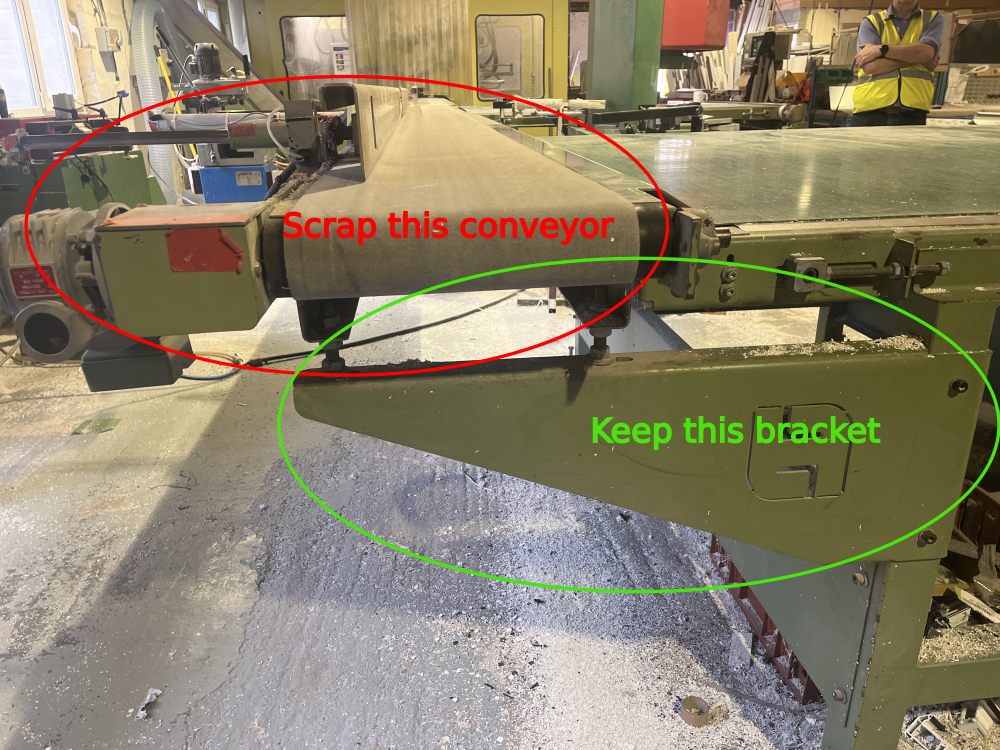
Étape 1 - Remove the Soenen Machine
Wed / Thur before unloading, remove the Soenen machine, leaving the large outfeed conveyor tables
The Brackets on the outfeed tables will be used for the Stuga conveyors
Étape 2 - Prepare the floor
The datum points for loading have already been marked on the floor.
Using these datum points, mark the position of the remainder of the floor pads


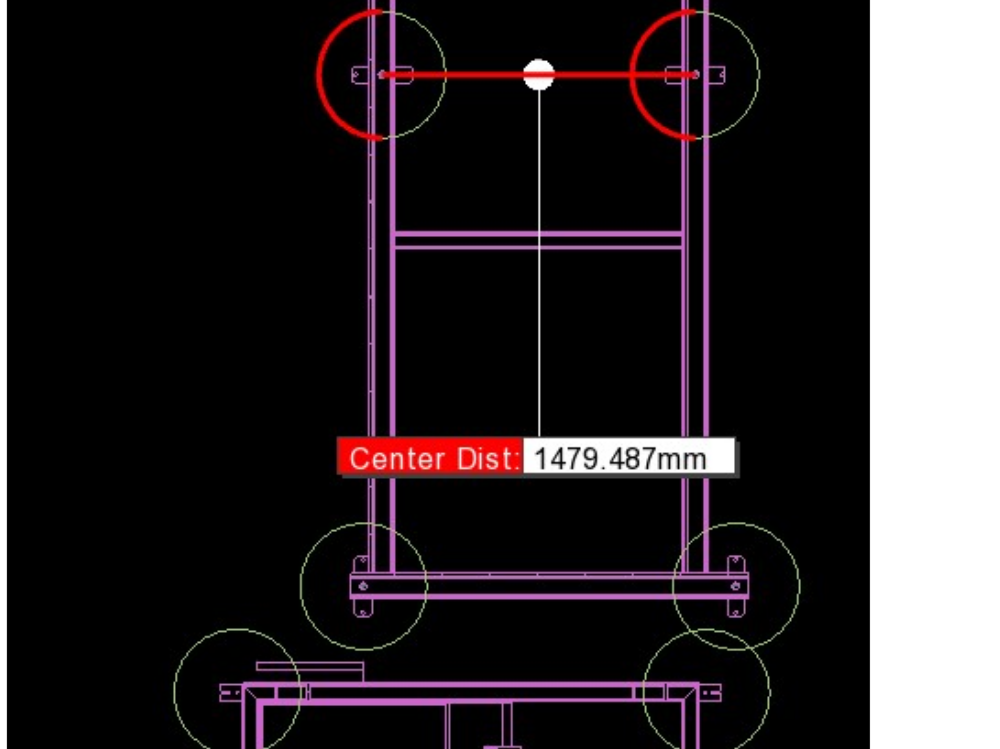

Étape 3 - Triangulation for Infeed Pads
Pictures show triangulation distances.


Étape 4 - Odd pad
Additional pad needed on infeed "unwrapping" table

Étape 5 - Prepare the Machine Pads / Piles
Friday:- Pad size 300mm x 300mm (or similar)
- Pad Depth 300-500mm
- Use shuttering or large diameter soil pipe
- Find the highest point, string a level agcross to the other pads
- Fill shuttering with quick set cement to +/- 15mm of level
Étape 6 - Prepare unloading bogeys
Window loading bogeys (3 off) to be prepared on a rigid base to allow one end of machine infeed frame to rest on them
The forklift will lift and push from the other end

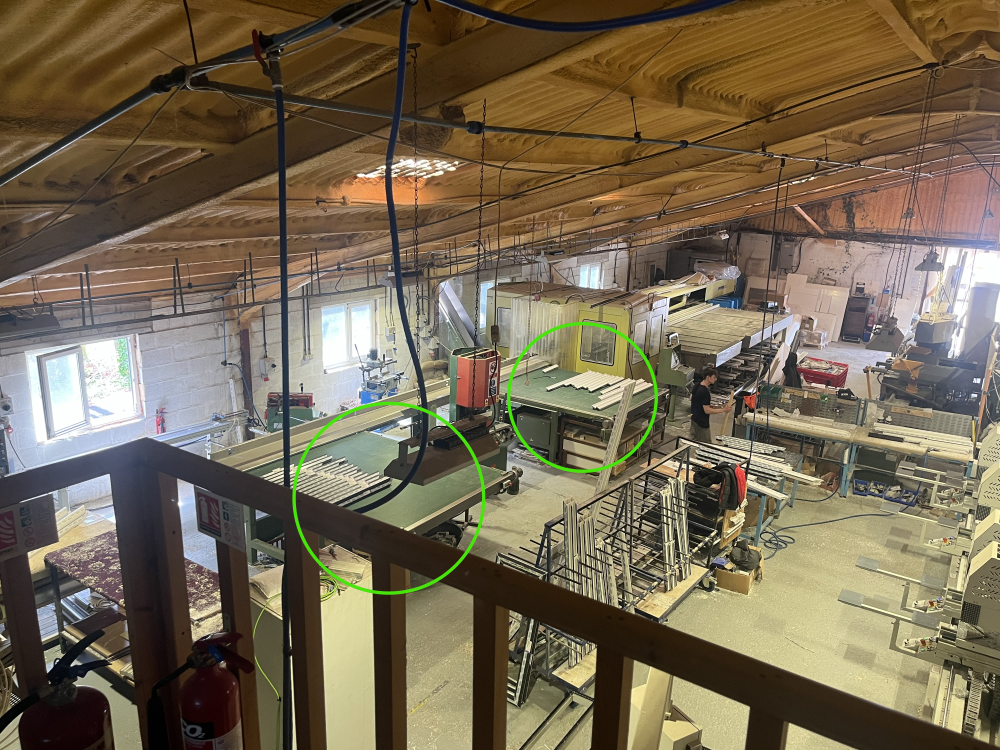
Étape 7 - Clear the inside area
Including the chop saw table
Leaving a clear route for the 2.4m x 7.5m table to roll in

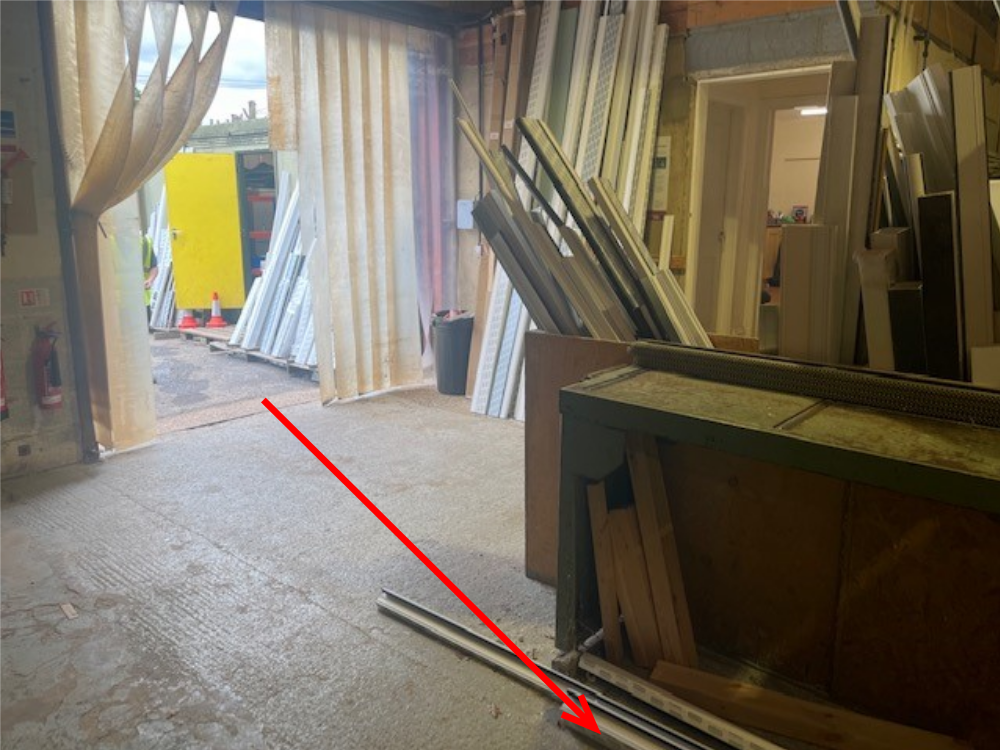
Étape 8 - Clear Outside Unloading Area
The full width of this route will need to be cleared

Étape 9 - Imporvements to step into building
If possible, improve the access pathway.
Potentially find a ramp system for the step into the unit

Étape 10 - Lorry to reverse along LHS of building
Monday:
Lorry to reverse along left side of building (when viewed from front)
This allow easy unloading access for forklift to unload to ground, and align components with door


Étape 11 - Machining Centre
The machining centre
Étape 12 - Machining Centre Guard
The guar is a clam shell design that encases the machine in 2 pars from front and rear
Draft
 Français
 English
 Deutsch
 Español
 Italiano
 Português