| [version en cours de rédaction] | [version en cours de rédaction] |
| Ligne 10 : | Ligne 10 : | ||
}} | }} | ||
{{Introduction | {{Introduction | ||
| − | |Introduction= | + | |Introduction=<translate><br />{{Info|...Beckhoff Technical help is available on 01491 410539 option 3}} |
| − | + | <br /></translate> | |
|class="wikitable" | |class="wikitable" | ||
}} | }} | ||
| Ligne 21 : | Ligne 21 : | ||
The "CNC" standard PCs used for the front end on Flowlines and ZXs have Visual Studio already installed but the TwinCAt version needs to be upgraded from 4022 to 4024}} | The "CNC" standard PCs used for the front end on Flowlines and ZXs have Visual Studio already installed but the TwinCAt version needs to be upgraded from 4022 to 4024}} | ||
| + | #Uninstall all references to Visual Studio 2013. If this is needed, restart the PC | ||
#Copy the install file from g:\Design\TwinCAT3\TC31-Full-Setup.3.1.4024.7.exe to the desktop of the Beckhoff PC | #Copy the install file from g:\Design\TwinCAT3\TC31-Full-Setup.3.1.4024.7.exe to the desktop of the Beckhoff PC | ||
| − | #Delete the setup zip file and unzipped directory to save hard drive space</translate> | + | #Delete the setup zip file and unzipped directory to save hard drive space |
| + | |||
| + | <br />{{Info|..."Specified account already exists" error will happen if the Visual Studio 2013 is not fully uninstalled and PC restarted}}<br /></translate> | ||
|Step_Picture_00=Create_a_TwinCAT_Project_from_Scratch_Annotation_2020-02-01_123920.jpg | |Step_Picture_00=Create_a_TwinCAT_Project_from_Scratch_Annotation_2020-02-01_123920.jpg | ||
}} | }} | ||
| Ligne 227 : | Ligne 230 : | ||
{{Tuto Step | {{Tuto Step | ||
|Step_Title=<translate>Install Drive Manager 2 Project</translate> | |Step_Title=<translate>Install Drive Manager 2 Project</translate> | ||
| − | |Step_Content=<translate></translate> | + | |Step_Content=<translate>#Note which Device number has the drive in it |
| + | #Left-click on ''FILE.'' A new context menu open | ||
| + | #Move the mouse to ''Add.'' | ||
| + | #Left-click on ''New Project''. | ||
| + | #Select TwinCAT Drive manager 2 on left | ||
| + | #Click on TwinCAT Drive manager 2 Project on right | ||
| + | #Save with filename "[BuildNo] Drive Manager" in the folder for the project (c:\TwinCAT\Stuga\[BuildNo]) | ||
| + | #EtherCAT master will be the device that has the drive in from Step 1 | ||
| + | #Leave the basic settings, click OK | ||
| + | #This should link up the drives set in previous steps to a Drive Manager project | ||
| + | {{Info|1=...More information from Beckhoff https://infosys.beckhoff.com/english.php?content=../content/1033/ax8000_inbetriebnahme/3746354955.html&id=1243614138563339940}}</translate> | ||
}} | }} | ||
{{Tuto Step | {{Tuto Step | ||
| Ligne 244 : | Ligne 257 : | ||
{{Tuto Step | {{Tuto Step | ||
|Step_Title=<translate>Add Axes</translate> | |Step_Title=<translate>Add Axes</translate> | ||
| − | |Step_Content=<translate></translate> | + | |Step_Content=<translate>{{Info|...This step may not be necessary if the Device scan added them automatically}} |
| + | |||
| + | If the axes do not exist under MOTION->NC Task->Axes, add them | ||
| + | |||
| + | #Right Click Add axis | ||
| + | #Name to convention nn Axis | ||
| + | |||
| + | |||
| + | Repeat for each axis on machine | ||
| + | |||
| + | Axis naming and configuration for different machines can be found [https://stuga.dokit.app/wiki/Naming_Convention_for_Axis_Drives here]</translate> | ||
|Step_Picture_00=Create_a_TwinCAT_Project_from_Scratch_Annotation_2019-11-20_145941.jpg | |Step_Picture_00=Create_a_TwinCAT_Project_from_Scratch_Annotation_2019-11-20_145941.jpg | ||
|Step_Picture_01=Create_a_TwinCAT_Project_from_Scratch_Annotation_2019-11-20_150007.jpg | |Step_Picture_01=Create_a_TwinCAT_Project_from_Scratch_Annotation_2019-11-20_150007.jpg | ||
| Ligne 250 : | Ligne 273 : | ||
{{Tuto Step | {{Tuto Step | ||
|Step_Title=<translate>Map Axes</translate> | |Step_Title=<translate>Map Axes</translate> | ||
| − | |Step_Content=<translate></translate> | + | |Step_Content=<translate>{{Info|...This step may not be necessary if the Device scan added them automatically}} |
| + | |||
| + | #Double click an axis | ||
| + | #Settings tab | ||
| + | #Click Link To IO | ||
| + | #Connect to associated Drive | ||
| + | #Click Link to PLC | ||
| + | #Use the reference [https://stuga.dokit.app/wiki/Naming_Convention_for_Axis_Drives here] to get the Axis Numbers | ||
| + | |||
| + | |||
| + | Repeat for each axis | ||
| + | |||
| + | {{Warning|...Make sure you select the correct channel number / letter is it is a dual drive}}<br /></translate> | ||
}} | }} | ||
{{Tuto Step | {{Tuto Step | ||
|Step_Title=<translate>Add PLC_Reset to tc3Multi Link</translate> | |Step_Title=<translate>Add PLC_Reset to tc3Multi Link</translate> | ||
| − | |Step_Content=<translate></translate> | + | |Step_Content=<translate>{{Info|...An output from tcMulti needs to be set up to an input on PLC reset to allow the PLC to reset itself. This is linke a physical wire between two PLCs but just exists in the software}} |
| + | |||
| + | #Expand PLC_Reset Instance to get to ibResetPLC | ||
| + | #Double Click ibResetPLC to open the properties | ||
| + | #Link to qbResetPLC (this is very far down the list) | ||
| + | #Activate configuration</translate> | ||
|Step_Picture_00=Create_a_TwinCAT_Project_from_Scratch_Annotation_2019-11-21_145235.jpg | |Step_Picture_00=Create_a_TwinCAT_Project_from_Scratch_Annotation_2019-11-21_145235.jpg | ||
|Step_Picture_00_annotation={"version":"2.4.6","objects":[{"type":"image","version":"2.4.6","originX":"left","originY":"top","left":0,"top":0,"width":352,"height":250,"fill":"rgb(0,0,0)","stroke":null,"strokeWidth":0,"strokeDashArray":null,"strokeLineCap":"butt","strokeDashOffset":0,"strokeLineJoin":"miter","strokeMiterLimit":4,"scaleX":1.7,"scaleY":1.7,"angle":0,"flipX":false,"flipY":false,"opacity":1,"shadow":null,"visible":true,"clipTo":null,"backgroundColor":"","fillRule":"nonzero","paintFirst":"fill","globalCompositeOperation":"source-over","transformMatrix":null,"skewX":0,"skewY":0,"crossOrigin":"","cropX":0,"cropY":0,"src":"https://stuga.dokit.app/images/4/4c/Create_a_TwinCAT_Project_from_Scratch_Annotation_2019-11-21_145235.jpg","filters":[]},{"type":"wfrect","version":"2.4.6","originX":"center","originY":"center","left":290.2,"top":365.91,"width":165.07,"height":34.26,"fill":"rgba(255,0,0,0)","stroke":"#FF0000","strokeWidth":2,"strokeDashArray":null,"strokeLineCap":"butt","strokeDashOffset":0,"strokeLineJoin":"miter","strokeMiterLimit":4,"scaleX":1,"scaleY":1,"angle":0,"flipX":false,"flipY":false,"opacity":1,"shadow":null,"visible":true,"clipTo":null,"backgroundColor":"","fillRule":"nonzero","paintFirst":"fill","globalCompositeOperation":"source-over","transformMatrix":null,"skewX":0,"skewY":0,"rx":0,"ry":0}],"height":426,"width":600} | |Step_Picture_00_annotation={"version":"2.4.6","objects":[{"type":"image","version":"2.4.6","originX":"left","originY":"top","left":0,"top":0,"width":352,"height":250,"fill":"rgb(0,0,0)","stroke":null,"strokeWidth":0,"strokeDashArray":null,"strokeLineCap":"butt","strokeDashOffset":0,"strokeLineJoin":"miter","strokeMiterLimit":4,"scaleX":1.7,"scaleY":1.7,"angle":0,"flipX":false,"flipY":false,"opacity":1,"shadow":null,"visible":true,"clipTo":null,"backgroundColor":"","fillRule":"nonzero","paintFirst":"fill","globalCompositeOperation":"source-over","transformMatrix":null,"skewX":0,"skewY":0,"crossOrigin":"","cropX":0,"cropY":0,"src":"https://stuga.dokit.app/images/4/4c/Create_a_TwinCAT_Project_from_Scratch_Annotation_2019-11-21_145235.jpg","filters":[]},{"type":"wfrect","version":"2.4.6","originX":"center","originY":"center","left":290.2,"top":365.91,"width":165.07,"height":34.26,"fill":"rgba(255,0,0,0)","stroke":"#FF0000","strokeWidth":2,"strokeDashArray":null,"strokeLineCap":"butt","strokeDashOffset":0,"strokeLineJoin":"miter","strokeMiterLimit":4,"scaleX":1,"scaleY":1,"angle":0,"flipX":false,"flipY":false,"opacity":1,"shadow":null,"visible":true,"clipTo":null,"backgroundColor":"","fillRule":"nonzero","paintFirst":"fill","globalCompositeOperation":"source-over","transformMatrix":null,"skewX":0,"skewY":0,"rx":0,"ry":0}],"height":426,"width":600} | ||
| Ligne 268 : | Ligne 308 : | ||
{{Tuto Step | {{Tuto Step | ||
|Step_Title=<translate>Set up Drives</translate> | |Step_Title=<translate>Set up Drives</translate> | ||
| − | |Step_Content=<translate></translate> | + | |Step_Content=<translate>[[Specialised Settings for Beckhoff Drives|https://stuga.dokit.app/wiki/Specialised_Settings_for_Beckhoff_Drives]]</translate> |
}} | }} | ||
{{Tuto Step | {{Tuto Step | ||
|Step_Title=<translate>Add The PC types to Monday Log</translate> | |Step_Title=<translate>Add The PC types to Monday Log</translate> | ||
| − | |Step_Content=<translate></translate> | + | |Step_Content=<translate>The board "Control Systems Log" is setup to log all machine setups |
| + | |||
| + | https://stugaltd.monday.com/boards/304269981 | ||
| + | |||
| + | <br /></translate> | ||
}} | }} | ||
{{Notes}} | {{Notes}} | ||
Version du 26 juillet 2022 à 14:16
How to create a new TwinCAT3 Project from scratch
Sommaire
- 1 Introduction
- 2 Étape 1 - Install Visual Studio (if required)
- 3 Étape 2 - Add the latest Device Description Table
- 4 Étape 3 - Add Drive Manager 2 for AX8000 drives (if not installed already)
- 5 Étape 4 - Start a new project
- 6 Étape 5 - Clone the Repository
- 7 Étape 6 - Enter Git Credentials (if required)
- 8 Étape 7 - Add The tc3Multi then PLC_Reset Project
- 9 Étape 8 - Check PLC Ports 851 and 852 correct
- 10 Étape 9 - Ensure Correct Machine Commented in tcMulti project
- 11 Étape 10 - Add TwinSAFE project
- 12 Étape 11 - Add the route to the Target System
- 13 Étape 12 - Scan for Devices
- 14 Étape 13 - Check EtherCAT validity
- 15 Étape 14 - Name all EtherCAT devices according to network
- 16 Étape 15 - Map all IO References
- 17 Étape 16 - Map Analogue Input references
- 18 Étape 17 - Double check all IO references with someone else
- 19 Étape 18 - Install Drive Manager 2 Project
- 20 Étape 19 - Add Axis Task
- 21 Étape 20 - Add Axes
- 22 Étape 21 - Map Axes
- 23 Étape 22 - Add PLC_Reset to tc3Multi Link
- 24 Étape 23 - Activate configuration
- 25 Étape 24 - Set up Drives
- 26 Étape 25 - Add The PC types to Monday Log
- 27 Commentaires
Introduction
Étape 1 - Install Visual Studio (if required)
- Uninstall all references to Visual Studio 2013. If this is needed, restart the PC
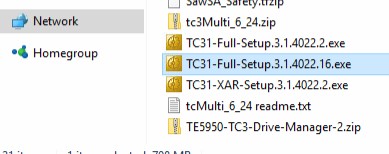
- Copy the install file from g:\Design\TwinCAT3\TC31-Full-Setup.3.1.4024.7.exe to the desktop of the Beckhoff PC
- Delete the setup zip file and unzipped directory to save hard drive space
Étape 2 - Add the latest Device Description Table
Copy the contents of g:\design\twincat3\Beckhoff_EtherCAT_XML.zip
to
C:\TwinCAT\3.1\config\Io\EtherCAT and overwrite all the .xml files in this folder
Étape 3 - Add Drive Manager 2 for AX8000 drives (if not installed already)
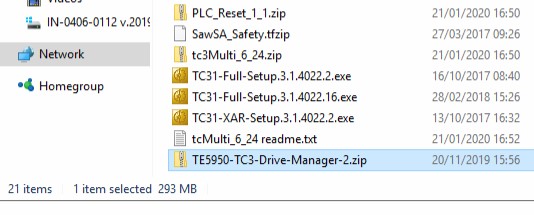
- Copy the Drive Manager 2 setup g:\design\TwinCAT3\TE5950-TC3-Drive-Manager-2.zip to Install Files or the desktop on the PC running Visual Studio
- Close Visual Studio if it is open
- Extract the Zip File
- Run the Setup File
- Delete the setup zip file and unzipped directory to save hard drive space
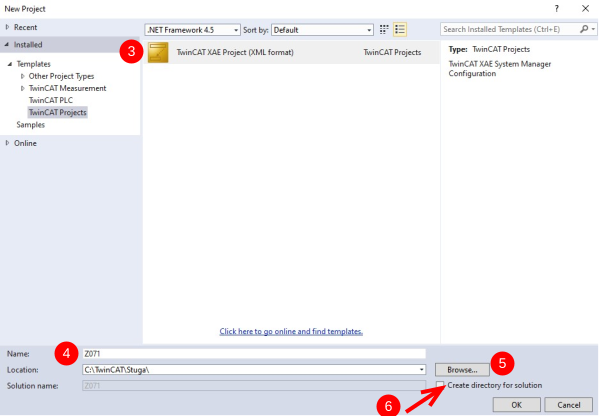
Étape 4 - Start a new project
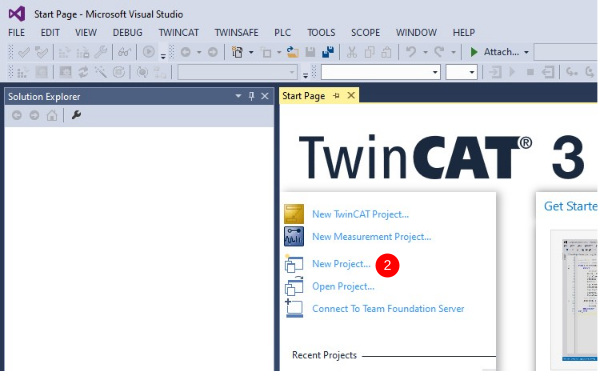
- Open Visual Studio
- Click on New project
- Choose TwinCAT projects->TwinCAT XAE Project (xml format)
- Name is build number (no Suffix)
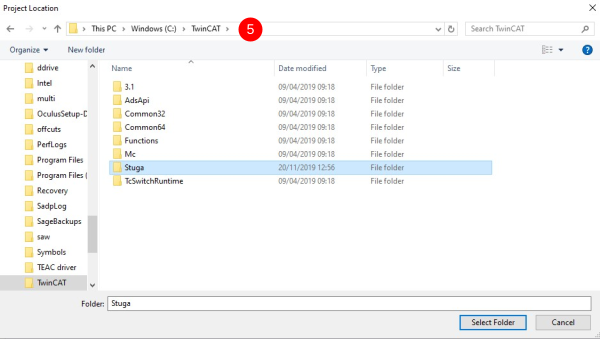
- Location is c:\TwinCAT\Stuga\
- Untick "Create Directory for solution"
- This may take some time - a long delay sometimes "Rebuilding Device Description Cache"
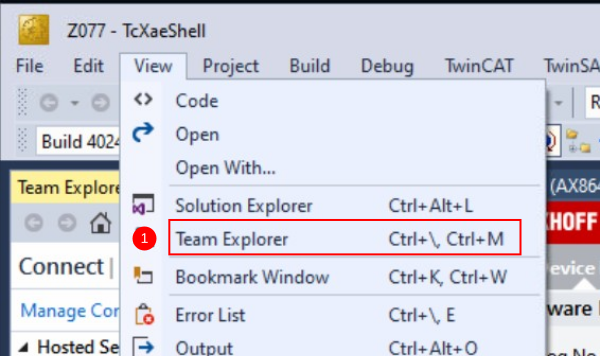
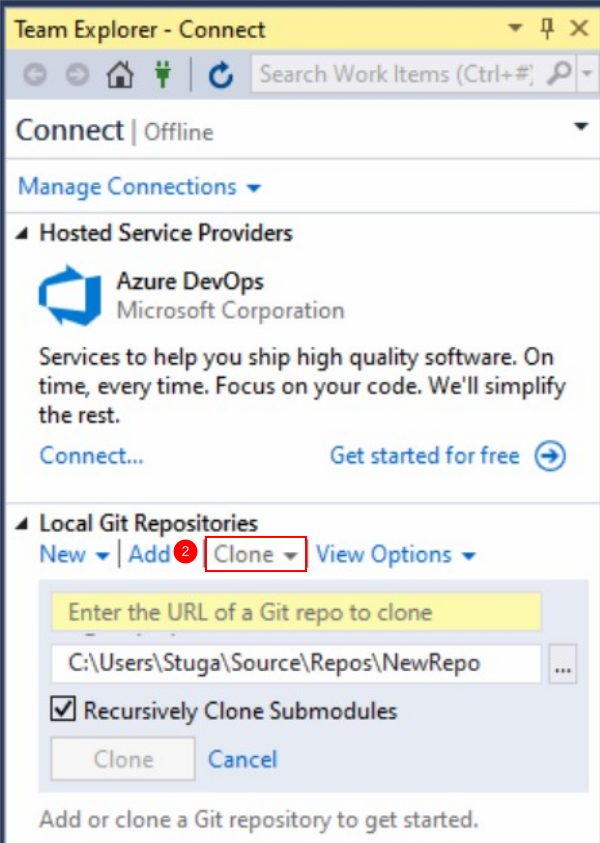
Étape 5 - Clone the Repository
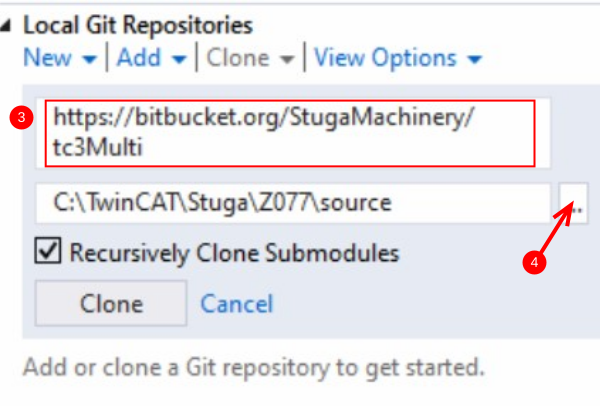
- Open Team Explorer
- Clone a new Git Repository
- URL to clone: https://bitbucket.org/StugaMachinery/tc3Multi
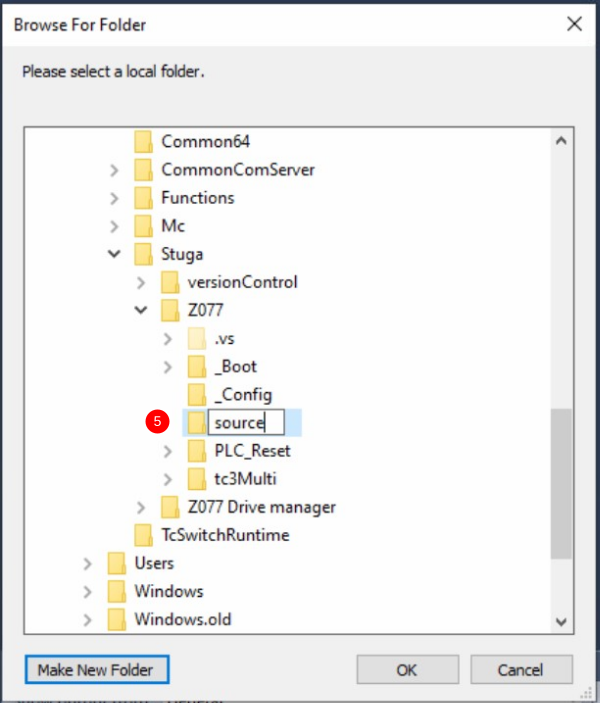
- Click on the destination setup
- Create a new folder under the machine build folder called "source"
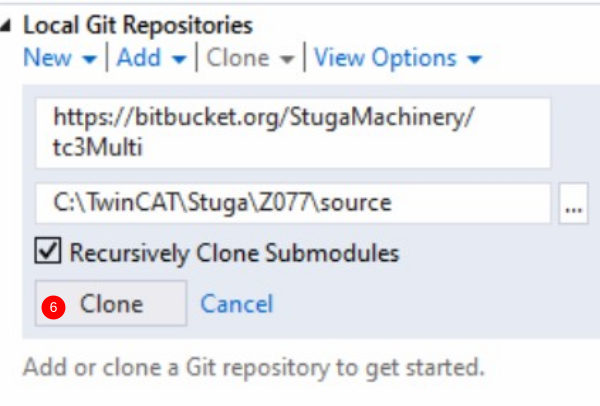
- Click 'Clone'
Étape 6 - Enter Git Credentials (if required)
Atlassian Username is StugaMachinery
Password is stored in the file
Étape 7 - Add The tc3Multi then PLC_Reset Project
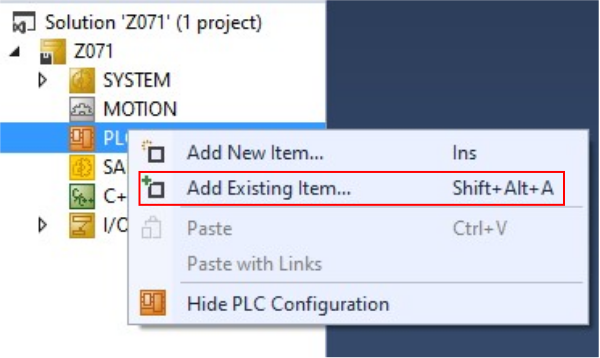
- Right click PLC
- Select Add Existing Item
- Navigate to the repository you have created in Step 6 c:\TwinCAT\Stuga\BuildNo\source\tc3Multi\tc3Multi.plcproj
- Repeat for the PLC_Reset project
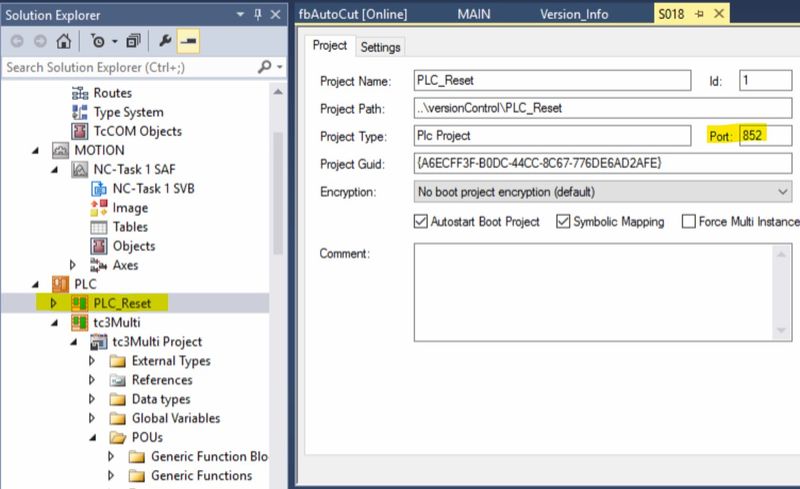
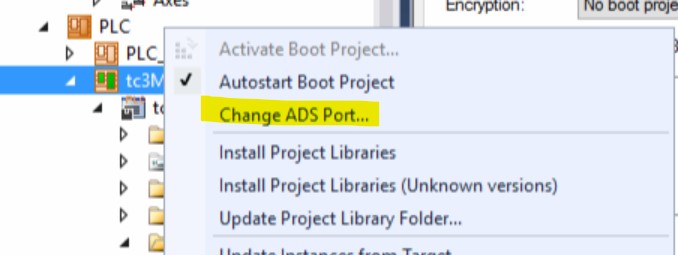
Étape 8 - Check PLC Ports 851 and 852 correct
Check that
tcMulti - Port 851
PLC_Reset - Port 852
If not you can change the port assignment by right clicking the PLC project - you will need to change one to a "spare" port 853 first
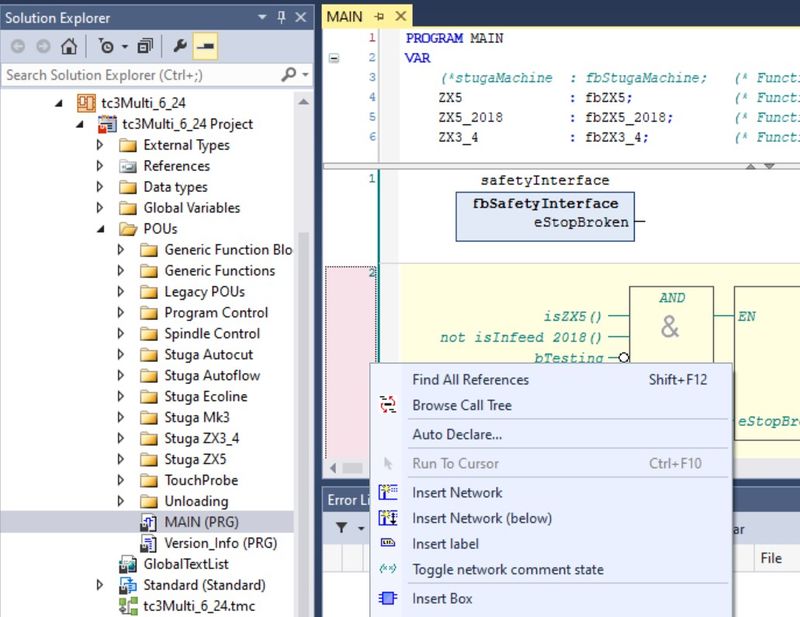
Étape 9 - Ensure Correct Machine Commented in tcMulti project
- Navigate to tcMulti project->POUs->MAIN
- Scroll down to the machine types. The "comment State" can be toggled on and off by right clicking next to the step number on the left
- Your goal is to ensure the correct machine is highlighted and the incorrect ones are commented out (in green)
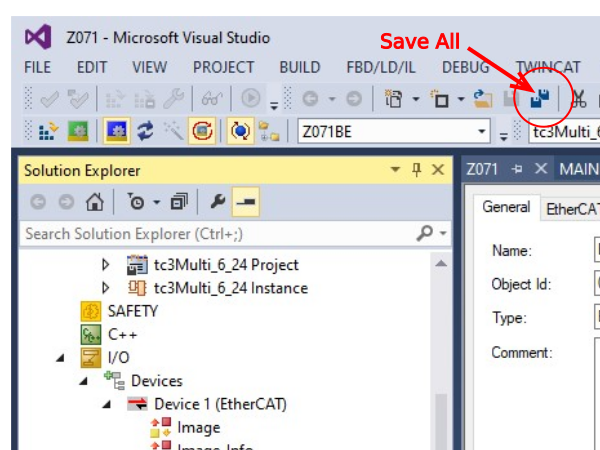
- Click Save All
Étape 10 - Add TwinSAFE project
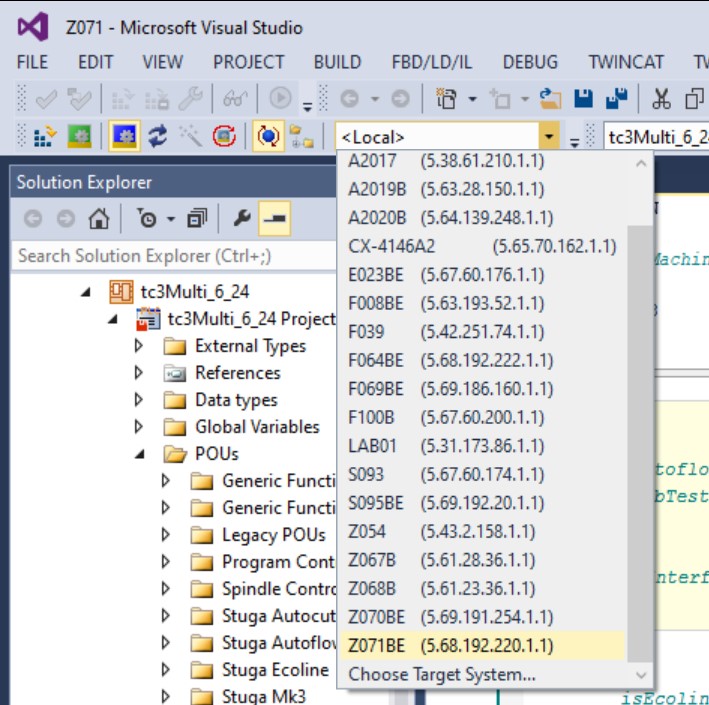
Étape 11 - Add the route to the Target System
If the front and back end PLCs are the same, the Target System is <Local>
If this is a separate Front End PC
- From Dropdown box select the Build number (If it does not exist we will need to add a new route)
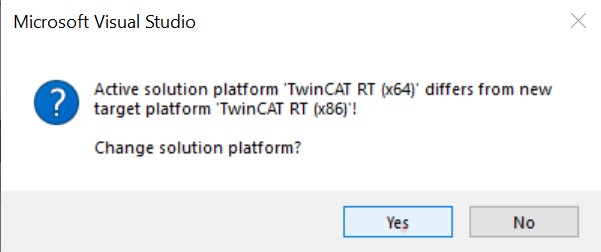
- If there is a request for a platform change, click Yes
- On success, the Route dropdown will not read Error
Étape 12 - Scan for Devices
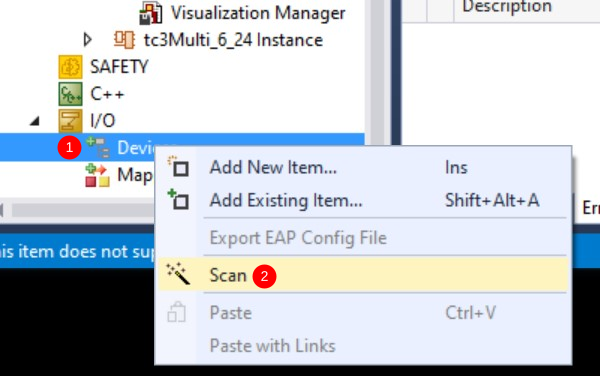
- Expand IO
- Right click on devices, Scan
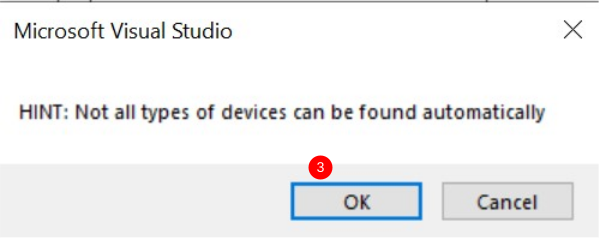
- Click OK on the Hint:
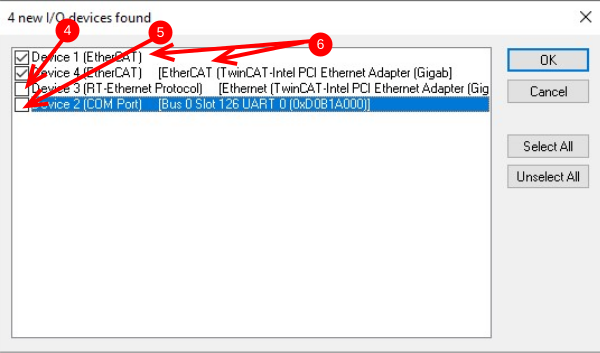
- Untick RT-Ethernet
- Untick COM-Port
- Just have the EtherCAT ports
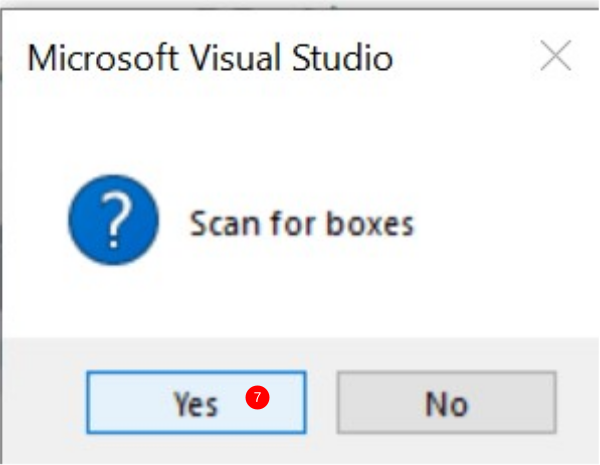
- Scan for boxes - Yes
- If there is a request for New Device Type, Click Apply to All, Click Yes
If the scan does not work, a potential root casue could be missing EtherCAT drivers for the network adapter. See Updating Realtime Drivers for EtherCAT
Étape 13 - Check EtherCAT validity
Check the Devices and boxes match the expected EtherCAT setupRepeat steps 7 and 8 until the physical network matches the scanned networkYou may need to Right Click->scan Boxes on the second device if the EtherCAT boxes do not appear
Étape 14 - Name all EtherCAT devices according to network
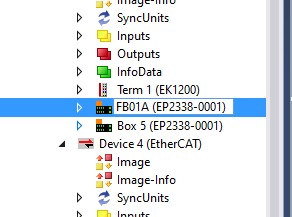
Click twice on each device (not double click) to enable the device to be renamed
rename to convention
Étape 15 - Map all IO References
Using the circuit diagrams, map all the IO ref numbers to the associated IO channels
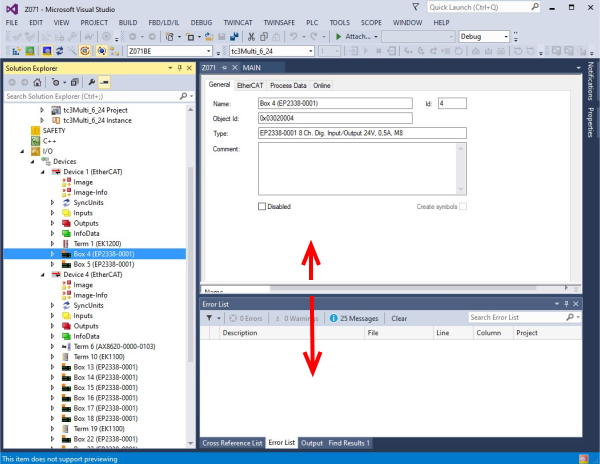
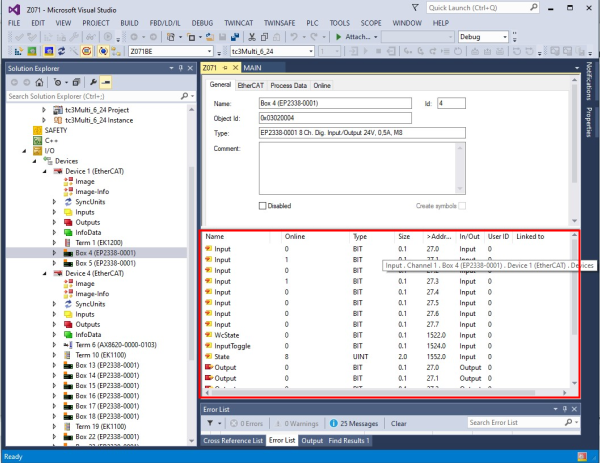
- Double click a field-bus box or slice
- Ensure you can see the input / Output list (may need some screen resizing
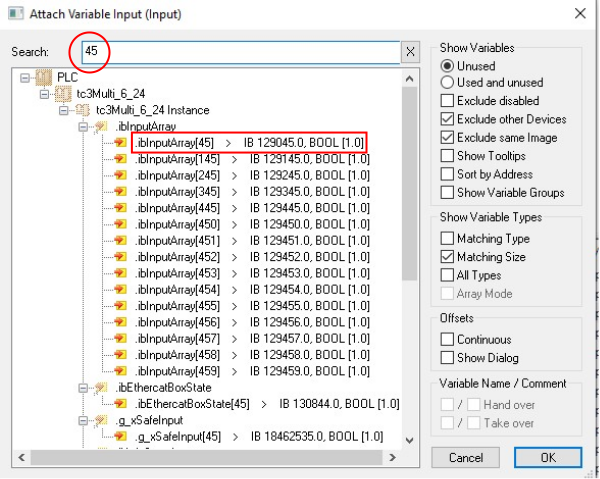
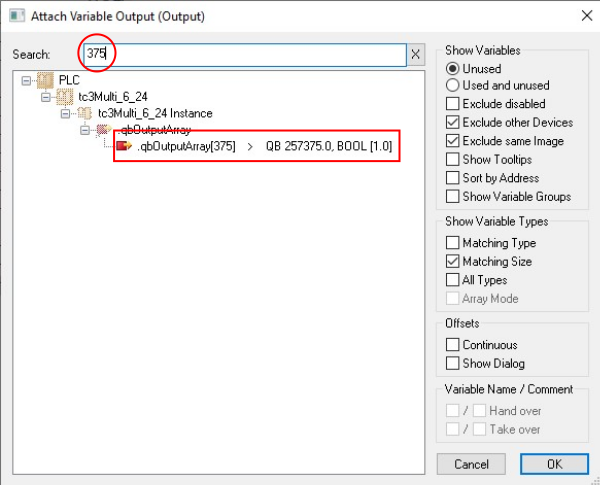
- Double click an IO channel
- Enter the number in the search box
- Double click the associated IO Ref number from ibInputArray(inputs) or qbOutputArray(outputs)
Repeat for all IO
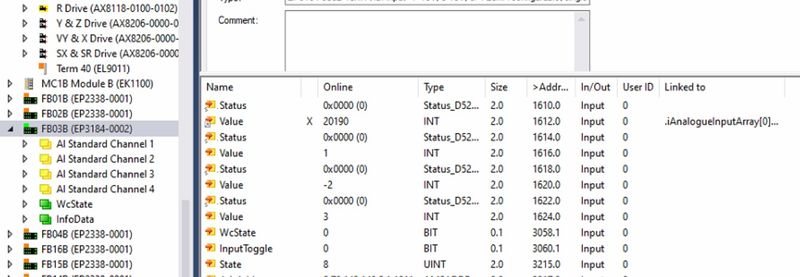
Étape 16 - Map Analogue Input references
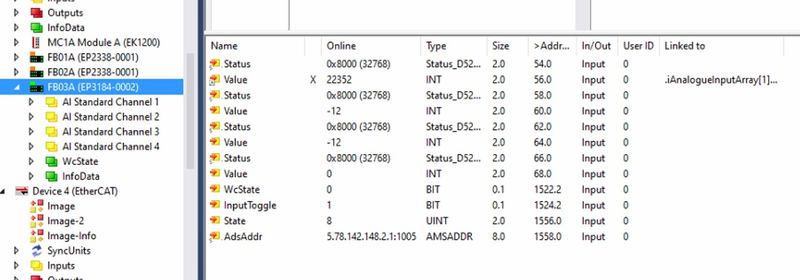
Length and width sensors need to be mapped to their relevant EtherCAT boxes
- Width Sensor on Machining centre is iAnalogueInputArray[0]
- Length Sensor on Infeed table is iAnalogueInputArray[1]
Étape 17 - Double check all IO references with someone else
Any mistakes made will save hours if spotted here
Étape 18 - Install Drive Manager 2 Project
- Note which Device number has the drive in it
- Left-click on FILE. A new context menu open
- Move the mouse to Add.
- Left-click on New Project.
- Select TwinCAT Drive manager 2 on left
- Click on TwinCAT Drive manager 2 Project on right
- Save with filename "[BuildNo] Drive Manager" in the folder for the project (c:\TwinCAT\Stuga\[BuildNo])
- EtherCAT master will be the device that has the drive in from Step 1
- Leave the basic settings, click OK
- This should link up the drives set in previous steps to a Drive Manager project
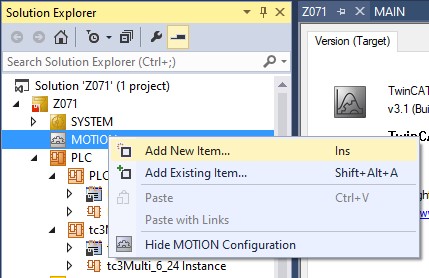
Étape 19 - Add Axis Task
A smooth setup will have detected the axes and added them under the MOTION tab already.
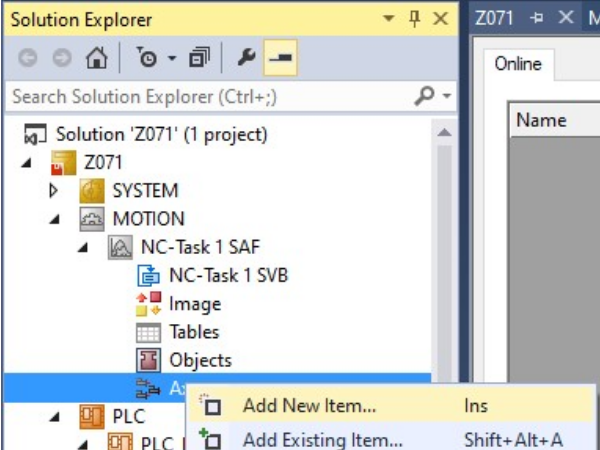
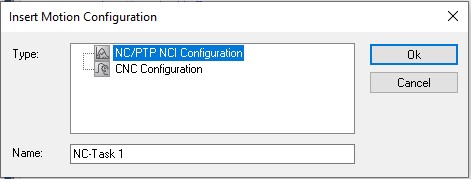
if not, an axis task may need to be added under the MOTION tree:
- Add New Item
- NC/PTP Configuration
- Leave the Name as default
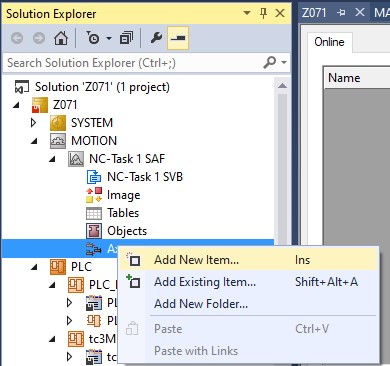
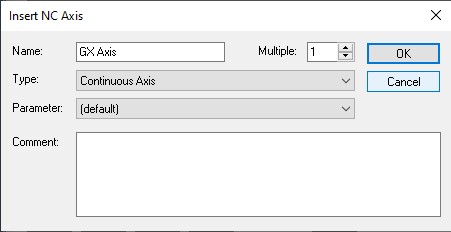
Étape 20 - Add Axes
If the axes do not exist under MOTION->NC Task->Axes, add them
- Right Click Add axis
- Name to convention nn Axis
Repeat for each axis on machine
Axis naming and configuration for different machines can be found here
Étape 21 - Map Axes
- Double click an axis
- Settings tab
- Click Link To IO
- Connect to associated Drive
- Click Link to PLC
- Use the reference here to get the Axis Numbers
Repeat for each axis
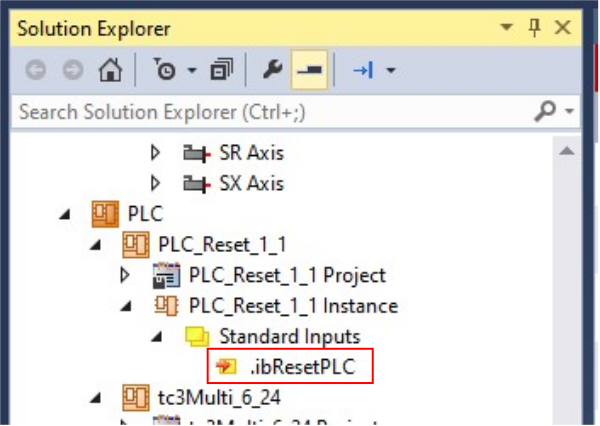
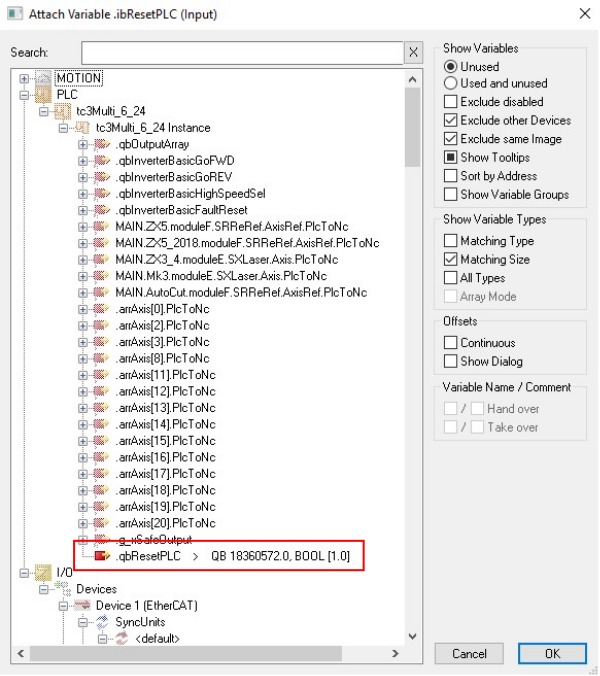
Étape 22 - Add PLC_Reset to tc3Multi Link
- Expand PLC_Reset Instance to get to ibResetPLC
- Double Click ibResetPLC to open the properties
- Link to qbResetPLC (this is very far down the list)
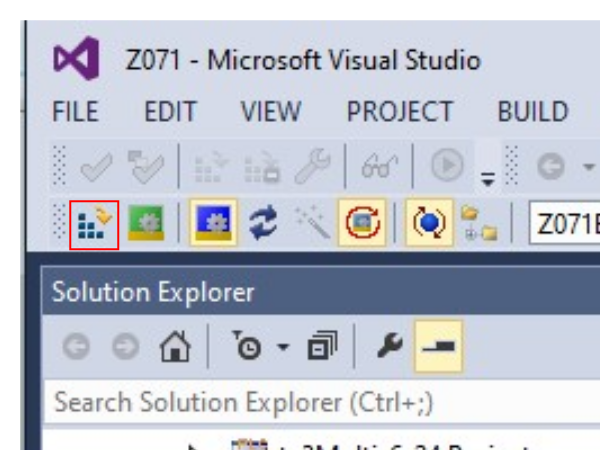
- Activate configuration
Étape 24 - Set up Drives
https://stuga.dokit.app/wiki/Specialised_Settings_for_Beckhoff_Drives
Étape 25 - Add The PC types to Monday Log
The board "Control Systems Log" is setup to log all machine setups
https://stugaltd.monday.com/boards/304269981
Draft

 Français
 English
 Deutsch
 Español
 Italiano
 Português