| [version en cours de rédaction] | [version en cours de rédaction] |
(Page créée avec « {{Tuto Details |Main_Picture=ZX5_Improvements_and_Upgrades_StugaMX5_rearCPweb.jpg |Main_Picture_annotation={"version":"2.4.6","objects":[{"type":"image","version":"2.4.6",... ») |
|||
| Ligne 1 : | Ligne 1 : | ||
{{Tuto Details | {{Tuto Details | ||
| − | |Main_Picture= | + | |Main_Picture=ZX4_Transfer_Table_image25.png |
| − | |Main_Picture_annotation={"version":"2.4.6","objects":[{"type":"image","version":"2.4.6","originX":"left","originY":"top","left": | + | |Main_Picture_annotation={"version":"2.4.6","objects":[{"type":"image","version":"2.4.6","originX":"left","originY":"top","left":102,"top":-152,"width":1169,"height":827,"fill":"rgb(0,0,0)","stroke":null,"strokeWidth":0,"strokeDashArray":null,"strokeLineCap":"butt","strokeDashOffset":0,"strokeLineJoin":"miter","strokeMiterLimit":4,"scaleX":0.89,"scaleY":0.89,"angle":0,"flipX":false,"flipY":false,"opacity":1,"shadow":null,"visible":true,"clipTo":null,"backgroundColor":"","fillRule":"nonzero","paintFirst":"fill","globalCompositeOperation":"source-over","transformMatrix":null,"skewX":0,"skewY":0,"crossOrigin":"","cropX":0,"cropY":0,"src":"https://stuga.dokit.app/images/9/98/ZX4_Transfer_Table_image25.png","filters":[]}],"height":450.4201680672269,"width":600} |
|Description=<translate>How to successfully change the control of the transfer table on an all-in-one machine from the saw side to MH side</translate> | |Description=<translate>How to successfully change the control of the transfer table on an all-in-one machine from the saw side to MH side</translate> | ||
|Categories=Maintenance | |Categories=Maintenance | ||
|Tags=Transfer, Transfer Table, Control | |Tags=Transfer, Transfer Table, Control | ||
}} | }} | ||
| − | <translate></translate> | + | <translate>= Why Change = |
| + | JF noted during training that when the saw paused, the MH could only finish the bar it was on but not eject its bar onto the transfer table. If the soft pause then led to a hard reset, the bar was stuck on MH outfeed. This is difficult for the operator to retrieve. | ||
| + | |||
| + | If the MH controls the transfer, the saw can pause, but MH can carry on. This is more efficient and faster | ||
| + | |||
| + | = How = | ||
| + | Software updates are needed which give a new parameter<syntaxhighlight> | ||
| + | transferMHControl | ||
| + | </syntaxhighlight>Switching to 1 will change control from the saw side to MH side | ||
| + | {| class="wikitable" | ||
| + | |+Software Versions | ||
| + | |winMulti | ||
| + | |6.4.32.0 | ||
| + | |- | ||
| + | |tc3Multi PLC | ||
| + | |6.3007 | ||
| + | |} | ||
| + | |||
| + | ==== Stoppable Outputs ==== | ||
| + | StoppableOutputs are outputs that need to switch off when the machine is paused - these are generally conveyor motors or blowers. When the machine is restarted from the pause, the outputs are automatically restarted. | ||
| + | |||
| + | |||
| + | Care must be taken to change the "Location" of any relevant stoppableOutputs. This is important because these outputs will deactivate during a pause on the controlling side - if this is wrongly set, the output will switch off when the wrong side is paused. | ||
| + | |||
| + | |||
| + | The location is set via Machine settings, IO screen. | ||
| + | |||
| + | The critical outputs would be the transfer table motors | ||
| + | <br />{{#annotatedImageLight:Fichier:IO Map.png|0=918px|hash=3c2353718af51af31dce77529794e5f3|jsondata={"version":"2.4.6","objects":[{"type":"image","version":"2.4.6","originX":"left","originY":"top","left":0,"top":0,"width":918,"height":578,"fill":"rgb(0,0,0)","stroke":null,"strokeWidth":0,"strokeDashArray":null,"strokeLineCap":"butt","strokeDashOffset":0,"strokeLineJoin":"miter","strokeMiterLimit":4,"scaleX":1,"scaleY":1,"angle":0,"flipX":false,"flipY":false,"opacity":1,"shadow":null,"visible":true,"clipTo":null,"backgroundColor":"","fillRule":"nonzero","paintFirst":"fill","globalCompositeOperation":"source-over","transformMatrix":null,"skewX":0,"skewY":0,"crossOrigin":"","cropX":0,"cropY":0,"src":"https://stuga.dokit.app/images/3/30/IO_Map.png","filters":[]},{"type":"wfrect","version":"2.4.6","originX":"center","originY":"center","left":274.36,"top":301.87,"width":377.93,"height":49.14,"fill":"rgba(255,0,0,0)","stroke":"#FF0000","strokeWidth":2,"strokeDashArray":null,"strokeLineCap":"butt","strokeDashOffset":0,"strokeLineJoin":"miter","strokeMiterLimit":4,"scaleX":1,"scaleY":1,"angle":0,"flipX":false,"flipY":false,"opacity":1,"shadow":null,"visible":true,"clipTo":null,"backgroundColor":"","fillRule":"nonzero","paintFirst":"fill","globalCompositeOperation":"source-over","transformMatrix":null,"skewX":0,"skewY":0,"rx":0,"ry":0}],"height":578,"width":918}|mediaClass=Image|type=frameless|align=center|src=/images/thumb/3/30/IO_Map.png/ia-3c2353718af51af31dce77529794e5f3-px-IO_Map.png.png|href=./Fichier:IO Map.png|resource=./Fichier:IO Map.png|caption=|size=918px}}<br /> | ||
| + | |||
| + | ==== Alarm Outputs ==== | ||
| + | The alarm "module" column will also need to be updated for any specific alarms that need moving across for saw control to MH control. On recent ZX5 software, there are no alarms in this category, all alarms are done internally. {{#annotatedImageLight:Fichier:Alarms form.png|0=913px|hash=95bb3f2bea18b9d6614023e6ee6b81ba|jsondata={"version":"2.4.6","objects":[{"type":"image","version":"2.4.6","originX":"left","originY":"top","left":0,"top":0,"width":913,"height":570,"fill":"rgb(0,0,0)","stroke":null,"strokeWidth":0,"strokeDashArray":null,"strokeLineCap":"butt","strokeDashOffset":0,"strokeLineJoin":"miter","strokeMiterLimit":4,"scaleX":1,"scaleY":1,"angle":0,"flipX":false,"flipY":false,"opacity":1,"shadow":null,"visible":true,"clipTo":null,"backgroundColor":"","fillRule":"nonzero","paintFirst":"fill","globalCompositeOperation":"source-over","transformMatrix":null,"skewX":0,"skewY":0,"crossOrigin":"","cropX":0,"cropY":0,"src":"https://stuga.dokit.app/images/7/74/Alarms_form.png","filters":[]},{"type":"wfrect","version":"2.4.6","originX":"center","originY":"center","left":733.67,"top":285.96,"width":60.32,"height":406.94,"fill":"rgba(255,0,0,0)","stroke":"#FF0000","strokeWidth":2,"strokeDashArray":null,"strokeLineCap":"butt","strokeDashOffset":0,"strokeLineJoin":"miter","strokeMiterLimit":4,"scaleX":1,"scaleY":1,"angle":0,"flipX":false,"flipY":false,"opacity":1,"shadow":null,"visible":true,"clipTo":null,"backgroundColor":"","fillRule":"nonzero","paintFirst":"fill","globalCompositeOperation":"source-over","transformMatrix":null,"skewX":0,"skewY":0,"rx":0,"ry":0}],"height":570,"width":913}|mediaClass=Image|type=frameless|align=center|src=/images/thumb/7/74/Alarms_form.png/ia-95bb3f2bea18b9d6614023e6ee6b81ba-px-Alarms_form.png.png|href=./Fichier:Alarms form.png|resource=./Fichier:Alarms form.png|caption=|size=913px}} | ||
| + | </translate> | ||
{{PageLang | {{PageLang | ||
| + | |Language=en | ||
|SourceLanguage=none | |SourceLanguage=none | ||
|IsTranslation=0 | |IsTranslation=0 | ||
| − | |||
}} | }} | ||
{{AddComments}} | {{AddComments}} | ||
Version actuelle datée du 21 janvier 2020 à 19:57
How to successfully change the control of the transfer table on an all-in-one machine from the saw side to MH side

Why Change
JF noted during training that when the saw paused, the MH could only finish the bar it was on but not eject its bar onto the transfer table. If the soft pause then led to a hard reset, the bar was stuck on MH outfeed. This is difficult for the operator to retrieve.
If the MH controls the transfer, the saw can pause, but MH can carry on. This is more efficient and faster
How
Software updates are needed which give a new parameter
transferMHControlSwitching to 1 will change control from the saw side to MH side
| winMulti | 6.4.32.0 |
| tc3Multi PLC | 6.3007 |
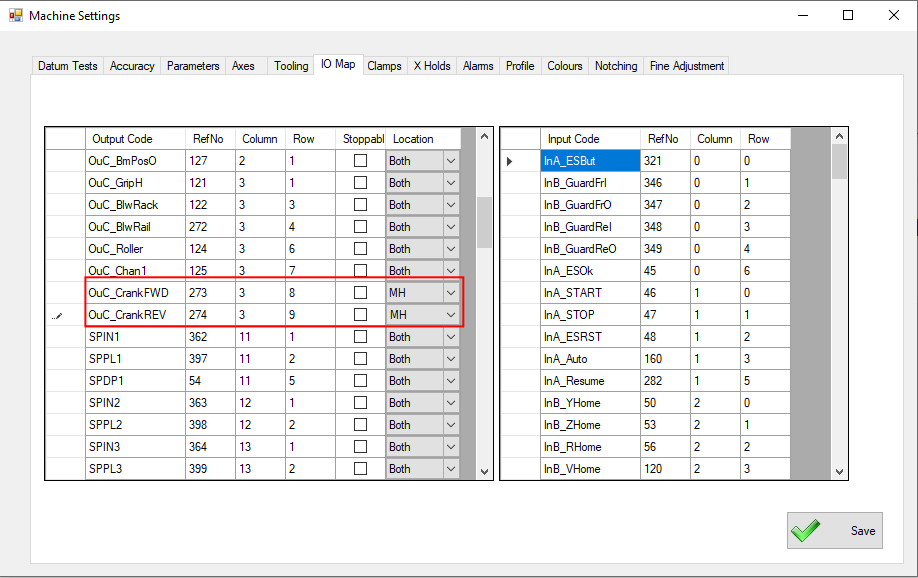
Stoppable Outputs
StoppableOutputs are outputs that need to switch off when the machine is paused - these are generally conveyor motors or blowers. When the machine is restarted from the pause, the outputs are automatically restarted.
Care must be taken to change the "Location" of any relevant stoppableOutputs. This is important because these outputs will deactivate during a pause on the controlling side - if this is wrongly set, the output will switch off when the wrong side is paused.
The location is set via Machine settings, IO screen.
The critical outputs would be the transfer table motors
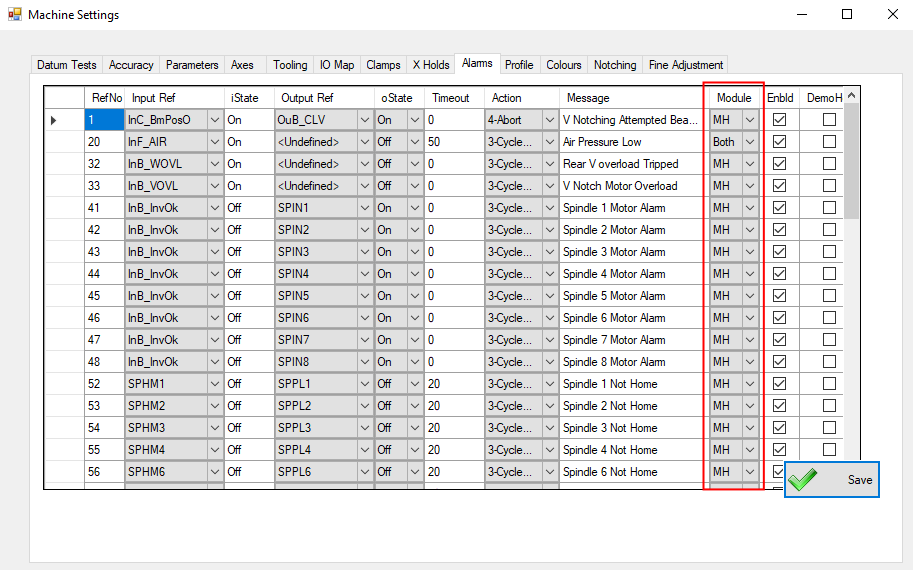
Alarm Outputs
The alarm "module" column will also need to be updated for any specific alarms that need moving across for saw control to MH control. On recent ZX5 software, there are no alarms in this category, all alarms are done internally.
Draft
 Français
 English
 Deutsch
 Español
 Italiano
 Português