The software triggers the use of the second saw height sensor when the profile parameters are set to make this happen, else it simply uses the sensor at the top of travel.
−
Two parameters are used, firstly the secondSawHeight parameter{{#annotatedImageLight:Fichier:Reducing Saw Cut Height for Lower Profiles Annotation 2019-10-14 140150.jpg|0=874px|hash=|jsondata=|mediaClass=Image|type=frameless|align=center|src=https://stuga.dokit.app/images/6/6a/Reducing_Saw_Cut_Height_for_Lower_Profiles_Annotation_2019-10-14_140150.jpg|href=./Fichier:Reducing Saw Cut Height for Lower Profiles Annotation 2019-10-14 140150.jpg|resource=./Fichier:Reducing Saw Cut Height for Lower Profiles Annotation 2019-10-14 140150.jpg|caption=|size=874px}}
This is the actual height that the user sets the saw blade to lift to
−
−
−
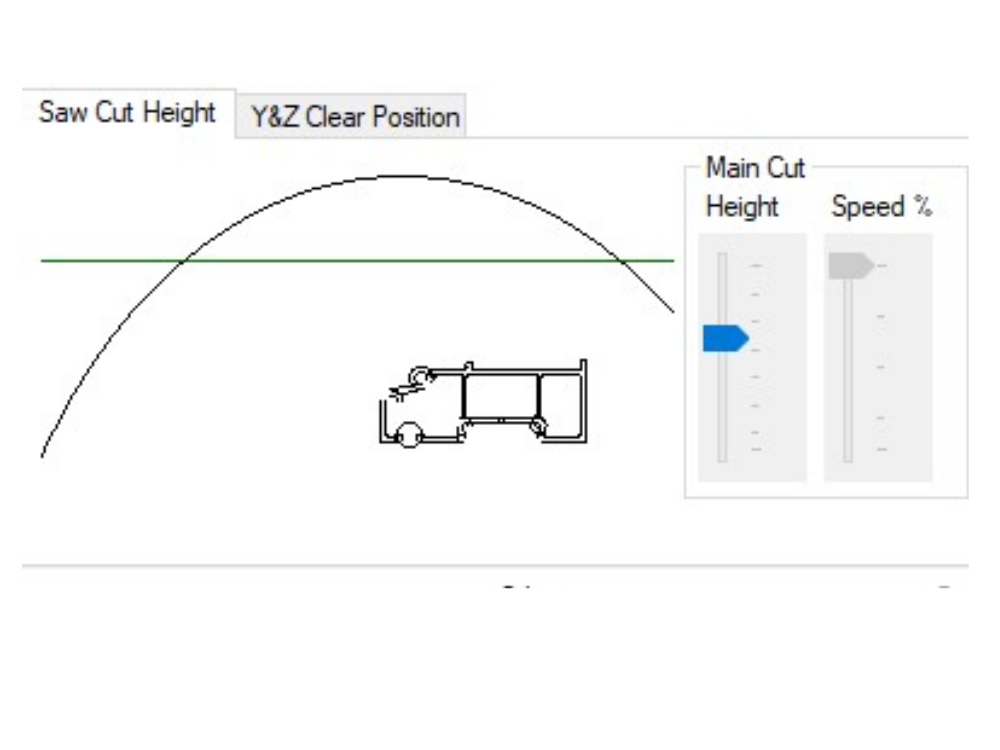
Secondly the saw cut height must be set for the profile. In the following picture, the saw cut height is above the green line
−
<br />{{#annotatedImageLight:Fichier:Reducing Saw Cut Height for Lower Profiles Annotation 2019-10-14 140401.jpg|0=392px|hash=|jsondata=|mediaClass=Image|type=frameless|align=center|src=https://stuga.dokit.app/images/e/ed/Reducing_Saw_Cut_Height_for_Lower_Profiles_Annotation_2019-10-14_140401.jpg|href=./Fichier:Reducing Saw Cut Height for Lower Profiles Annotation 2019-10-14 140401.jpg|resource=./Fichier:Reducing Saw Cut Height for Lower Profiles Annotation 2019-10-14 140401.jpg|caption=|size=392px}}{{Info|...The green line height is set by the secondSawHeight parameter}}
−
Adjusting the cut height slider will bring the black blade line lower down. If the black line is completely below the green line, then the mid height sensor will be used on this profile. The user can visually determine if the cut height still clears the profile, as in the following picture.{{#annotatedImageLight:Fichier:Reducing Saw Cut Height for Lower Profiles Annotation 2019-10-14 140334.jpg|0=396px|hash=|jsondata=|mediaClass=Image|type=frameless|align=center|src=https://stuga.dokit.app/images/1/13/Reducing_Saw_Cut_Height_for_Lower_Profiles_Annotation_2019-10-14_140334.jpg|href=./Fichier:Reducing Saw Cut Height for Lower Profiles Annotation 2019-10-14 140334.jpg|resource=./Fichier:Reducing Saw Cut Height for Lower Profiles Annotation 2019-10-14 140334.jpg|caption=|size=396px}}Th physical height of the sensor on the cylinder will need to be adjusted by trial and error to ensure it switches at a similar point to the expectation of the green line
−
−
=Input Assignment=
−
The input is called X269 InF_SCOutMid - Saw cut out Mid Switch.
−
−
If adding this to a machine as part of an upgrade, the input channel used will need to be linked to ibInputArray[269]</translate>
{{PageLang
{{PageLang
|Language=en
|Language=en
Version actuelle datée du 8 août 2025 à 14:06
For sawing modules running from winMulti (including flowlines with integrated control), there is an option to reduce the cut height. This is managed through an additional sensor on the saw cut stroke cylinder. This is particularly useful on saws with a 500mm blade (to cut wide or tall profiles) but a reduced cycle time can be gained by reducing the saw cut stoke time by limiting its travel on shorter profiles
For sawing modules running from winMulti (including flowlines with integrated control), there is an option to reduce the cut height. This is managed through an additional sensor on the saw cut stroke cylinder. This is particularly useful on saws with a 500mm blade (to cut wide or tall profiles) but a reduced cycle time can be gained by reducing the saw cut stoke time by limiting its travel on shorter profiles

 Français
 English
 Deutsch
 Español
 Italiano
 Português