| [version en cours de rédaction] | [version en cours de rédaction] |
| Ligne 1 : | Ligne 1 : | ||
{{Tuto Details | {{Tuto Details | ||
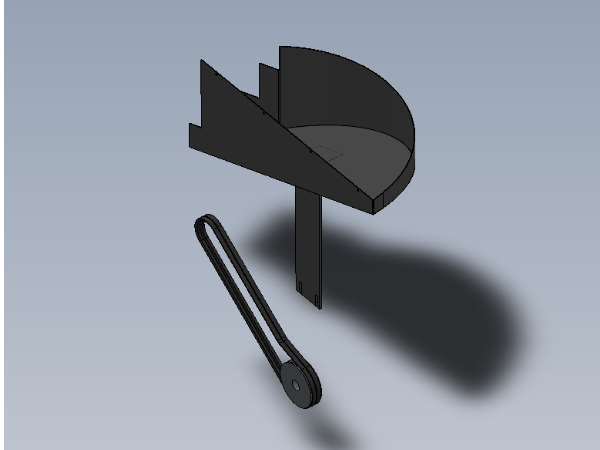
| − | |Main_Picture=R0000574_Fit_Motor_and_Swarf_Chute_Screenshot_2023-10- | + | |Main_Picture=R0000574_Fit_Motor_and_Swarf_Chute_Screenshot_2023-10-19_134327.png |
| − | |Main_Picture_annotation={"version":"2.4.6","objects":[{"type":"image","version":"2.4.6","originX":"left","originY":"top","left": | + | |Main_Picture_annotation={"version":"2.4.6","objects":[{"type":"image","version":"2.4.6","originX":"left","originY":"top","left":4,"top":-65,"width":788,"height":733,"fill":"rgb(0,0,0)","stroke":null,"strokeWidth":0,"strokeDashArray":null,"strokeLineCap":"butt","strokeDashOffset":0,"strokeLineJoin":"miter","strokeMiterLimit":4,"scaleX":0.77,"scaleY":0.77,"angle":0,"flipX":false,"flipY":false,"opacity":1,"shadow":null,"visible":true,"clipTo":null,"backgroundColor":"","fillRule":"nonzero","paintFirst":"fill","globalCompositeOperation":"source-over","transformMatrix":null,"skewX":0,"skewY":0,"crossOrigin":"","cropX":0,"cropY":0,"src":"https://stuga.dokit.app/images/0/0e/R0000574_Fit_Motor_and_Swarf_Chute_Screenshot_2023-10-19_134327.png","filters":[]}],"height":449.52076677316296,"width":600} |
|Description=<translate>Details for fitting motor and swarf chute</translate> | |Description=<translate>Details for fitting motor and swarf chute</translate> | ||
|Categories=Production | |Categories=Production | ||
| Ligne 58 : | Ligne 58 : | ||
Fasteners required with drilling method</translate> | Fasteners required with drilling method</translate> | ||
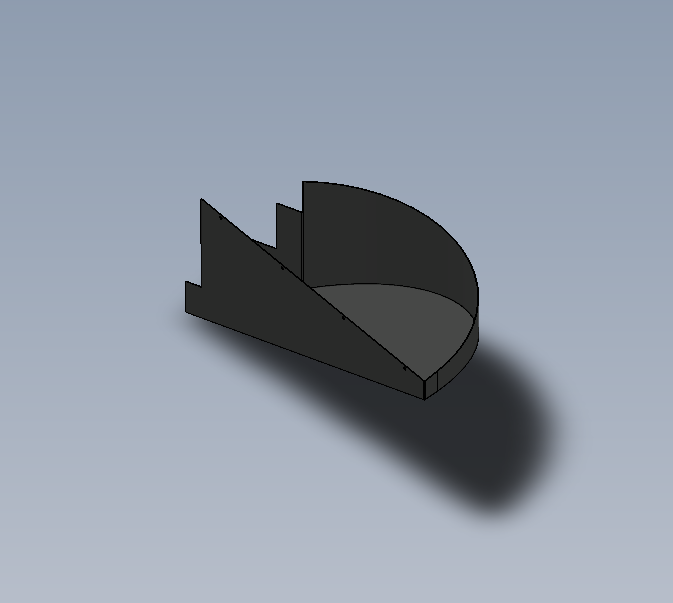
| + | |Step_Picture_00=R0000574_Fit_Motor_and_Swarf_Chute_Screenshot_2023-10-19_134408.png | ||
| + | }} | ||
| + | {{Tuto Step | ||
| + | |Step_Title=<translate>Fit motor</translate> | ||
| + | |Step_Content=<translate>Fit pre assembled motor to head assembly | ||
| + | |||
| + | |||
| + | Fix with......</translate> | ||
| + | }} | ||
| + | {{Tuto Step | ||
| + | |Step_Title=<translate>Attach anaconda assembly</translate> | ||
| + | |Step_Content=<translate>Attach saw motor anaconda to frame | ||
| + | |||
| + | <br /></translate> | ||
| + | }} | ||
| + | {{Tuto Step | ||
| + | |Step_Title=<translate>Fit pulley and belts</translate> | ||
| + | |Step_Content=<translate>Fit pulley to saw motor ensure copper slip is used on taper lock grubscrews | ||
| + | |||
| + | |||
| + | fit 2 off belts | ||
| + | |||
| + | |||
| + | Align both pulleys with steel rule | ||
| + | |||
| + | |||
| + | Ensure pulleys align belts to centre of belt tensioner</translate> | ||
| + | }} | ||
| + | {{Tuto Step | ||
| + | |Step_Title=<translate>Fit chute support</translate> | ||
| + | |Step_Content=<translate>Fit chute support to head assembly | ||
| + | |||
| + | |||
| + | Fixings ......</translate> | ||
| + | }} | ||
| + | {{Tuto Step | ||
| + | |Step_Title=<translate>Fit chute</translate> | ||
| + | |Step_Content=<translate>Fit swarf chute with M5 x 10 button hex heads</translate> | ||
| + | }} | ||
| + | {{Tuto Step | ||
| + | |Step_Title=<translate>Align swarf chute and finalise</translate> | ||
| + | |Step_Content=<translate>Adjust chute support so chute sits parallel to blade | ||
| + | |||
| + | |||
| + | Mark through 2 off M6 tapped holes on chute support bracket onto swarf chute | ||
| + | |||
| + | |||
| + | Remove swarf chute , drill 6.5mm diameter clearance holes | ||
| + | |||
| + | |||
| + | Refit swarf chute and secure with M6 x 10 button sockets</translate> | ||
| + | }} | ||
| + | {{Tuto Step | ||
| + | |Step_Title=<translate>Check spindle clearance</translate> | ||
| + | |Step_Content=<translate>Check spindle clearance once chute is fixed. | ||
| + | |||
| + | |||
| + | Hex head on spindle should clear swarf chute on all points of travel</translate> | ||
}} | }} | ||
{{Notes}} | {{Notes}} | ||
Version du 19 octobre 2023 à 13:50
Details for fitting motor and swarf chute
Sommaire
- 1 Introduction
- 2 Étape 1 - Unless otherwise stated
- 3 Étape 2 - Fit Infill panel to chute
- 4 Étape 3 - Fit motor
- 5 Étape 4 - Attach anaconda assembly
- 6 Étape 5 - Fit pulley and belts
- 7 Étape 6 - Fit chute support
- 8 Étape 7 - Fit chute
- 9 Étape 8 - Align swarf chute and finalise
- 10 Étape 9 - Check spindle clearance
- 11 Commentaires
Introduction
Tools Required
standard hex keys
Standard spanner set
1 meter steel rule
Copper slip
Chute flap template jig
Standard Hss drills
Standard taps
Parts Required
B0000048 Taperlock Set SPZ 80-2 1210-24 x 1
B0001175 Saw V-belt (special size 987mm) for 500mm blade x 2
D0005628 Saw chute infill panel x 1
H0004637 Offcut Chute (5333) x 1
H0004660 Chute Bracket x 1
P0000609 Reed Switch Mount (Tie Bar) x 3Étape 1 - Unless otherwise stated
All bolts to have Loctite 243 adhesive applied unless otherwise stated
All Threaded Pneumatic connections to have Loctite 570 applied
All bolts to be pen marked once adhesive applied and correct tension added
Étape 2 - Fit Infill panel to chute
Fit D0005628 Saw chute infill panel to H0004637 Offcut Chute
Fasteners required with drilling method
Étape 3 - Fit motor
Fit pre assembled motor to head assembly
Fix with......
Étape 4 - Attach anaconda assembly
Attach saw motor anaconda to frame
Étape 5 - Fit pulley and belts
Fit pulley to saw motor ensure copper slip is used on taper lock grubscrews
fit 2 off belts
Align both pulleys with steel rule
Ensure pulleys align belts to centre of belt tensioner
Étape 6 - Fit chute support
Fit chute support to head assembly
Fixings ......
Étape 7 - Fit chute
Fit swarf chute with M5 x 10 button hex heads
Étape 8 - Align swarf chute and finalise
Adjust chute support so chute sits parallel to blade
Mark through 2 off M6 tapped holes on chute support bracket onto swarf chute
Remove swarf chute , drill 6.5mm diameter clearance holes
Refit swarf chute and secure with M6 x 10 button sockets
Étape 9 - Check spindle clearance
Check spindle clearance once chute is fixed.
Hex head on spindle should clear swarf chute on all points of travel
Draft


 Français
 English
 Deutsch
 Español
 Italiano
 Português