| [version en cours de rédaction] | [version en cours de rédaction] |
(Page créée avec « {{Tuto Details |Main_Picture=TB0402_Modification_to_Autoflow_Concertina_Door_Slide_Pin_Image5.png |Main_Picture_annotation={"version":"2.4.6","objects":[{"type":"image","v... ») |
|||
| (3 révisions intermédiaires par le même utilisateur non affichées) | |||
| Ligne 1 : | Ligne 1 : | ||
{{Tuto Details | {{Tuto Details | ||
|Main_Picture=TB0402_Modification_to_Autoflow_Concertina_Door_Slide_Pin_Image5.png | |Main_Picture=TB0402_Modification_to_Autoflow_Concertina_Door_Slide_Pin_Image5.png | ||
| − | |Main_Picture_annotation={"version":"2.4.6","objects":[{"type":"image","version":"2.4.6","originX":"left","originY":"top","left":- | + | |Main_Picture_annotation={"version":"2.4.6","objects":[{"type":"image","version":"2.4.6","originX":"left","originY":"top","left":-71,"top":-5,"width":341,"height":211,"fill":"rgb(0,0,0)","stroke":null,"strokeWidth":0,"strokeDashArray":null,"strokeLineCap":"butt","strokeDashOffset":0,"strokeLineJoin":"miter","strokeMiterLimit":4,"scaleX":2.13,"scaleY":2.13,"angle":0,"flipX":false,"flipY":false,"opacity":1,"shadow":null,"visible":true,"clipTo":null,"backgroundColor":"","fillRule":"nonzero","paintFirst":"fill","globalCompositeOperation":"source-over","transformMatrix":null,"skewX":0,"skewY":0,"crossOrigin":"","cropX":0,"cropY":0,"src":"https://stuga.dokit.app/images/1/19/TB0402_Modification_to_Autoflow_Concertina_Door_Slide_Pin_Image5.png","filters":[]}],"height":449.21465968586386,"width":600} |
| − | |Description=<translate>There are regular reports of the concertina doors coming out of their slideways on the Autoflow. The moving end of the door is meant to be contained using a kit which has a plate bolted to the underside of the door, and which has a downwards facing plastic top hat bush. This bush is located using a dowel which is press fitted into the plate. Over time, the dowel works loose and falls out, resulting in the top hat bush falling away.</translate> | + | |Description=<translate>There are regular reports of the concertina doors coming out of their slideways on the Autoflow. The moving end of the door is meant to be contained using a kit which has a plate bolted to the underside of the door, and which has a downwards facing plastic top hat bush. This bush is located using a dowel which is press fitted into the plate. Over time, the dowel works loose and falls out, resulting in the top hat bush falling away. Part number M0001024</translate> |
|Categories=Maintenance | |Categories=Maintenance | ||
|Tags=TB0402, Modification, Autoflow, Concertina, Door, Slide, Pin | |Tags=TB0402, Modification, Autoflow, Concertina, Door, Slide, Pin | ||
}} | }} | ||
| − | <translate>== Solution == | + | <translate>==Solution== |
The unmodified plate is shown below: | The unmodified plate is shown below: | ||
| + | |||
| + | |||
| + | Stuga P/No M0001024 | ||
<br />{{#annotatedImageLight:Fichier:TB0402 Modification to Autoflow Concertina Door Slide Pin Image1.png|0=481px|hash=|jsondata=|mediaClass=Image|type=frameless|align=center|src=https://stuga.dokit.app/images/5/5f/TB0402_Modification_to_Autoflow_Concertina_Door_Slide_Pin_Image1.png|href=./Fichier:TB0402 Modification to Autoflow Concertina Door Slide Pin Image1.png|resource=./Fichier:TB0402 Modification to Autoflow Concertina Door Slide Pin Image1.png|caption=|size=481px}}{{#annotatedImageLight:Fichier:TB0402 Modification to Autoflow Concertina Door Slide Pin Image2.png|0=480px|hash=|jsondata=|mediaClass=Image|type=frameless|align=center|src=https://stuga.dokit.app/images/e/ee/TB0402_Modification_to_Autoflow_Concertina_Door_Slide_Pin_Image2.png|href=./Fichier:TB0402 Modification to Autoflow Concertina Door Slide Pin Image2.png|resource=./Fichier:TB0402 Modification to Autoflow Concertina Door Slide Pin Image2.png|caption=|size=480px}} | <br />{{#annotatedImageLight:Fichier:TB0402 Modification to Autoflow Concertina Door Slide Pin Image1.png|0=481px|hash=|jsondata=|mediaClass=Image|type=frameless|align=center|src=https://stuga.dokit.app/images/5/5f/TB0402_Modification_to_Autoflow_Concertina_Door_Slide_Pin_Image1.png|href=./Fichier:TB0402 Modification to Autoflow Concertina Door Slide Pin Image1.png|resource=./Fichier:TB0402 Modification to Autoflow Concertina Door Slide Pin Image1.png|caption=|size=481px}}{{#annotatedImageLight:Fichier:TB0402 Modification to Autoflow Concertina Door Slide Pin Image2.png|0=480px|hash=|jsondata=|mediaClass=Image|type=frameless|align=center|src=https://stuga.dokit.app/images/e/ee/TB0402_Modification_to_Autoflow_Concertina_Door_Slide_Pin_Image2.png|href=./Fichier:TB0402 Modification to Autoflow Concertina Door Slide Pin Image2.png|resource=./Fichier:TB0402 Modification to Autoflow Concertina Door Slide Pin Image2.png|caption=|size=480px}} | ||
Simply countersink the centre of the 3 holes shown on the left hand side. The countersink should be done from the face shown, and should allow for an M5 countersunk screw to fit flush or subflush, but without the countersink section of the screw breaking through the far face of the plate. | Simply countersink the centre of the 3 holes shown on the left hand side. The countersink should be done from the face shown, and should allow for an M5 countersunk screw to fit flush or subflush, but without the countersink section of the screw breaking through the far face of the plate. | ||
| − | <br />{{#annotatedImageLight:Fichier:TB0402 Modification to Autoflow Concertina Door Slide Pin Image3.png|0=352px|hash=|jsondata=|mediaClass=Image|type=frameless|align=center|src=https://stuga.dokit.app/images/a/ad/TB0402_Modification_to_Autoflow_Concertina_Door_Slide_Pin_Image3.png|href=./Fichier:TB0402 Modification to Autoflow Concertina Door Slide Pin Image3.png|resource=./Fichier:TB0402 Modification to Autoflow Concertina Door Slide Pin Image3.png|caption=|size=352px}}The M5 countersunk screw should then be “loc-tited” in place.{{#annotatedImageLight:Fichier:TB0402 Modification to Autoflow Concertina Door Slide Pin Image4.png|0=341px|hash=|jsondata=|mediaClass=Image|type=frameless|align=center|src=https://stuga.dokit.app/images/5/57/TB0402_Modification_to_Autoflow_Concertina_Door_Slide_Pin_Image4.png|href=./Fichier:TB0402 Modification to Autoflow Concertina Door Slide Pin Image4.png|resource=./Fichier:TB0402 Modification to Autoflow Concertina Door Slide Pin Image4.png|caption=|size=341px}}When fitting, the top hat can then slide fit over the screw as normal (note: it will be a looser fit than with the dowel, but will be captivated when the door is installed).{{#annotatedImageLight:Fichier:TB0402 Modification to Autoflow Concertina Door Slide Pin Image5.png|0=341px|hash=|jsondata=|mediaClass=Image|type=frameless|align=center|src=https://stuga.dokit.app/images/1/19/TB0402_Modification_to_Autoflow_Concertina_Door_Slide_Pin_Image5.png|href=./Fichier:TB0402 Modification to Autoflow Concertina Door Slide Pin Image5.png|resource=./Fichier:TB0402 Modification to Autoflow Concertina Door Slide Pin Image5.png|caption=|size=341px}}<br /></translate> | + | <br />{{#annotatedImageLight:Fichier:TB0402 Modification to Autoflow Concertina Door Slide Pin Image3.png|0=352px|hash=|jsondata=|mediaClass=Image|type=frameless|align=center|src=https://stuga.dokit.app/images/a/ad/TB0402_Modification_to_Autoflow_Concertina_Door_Slide_Pin_Image3.png|href=./Fichier:TB0402 Modification to Autoflow Concertina Door Slide Pin Image3.png|resource=./Fichier:TB0402 Modification to Autoflow Concertina Door Slide Pin Image3.png|caption=|size=352px}} |
| + | |||
| + | |||
| + | The M5 countersunk screw should then be “loc-tited” in place. | ||
| + | <br />{{#annotatedImageLight:Fichier:TB0402 Modification to Autoflow Concertina Door Slide Pin Image4.png|0=341px|hash=|jsondata=|mediaClass=Image|type=frameless|align=center|src=https://stuga.dokit.app/images/5/57/TB0402_Modification_to_Autoflow_Concertina_Door_Slide_Pin_Image4.png|href=./Fichier:TB0402 Modification to Autoflow Concertina Door Slide Pin Image4.png|resource=./Fichier:TB0402 Modification to Autoflow Concertina Door Slide Pin Image4.png|caption=|size=341px}} | ||
| + | |||
| + | |||
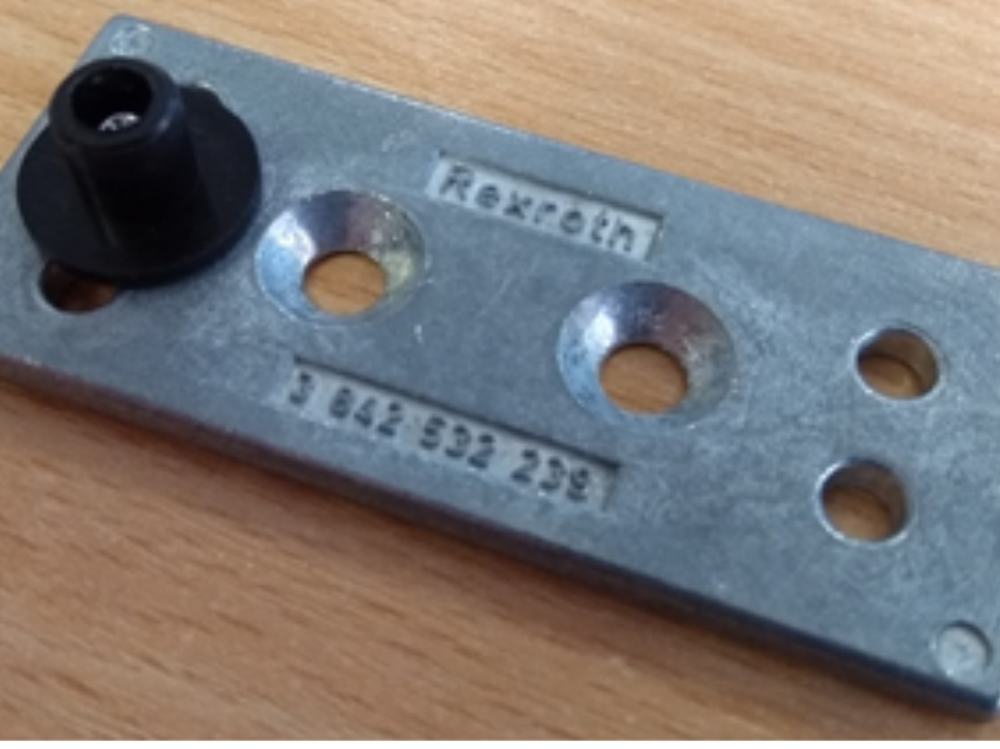
| + | When fitting, the top hat can then slide fit over the screw as normal (note: it will be a looser fit than with the dowel, but will be captivated when the door is installed). | ||
| + | <br />{{#annotatedImageLight:Fichier:TB0402 Modification to Autoflow Concertina Door Slide Pin Image5.png|0=341px|hash=|jsondata=|mediaClass=Image|type=frameless|align=center|src=https://stuga.dokit.app/images/1/19/TB0402_Modification_to_Autoflow_Concertina_Door_Slide_Pin_Image5.png|href=./Fichier:TB0402 Modification to Autoflow Concertina Door Slide Pin Image5.png|resource=./Fichier:TB0402 Modification to Autoflow Concertina Door Slide Pin Image5.png|caption=|size=341px}}<br /></translate> | ||
{{PageLang | {{PageLang | ||
| + | |Language=en | ||
|SourceLanguage=none | |SourceLanguage=none | ||
|IsTranslation=0 | |IsTranslation=0 | ||
| − | |||
}} | }} | ||
{{AddComments}} | {{AddComments}} | ||
Version actuelle datée du 19 avril 2023 à 13:38
There are regular reports of the concertina doors coming out of their slideways on the Autoflow. The moving end of the door is meant to be contained using a kit which has a plate bolted to the underside of the door, and which has a downwards facing plastic top hat bush. This bush is located using a dowel which is press fitted into the plate. Over time, the dowel works loose and falls out, resulting in the top hat bush falling away. Part number M0001024

Sommaire
Solution
The unmodified plate is shown below:
Stuga P/No M0001024


Simply countersink the centre of the 3 holes shown on the left hand side. The countersink should be done from the face shown, and should allow for an M5 countersunk screw to fit flush or subflush, but without the countersink section of the screw breaking through the far face of the plate.

The M5 countersunk screw should then be “loc-tited” in place.

When fitting, the top hat can then slide fit over the screw as normal (note: it will be a looser fit than with the dowel, but will be captivated when the door is installed).

Draft
 Français
 English
 Deutsch
 Español
 Italiano
 Português