| [version en cours de rédaction] | [version en cours de rédaction] |
| Ligne 91 : | Ligne 91 : | ||
Press the '''DOWNLOAD''' button and check that there are no errors. | Press the '''DOWNLOAD''' button and check that there are no errors. | ||
| + | |||
| + | |||
| + | Now on the Toshiba side: | ||
| + | |||
| + | * Select Paraeter Settings | ||
| + | * Select Standard 2 | ||
| + | * Adjust Cut Adjust to -2.0 | ||
| + | * Press the submit button | ||
| + | |||
| + | The screen shows the Web version. The adjustment brings the label forward out of the printer to allow collection by the Picling Arm. | ||
| + | |||
<br /></translate> | <br /></translate> | ||
|Step_Picture_00=Toshiba_-_B-EX4T1_Printer_Setup_Screenshot_2023-02-06_144524.png | |Step_Picture_00=Toshiba_-_B-EX4T1_Printer_Setup_Screenshot_2023-02-06_144524.png | ||
|Step_Picture_00_annotation={"version":"2.4.6","objects":[{"type":"image","version":"2.4.6","originX":"left","originY":"top","left":0,"top":0,"width":1414,"height":984,"fill":"rgb(0,0,0)","stroke":null,"strokeWidth":0,"strokeDashArray":null,"strokeLineCap":"butt","strokeDashOffset":0,"strokeLineJoin":"miter","strokeMiterLimit":4,"scaleX":0.42,"scaleY":0.42,"angle":0,"flipX":false,"flipY":false,"opacity":1,"shadow":null,"visible":true,"clipTo":null,"backgroundColor":"","fillRule":"nonzero","paintFirst":"fill","globalCompositeOperation":"source-over","transformMatrix":null,"skewX":0,"skewY":0,"crossOrigin":"","cropX":0,"cropY":0,"src":"https://stuga.dokit.app/images/4/4c/Toshiba_-_B-EX4T1_Printer_Setup_Screenshot_2023-02-06_144524.png","filters":[]},{"type":"wfarrow2line","version":"2.4.6","originX":"center","originY":"center","left":112,"top":340,"width":92,"height":16,"fill":"rgba(255,0,0,0)","stroke":"#FF0000","strokeWidth":4,"strokeDashArray":null,"strokeLineCap":"round","strokeDashOffset":0,"strokeLineJoin":"miter","strokeMiterLimit":4,"scaleX":1,"scaleY":1,"angle":0,"flipX":false,"flipY":false,"opacity":1,"shadow":null,"visible":true,"clipTo":null,"backgroundColor":"","fillRule":"nonzero","paintFirst":"fill","globalCompositeOperation":"source-over","transformMatrix":null,"skewX":0,"skewY":0,"x1":46,"x2":-46,"y1":-8,"y2":8,"x2a":-24.92503550559653,"y2a":12.45487054353244,"x2b":-27.666494301616492,"y2b":-3.308517533582351},{"type":"wfarrow2circle","version":"2.4.6","originX":"center","originY":"center","left":158,"top":332,"width":16,"height":16,"fill":"#aaa","stroke":"#666","strokeWidth":0,"strokeDashArray":null,"strokeLineCap":"butt","strokeDashOffset":0,"strokeLineJoin":"miter","strokeMiterLimit":4,"scaleX":1,"scaleY":1,"angle":0,"flipX":false,"flipY":false,"opacity":0.5,"shadow":null,"visible":true,"clipTo":null,"backgroundColor":"","fillRule":"nonzero","paintFirst":"fill","globalCompositeOperation":"source-over","transformMatrix":null,"skewX":0,"skewY":0,"radius":8,"startAngle":0,"endAngle":6.283185307179586},{"type":"wfarrow2circle","version":"2.4.6","originX":"center","originY":"center","left":66,"top":348,"width":16,"height":16,"fill":"#aaa","stroke":"#666","strokeWidth":0,"strokeDashArray":null,"strokeLineCap":"butt","strokeDashOffset":0,"strokeLineJoin":"miter","strokeMiterLimit":4,"scaleX":1,"scaleY":1,"angle":0,"flipX":false,"flipY":false,"opacity":0.5,"shadow":null,"visible":true,"clipTo":null,"backgroundColor":"","fillRule":"nonzero","paintFirst":"fill","globalCompositeOperation":"source-over","transformMatrix":null,"skewX":0,"skewY":0,"radius":8,"startAngle":0,"endAngle":6.283185307179586}],"height":418,"width":600} | |Step_Picture_00_annotation={"version":"2.4.6","objects":[{"type":"image","version":"2.4.6","originX":"left","originY":"top","left":0,"top":0,"width":1414,"height":984,"fill":"rgb(0,0,0)","stroke":null,"strokeWidth":0,"strokeDashArray":null,"strokeLineCap":"butt","strokeDashOffset":0,"strokeLineJoin":"miter","strokeMiterLimit":4,"scaleX":0.42,"scaleY":0.42,"angle":0,"flipX":false,"flipY":false,"opacity":1,"shadow":null,"visible":true,"clipTo":null,"backgroundColor":"","fillRule":"nonzero","paintFirst":"fill","globalCompositeOperation":"source-over","transformMatrix":null,"skewX":0,"skewY":0,"crossOrigin":"","cropX":0,"cropY":0,"src":"https://stuga.dokit.app/images/4/4c/Toshiba_-_B-EX4T1_Printer_Setup_Screenshot_2023-02-06_144524.png","filters":[]},{"type":"wfarrow2line","version":"2.4.6","originX":"center","originY":"center","left":112,"top":340,"width":92,"height":16,"fill":"rgba(255,0,0,0)","stroke":"#FF0000","strokeWidth":4,"strokeDashArray":null,"strokeLineCap":"round","strokeDashOffset":0,"strokeLineJoin":"miter","strokeMiterLimit":4,"scaleX":1,"scaleY":1,"angle":0,"flipX":false,"flipY":false,"opacity":1,"shadow":null,"visible":true,"clipTo":null,"backgroundColor":"","fillRule":"nonzero","paintFirst":"fill","globalCompositeOperation":"source-over","transformMatrix":null,"skewX":0,"skewY":0,"x1":46,"x2":-46,"y1":-8,"y2":8,"x2a":-24.92503550559653,"y2a":12.45487054353244,"x2b":-27.666494301616492,"y2b":-3.308517533582351},{"type":"wfarrow2circle","version":"2.4.6","originX":"center","originY":"center","left":158,"top":332,"width":16,"height":16,"fill":"#aaa","stroke":"#666","strokeWidth":0,"strokeDashArray":null,"strokeLineCap":"butt","strokeDashOffset":0,"strokeLineJoin":"miter","strokeMiterLimit":4,"scaleX":1,"scaleY":1,"angle":0,"flipX":false,"flipY":false,"opacity":0.5,"shadow":null,"visible":true,"clipTo":null,"backgroundColor":"","fillRule":"nonzero","paintFirst":"fill","globalCompositeOperation":"source-over","transformMatrix":null,"skewX":0,"skewY":0,"radius":8,"startAngle":0,"endAngle":6.283185307179586},{"type":"wfarrow2circle","version":"2.4.6","originX":"center","originY":"center","left":66,"top":348,"width":16,"height":16,"fill":"#aaa","stroke":"#666","strokeWidth":0,"strokeDashArray":null,"strokeLineCap":"butt","strokeDashOffset":0,"strokeLineJoin":"miter","strokeMiterLimit":4,"scaleX":1,"scaleY":1,"angle":0,"flipX":false,"flipY":false,"opacity":0.5,"shadow":null,"visible":true,"clipTo":null,"backgroundColor":"","fillRule":"nonzero","paintFirst":"fill","globalCompositeOperation":"source-over","transformMatrix":null,"skewX":0,"skewY":0,"radius":8,"startAngle":0,"endAngle":6.283185307179586}],"height":418,"width":600} | ||
| + | |Step_Picture_01=Toshiba_-_B-EX4T1_Printer_Setup_Screenshot_2023-02-15_140804.jpg | ||
}} | }} | ||
{{Tuto Step | {{Tuto Step | ||
Version du 15 février 2023 à 15:38
B-EX4T1 Printer Setup for Auto Labeling
Sommaire
- 1 Étape 1 - Inner & Outer
- 2 Étape 2 - Rewind Spool
- 3 Étape 3 - Printhead access
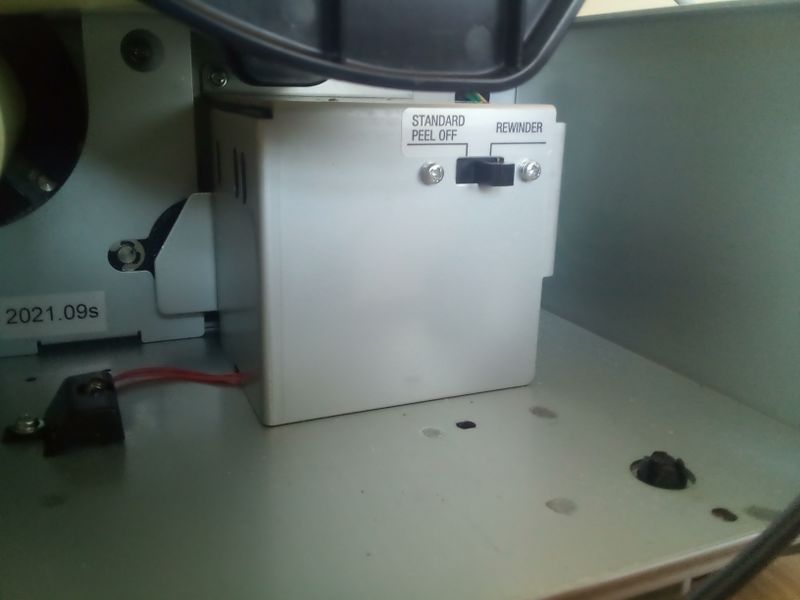
- 4 Étape 4 - Setting Rewinder
- 5 Étape 5 - Label Guides
- 6 Étape 6 - Sensor Position
- 7 Étape 7 - Closing Label Head
- 8 Étape 8 - Connecting printer to PC
- 9 Étape 9 - Initial Power up
- 10 Étape 10 - Using BCP to setup the printer
- 11 Étape 11 - Change Settings
- 12 Étape 12 - Testing
- 13 Étape 13 - Set the IP Address for the Customers network
- 14 Commentaires
Étape 1 - Inner & Outer
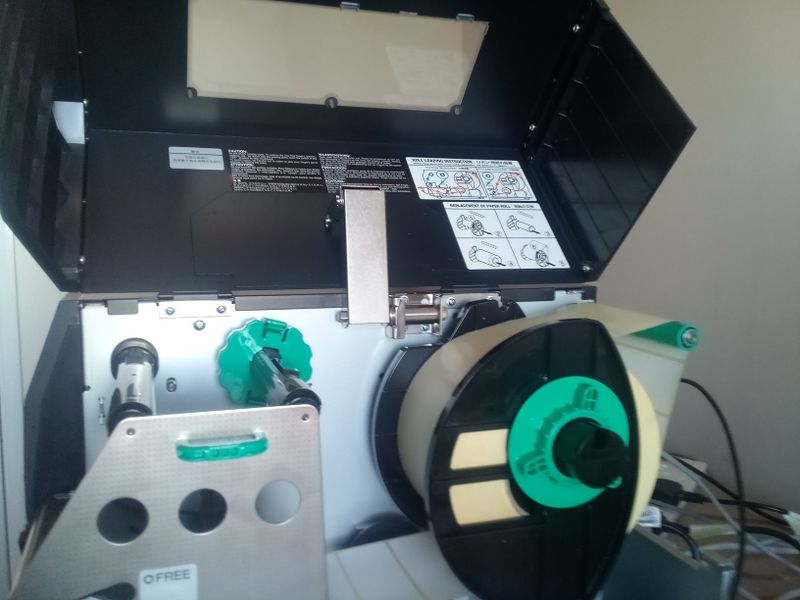
The instructions for both the Inner & Outer wound labels are on the inside of the open lid.
Étape 2 - Rewind Spool
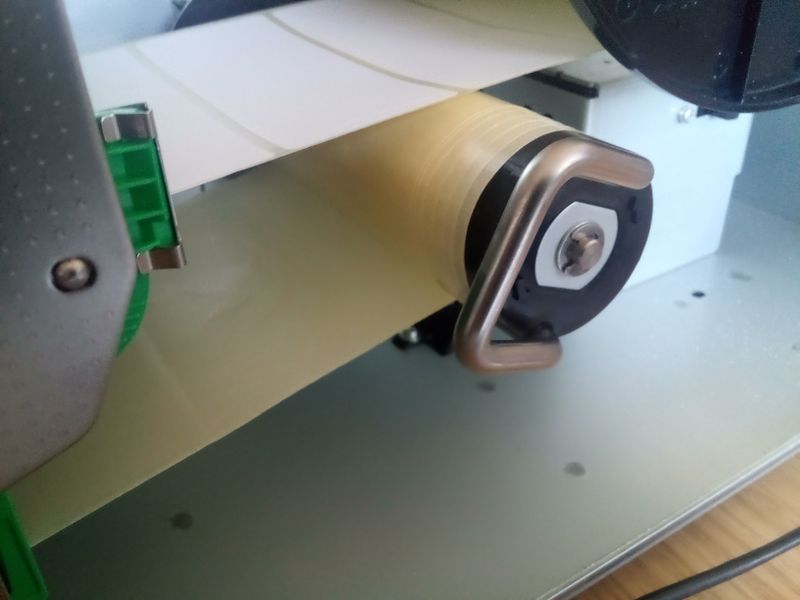
There will be no ribbon and as the settings will be for Peel Off a length of blank backing needs to be fed onto the Rewind spool
Étape 3 - Printhead access
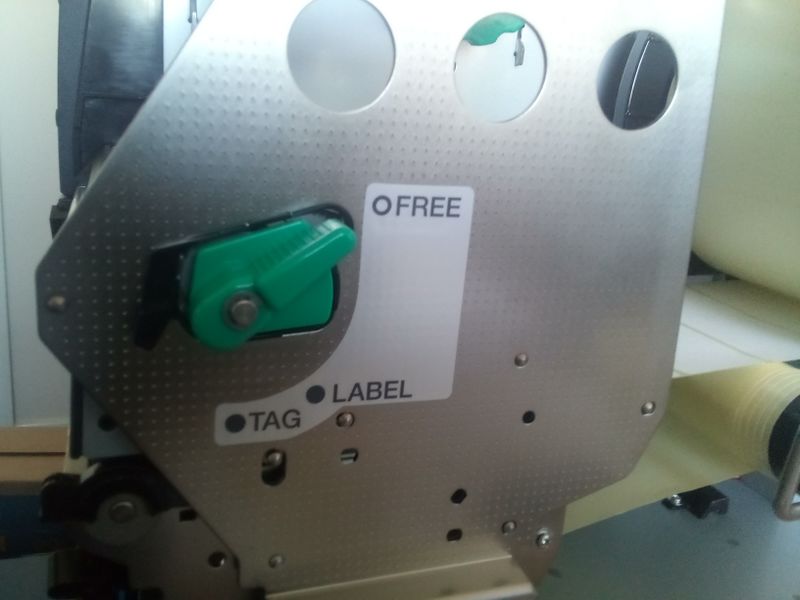
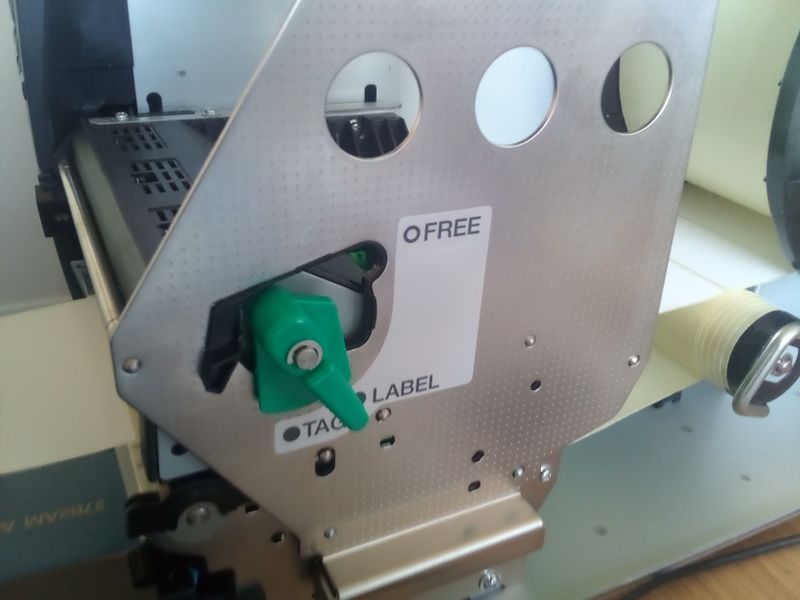
To gain access turn the green knob to FREE. You can then pull the front plate down and lift the printer head up.
Étape 5 - Label Guides
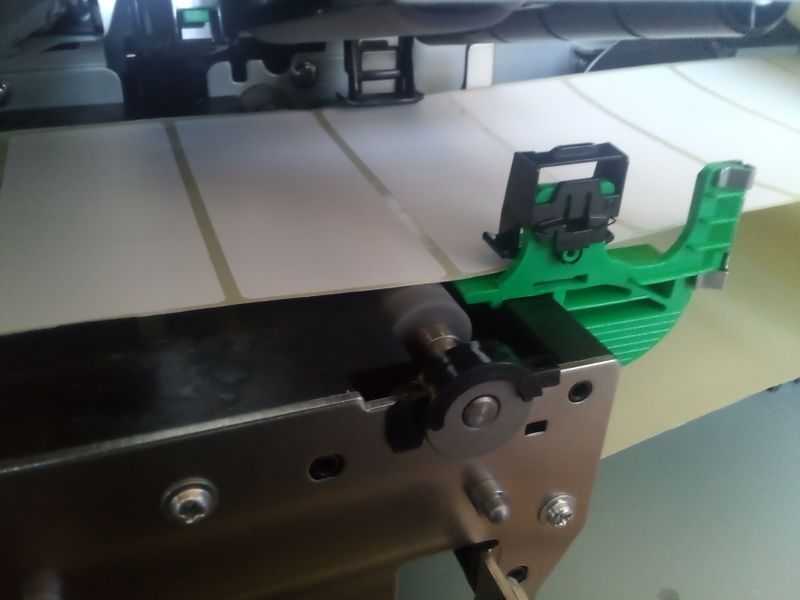
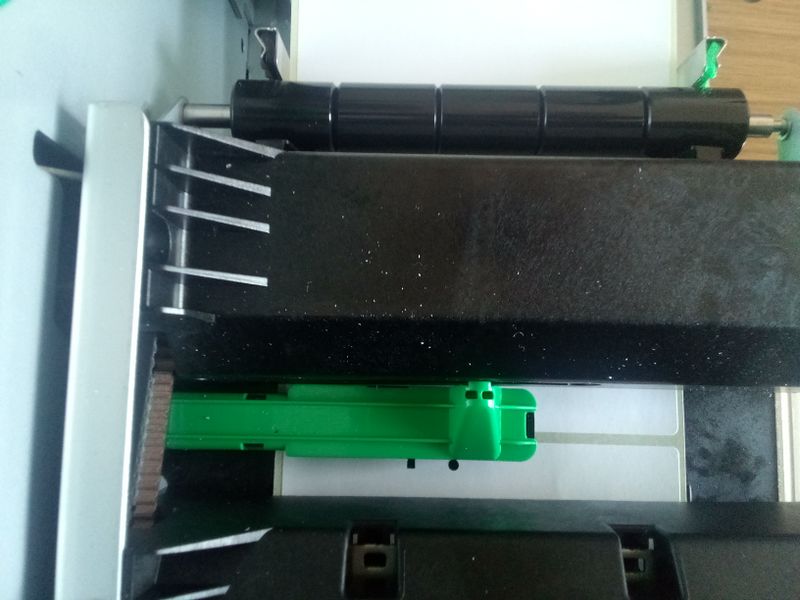
With the Printhead open ensure that the labels are under the small black sprung guides. Slide the green guide to the width of the label.
Étape 7 - Closing Label Head
When loaded close the Printhead down, lift the front plate up and turn the green knob to LABEL.
Étape 8 - Connecting printer to PC
For easy setup use a USB cable (Alternatively everything can be done via the network web interface)
1) Connect a USB cable to the PC
2) Connect a Network cable to a live DHCP network to obtain an IP address.
3) Download and install the BCP setup software: https://www.toshibatec.com/download_overseas/printer/setting_tool/BCP_Series/ [1]
Étape 9 - Initial Power up
If the labels have been fitted properly on power up the calibration process will eject several labels.
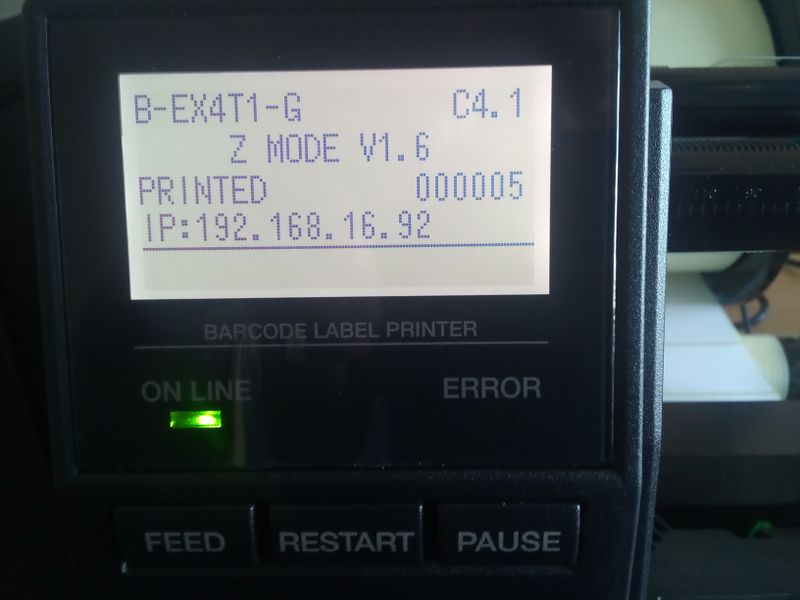
Take a note of the IP address given to the printer on the front panel.
Étape 10 - Using BCP to setup the printer
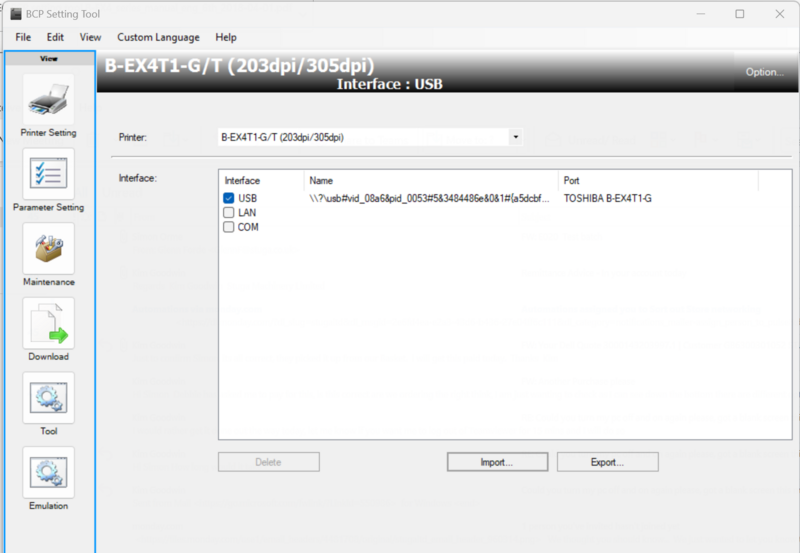
When you start BCP you should see as picture
Select USB if not Selected
Étape 11 - Change Settings
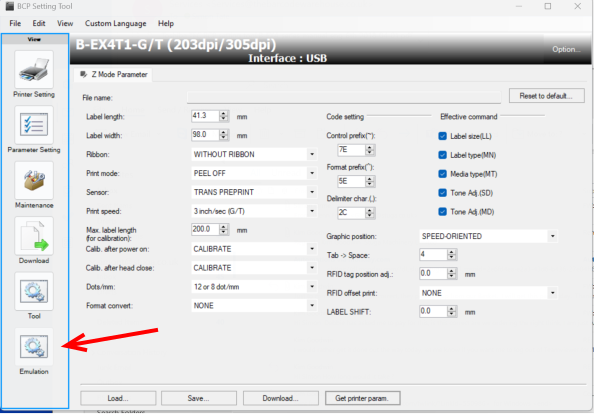
Press the Emulation Button and take the top option "Zmode System Parameter Settings"
Then Make the changes
- Label Length 38mm (after calibration this will be reset to 41.3)
- Label Width 98mm
- Ribbon WITHOUT RIBBON
- Print mode PEEL OFF
- Sensor TRANS PREPRINT
- Max Label Length (for calibration) 200mm (this just saves on labels)
Press the DOWNLOAD button and check that there are no errors.
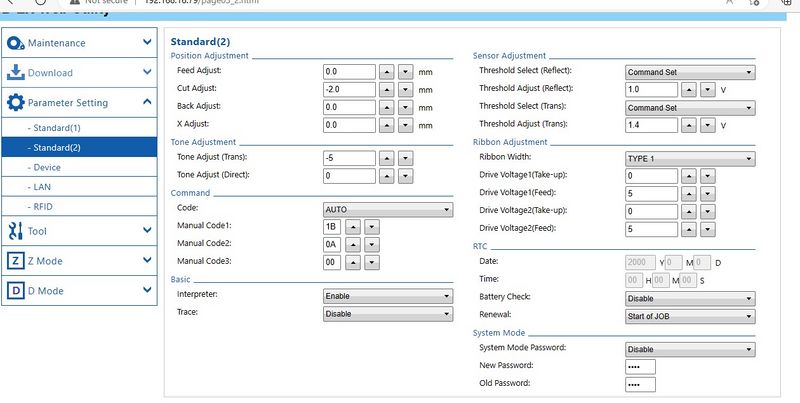
Now on the Toshiba side:
- Select Paraeter Settings
- Select Standard 2
- Adjust Cut Adjust to -2.0
- Press the submit button
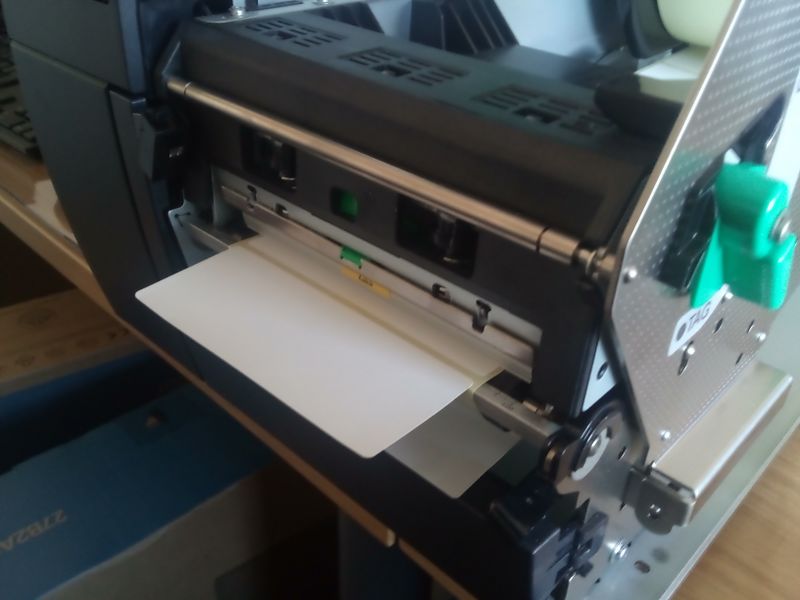
The screen shows the Web version. The adjustment brings the label forward out of the printer to allow collection by the Picling Arm.
Étape 12 - Testing
1) Pressing "Feed" should push out another label regardless.
2) Send a label to the printer via the network (or via the Test - Send file within BCP).
3) Send more than one file and make sure that each time you remove a label from the output the next one is presented.
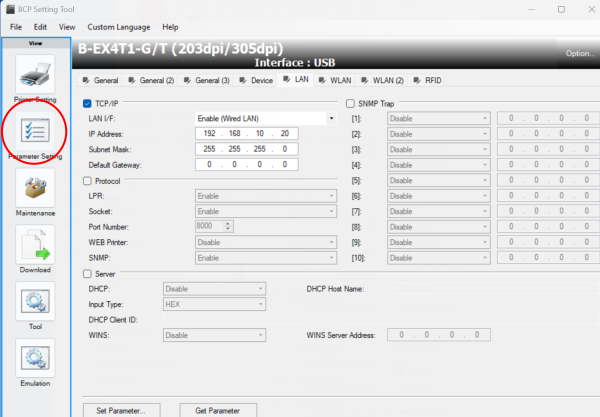
Étape 13 - Set the IP Address for the Customers network
- Within BCP choose "Parameter Settings"
- Select the LAN tab
- Enable TCP/IP
- Enable Wired LAN
- Set IP Address and Sub Net Mask
- Press the Set Parameter at the bottom.
Draft
 Français
 English
 Deutsch
 Español
 Italiano
 Português