|
|
| Ligne 15 : |
Ligne 15 : |
| | {{EPI}} | | {{EPI}} |
| | {{Tuto Step | | {{Tuto Step |
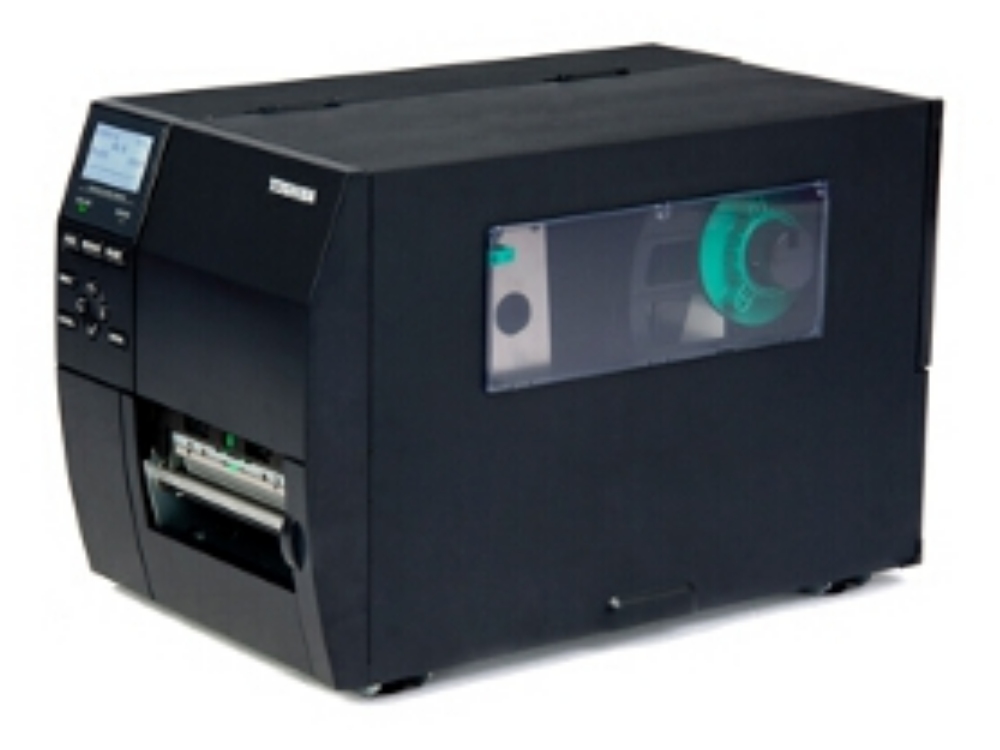
| − | |Step_Title=<translate>Loading Labels</translate> | + | |Step_Title=<translate>Inner & Outter</translate> |
| − | |Step_Content=<translate>1) The instructions for the both Inner & Outter wound labels are on the inside of the open lid. | + | |Step_Content=<translate>The instructions for the both Inner & Outter wound labels are on the inside of the open lid. |
| | | | |
| − | 2) There will be no ribbon and as the seetings will be for Peel Off a length of blank backing needs to be feed onto the Rewind spool
| + | <br /></translate> |
| − | | |
| − | 3) To gain access turn the green knob to FREE. You can then pull the front plate down and lift the printer head up.</translate>
| |
| | |Step_Picture_00=Toshiba_-_B-EX4T1_Printer_Setup_B-EX4-Lid.jpg | | |Step_Picture_00=Toshiba_-_B-EX4T1_Printer_Setup_B-EX4-Lid.jpg |
| − | |Step_Picture_00_annotation={"version":"2.4.6","objects":[{"type":"image","version":"2.4.6","originX":"left","originY":"top","left":0,"top":0,"width":3264,"height":2448,"fill":"rgb(0,0,0)","stroke":null,"strokeWidth":0,"strokeDashArray":null,"strokeLineCap":"butt","strokeDashOffset":0,"strokeLineJoin":"miter","strokeMiterLimit":4,"scaleX":0.18,"scaleY":0.18,"angle":0,"flipX":false,"flipY":false,"opacity":1,"shadow":null,"visible":true,"clipTo":null,"backgroundColor":"","fillRule":"nonzero","paintFirst":"fill","globalCompositeOperation":"source-over","transformMatrix":null,"skewX":0,"skewY":0,"crossOrigin":"","cropX":0,"cropY":0,"src":"https://stuga.dokit.app/images/f/f2/Toshiba_-_B-EX4T1_Printer_Setup_B-EX4-Lid.jpg","filters":[]},{"type":"wfnumberedbullet","version":"2.4.6","originX":"left","originY":"top","left":276,"top":145,"width":25,"height":25,"fill":"rgb(0,0,0)","stroke":"#FF0000","strokeWidth":0,"strokeDashArray":null,"strokeLineCap":"butt","strokeDashOffset":0,"strokeLineJoin":"miter","strokeMiterLimit":4,"scaleX":1,"scaleY":1,"angle":0,"flipX":false,"flipY":false,"opacity":1,"shadow":null,"visible":true,"clipTo":null,"backgroundColor":"","fillRule":"nonzero","paintFirst":"fill","globalCompositeOperation":"source-over","transformMatrix":null,"skewX":0,"skewY":0,"objects":[{"type":"circle","version":"2.4.6","originX":"center","originY":"center","left":0,"top":0,"width":24,"height":24,"fill":"#FF0000","stroke":null,"strokeWidth":1,"strokeDashArray":null,"strokeLineCap":"butt","strokeDashOffset":0,"strokeLineJoin":"miter","strokeMiterLimit":4,"scaleX":1,"scaleY":1,"angle":0,"flipX":false,"flipY":false,"opacity":1,"shadow":null,"visible":true,"clipTo":null,"backgroundColor":"","fillRule":"nonzero","paintFirst":"fill","globalCompositeOperation":"source-over","transformMatrix":null,"skewX":0,"skewY":0,"radius":12,"startAngle":0,"endAngle":6.283185307179586},{"type":"text","version":"2.4.6","originX":"center","originY":"center","left":0,"top":0,"width":7.79,"height":15.82,"fill":"rgba(255,255,255,255)","stroke":null,"strokeWidth":1,"strokeDashArray":null,"strokeLineCap":"butt","strokeDashOffset":0,"strokeLineJoin":"miter","strokeMiterLimit":4,"scaleX":1,"scaleY":1,"angle":0,"flipX":false,"flipY":false,"opacity":1,"shadow":null,"visible":true,"clipTo":null,"backgroundColor":"","fillRule":"nonzero","paintFirst":"fill","globalCompositeOperation":"source-over","transformMatrix":null,"skewX":0,"skewY":0,"text":"1","fontSize":14,"fontWeight":"normal","fontFamily":"arial","fontStyle":"normal","lineHeight":1.16,"underline":false,"overline":false,"linethrough":false,"textAlign":"left","textBackgroundColor":"","charSpacing":0,"styles":{} }],"number":1}],"height":450,"width":600}
| + | }} |
| − | |Step_Picture_01=Toshiba_-_B-EX4T1_Printer_Setup_B-EX4-Load_New.jpg | + | {{Tuto Step |
| − | |Step_Picture_02=Toshiba_-_B-EX4T1_Printer_Setup_B-EX4-Rewinder_New.jpg | + | |Step_Title=<translate>Rewind Spool</translate> |
| − | |Step_Picture_02_annotation={"version":"2.4.6","objects":[{"type":"image","version":"2.4.6","originX":"left","originY":"top","left":0,"top":0,"width":3264,"height":2448,"fill":"rgb(0,0,0)","stroke":null,"strokeWidth":0,"strokeDashArray":null,"strokeLineCap":"butt","strokeDashOffset":0,"strokeLineJoin":"miter","strokeMiterLimit":4,"scaleX":0.18,"scaleY":0.18,"angle":0,"flipX":false,"flipY":false,"opacity":1,"shadow":null,"visible":true,"clipTo":null,"backgroundColor":"","fillRule":"nonzero","paintFirst":"fill","globalCompositeOperation":"source-over","transformMatrix":null,"skewX":0,"skewY":0,"crossOrigin":"","cropX":0,"cropY":0,"src":"https://stuga.dokit.app/images/9/9f/Toshiba_-_B-EX4T1_Printer_Setup_B-EX4-Rewinder_New.jpg","filters":[]},{"type":"wfnumberedbullet","version":"2.4.6","originX":"left","originY":"top","left":464,"top":215,"width":25,"height":25,"fill":"rgb(0,0,0)","stroke":"#FF0000","strokeWidth":0,"strokeDashArray":null,"strokeLineCap":"butt","strokeDashOffset":0,"strokeLineJoin":"miter","strokeMiterLimit":4,"scaleX":1,"scaleY":1,"angle":0,"flipX":false,"flipY":false,"opacity":1,"shadow":null,"visible":true,"clipTo":null,"backgroundColor":"","fillRule":"nonzero","paintFirst":"fill","globalCompositeOperation":"source-over","transformMatrix":null,"skewX":0,"skewY":0,"objects":[{"type":"circle","version":"2.4.6","originX":"center","originY":"center","left":0,"top":0,"width":24,"height":24,"fill":"#FF0000","stroke":null,"strokeWidth":1,"strokeDashArray":null,"strokeLineCap":"butt","strokeDashOffset":0,"strokeLineJoin":"miter","strokeMiterLimit":4,"scaleX":1,"scaleY":1,"angle":0,"flipX":false,"flipY":false,"opacity":1,"shadow":null,"visible":true,"clipTo":null,"backgroundColor":"","fillRule":"nonzero","paintFirst":"fill","globalCompositeOperation":"source-over","transformMatrix":null,"skewX":0,"skewY":0,"radius":12,"startAngle":0,"endAngle":6.283185307179586},{"type":"text","version":"2.4.6","originX":"center","originY":"center","left":0,"top":0,"width":7.79,"height":15.82,"fill":"rgba(255,255,255,255)","stroke":null,"strokeWidth":1,"strokeDashArray":null,"strokeLineCap":"butt","strokeDashOffset":0,"strokeLineJoin":"miter","strokeMiterLimit":4,"scaleX":1,"scaleY":1,"angle":0,"flipX":false,"flipY":false,"opacity":1,"shadow":null,"visible":true,"clipTo":null,"backgroundColor":"","fillRule":"nonzero","paintFirst":"fill","globalCompositeOperation":"source-over","transformMatrix":null,"skewX":0,"skewY":0,"text":"2","fontSize":14,"fontWeight":"normal","fontFamily":"arial","fontStyle":"normal","lineHeight":1.16,"underline":false,"overline":false,"linethrough":false,"textAlign":"left","textBackgroundColor":"","charSpacing":0,"styles":{} }],"number":2}],"height":450,"width":600} | + | |Step_Content=<translate>There will be no ribbon and as the seetings will be for Peel Off a length of blank backing needs to be feed onto the Rewind spool</translate> |
| − | |Step_Picture_03=Toshiba_-_B-EX4T1_Printer_Setup_B-EX4-PrinterHead-Readtoopen_New.jpg | + | |Step_Picture_00=Toshiba_-_B-EX4T1_Printer_Setup_B-EX4-Rewinder_New.jpg |
| − | |Step_Picture_03_annotation={"version":"2.4.6","objects":[{"type":"image","version":"2.4.6","originX":"left","originY":"top","left":0,"top":0,"width":3264,"height":2448,"fill":"rgb(0,0,0)","stroke":null,"strokeWidth":0,"strokeDashArray":null,"strokeLineCap":"butt","strokeDashOffset":0,"strokeLineJoin":"miter","strokeMiterLimit":4,"scaleX":0.18,"scaleY":0.18,"angle":0,"flipX":false,"flipY":false,"opacity":1,"shadow":null,"visible":true,"clipTo":null,"backgroundColor":"","fillRule":"nonzero","paintFirst":"fill","globalCompositeOperation":"source-over","transformMatrix":null,"skewX":0,"skewY":0,"crossOrigin":"","cropX":0,"cropY":0,"src":"https://stuga.dokit.app/images/d/d3/Toshiba_-_B-EX4T1_Printer_Setup_B-EX4-PrinterHead-Readtoopen_New.jpg","filters":[]},{"type":"wfnumberedbullet","version":"2.4.6","originX":"left","originY":"top","left":244,"top":123,"width":25,"height":25,"fill":"rgb(0,0,0)","stroke":"#FF0000","strokeWidth":0,"strokeDashArray":null,"strokeLineCap":"butt","strokeDashOffset":0,"strokeLineJoin":"miter","strokeMiterLimit":4,"scaleX":1,"scaleY":1,"angle":0,"flipX":false,"flipY":false,"opacity":1,"shadow":null,"visible":true,"clipTo":null,"backgroundColor":"","fillRule":"nonzero","paintFirst":"fill","globalCompositeOperation":"source-over","transformMatrix":null,"skewX":0,"skewY":0,"objects":[{"type":"circle","version":"2.4.6","originX":"center","originY":"center","left":0,"top":0,"width":24,"height":24,"fill":"#FF0000","stroke":null,"strokeWidth":1,"strokeDashArray":null,"strokeLineCap":"butt","strokeDashOffset":0,"strokeLineJoin":"miter","strokeMiterLimit":4,"scaleX":1,"scaleY":1,"angle":0,"flipX":false,"flipY":false,"opacity":1,"shadow":null,"visible":true,"clipTo":null,"backgroundColor":"","fillRule":"nonzero","paintFirst":"fill","globalCompositeOperation":"source-over","transformMatrix":null,"skewX":0,"skewY":0,"radius":12,"startAngle":0,"endAngle":6.283185307179586},{"type":"text","version":"2.4.6","originX":"center","originY":"center","left":0,"top":0,"width":7.79,"height":15.82,"fill":"rgba(255,255,255,255)","stroke":null,"strokeWidth":1,"strokeDashArray":null,"strokeLineCap":"butt","strokeDashOffset":0,"strokeLineJoin":"miter","strokeMiterLimit":4,"scaleX":1,"scaleY":1,"angle":0,"flipX":false,"flipY":false,"opacity":1,"shadow":null,"visible":true,"clipTo":null,"backgroundColor":"","fillRule":"nonzero","paintFirst":"fill","globalCompositeOperation":"source-over","transformMatrix":null,"skewX":0,"skewY":0,"text":"3","fontSize":14,"fontWeight":"normal","fontFamily":"arial","fontStyle":"normal","lineHeight":1.16,"underline":false,"overline":false,"linethrough":false,"textAlign":"left","textBackgroundColor":"","charSpacing":0,"styles":{} }],"number":3}],"height":450,"width":600} | + | }} |
| | + | {{Tuto Step |
| | + | |Step_Title=<translate>Printhead access</translate> |
| | + | |Step_Content=<translate>To gain access turn the green knob to FREE. You can then pull the front plate down and lift the printer head up.</translate> |
| | + | |Step_Picture_00=Toshiba_-_B-EX4T1_Printer_Setup_B-EX4-PrinterHead-Readtoopen_New.jpg |
| | }} | | }} |
| | {{Tuto Step | | {{Tuto Step |
| | |Step_Title=<translate>Setting Rewinder</translate> | | |Step_Title=<translate>Setting Rewinder</translate> |
| − | |Step_Content=<translate></translate> | + | |Step_Content=<translate>Ensure the Switch is set to REWINDER</translate> |
| | |Step_Picture_00=Toshiba_-_B-EX4T1_Printer_Setup_B-EX4-Rewinder-Switch_New.jpg | | |Step_Picture_00=Toshiba_-_B-EX4T1_Printer_Setup_B-EX4-Rewinder-Switch_New.jpg |
| | }} | | }} |
| | {{Tuto Step | | {{Tuto Step |
| | |Step_Title=<translate>Label Guides</translate> | | |Step_Title=<translate>Label Guides</translate> |
| − | |Step_Content=<translate></translate> | + | |Step_Content=<translate>With the Printhead open ensure that the labels are under the small black sprung guids. Slide the green gluide to the width of the label.</translate> |
| − | |Step_Picture_00=Toshiba_-_B-EX4T1_Printer_Setup_B-EX4-PrinterHead-Readtoopen_New.jpg | + | |Step_Picture_00=Toshiba_-_B-EX4T1_Printer_Setup_B-EX4-LabelGuides_New.jpg |
| − | |Step_Picture_01=Toshiba_-_B-EX4T1_Printer_Setup_B-EX4-LabelGuides_New.jpg
| |
| − | |Step_Picture_02=Toshiba_-_B-EX4T1_Printer_Setup_B-EX4-PrintHeadOpen_New.jpg
| |
| | }} | | }} |
| | {{Tuto Step | | {{Tuto Step |
| | |Step_Title=<translate>Sensor Position</translate> | | |Step_Title=<translate>Sensor Position</translate> |
| − | |Step_Content=<translate></translate> | + | |Step_Content=<translate>Ensure that the send head is in the middle of the label</translate> |
| | |Step_Picture_00=Toshiba_-_B-EX4T1_Printer_Setup_B-EX4-Sensor_New.jpg | | |Step_Picture_00=Toshiba_-_B-EX4T1_Printer_Setup_B-EX4-Sensor_New.jpg |
| | }} | | }} |
| | {{Tuto Step | | {{Tuto Step |
| | |Step_Title=<translate>Closing Label Head</translate> | | |Step_Title=<translate>Closing Label Head</translate> |
| − | |Step_Content=<translate></translate> | + | |Step_Content=<translate>When Loaded close the Printhead down, lift the front plate up and turn the green knob to LABEL.</translate> |
| | |Step_Picture_00=Toshiba_-_B-EX4T1_Printer_Setup_B-EX4-PrintHeadClosed_New.jpg | | |Step_Picture_00=Toshiba_-_B-EX4T1_Printer_Setup_B-EX4-PrintHeadClosed_New.jpg |
| | }} | | }} |
| | {{Tuto Step | | {{Tuto Step |
| | |Step_Title=<translate>Connecting printer to PC</translate> | | |Step_Title=<translate>Connecting printer to PC</translate> |
| − | |Step_Content=<translate></translate> | + | |Step_Content=<translate>For easy setup use a USB cable (Everything can be done via the network web interface) |
| | + | |
| | + | |
| | + | 1) Connect a USB cable to the PC |
| | + | |
| | + | 2) Connect a Network cable to a live DHCP network to obtain an Ip address. |
| | + | |
| | + | 3) Download load the BCP setup software: [https://url6.mailanyone.net/scanner?m=1pIYAE-0003U9-3G&d=4%7Cmail%2F90%2F1674147000%2F1pIYAE-0003U9-3G%7Cin6f%7C57e1b682%7C27359798%7C12301058%7C63C975823F8CF099951D682ADAAD7EC2&o=%2Fphtw%3A%2Fwtsbow.thiatsdcecwm%2Fo.ovanlr_oeodissetprna%2Fisergttn%2FeCo_t_%2FBPol%2FseireS&s=uO4_tHdOp9-EM4-X9--MGgLUV_Y https://www.toshibatec.com/download_overseas/printer/setting_tool/BCP_Series/] [https://url6.mailanyone.net/scanner?m=1pIYAE-0003U9-3G&d=4%7Cmail%2F90%2F1674147000%2F1pIYAE-0003U9-3G%7Cin6f%7C57e1b682%7C27359798%7C12301058%7C63C975823F8CF099951D682ADAAD7EC2&o=%2Fphtw%3A%2Fwtsbow.thiatsdcecwm%2Fo.ovanlr_oeodissetprna%2Fisergttn%2FeCo_t_%2FBPol%2FseireS&s=uO4_tHdOp9-EM4-X9--MGgLUV_Y]</translate> |
| | }} | | }} |
| | {{Tuto Step | | {{Tuto Step |
| | |Step_Title=<translate>Initial Power up</translate> | | |Step_Title=<translate>Initial Power up</translate> |
| − | |Step_Content=<translate></translate> | + | |Step_Content=<translate>If the labels have been fitted properly on power up the calibration process will eject several labels. |
| | + | |
| | + | Take a note of the IP addres given to the printer on the front panel.</translate> |
| | + | |Step_Picture_00=Toshiba_-_B-EX4T1_Printer_Setup_B-EX4-panel_network.jpg |
| | }} | | }} |
| | {{Tuto Step | | {{Tuto Step |
| − | |Step_Title=<translate>Printer settings</translate> | + | |Step_Title=<translate>Using BCP to setup the printer</translate> |
| − | |Step_Content=<translate></translate> | + | |Step_Content=<translate>When you start BCP you should see</translate> |
| | }} | | }} |
| | {{Tuto Step | | {{Tuto Step |


 Français
 English
 Deutsch
 Español
 Italiano
 Português