| [version en cours de rédaction] | [version en cours de rédaction] |
m (Gareth Green a déplacé la page Autocut Shutdown procedure vers WinMulti Shutdown procedure : Renamed so not machine specific) |
|||
| (Une révision intermédiaire par le même utilisateur non affichée) | |||
| Ligne 15 : | Ligne 15 : | ||
{{EPI}} | {{EPI}} | ||
{{Tuto Step | {{Tuto Step | ||
| − | |Step_Title=<translate>Ensure cutting has finished</translate> | + | |Step_Title=<translate>Ensure cutting has finished and machine is initialised</translate> |
| − | |Step_Content=<translate></translate> | + | |Step_Content=<translate>{{Warning|...The shutdown procedure will not work correctly until the machine is initialised}} |
| + | |||
| + | If the machine estop circuit has been broken (eg machine has just been cleaned), the system needs to reinitialise back to datum before the shutdown procedure will work correctly | ||
| + | |||
| + | # Ensure estop circuit is reset | ||
| + | # Press start to initialise | ||
| + | |||
| + | <br />{{Info|...This step is necessary because the datum sequence references the zero position of the x axis - the machine can't safely move the x axis unless it knows where it is.}}<br /></translate> | ||
}} | }} | ||
{{Tuto Step | {{Tuto Step | ||
| Ligne 25 : | Ligne 32 : | ||
The software will now automatically close, windows will also start to shutdown. You may have to wait up to 60 seconds until the PC is shutdown. | The software will now automatically close, windows will also start to shutdown. You may have to wait up to 60 seconds until the PC is shutdown. | ||
| − | <br /></translate> | + | <br /> |
| + | {{Info|...Depending on the machine type, the axes may move to a 'clear' position}}</translate> | ||
| + | |Step_Picture_00=Recovery_of_Bar_Queue_following_winMulti_Crash_Annotation_2019-09-23_152230-3.jpg | ||
| + | |Step_Picture_00_annotation={"version":"2.4.6","objects":[{"type":"image","version":"2.4.6","originX":"left","originY":"top","left":0,"top":0,"width":1812,"height":1214,"fill":"rgb(0,0,0)","stroke":null,"strokeWidth":0,"strokeDashArray":null,"strokeLineCap":"butt","strokeDashOffset":0,"strokeLineJoin":"miter","strokeMiterLimit":4,"scaleX":0.33,"scaleY":0.33,"angle":0,"flipX":false,"flipY":false,"opacity":1,"shadow":null,"visible":true,"clipTo":null,"backgroundColor":"","fillRule":"nonzero","paintFirst":"fill","globalCompositeOperation":"source-over","transformMatrix":null,"skewX":0,"skewY":0,"crossOrigin":"","cropX":0,"cropY":0,"src":"https://stuga.dokit.app/images/1/10/Recovery_of_Bar_Queue_following_winMulti_Crash_Annotation_2019-09-23_152230-3.jpg","filters":[]},{"type":"wfrect","version":"2.4.6","originX":"center","originY":"center","left":319.71,"top":34.71,"width":50.76,"height":50.76,"fill":"rgba(255,0,0,0)","stroke":"#FF0000","strokeWidth":2,"strokeDashArray":null,"strokeLineCap":"butt","strokeDashOffset":0,"strokeLineJoin":"miter","strokeMiterLimit":4,"scaleX":1,"scaleY":1,"angle":0,"flipX":false,"flipY":false,"opacity":1,"shadow":null,"visible":true,"clipTo":null,"backgroundColor":"","fillRule":"nonzero","paintFirst":"fill","globalCompositeOperation":"source-over","transformMatrix":null,"skewX":0,"skewY":0,"rx":0,"ry":0}],"height":402,"width":600} | ||
}} | }} | ||
{{Tuto Step | {{Tuto Step | ||
| Ligne 37 : | Ligne 47 : | ||
{{Notes}} | {{Notes}} | ||
{{PageLang | {{PageLang | ||
| + | |Language=en | ||
|SourceLanguage=none | |SourceLanguage=none | ||
|IsTranslation=0 | |IsTranslation=0 | ||
| − | |||
}} | }} | ||
{{Tuto Status | {{Tuto Status | ||
|Complete=Draft | |Complete=Draft | ||
}} | }} | ||
Version actuelle datée du 3 mars 2021 à 10:25
How to correctly shut down the Stuga Autocut
Difficulté
Très facile
Durée
2 minute(s)
Étape 1 - Ensure cutting has finished and machine is initialised
If the machine estop circuit has been broken (eg machine has just been cleaned), the system needs to reinitialise back to datum before the shutdown procedure will work correctly
- Ensure estop circuit is reset
- Press start to initialise
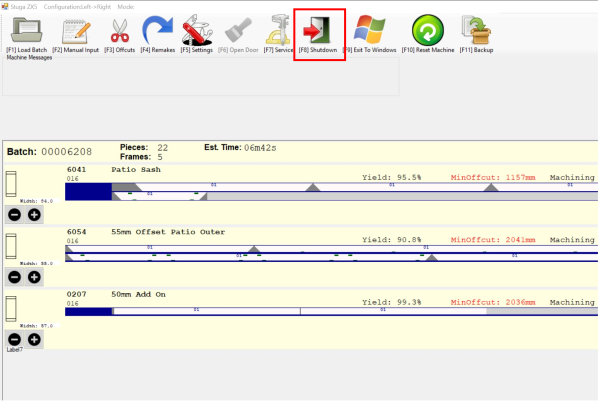
Étape 2 - Press [F8] Shutdown
When prompted press 'Yes' to confirm you are wanting to shutdown the machine
The software will now automatically close, windows will also start to shutdown. You may have to wait up to 60 seconds until the PC is shutdown.
Étape 3 - Power Off
Once you have a black screen with a small blue text box in the middle you are safe to press the physical red 'POWER OFF' button on the console.
Étape 4 - Isolator Off
Now turn the console isolator anti-clockwise to the off position
Draft


 Français
 English
 Deutsch
 Español
 Italiano
 Português