| [version en cours de rédaction] | [version en cours de rédaction] |
| (2 révisions intermédiaires par le même utilisateur non affichées) | |||
| Ligne 1 : | Ligne 1 : | ||
{{Tuto Details | {{Tuto Details | ||
|Main_Picture=Omron_E5CVS_PV_Shift_E5CSV.png | |Main_Picture=Omron_E5CVS_PV_Shift_E5CSV.png | ||
| − | |Main_Picture_annotation={"version":"2.4.6","objects":[{"type":"image","version":"2.4.6","originX":"left","originY":"top","left": | + | |Main_Picture_annotation={"version":"2.4.6","objects":[{"type":"image","version":"2.4.6","originX":"left","originY":"top","left":74,"top":-32,"width":605,"height":804,"fill":"rgb(0,0,0)","stroke":null,"strokeWidth":0,"strokeDashArray":null,"strokeLineCap":"butt","strokeDashOffset":0,"strokeLineJoin":"miter","strokeMiterLimit":4,"scaleX":0.76,"scaleY":0.76,"angle":0,"flipX":false,"flipY":false,"opacity":1,"shadow":null,"visible":true,"clipTo":null,"backgroundColor":"","fillRule":"nonzero","paintFirst":"fill","globalCompositeOperation":"source-over","transformMatrix":null,"skewX":0,"skewY":0,"crossOrigin":"","cropX":0,"cropY":0,"src":"https://stuga.dokit.app/images/2/29/Omron_E5CVS_PV_Shift_E5CSV.png","filters":[]}],"height":450.2189781021898,"width":600} |
|Description=<translate>The Purpose of the PV Shift is to make the temp controller as accurate as you can to the plate temperature.</translate> | |Description=<translate>The Purpose of the PV Shift is to make the temp controller as accurate as you can to the plate temperature.</translate> | ||
|Categories=Maintenance, Operation | |Categories=Maintenance, Operation | ||
| Ligne 9 : | Ligne 9 : | ||
}} | }} | ||
{{Introduction | {{Introduction | ||
| − | |Introduction=<translate>{{#annotatedImageLight:Fichier:Omron E5CVS PV Shift E5CSVJPG.JPG|0= | + | |Introduction=<translate>{{#annotatedImageLight:Fichier:Omron E5CVS PV Shift E5CSVJPG.JPG|0=600px|hash=70172f9505624a139a6dbb051eeb6aae|jsondata={"version":"2.4.6","objects":[{"type":"image","version":"2.4.6","originX":"left","originY":"top","left":-57,"top":-111,"width":1521,"height":1306,"fill":"rgb(0,0,0)","stroke":null,"strokeWidth":0,"strokeDashArray":null,"strokeLineCap":"butt","strokeDashOffset":0,"strokeLineJoin":"miter","strokeMiterLimit":4,"scaleX":0.59,"scaleY":0.59,"angle":0,"flipX":false,"flipY":false,"opacity":1,"shadow":null,"visible":true,"clipTo":null,"backgroundColor":"","fillRule":"nonzero","paintFirst":"fill","globalCompositeOperation":"source-over","transformMatrix":null,"skewX":0,"skewY":0,"crossOrigin":"","cropX":0,"cropY":0,"src":"https://stuga.dokit.app/images/3/3e/Omron_E5CVS_PV_Shift_E5CSVJPG.JPG","filters":[]}],"height":638.3202099737533,"width":800}|mediaClass=Image|type=frameless|alt=Omron E5CVS PV Shift E5CSVJPG.JPG|align=center|src=/images/thumb/3/3e/Omron_E5CVS_PV_Shift_E5CSVJPG.JPG/ia-70172f9505624a139a6dbb051eeb6aae-px-Omron_E5CVS_PV_Shift_E5CSVJPG.JPG.png|href=./Fichier:Omron E5CVS PV Shift E5CSVJPG.JPG|resource=./Fichier:Omron E5CVS PV Shift E5CSVJPG.JPG|caption=|size=600px}}<br /></translate> |
}} | }} | ||
{{Materials}} | {{Materials}} | ||
| Ligne 20 : | Ligne 20 : | ||
| − | {{#annotatedImageLight:Fichier:Omron E5CVS PV Shift Mode key.jpg|0= | + | {{#annotatedImageLight:Fichier:Omron E5CVS PV Shift Mode key.jpg|0=400px|hash=|jsondata=|mediaClass=Image|type=frameless|alt=Omron E5CVS PV Shift Mode key.jpg|align=center|src=https://stuga.dokit.app/images/0/0d/Omron_E5CVS_PV_Shift_Mode_key.jpg|href=./Fichier:Omron E5CVS PV Shift Mode key.jpg|resource=./Fichier:Omron E5CVS PV Shift Mode key.jpg|caption=|size=400px}}<br /></translate> |
|Step_Picture_00=Omron_E5CVS_PV_Shift_E5CSV_OPERATION.JPG | |Step_Picture_00=Omron_E5CVS_PV_Shift_E5CSV_OPERATION.JPG | ||
}} | }} | ||
{{Tuto Step | {{Tuto Step | ||
|Step_Title=<translate>Checking if Input shift is ON.</translate> | |Step_Title=<translate>Checking if Input shift is ON.</translate> | ||
| − | |Step_Content=<translate>{{#annotatedImageLight:Fichier:Omron E5CVS PV Shift Setting input shift.jpg|0= | + | |Step_Content=<translate>{{#annotatedImageLight:Fichier:Omron E5CVS PV Shift Setting input shift.jpg|0=400px|hash=|jsondata=|mediaClass=Image|type=frameless|alt=Omron E5CVS PV Shift Setting input shift.jpg|align=center|src=https://stuga.dokit.app/images/b/b9/Omron_E5CVS_PV_Shift_Setting_input_shift.jpg|href=./Fichier:Omron E5CVS PV Shift Setting input shift.jpg|resource=./Fichier:Omron E5CVS PV Shift Setting input shift.jpg|caption=|size=400px}}<br /></translate> |
|Step_Picture_00=Omron_E5CVS_PV_Shift_Setting_input_shift.jpg | |Step_Picture_00=Omron_E5CVS_PV_Shift_Setting_input_shift.jpg | ||
}} | }} | ||
| Ligne 38 : | Ligne 38 : | ||
{{Tuto Step | {{Tuto Step | ||
|Step_Title=<translate>Checking Protection button is not locked. Dip Switch P</translate> | |Step_Title=<translate>Checking Protection button is not locked. Dip Switch P</translate> | ||
| − | |Step_Content=<translate>{{#annotatedImageLight:Fichier:Omron E5CVS PV Shift Protect switch key.jpg|0= | + | |Step_Content=<translate>{{#annotatedImageLight:Fichier:Omron E5CVS PV Shift Protect switch key.jpg|0=400px|hash=f76f31750487f3485302a0d595d5e4ed|jsondata={"version":"2.4.6","objects":[{"type":"image","version":"2.4.6","originX":"left","originY":"top","left":-16,"top":2,"width":459,"height":410,"fill":"rgb(0,0,0)","stroke":null,"strokeWidth":0,"strokeDashArray":null,"strokeLineCap":"butt","strokeDashOffset":0,"strokeLineJoin":"miter","strokeMiterLimit":4,"scaleX":1.04,"scaleY":1.04,"angle":0,"flipX":false,"flipY":false,"opacity":1,"shadow":null,"visible":true,"clipTo":null,"backgroundColor":"","fillRule":"nonzero","paintFirst":"fill","globalCompositeOperation":"source-over","transformMatrix":null,"skewX":0,"skewY":0,"crossOrigin":"","cropX":0,"cropY":0,"src":"https://stuga.dokit.app/images/0/03/Omron_E5CVS_PV_Shift_Protect_switch_key.jpg","filters":[]}],"height":423.2047116165719,"width":459}|mediaClass=Image|type=frameless|alt=Omron E5CVS PV Shift Protect switch key.jpg|align=center|src=/images/thumb/0/03/Omron_E5CVS_PV_Shift_Protect_switch_key.jpg/ia-f76f31750487f3485302a0d595d5e4ed-px-Omron_E5CVS_PV_Shift_Protect_switch_key.jpg.png|href=./Fichier:Omron E5CVS PV Shift Protect switch key.jpg|resource=./Fichier:Omron E5CVS PV Shift Protect switch key.jpg|caption=|size=400px}}<br /></translate> |
|Step_Picture_00=Omron_E5CVS_PV_Shift_Protect_switch.JPG | |Step_Picture_00=Omron_E5CVS_PV_Shift_Protect_switch.JPG | ||
}} | }} | ||
| Ligne 49 : | Ligne 49 : | ||
|Step_Picture_01=Omron_E5CVS_PV_Shift_Virtual_temp_2.jpg | |Step_Picture_01=Omron_E5CVS_PV_Shift_Virtual_temp_2.jpg | ||
|Step_Picture_02=Omron_E5CVS_PV_Shift_Virtual_temp_3.jpg | |Step_Picture_02=Omron_E5CVS_PV_Shift_Virtual_temp_3.jpg | ||
| + | }} | ||
| + | {{Tuto Step | ||
| + | |Step_Title=<translate>Where to Measure the Welding Plate.</translate> | ||
| + | |Step_Content=<translate>Most Machine Manufactures suggest the Measuring is done by a Probe and is in Measured in the main area of the welder plate where profile is used. | ||
| + | |||
| + | Also with no Teflon fitted . | ||
| + | |||
| + | <br /></translate> | ||
| + | |Step_Picture_00=Omron_E5CVS_PV_Shift_20230901_075328_resized.jpg | ||
| + | |Step_Picture_01=Omron_E5CVS_PV_Shift_20230901_075356_resized.jpg | ||
| + | |Step_Picture_02=Omron_E5CVS_PV_Shift_20230901_075002_resized.jpg | ||
| + | |Step_Picture_03=Omron_E5CVS_PV_Shift_20230901_074951_resized.jpg | ||
}} | }} | ||
{{Notes}} | {{Notes}} | ||
| Ligne 57 : | Ligne 69 : | ||
}} | }} | ||
{{Tuto Status | {{Tuto Status | ||
| − | |Complete= | + | |Complete=Published |
}} | }} | ||
Version actuelle datée du 22 septembre 2023 à 10:18
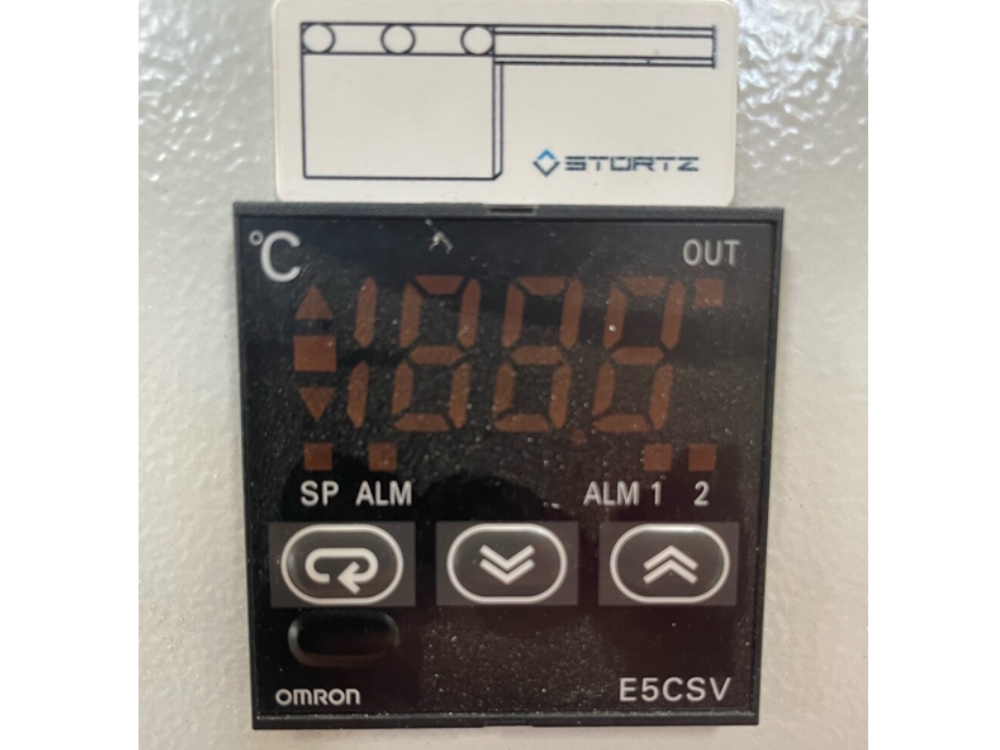
The Purpose of the PV Shift is to make the temp controller as accurate as you can to the plate temperature.

Difficulté
Facile
Durée
10 minute(s)
Sommaire
- 1 Introduction
- 2 Étape 1 - Unit Operation
- 3 Étape 2 - Checking if Input shift is ON.
- 4 Étape 3 - Adjust Shift value until Temperature at Plate is same as on Display
- 5 Étape 4 - Checking Protection button is not locked. Dip Switch P
- 6 Étape 5 - Virtual Temp Controllers - Newer Machines (SWC) 7735
- 7 Étape 6 - Where to Measure the Welding Plate.
- 8 Commentaires
Introduction
Utiliser des vêtements de protection pour les mains
Avertissement pour surface chaude
Étape 1 - Unit Operation
Using the Mode switch step through until you reach


Étape 2 - Checking if Input shift is ON.

Étape 3 - Adjust Shift value until Temperature at Plate is same as on Display
H0 = No offset. Temp at Plate =230 degrees - Display on E5CSV = 240 Degrees
L10 = - 10 degree. Temp at plate = 230 degrees - Display E5CSV = 230 Degrees
H10 = +10 degree . Temp at plate = 230 degrees - Display E5CSV = 250 Degrees
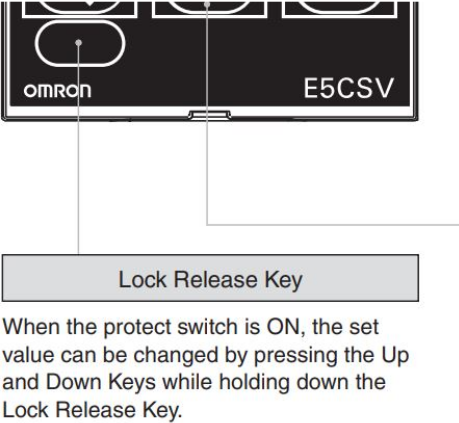
Étape 4 - Checking Protection button is not locked. Dip Switch P

Étape 5 - Virtual Temp Controllers - Newer Machines (SWC) 7735
Log in as a High level
Find on HDMI the App Temp controller


Étape 6 - Where to Measure the Welding Plate.
Most Machine Manufactures suggest the Measuring is done by a Probe and is in Measured in the main area of the welder plate where profile is used.
Also with no Teflon fitted .


Published
 Français
 English
 Deutsch
 Español
 Italiano
 Português