| [version en cours de rédaction] | [version en cours de rédaction] |
| Ligne 10 : | Ligne 10 : | ||
}} | }} | ||
{{Introduction | {{Introduction | ||
| − | |Introduction=<translate> | + | |Introduction=<translate>Update 2024 - Upgrades now consist of a new Windows 11 PC with VM for the front end and a C6017 PC for the back end. |
| − | + | Upgrading an Autoflow to Windows 10 involves upgrading two PCS | |
| − | |||
| + | #The Beckhoff control PC - replaced with a C0001225-KIT | ||
| + | #The Camera PC - replaced with a C0000422-KIT with a VM setup. this now becomes the front end PC | ||
| − | + | <br /> | |
| − | + | === For Historical reference, these are the pre-2024 notes: === | |
| + | ''Upgrading an Autoflow to Windows 10 on site involves upgrading two PCS'' | ||
| − | + | #''The Beckhoff control PC'' | |
| + | #''The Camera PC'' | ||
| − | * The Beckhoff PC is now powerful enough to run the front end and back end. | + | ''<br /> |
| − | * The camera PC is there to replace the camera PC on site and contains the storage for the machine cameras | + | The Beckhoff PC is not upgradable so needs to be completely replaced. We use the miniature [https://www.beckhoff.com/english.asp?industrial_pc/c6017.htm Beckhoff C6017] for this'' |
| − | * Because the Beckhoff PC has limited hard drive space, the DDRIVE will be on the cameraPC | + | |
| + | ''It is not cost effective to upgrade and old camera PC, so a new one is supplied'' | ||
| + | |||
| + | ===''Notes''=== | ||
| + | |||
| + | *''The Beckhoff PC is now powerful enough to run the front end and back end.'' | ||
| + | *''The camera PC is there to replace the camera PC on site and contains the storage for the machine cameras'' | ||
| + | *''Because the Beckhoff PC has limited hard drive space, the DDRIVE will be on the cameraPC''</translate> | ||
}} | }} | ||
{{Materials}} | {{Materials}} | ||
{{EPI}} | {{EPI}} | ||
{{Tuto Step | {{Tuto Step | ||
| − | |Step_Title=<translate>Set up the | + | |Step_Title=<translate>Set up the 6015 PC</translate> |
|Step_Content=<translate>*Ensure regional settings correct - correct date format | |Step_Content=<translate>*Ensure regional settings correct - correct date format | ||
*Rename the Ethernet Adaptors to Ethernet and EtherCAT | *Rename the Ethernet Adaptors to Ethernet and EtherCAT | ||
| Ligne 39 : | Ligne 49 : | ||
}} | }} | ||
{{Tuto Step | {{Tuto Step | ||
| − | |Step_Title=<translate>Set | + | |Step_Title=<translate>Set Up VM PC ready for project</translate> |
| − | |Step_Content=<translate>Follow standard [https://stuga.dokit.app/wiki/Create_a_TwinCAT_Project_from_Scratch Setup procedure] to step 5 to ensure sourcetree installed with latest tc3Multi software pulled to machine | + | |Step_Content=<translate>Follow standard [https://stuga.dokit.app/wiki/Create_a_TwinCAT_Project_from_Scratch Setup procedure] to step 5 to ensure sourcetree installed with latest tc3Multi software pulled to machine</translate> |
| − | |||
| − | |||
}} | }} | ||
{{Tuto Step | {{Tuto Step | ||
| − | |Step_Title=<translate> | + | |Step_Title=<translate>Set up Front End PC</translate> |
| − | |Step_Content=<translate> | + | |Step_Content=<translate></translate> |
| − | |||
| − | |||
}} | }} | ||
{{Tuto Step | {{Tuto Step | ||
|Step_Title=<translate>Convert the TC2 project from old machine</translate> | |Step_Title=<translate>Convert the TC2 project from old machine</translate> | ||
| − | |Step_Content=<translate>[https://stuga.dokit.app/wiki/Convert_Autoflow_TC2_Project_to_TC3 Follow this procedure] to convert the project | + | |Step_Content=<translate>[https://stuga.dokit.app/wiki/Convert_Autoflow_TC2_Project_to_TC3 Follow this procedure] to convert the project |
Map the Saw On, Conveyor and extractor as outputs rather than invertergofwd links (outputs 97 and 98) | Map the Saw On, Conveyor and extractor as outputs rather than invertergofwd links (outputs 97 and 98) | ||
| + | |||
| + | '''''[ASK GG if not clear on this - it is confusing}''''' | ||
Ensure the PLC projects are in the correct ports | Ensure the PLC projects are in the correct ports | ||
| Ligne 65 : | Ligne 73 : | ||
{{Tuto Step | {{Tuto Step | ||
|Step_Title=<translate>Install the new PCs on site</translate> | |Step_Title=<translate>Install the new PCs on site</translate> | ||
| − | |Step_Content=<translate>* Ensure the | + | |Step_Content=<translate>*Ensure the 6015 PC has been earthed adequately</translate> |
}} | }} | ||
{{Tuto Step | {{Tuto Step | ||
Version actuelle datée du 9 février 2024 à 13:23
Steps to upgrading an Autoflow to Windows 10, replacing both the front end and back end PCs

Difficulté
Difficile
Durée
1 jour(s)
Sommaire
- 1 Introduction
- 2 Étape 1 - Set up the 6015 PC
- 3 Étape 2 - Set Up VM PC ready for project
- 4 Étape 3 - Set up Front End PC
- 5 Étape 4 - Convert the TC2 project from old machine
- 6 Étape 5 - Install the new PCs on site
- 7 Étape 6 - Set up the IP addresses
- 8 Étape 7 - Test all IO
- 9 Étape 8 - Test axis directions
- 10 Étape 9 - Test axis Datuming
- 11 Étape 10 - Check Spindles and alarms
- 12 Étape 11 - Important parameters
- 13 Étape 12 - Check cut speeds
- 14 Commentaires
Introduction
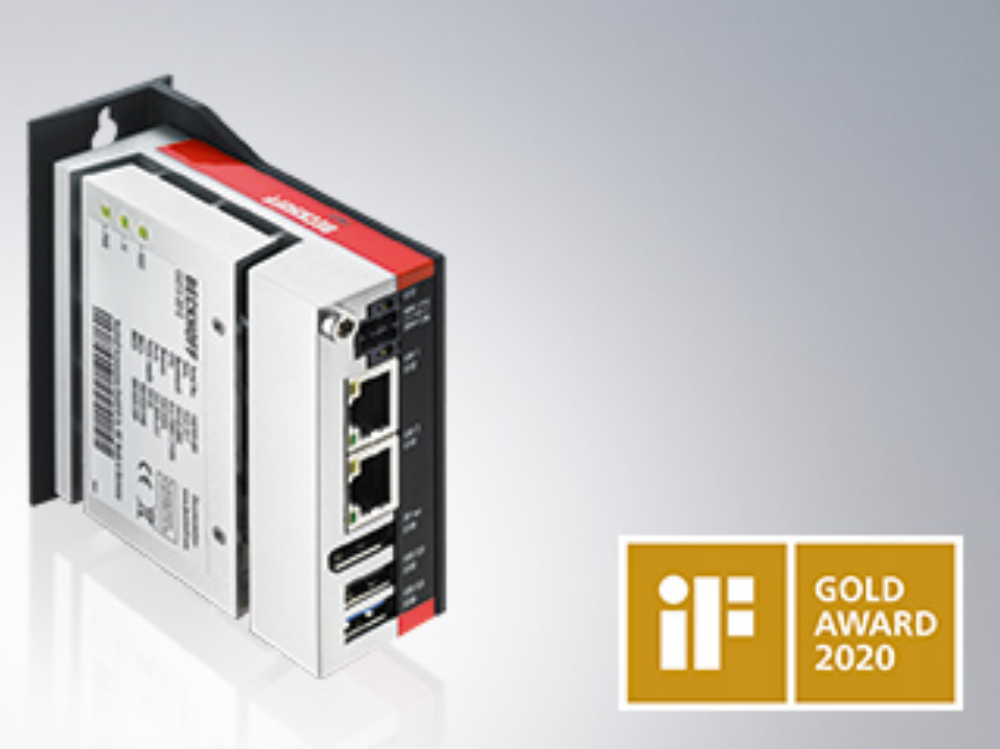
Update 2024 - Upgrades now consist of a new Windows 11 PC with VM for the front end and a C6017 PC for the back end.
Upgrading an Autoflow to Windows 10 involves upgrading two PCS
- The Beckhoff control PC - replaced with a C0001225-KIT
- The Camera PC - replaced with a C0000422-KIT with a VM setup. this now becomes the front end PC
For Historical reference, these are the pre-2024 notes:
Upgrading an Autoflow to Windows 10 on site involves upgrading two PCS
- The Beckhoff control PC
- The Camera PC
The Beckhoff PC is not upgradable so needs to be completely replaced. We use the miniature Beckhoff C6017 for this
It is not cost effective to upgrade and old camera PC, so a new one is supplied
Notes
- The Beckhoff PC is now powerful enough to run the front end and back end.
- The camera PC is there to replace the camera PC on site and contains the storage for the machine cameras
- Because the Beckhoff PC has limited hard drive space, the DDRIVE will be on the cameraPC
Étape 1 - Set up the 6015 PC
- Ensure regional settings correct - correct date format
- Rename the Ethernet Adaptors to Ethernet and EtherCAT
- Ensure the TwinCAT Protocol is installed on the EtherCAT adaptor
- Teamviewer setup
- Administrator password set to "Stuga001"
- Add Stuga desktop image
- Latest winMulti in c:\multi
Étape 2 - Set Up VM PC ready for project
Follow standard Setup procedure to step 5 to ensure sourcetree installed with latest tc3Multi software pulled to machine
Étape 3 - Set up Front End PC
Étape 4 - Convert the TC2 project from old machine
Follow this procedure to convert the project
Map the Saw On, Conveyor and extractor as outputs rather than invertergofwd links (outputs 97 and 98)
[ASK GG if not clear on this - it is confusing}
Ensure the PLC projects are in the correct ports
851- tc3multi
852 - PLC_Reset
Étape 5 - Install the new PCs on site
- Ensure the 6015 PC has been earthed adequately
Étape 6 - Set up the IP addresses
Map the network drives
Map customer network connections
Étape 7 - Test all IO
This is important to ensure there have been no mistakes in the remapping
Étape 8 - Test axis directions
Étape 9 - Test axis Datuming
Étape 10 - Check Spindles and alarms
Check inverter is wired so that OK=high on X90
Check alarms trigger on low signal on inverter ok
Check 50Hz and 300Hz spindles function correctly from SpindleIO screen
Étape 11 - Important parameters
Ensure:
autoQueue=1
sawSYType=1
allWasteAtStart=1
throwaway=230
throwawayChunkSize=120
throwawayMaxChunk=100
throwawayMinChunk=100
throwawayEjectAtStart=1
storeOffcuts=0
Étape 12 - Check cut speeds
The software highlighted a bug in the calculation for the saw cutting speed which has now been corrected. Saw cut speeds should be checked if they are not default.
Draft
 Français
 English
 Deutsch
 Español
 Italiano
 Português