| [version en cours de rédaction] | [version en cours de rédaction] |
| Ligne 4 : | Ligne 4 : | ||
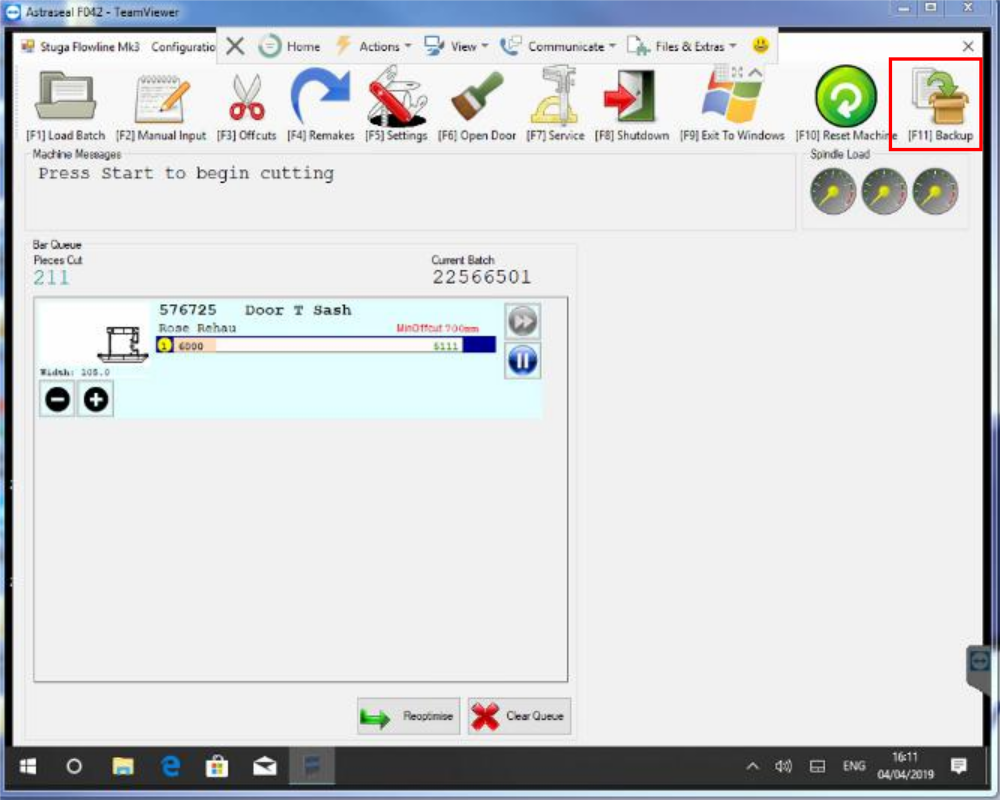
|Description=<translate>A backup zip folder of all necessary files can be created in WinMulti. By pressing the backup button (F11) and navigating to the backup’s folder (C:\multi\backup) a machine backup will be created.</translate> | |Description=<translate>A backup zip folder of all necessary files can be created in WinMulti. By pressing the backup button (F11) and navigating to the backup’s folder (C:\multi\backup) a machine backup will be created.</translate> | ||
|Categories=Software | |Categories=Software | ||
| − | |Difficulty= | + | |Difficulty=Very easy |
|Duration=10 | |Duration=10 | ||
|Duration-type=minute(s) | |Duration-type=minute(s) | ||
| Ligne 18 : | Ligne 18 : | ||
|Step_Content=<translate>Press on the “Backup” button on WinMulti</translate> | |Step_Content=<translate>Press on the “Backup” button on WinMulti</translate> | ||
|Step_Picture_00=TB0436_Creating_a_Backup_Through_WinMulti_0436_01.jpg | |Step_Picture_00=TB0436_Creating_a_Backup_Through_WinMulti_0436_01.jpg | ||
| + | |Step_Picture_00_annotation={"version":"2.4.6","objects":[{"type":"image","version":"2.4.6","originX":"left","originY":"top","left":0,"top":0,"width":667,"height":534,"fill":"rgb(0,0,0)","stroke":null,"strokeWidth":0,"strokeDashArray":null,"strokeLineCap":"butt","strokeDashOffset":0,"strokeLineJoin":"miter","strokeMiterLimit":4,"scaleX":0.9,"scaleY":0.9,"angle":0,"flipX":false,"flipY":false,"opacity":1,"shadow":null,"visible":true,"clipTo":null,"backgroundColor":"","fillRule":"nonzero","paintFirst":"fill","globalCompositeOperation":"source-over","transformMatrix":null,"skewX":0,"skewY":0,"crossOrigin":"","cropX":0,"cropY":0,"src":"https://stuga.dokit.app/images/5/50/TB0436_Creating_a_Backup_Through_WinMulti_0436_01.jpg","filters":[]},{"type":"wfrect","version":"2.4.6","originX":"center","originY":"center","left":561.43,"top":62.57,"width":54.33,"height":54.33,"fill":"rgba(255,0,0,0)","stroke":"#FF0000","strokeWidth":2,"strokeDashArray":null,"strokeLineCap":"butt","strokeDashOffset":0,"strokeLineJoin":"miter","strokeMiterLimit":4,"scaleX":1,"scaleY":1,"angle":0,"flipX":false,"flipY":false,"opacity":1,"shadow":null,"visible":true,"clipTo":null,"backgroundColor":"","fillRule":"nonzero","paintFirst":"fill","globalCompositeOperation":"source-over","transformMatrix":null,"skewX":0,"skewY":0,"rx":0,"ry":0}],"height":480,"width":600} | ||
|Step_Picture_01=TB0436_Creating_a_Backup_Through_WinMulti_0436_02.jpg | |Step_Picture_01=TB0436_Creating_a_Backup_Through_WinMulti_0436_02.jpg | ||
}} | }} | ||
Version actuelle datée du 28 février 2020 à 18:41
A backup zip folder of all necessary files can be created in WinMulti. By pressing the backup button (F11) and navigating to the backup’s folder (C:\multi\backup) a machine backup will be created.

Difficulté
Très facile
Durée
10 minute(s)
Introduction
A backup zip folder of all necessary files can be created in WinMulti. By pressing the backup button (F11) and navigating to the backup’s folder (C:\multi\backup) a machine backup will be created.
Étape 1 - Press Backup button
Press on the “Backup” button on WinMulti

Most Stuga machines have a backup folder, but it is more secure if you backup to another device, e.g.a memory stick
To locate to the standard Stuga backup folder:
- Navigate to “Local Disk (C:)”
- Open the “multi” folder.
- Select the “backup” folder and press ok.


Étape 3 - .zip created
.zip file has been created


Draft
 Français
 English
 Deutsch
 Español
 Italiano
 Português