| [version en cours de rédaction] | [version en cours de rédaction] |
(Page créée avec « {{Tuto Details |Main_Picture=Setting_Up_New_Printer_-_GX420d_zebra_gx420d_1PSP_copy_large.jpg |Main_Picture_annotation={"version":"2.4.6","objects":[{"type":"image","versi... ») |
|||
| Ligne 19 : | Ligne 19 : | ||
|Step_Picture_00=Setting_Up_New_Printer_-_GX420d_1449783222550.jpg | |Step_Picture_00=Setting_Up_New_Printer_-_GX420d_1449783222550.jpg | ||
|Step_Picture_00_annotation={"version":"2.4.6","objects":[{"type":"image","version":"2.4.6","originX":"left","originY":"top","left":-434,"top":17,"width":1280,"height":455,"fill":"rgb(0,0,0)","stroke":null,"strokeWidth":0,"strokeDashArray":null,"strokeLineCap":"butt","strokeDashOffset":0,"strokeLineJoin":"miter","strokeMiterLimit":4,"scaleX":0.91,"scaleY":0.91,"angle":0,"flipX":false,"flipY":false,"opacity":1,"shadow":null,"visible":true,"clipTo":null,"backgroundColor":"","fillRule":"nonzero","paintFirst":"fill","globalCompositeOperation":"source-over","transformMatrix":null,"skewX":0,"skewY":0,"crossOrigin":"","cropX":0,"cropY":0,"src":"https://stuga.dokit.app/images/9/9e/Setting_Up_New_Printer_-_GX420d_1449783222550.jpg","filters":[]},{"type":"wfarrow2line","version":"2.4.6","originX":"center","originY":"center","left":277,"top":208,"width":454,"height":316,"fill":"rgba(255,0,0,0)","stroke":"#FF0000","strokeWidth":4,"strokeDashArray":null,"strokeLineCap":"round","strokeDashOffset":0,"strokeLineJoin":"miter","strokeMiterLimit":4,"scaleX":1,"scaleY":1,"angle":0,"flipX":false,"flipY":false,"opacity":1,"shadow":null,"visible":true,"clipTo":null,"backgroundColor":"","fillRule":"nonzero","paintFirst":"fill","globalCompositeOperation":"source-over","transformMatrix":null,"skewX":0,"skewY":0,"x1":-227,"x2":227,"y1":-158,"y2":158,"x2a":215.15505506511855,"y2a":140.00841086814103,"x2b":206.01463357690724,"y2b":153.1405354113307},{"type":"wfarrow2circle","version":"2.4.6","originX":"center","originY":"center","left":50,"top":50,"width":16,"height":16,"fill":"#aaa","stroke":"#666","strokeWidth":0,"strokeDashArray":null,"strokeLineCap":"butt","strokeDashOffset":0,"strokeLineJoin":"miter","strokeMiterLimit":4,"scaleX":1,"scaleY":1,"angle":0,"flipX":false,"flipY":false,"opacity":0.5,"shadow":null,"visible":true,"clipTo":null,"backgroundColor":"","fillRule":"nonzero","paintFirst":"fill","globalCompositeOperation":"source-over","transformMatrix":null,"skewX":0,"skewY":0,"radius":8,"startAngle":0,"endAngle":6.283185307179586},{"type":"wfarrow2circle","version":"2.4.6","originX":"center","originY":"center","left":504,"top":366,"width":16,"height":16,"fill":"#aaa","stroke":"#666","strokeWidth":0,"strokeDashArray":null,"strokeLineCap":"butt","strokeDashOffset":0,"strokeLineJoin":"miter","strokeMiterLimit":4,"scaleX":1,"scaleY":1,"angle":0,"flipX":false,"flipY":false,"opacity":0.5,"shadow":null,"visible":true,"clipTo":null,"backgroundColor":"","fillRule":"nonzero","paintFirst":"fill","globalCompositeOperation":"source-over","transformMatrix":null,"skewX":0,"skewY":0,"radius":8,"startAngle":0,"endAngle":6.283185307179586}],"height":450,"width":600} | |Step_Picture_00_annotation={"version":"2.4.6","objects":[{"type":"image","version":"2.4.6","originX":"left","originY":"top","left":-434,"top":17,"width":1280,"height":455,"fill":"rgb(0,0,0)","stroke":null,"strokeWidth":0,"strokeDashArray":null,"strokeLineCap":"butt","strokeDashOffset":0,"strokeLineJoin":"miter","strokeMiterLimit":4,"scaleX":0.91,"scaleY":0.91,"angle":0,"flipX":false,"flipY":false,"opacity":1,"shadow":null,"visible":true,"clipTo":null,"backgroundColor":"","fillRule":"nonzero","paintFirst":"fill","globalCompositeOperation":"source-over","transformMatrix":null,"skewX":0,"skewY":0,"crossOrigin":"","cropX":0,"cropY":0,"src":"https://stuga.dokit.app/images/9/9e/Setting_Up_New_Printer_-_GX420d_1449783222550.jpg","filters":[]},{"type":"wfarrow2line","version":"2.4.6","originX":"center","originY":"center","left":277,"top":208,"width":454,"height":316,"fill":"rgba(255,0,0,0)","stroke":"#FF0000","strokeWidth":4,"strokeDashArray":null,"strokeLineCap":"round","strokeDashOffset":0,"strokeLineJoin":"miter","strokeMiterLimit":4,"scaleX":1,"scaleY":1,"angle":0,"flipX":false,"flipY":false,"opacity":1,"shadow":null,"visible":true,"clipTo":null,"backgroundColor":"","fillRule":"nonzero","paintFirst":"fill","globalCompositeOperation":"source-over","transformMatrix":null,"skewX":0,"skewY":0,"x1":-227,"x2":227,"y1":-158,"y2":158,"x2a":215.15505506511855,"y2a":140.00841086814103,"x2b":206.01463357690724,"y2b":153.1405354113307},{"type":"wfarrow2circle","version":"2.4.6","originX":"center","originY":"center","left":50,"top":50,"width":16,"height":16,"fill":"#aaa","stroke":"#666","strokeWidth":0,"strokeDashArray":null,"strokeLineCap":"butt","strokeDashOffset":0,"strokeLineJoin":"miter","strokeMiterLimit":4,"scaleX":1,"scaleY":1,"angle":0,"flipX":false,"flipY":false,"opacity":0.5,"shadow":null,"visible":true,"clipTo":null,"backgroundColor":"","fillRule":"nonzero","paintFirst":"fill","globalCompositeOperation":"source-over","transformMatrix":null,"skewX":0,"skewY":0,"radius":8,"startAngle":0,"endAngle":6.283185307179586},{"type":"wfarrow2circle","version":"2.4.6","originX":"center","originY":"center","left":504,"top":366,"width":16,"height":16,"fill":"#aaa","stroke":"#666","strokeWidth":0,"strokeDashArray":null,"strokeLineCap":"butt","strokeDashOffset":0,"strokeLineJoin":"miter","strokeMiterLimit":4,"scaleX":1,"scaleY":1,"angle":0,"flipX":false,"flipY":false,"opacity":0.5,"shadow":null,"visible":true,"clipTo":null,"backgroundColor":"","fillRule":"nonzero","paintFirst":"fill","globalCompositeOperation":"source-over","transformMatrix":null,"skewX":0,"skewY":0,"radius":8,"startAngle":0,"endAngle":6.283185307179586}],"height":450,"width":600} | ||
| − | |||
| − | |||
| − | |||
| − | |||
| − | |||
| − | |||
| − | |||
| − | |||
| − | |||
| − | |||
| − | |||
| − | |||
| − | |||
| − | |||
| − | |||
| − | |||
| − | |||
| − | |||
| − | |||
| − | |||
| − | |||
| − | |||
| − | |||
| − | |||
| − | |||
| − | |||
| − | |||
| − | |||
| − | |||
| − | |||
| − | |||
| − | |||
| − | |||
| − | |||
| − | |||
| − | |||
| − | |||
| − | |||
| − | |||
| − | |||
| − | |||
| − | |||
| − | |||
| − | |||
| − | |||
| − | |||
| − | |||
| − | |||
| − | |||
| − | |||
| − | |||
| − | |||
| − | |||
| − | |||
| − | |||
| − | |||
| − | |||
| − | |||
| − | |||
| − | |||
| − | |||
| − | |||
| − | |||
| − | |||
| − | |||
| − | |||
| − | |||
| − | |||
| − | |||
| − | |||
| − | |||
| − | |||
| − | |||
}} | }} | ||
{{Tuto Step | {{Tuto Step | ||
| Ligne 164 : | Ligne 91 : | ||
{{Tuto Step | {{Tuto Step | ||
|Step_Title=<translate>Save Configuration</translate> | |Step_Title=<translate>Save Configuration</translate> | ||
| − | |Step_Content=<translate> | + | |Step_Content=<translate>From "View and Modify Printer Settings", press 'Save Current Configuration' to permanently save the changes made above. |
You can now close the browser.</translate> | You can now close the browser.</translate> | ||
| + | |Step_Picture_00=Setting_Up_New_Printer_-_GX420d_Annotation_2019-10-21_184105.jpg | ||
| + | |Step_Picture_00_annotation={"version":"2.4.6","objects":[{"type":"image","version":"2.4.6","originX":"left","originY":"top","left":0,"top":0,"width":1561,"height":995,"fill":"rgb(0,0,0)","stroke":null,"strokeWidth":0,"strokeDashArray":null,"strokeLineCap":"butt","strokeDashOffset":0,"strokeLineJoin":"miter","strokeMiterLimit":4,"scaleX":0.38,"scaleY":0.38,"angle":0,"flipX":false,"flipY":false,"opacity":1,"shadow":null,"visible":true,"clipTo":null,"backgroundColor":"","fillRule":"nonzero","paintFirst":"fill","globalCompositeOperation":"source-over","transformMatrix":null,"skewX":0,"skewY":0,"crossOrigin":"","cropX":0,"cropY":0,"src":"https://stuga.dokit.app/images/f/fa/Setting_Up_New_Printer_-_GX420d_Annotation_2019-10-21_184105.jpg","filters":[]},{"type":"wfrect","version":"2.4.6","originX":"center","originY":"center","left":299.75,"top":285.91,"width":111,"height":22.16,"fill":"rgba(255,0,0,0)","stroke":"#FF0000","strokeWidth":2,"strokeDashArray":null,"strokeLineCap":"butt","strokeDashOffset":0,"strokeLineJoin":"miter","strokeMiterLimit":4,"scaleX":1,"scaleY":1,"angle":0,"flipX":false,"flipY":false,"opacity":1,"shadow":null,"visible":true,"clipTo":null,"backgroundColor":"","fillRule":"nonzero","paintFirst":"fill","globalCompositeOperation":"source-over","transformMatrix":null,"skewX":0,"skewY":0,"rx":0,"ry":0}],"height":382,"width":600} | ||
}} | }} | ||
{{Notes}} | {{Notes}} | ||
{{PageLang | {{PageLang | ||
| + | |Language=en | ||
|SourceLanguage=none | |SourceLanguage=none | ||
|IsTranslation=0 | |IsTranslation=0 | ||
| − | |||
}} | }} | ||
{{Tuto Status | {{Tuto Status | ||
|Complete=Draft | |Complete=Draft | ||
}} | }} | ||
Version actuelle datée du 21 octobre 2019 à 19:42
This guide will take you through installing a new printer (GX420d) step-by-step:


Difficulté
Difficile
Durée
30 minute(s)
Sommaire
- 1 Introduction
- 2 Étape 1 - Plug in and Switch on
- 3 Étape 2 - Output an information Label
- 4 Étape 3 - Navigate to the Printer's Web Page
- 5 Étape 4 - Modify Settings
- 6 Étape 5 - Change Label Parameters
- 7 Étape 6 - Setup Network Parameters
- 8 Étape 7 - Setup Media Settings
- 9 Étape 8 - Calibration
- 10 Étape 9 - Save Configuration
- 11 Commentaires
Introduction
This tutorial requires a basic knowledge of IP addresses - what are they and what are they for
Étape 1 - Plug in and Switch on
Plug in the power cable and ethernet cable to the back of printer, then turn the printer on with the switch at the back.

Étape 2 - Output an information Label
Press and hold the feed button for 1 flash - this will print various printer information labels.
The second to last label out of the printer will have an IP address that has been automatically assigned - note this down

In a web browser, type in the IP address of the printer
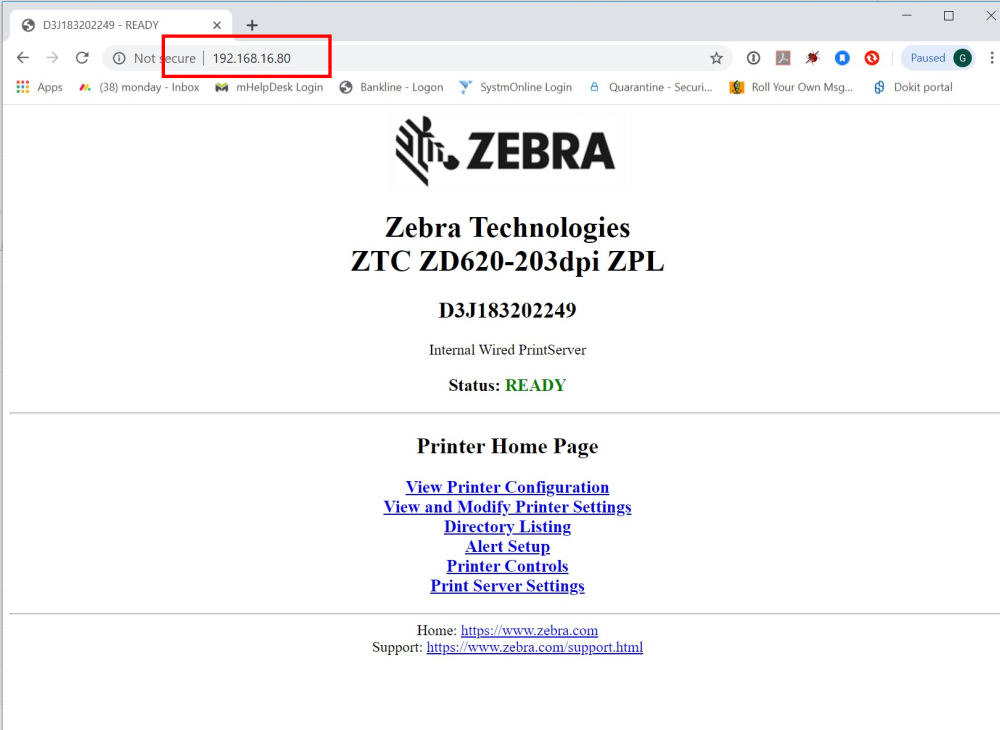
Étape 4 - Modify Settings
Press 'View and Modify Printer Settings' - you will be prompted for a password, this is '1234'.
Now press 'Submit Changes' and then click the following message to proceed - 'Access Granted. This IP Address now has admin access to the restricted printer pages. Please Click here to proceed'.

Étape 5 - Change Label Parameters
Click on 'General Setup' and change the following parameters only;
-Darkness: 30.0
-Print Mode: PEEL OFF
-Print Speed: 3 IPS
Click on 'Submit Changes' and then 'View and Modify Printer Settings' to return to the homepage.

Étape 6 - Setup Network Parameters
Click on 'Network Configuration' and then 'TCP/IP Settings' and change the following parameters only;
-IP Address: Set to the required IP address of the printer (see printerIPAddress parameter
-IP Protocol: PERMANENT
-Default Gateway: IP Address of the customer router Default Gateway
Click on 'Submit Changes' and then 'View and Modify Printer Settings' to return to the homepage.

Étape 7 - Setup Media Settings
Click on 'Media Setup' and change the following parameters only;
-Print Width: 800

Étape 8 - Calibration
Click on 'Calibration' and change the following parameters only;
Media Power Up: CALIBRATION
Head Close: FEED

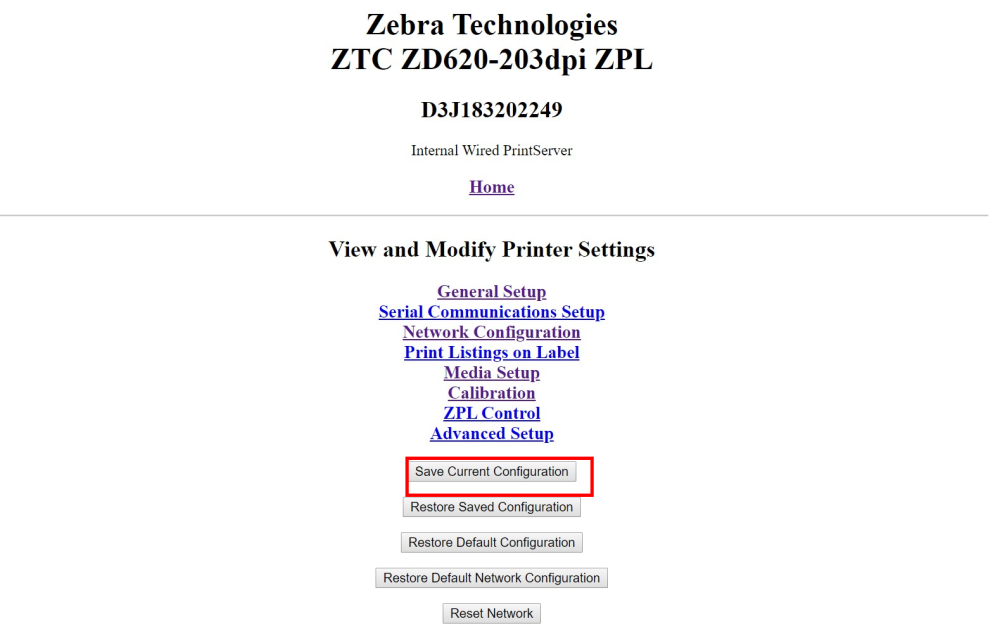
Étape 9 - Save Configuration
From "View and Modify Printer Settings", press 'Save Current Configuration' to permanently save the changes made above.
You can now close the browser.
Draft
 Français
 English
 Deutsch
 Español
 Italiano
 Português