| [version en cours de rédaction] | [version en cours de rédaction] |
| (7 révisions intermédiaires par le même utilisateur non affichées) | |||
| Ligne 5 : | Ligne 5 : | ||
|Categories=Production | |Categories=Production | ||
|Difficulty=Medium | |Difficulty=Medium | ||
| − | |Duration= | + | |Duration=2 |
|Duration-type=hour(s) | |Duration-type=hour(s) | ||
}} | }} | ||
| Ligne 58 : | Ligne 58 : | ||
P0001009 x 2 | P0001009 x 2 | ||
| − | P0001108 x | + | P0001108 x 4 |
P0001166 x 1 | P0001166 x 1 | ||
| Ligne 152 : | Ligne 152 : | ||
|Step_Content=<translate>Mount 2 off C0001018 Ethercat boxes to mounting plates D0010167 2 off using M3 x 20 Pan head fasteners</translate> | |Step_Content=<translate>Mount 2 off C0001018 Ethercat boxes to mounting plates D0010167 2 off using M3 x 20 Pan head fasteners</translate> | ||
|Step_Picture_00=R0015095_Bench_Assemble_Pneumatic_Rail_Screenshot_2023-06-13_084501.png | |Step_Picture_00=R0015095_Bench_Assemble_Pneumatic_Rail_Screenshot_2023-06-13_084501.png | ||
| + | }} | ||
| + | {{Tuto Step | ||
| + | |Step_Title=<translate>Attach trunking</translate> | ||
| + | |Step_Content=<translate>Attach a length of 75mm x 25mm trunking @ 1310mm, 120mm from non slotted end to rear of maytec and use M5 x 6 button sockets to secure | ||
| + | |||
| + | Ecr raised to add holes to maytec section on 05/09/23 | ||
| + | |||
| + | Holes will required drilling until ecr finalises | ||
| + | |||
| + | 1st m5 hole 130mm from non slotted hole end , then spaced at 250mm Drill and tap m5</translate> | ||
}} | }} | ||
{{Tuto Step | {{Tuto Step | ||
| Ligne 178 : | Ligne 188 : | ||
| − | Valve 1 and 2 secured with M4 x 40 socket caps and | + | Valve bank 1 and 2 secured with M4 x 40 socket caps and M8 motor plate washers, spaced away from maytec rail with 2 M8 washers to enable valve to sit straight |
| Ligne 192 : | Ligne 202 : | ||
{{Tuto Step | {{Tuto Step | ||
|Step_Title=<translate>Connect Air feed pipes</translate> | |Step_Title=<translate>Connect Air feed pipes</translate> | ||
| − | |Step_Content=<translate>Connect 12mm and 8mm blue air lines as shown | + | |Step_Content=<translate>Additional photo required to show additional 4th 12mm tee connection |
| + | |||
| + | Connect 12mm and 8mm blue air lines as shown | ||
| Ligne 198 : | Ligne 210 : | ||
| − | P0001108 x | + | P0001108 x 4 |
P0001166 x 1 | P0001166 x 1 | ||
Version actuelle datée du 3 avril 2024 à 12:33
Instructions to bench assemble pneumatic rail

Difficulté
Moyen
Durée
2 heure(s)
Sommaire
- 1 Introduction
- 2 Étape 1 - Unless otherwise stated
- 3 Étape 2 - Handing
- 4 Étape 3 - Assemble valve bank 1
- 5 Étape 4 - Assemble valve bank 2
- 6 Étape 5 - Assemble valve
- 7 Étape 6 - Assemble regulators
- 8 Étape 7 - Assemble Ethercat boxes
- 9 Étape 8 - Attach trunking
- 10 Étape 9 - Mount assembled components
- 11 Étape 10 - Connect Air feed pipes
- 12 Commentaires
Introduction
Tools Required
Standard spanner set
Standard hex key set
Pipe cutters
Standard screwdriver set
Parts Required
D0016300 x 1
P0001074 x 8
P0001101 x 2
P0001102 x 2
P0001071 x 1
P0001186 x 10
P0001068 x 1
P0000470 x 1
P0001040 x 2
P0000010 x 6
P00000007 x 2
P0000142 x 1
P0001008 x 2
D0010167 x 2
C0001018 x 2
P0001022 x 2
P0001009 x 2
P0001108 x 4
P0001166 x 1
P0001106 x 1
Étape 1 - Unless otherwise stated
Use Loctite 243 on all fasteners
Use Loctite 572 on all threaded pneumatic connections
Pen mark all bolts to show finalised

Étape 2 - Handing
If Machine is R to L build rail as shown
If machine is L to R build rail mirrored to layout shown
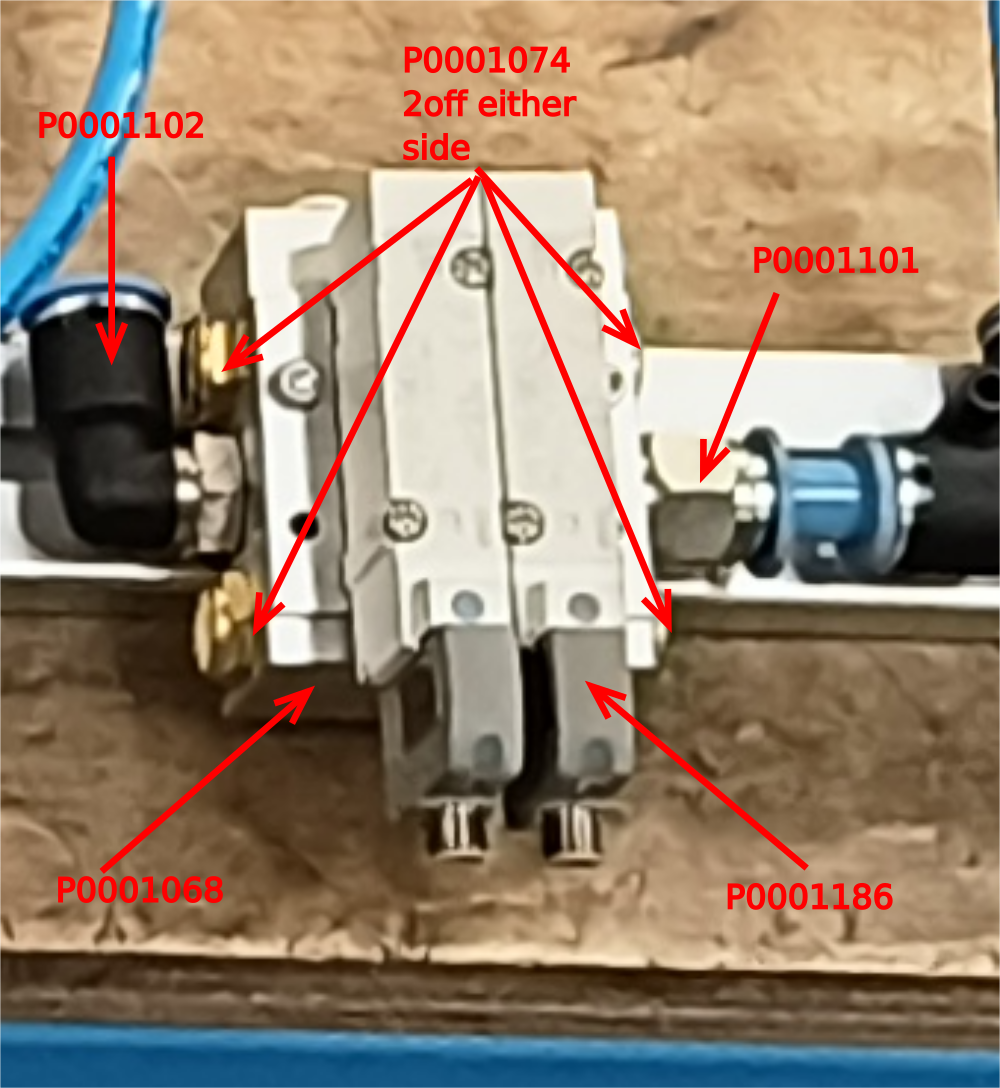
Étape 3 - Assemble valve bank 1
Assembly valve bank as shown using
P0001074 x 4
P0001101 x 1
P0001102 x 1
P0001071 x 1
P0001186 x 8
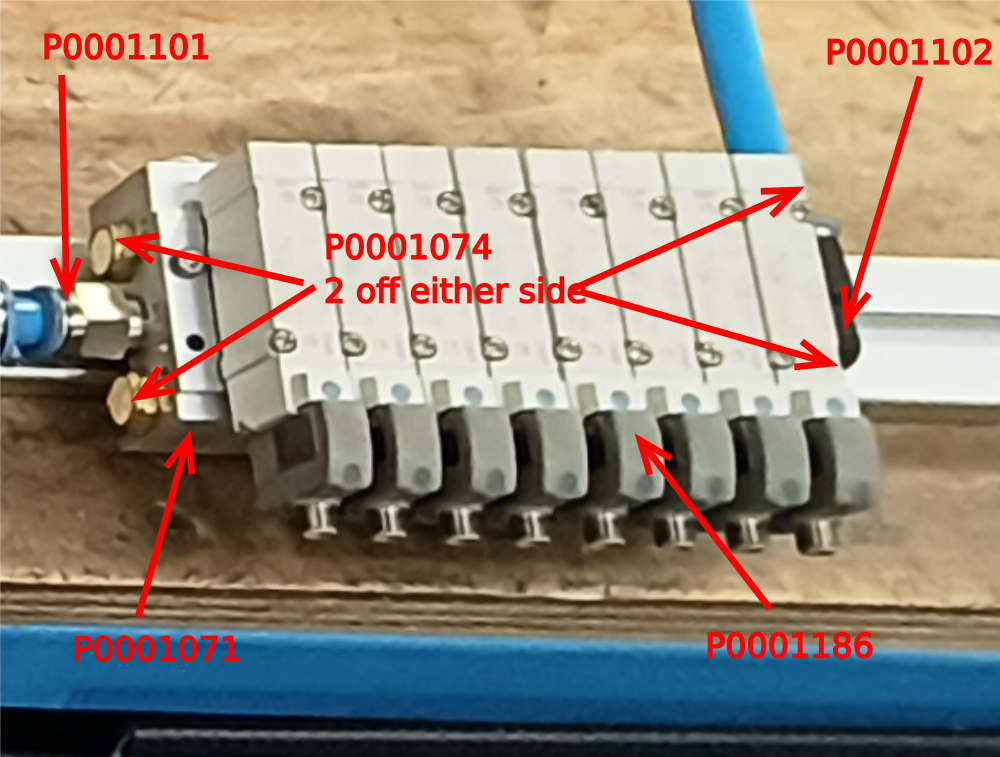
Étape 4 - Assemble valve bank 2
Assembly valve bank as shown using
P0001074 x 4
P0001101 x 1
P0001102 x 1
P0001068 x 1
P0001186 x 2

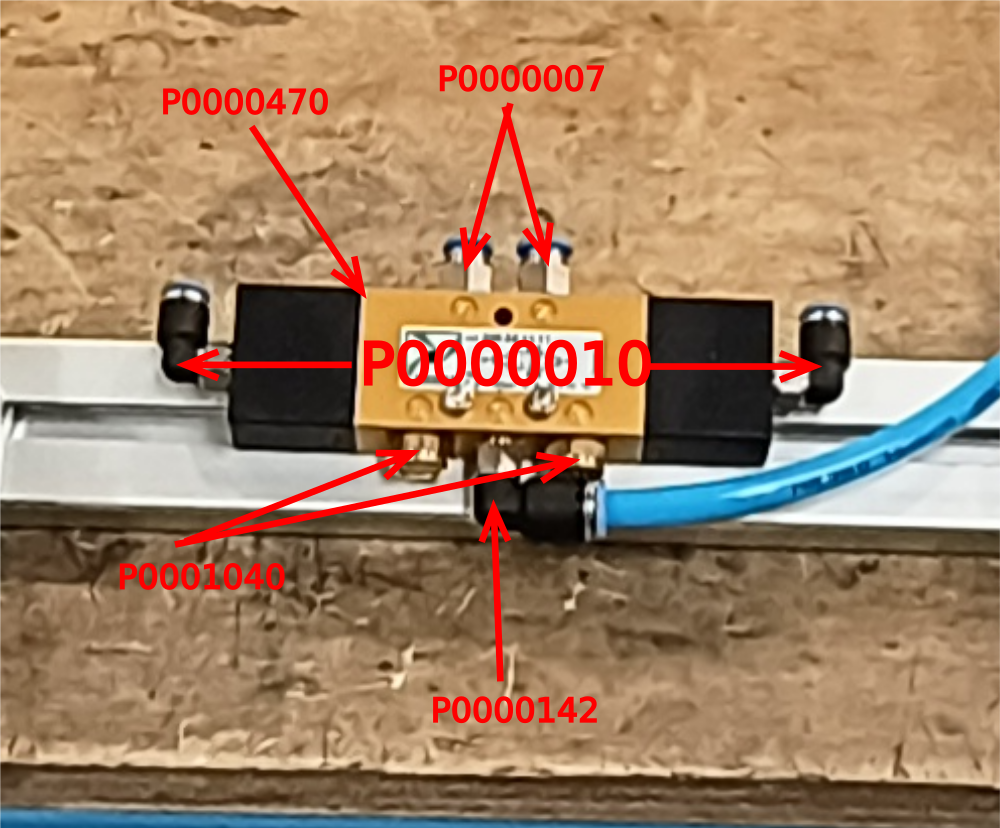
Étape 5 - Assemble valve
Assemble fittings onto valve P0000470 using
P0001040 x 2
P0000010 x 2
p0000007 x 2
P0000142 x 1

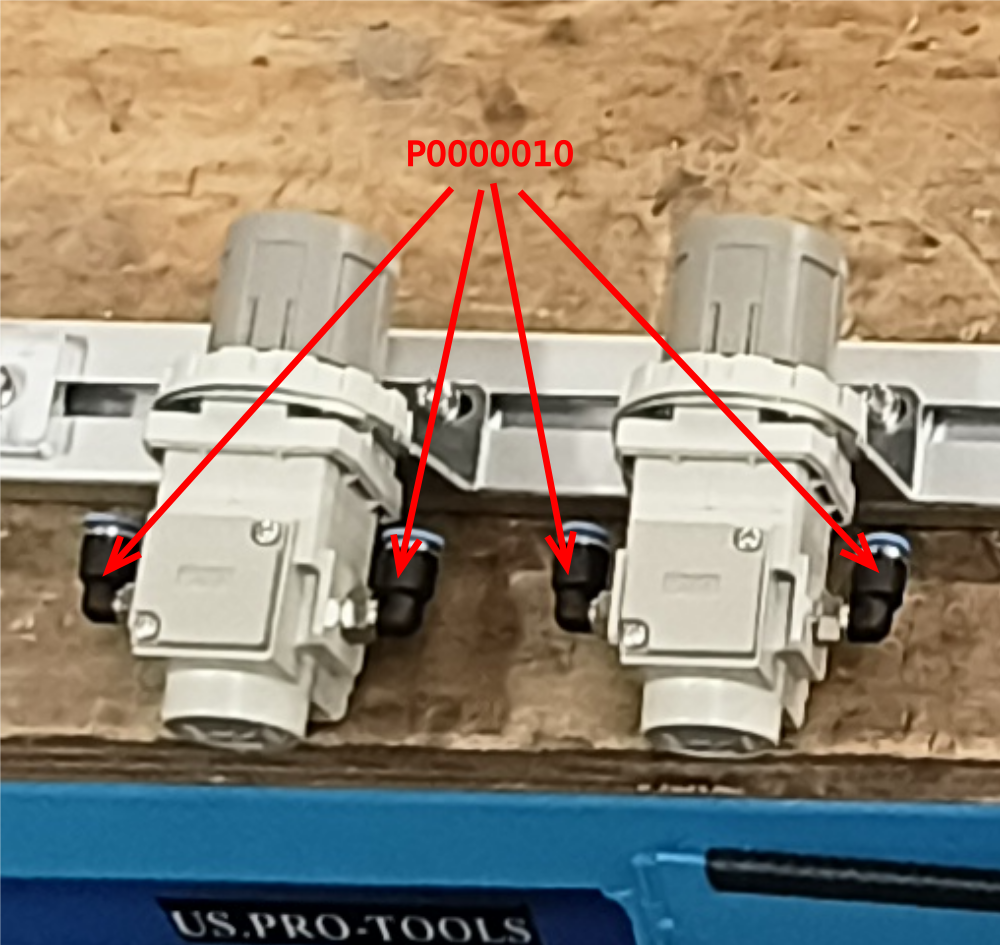
Étape 6 - Assemble regulators
Assemble 2 off P0001008 regulators with fittings as listed
P0000010 x 4

Étape 7 - Assemble Ethercat boxes
Mount 2 off C0001018 Ethercat boxes to mounting plates D0010167 2 off using M3 x 20 Pan head fasteners

Étape 8 - Attach trunking
Attach a length of 75mm x 25mm trunking @ 1310mm, 120mm from non slotted end to rear of maytec and use M5 x 6 button sockets to secure
Ecr raised to add holes to maytec section on 05/09/23
Holes will required drilling until ecr finalises
1st m5 hole 130mm from non slotted hole end , then spaced at 250mm Drill and tap m5
Étape 9 - Mount assembled components
Mount assembled components onto mounting bar D0016300 as shown
Space as follows
Position 1st ethercat box 100mm for end of maytec beam ( non slotted hole end )
All mounted components to be spaced 100mm apart
Except for
Ethercat boxes to butt together
Valve to valve bank 1 , set to 70mm
Valve B1 and Valve B2 spaced at 130mm
Use following fixings
Each regulator mounted with P0001022 bracket and P0001009 nut, fastened with M5 x 12 socket caps and washers
Valve bank 1 and 2 secured with M4 x 40 socket caps and M8 motor plate washers, spaced away from maytec rail with 2 M8 washers to enable valve to sit straight
Ethercats Mounted with M6 x 16 socket caps and A form washers.
Valve mounted with M4 x 30 socket caps, and M4 D nuts. ( one d nut will require cutting to shorten to allow fitment )
Use D nuts to provide fixing points into rail

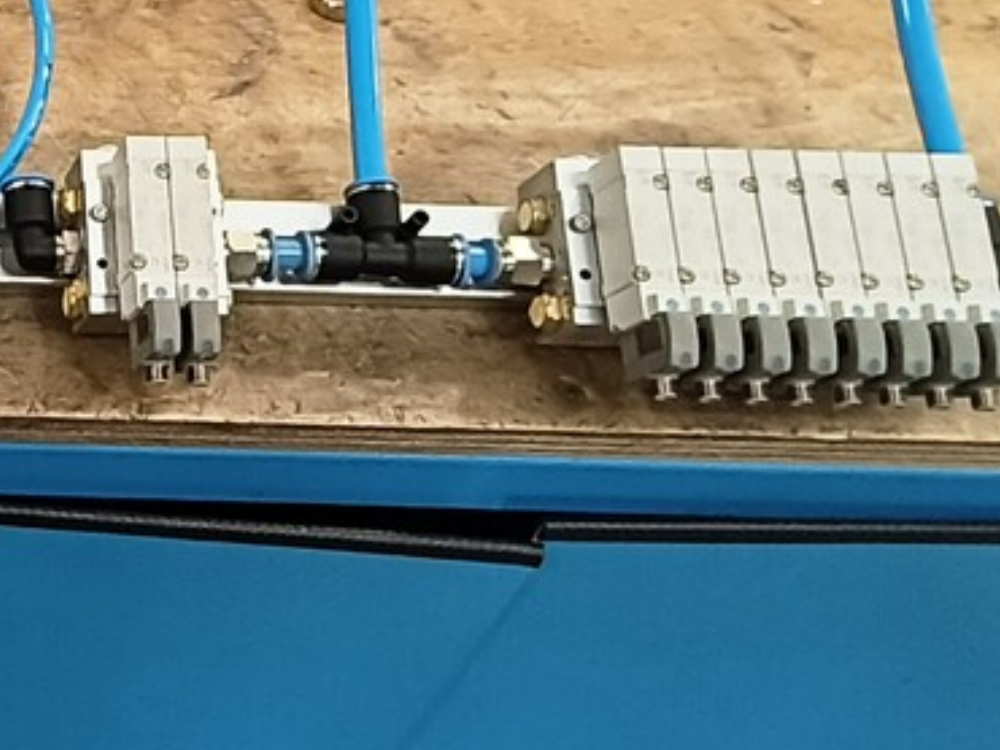
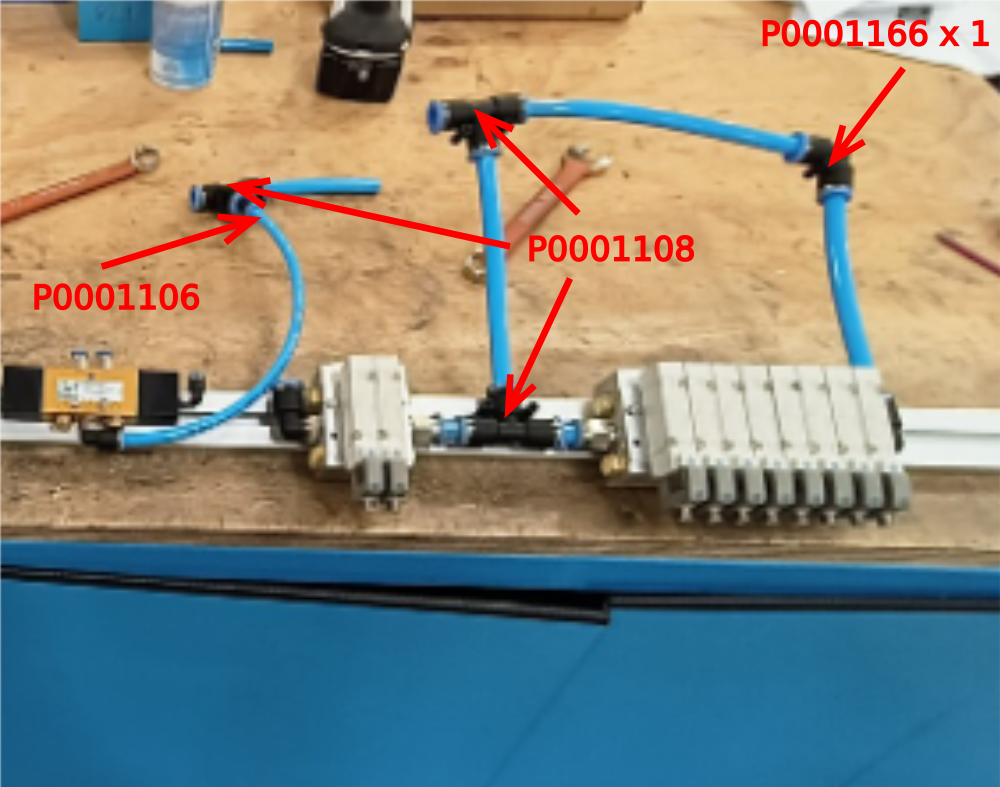
Étape 10 - Connect Air feed pipes
Additional photo required to show additional 4th 12mm tee connection
Connect 12mm and 8mm blue air lines as shown
Use fittings
P0001108 x 4
P0001166 x 1
p0001106 x 1
Draft
 Français
 English
 Deutsch
 Español
 Italiano
 Português