| [version en cours de rédaction] | [version en cours de rédaction] |
m (Gareth Green a déplacé la page R0015028D Fit Hepco Drive Beam Cylinder vers R0015246 Fit Hepco Drive Beam Cylinder) |
|||
| Ligne 1 : | Ligne 1 : | ||
{{Tuto Details | {{Tuto Details | ||
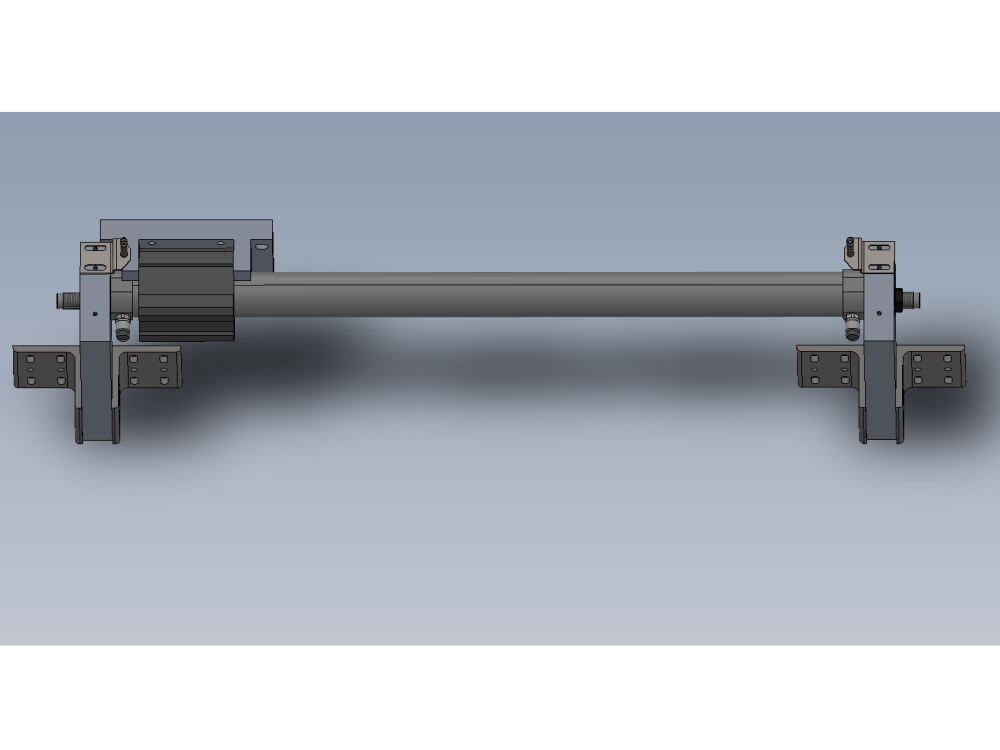
| + | |Main_Picture=R0015246_Fit_Hepco_Drive_Beam_Cylinder_Screenshot_2023-07-12_093817.png | ||
| + | |Main_Picture_annotation={"version":"2.4.6","objects":[{"type":"image","version":"2.4.6","originX":"left","originY":"top","left":-27,"top":67,"width":1619,"height":763,"fill":"rgb(0,0,0)","stroke":null,"strokeWidth":0,"strokeDashArray":null,"strokeLineCap":"butt","strokeDashOffset":0,"strokeLineJoin":"miter","strokeMiterLimit":4,"scaleX":0.42,"scaleY":0.42,"angle":0,"flipX":false,"flipY":false,"opacity":1,"shadow":null,"visible":true,"clipTo":null,"backgroundColor":"","fillRule":"nonzero","paintFirst":"fill","globalCompositeOperation":"source-over","transformMatrix":null,"skewX":0,"skewY":0,"crossOrigin":"","cropX":0,"cropY":0,"src":"https://stuga.dokit.app/images/0/04/R0015246_Fit_Hepco_Drive_Beam_Cylinder_Screenshot_2023-07-12_093817.png","filters":[]}],"height":450,"width":600} | ||
|Description=<translate>Instructions to mount and set hepco drive beam cylinder assembly</translate> | |Description=<translate>Instructions to mount and set hepco drive beam cylinder assembly</translate> | ||
|Categories=Production | |Categories=Production | ||
|Difficulty=Medium | |Difficulty=Medium | ||
| − | |Duration= | + | |Duration=3 |
|Duration-type=hour(s) | |Duration-type=hour(s) | ||
}} | }} | ||
{{Introduction | {{Introduction | ||
| − | |Introduction=<translate></translate> | + | |Introduction=<translate><u>'''Tools Required'''</u> |
| + | |||
| + | |||
| + | |||
| + | |||
| + | <u>'''Parts Required'''</u></translate> | ||
}} | }} | ||
{{Materials}} | {{Materials}} | ||
{{EPI}} | {{EPI}} | ||
{{Tuto Step | {{Tuto Step | ||
| − | |Step_Title=<translate></translate> | + | |Step_Title=<translate>Unless otherwise stated</translate> |
| − | |Step_Content=<translate></translate> | + | |Step_Content=<translate>All bolts to have Loctite 243 adhesive applied unless otherwise stated |
| + | |||
| + | All Threaded Pneumatic connections to have Loctite 570 applied | ||
| + | |||
| + | All bolts to be pen marked once adhesive applied and correct tension added</translate> | ||
| + | |Step_Picture_00=R0015086_Assemble_Pneumatics_on_to_electrical_cabinet_loctite_243.png | ||
| + | }} | ||
| + | {{Tuto Step | ||
| + | |Step_Title=<translate>Add dowels</translate> | ||
| + | |Step_Content=<translate>Add 4 off 8mm x 24mm dowels to parts D0015708 as shown</translate> | ||
| + | |Step_Picture_00=R0015246_Fit_Hepco_Drive_Beam_Cylinder_Screenshot_2023-07-12_094540.png | ||
| + | }} | ||
| + | {{Tuto Step | ||
| + | |Step_Title=<translate>Assemble drive adapter</translate> | ||
| + | |Step_Content=<translate>Assemble D0015077b with contains D0015707 x 1 and D0015708 x 2 using M8 x 30 socket caps 4 off</translate> | ||
| + | |Step_Picture_00=R0015246_Fit_Hepco_Drive_Beam_Cylinder_Screenshot_2023-07-12_094109.png | ||
| + | |Step_Picture_01=R0015246_Fit_Hepco_Drive_Beam_Cylinder_Screenshot_2023-07-12_094309.png | ||
| + | |Step_Picture_02=R0015246_Fit_Hepco_Drive_Beam_Cylinder_Screenshot_2023-07-12_094321.png | ||
| + | |Step_Picture_03=R0015246_Fit_Hepco_Drive_Beam_Cylinder_Screenshot_2023-07-12_094413.png | ||
}} | }} | ||
{{Tuto Step | {{Tuto Step | ||
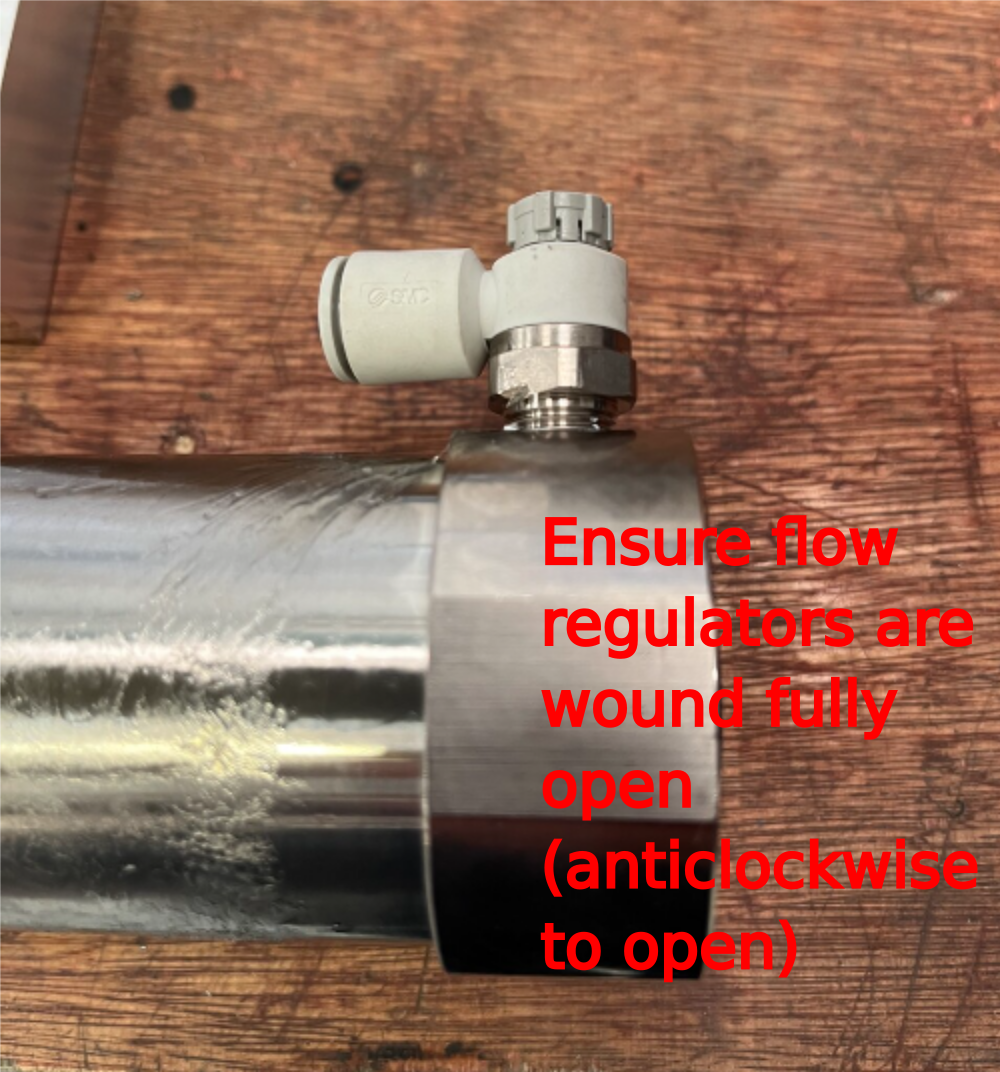
| − | |Step_Title=<translate></translate> | + | |Step_Title=<translate>Attach Air fittings to cylinder</translate> |
| − | |Step_Content=<translate></translate> | + | |Step_Content=<translate>Fit 2 off P0001145 air fittings to cylinder P0001118</translate> |
| + | |Step_Picture_00=R0015246_Fit_Hepco_Drive_Beam_Cylinder_Screenshot_2023-07-12_094740.png | ||
| + | |Step_Picture_01=R0015246_Fit_Hepco_Drive_Beam_Cylinder_Screenshot_2023-07-12_094727.png | ||
| + | |Step_Picture_01_annotation={"version":"2.4.6","objects":[{"type":"image","version":"2.4.6","originX":"left","originY":"top","left":0,"top":0,"width":501,"height":537,"fill":"rgb(0,0,0)","stroke":null,"strokeWidth":0,"strokeDashArray":null,"strokeLineCap":"butt","strokeDashOffset":0,"strokeLineJoin":"miter","strokeMiterLimit":4,"scaleX":1.2,"scaleY":1.2,"angle":0,"flipX":false,"flipY":false,"opacity":1,"shadow":null,"visible":true,"clipTo":null,"backgroundColor":"","fillRule":"nonzero","paintFirst":"fill","globalCompositeOperation":"source-over","transformMatrix":null,"skewX":0,"skewY":0,"crossOrigin":"","cropX":0,"cropY":0,"src":"https://stuga.dokit.app/images/d/d8/R0015246_Fit_Hepco_Drive_Beam_Cylinder_Screenshot_2023-07-12_094727.png","filters":[]},{"type":"textbox","version":"2.4.6","originX":"center","originY":"center","left":443.68,"top":447.68,"width":128.93,"height":153.68,"fill":"#FF0000","stroke":"#FF0000","strokeWidth":1,"strokeDashArray":null,"strokeLineCap":"butt","strokeDashOffset":0,"strokeLineJoin":"miter","strokeMiterLimit":4,"scaleX":1.85,"scaleY":1.85,"angle":0,"flipX":false,"flipY":false,"opacity":1,"shadow":null,"visible":true,"clipTo":null,"backgroundColor":"","fillRule":"nonzero","paintFirst":"fill","globalCompositeOperation":"source-over","transformMatrix":null,"skewX":0,"skewY":0,"text":"Ensure flow regulators are wound fully open (anticlockwise to open)","fontSize":20,"fontWeight":"normal","fontFamily":"sans-serif","fontStyle":"normal","lineHeight":1.16,"underline":false,"overline":false,"linethrough":false,"textAlign":"left","textBackgroundColor":"","charSpacing":0,"minWidth":20,"styles":{} }],"height":643,"width":600} | ||
}} | }} | ||
{{Tuto Step | {{Tuto Step | ||
| Ligne 53 : | Ligne 81 : | ||
{{Notes}} | {{Notes}} | ||
{{PageLang | {{PageLang | ||
| + | |Language=en | ||
|SourceLanguage=none | |SourceLanguage=none | ||
|IsTranslation=0 | |IsTranslation=0 | ||
| − | |||
}} | }} | ||
{{Tuto Status | {{Tuto Status | ||
|Complete=Draft | |Complete=Draft | ||
}} | }} | ||
Version du 12 juillet 2023 à 10:56
Instructions to mount and set hepco drive beam cylinder assembly

Difficulté
Moyen
Durée
3 heure(s)
Introduction
Tools Required
Étape 1 - Unless otherwise stated
All bolts to have Loctite 243 adhesive applied unless otherwise stated
All Threaded Pneumatic connections to have Loctite 570 applied
All bolts to be pen marked once adhesive applied and correct tension added

Étape 2 - Add dowels
Add 4 off 8mm x 24mm dowels to parts D0015708 as shown

Étape 3 - Assemble drive adapter
Assemble D0015077b with contains D0015707 x 1 and D0015708 x 2 using M8 x 30 socket caps 4 off


Étape 4 - Attach Air fittings to cylinder
Fit 2 off P0001145 air fittings to cylinder P0001118

Étape 5 -
Étape 6 -
Étape 7 -
Étape 8 -
Étape 9 -
Étape 10 -
Étape 11 -
Étape 12 -
Draft
 Français
 English
 Deutsch
 Español
 Italiano
 Português