| [version en cours de rédaction] | [version en cours de rédaction] |
| Ligne 36 : | Ligne 36 : | ||
{{Tuto Step | {{Tuto Step | ||
|Step_Title=<translate>Faulty ACEpc?</translate> | |Step_Title=<translate>Faulty ACEpc?</translate> | ||
| − | |Step_Content=<translate>If PC fails to label with fault, date and initials</translate> | + | |Step_Content=<translate>If PC fails to power on, load or operate, label with the fault, date and your initials. This makes sure the PC is not used again.</translate> |
}} | }} | ||
{{Tuto Step | {{Tuto Step | ||
| − | |Step_Title=<translate> | + | |Step_Title=<translate>Option 4: Format flash FX drive</translate> |
|Step_Content=<translate></translate> | |Step_Content=<translate></translate> | ||
| + | |Step_Picture_00=ACE_PC_Re-Flash_20190827_142841.jpg | ||
| + | |Step_Picture_00_annotation={"version":"2.4.6","objects":[{"type":"image","version":"2.4.6","originX":"left","originY":"top","left":-222,"top":-47,"width":4032,"height":2268,"fill":"rgb(0,0,0)","stroke":null,"strokeWidth":0,"strokeDashArray":null,"strokeLineCap":"butt","strokeDashOffset":0,"strokeLineJoin":"miter","strokeMiterLimit":4,"scaleX":0.24,"scaleY":0.24,"angle":0,"flipX":false,"flipY":false,"opacity":1,"shadow":null,"visible":true,"clipTo":null,"backgroundColor":"","fillRule":"nonzero","paintFirst":"fill","globalCompositeOperation":"source-over","transformMatrix":null,"skewX":0,"skewY":0,"crossOrigin":"","cropX":0,"cropY":0,"src":"https://stuga.dokit.app/images/3/33/ACE_PC_Re-Flash_20190827_142841.jpg","filters":[]}],"height":449.7444633730835,"width":600} | ||
| + | |Step_Picture_01=ACE_PC_Re-Flash_20190827_143954.jpg | ||
| + | |Step_Picture_01_annotation={"version":"2.4.6","objects":[{"type":"image","version":"2.4.6","originX":"left","originY":"top","left":-191,"top":-23,"width":4032,"height":2268,"fill":"rgb(0,0,0)","stroke":null,"strokeWidth":0,"strokeDashArray":null,"strokeLineCap":"butt","strokeDashOffset":0,"strokeLineJoin":"miter","strokeMiterLimit":4,"scaleX":0.25,"scaleY":0.25,"angle":0,"flipX":false,"flipY":false,"opacity":1,"shadow":null,"visible":true,"clipTo":null,"backgroundColor":"","fillRule":"nonzero","paintFirst":"fill","globalCompositeOperation":"source-over","transformMatrix":null,"skewX":0,"skewY":0,"crossOrigin":"","cropX":0,"cropY":0,"src":"https://stuga.dokit.app/images/5/56/ACE_PC_Re-Flash_20190827_143954.jpg","filters":[]}],"height":449.4773519163763,"width":600} | ||
| + | |Step_Picture_02=ACE_PC_Re-Flash_20190827_144010.jpg | ||
| + | |Step_Picture_02_annotation={"version":"2.4.6","objects":[{"type":"image","version":"2.4.6","originX":"left","originY":"top","left":-237,"top":-50,"width":4032,"height":2268,"fill":"rgb(0,0,0)","stroke":null,"strokeWidth":0,"strokeDashArray":null,"strokeLineCap":"butt","strokeDashOffset":0,"strokeLineJoin":"miter","strokeMiterLimit":4,"scaleX":0.25,"scaleY":0.25,"angle":0,"flipX":false,"flipY":false,"opacity":1,"shadow":null,"visible":true,"clipTo":null,"backgroundColor":"","fillRule":"nonzero","paintFirst":"fill","globalCompositeOperation":"source-over","transformMatrix":null,"skewX":0,"skewY":0,"crossOrigin":"","cropX":0,"cropY":0,"src":"https://stuga.dokit.app/images/5/54/ACE_PC_Re-Flash_20190827_144010.jpg","filters":[]}],"height":450.53003533568904,"width":600} | ||
}} | }} | ||
{{Tuto Step | {{Tuto Step | ||
| Ligne 47 : | Ligne 53 : | ||
}} | }} | ||
{{Tuto Step | {{Tuto Step | ||
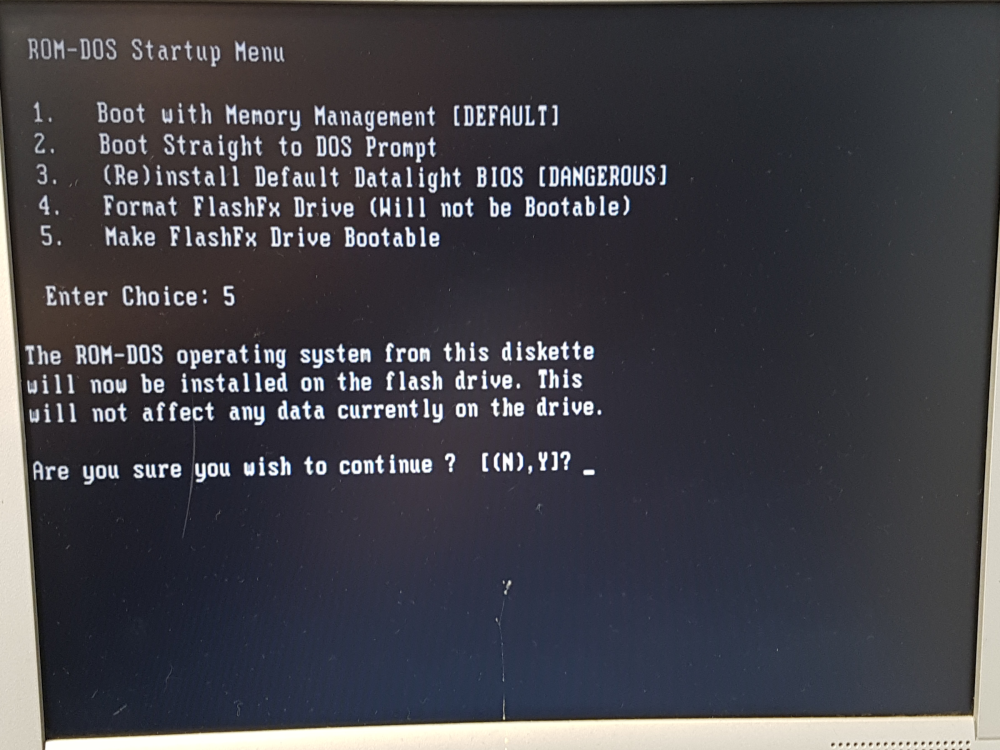
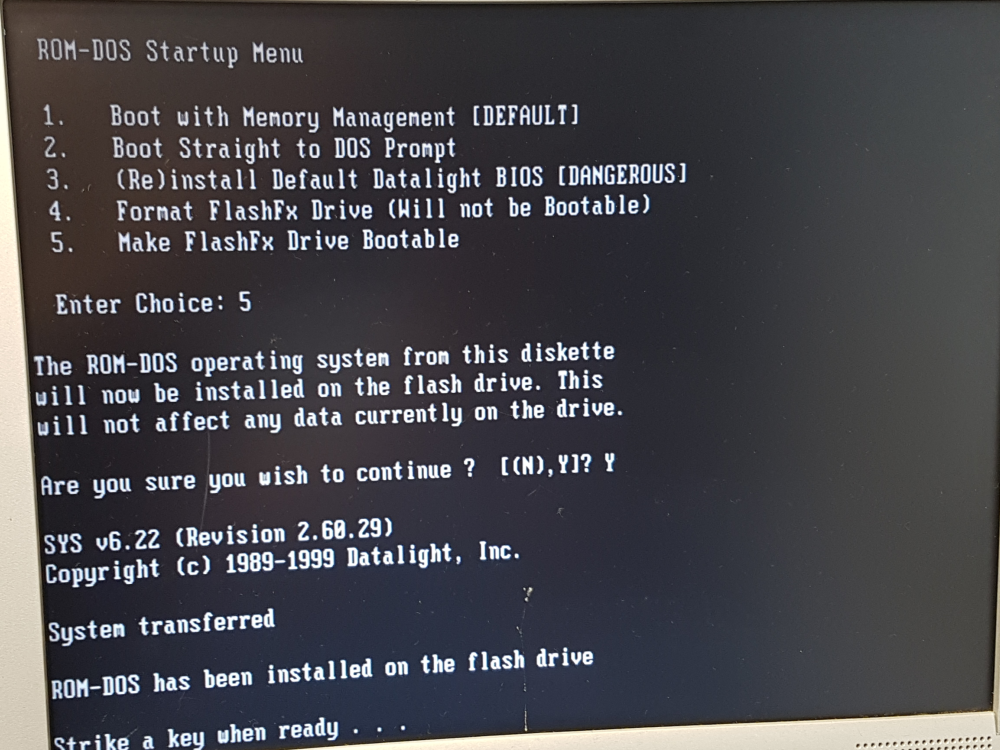
| − | |Step_Title=<translate> | + | |Step_Title=<translate>Option 5: Make FlashFx Drive Bootable</translate> |
|Step_Content=<translate></translate> | |Step_Content=<translate></translate> | ||
| + | |Step_Picture_00=ACE_PC_Re-Flash_20190827_144139.jpg | ||
| + | |Step_Picture_00_annotation={"version":"2.4.6","objects":[{"type":"image","version":"2.4.6","originX":"left","originY":"top","left":-199,"top":-52,"width":4032,"height":2268,"fill":"rgb(0,0,0)","stroke":null,"strokeWidth":0,"strokeDashArray":null,"strokeLineCap":"butt","strokeDashOffset":0,"strokeLineJoin":"miter","strokeMiterLimit":4,"scaleX":0.25,"scaleY":0.25,"angle":0,"flipX":false,"flipY":false,"opacity":1,"shadow":null,"visible":true,"clipTo":null,"backgroundColor":"","fillRule":"nonzero","paintFirst":"fill","globalCompositeOperation":"source-over","transformMatrix":null,"skewX":0,"skewY":0,"crossOrigin":"","cropX":0,"cropY":0,"src":"https://stuga.dokit.app/images/c/c0/ACE_PC_Re-Flash_20190827_144139.jpg","filters":[]}],"height":450,"width":600} | ||
| + | |Step_Picture_01=ACE_PC_Re-Flash_20190827_144155.jpg | ||
| + | |Step_Picture_01_annotation={"version":"2.4.6","objects":[{"type":"image","version":"2.4.6","originX":"left","originY":"top","left":-237,"top":-63,"width":4032,"height":2268,"fill":"rgb(0,0,0)","stroke":null,"strokeWidth":0,"strokeDashArray":null,"strokeLineCap":"butt","strokeDashOffset":0,"strokeLineJoin":"miter","strokeMiterLimit":4,"scaleX":0.26,"scaleY":0.26,"angle":0,"flipX":false,"flipY":false,"opacity":1,"shadow":null,"visible":true,"clipTo":null,"backgroundColor":"","fillRule":"nonzero","paintFirst":"fill","globalCompositeOperation":"source-over","transformMatrix":null,"skewX":0,"skewY":0,"crossOrigin":"","cropX":0,"cropY":0,"src":"https://stuga.dokit.app/images/9/90/ACE_PC_Re-Flash_20190827_144155.jpg","filters":[]}],"height":450,"width":600} | ||
}} | }} | ||
{{Tuto Step | {{Tuto Step | ||
Version du 3 septembre 2019 à 15:55
12


Difficulté
Facile
Durée
10 minute(s)
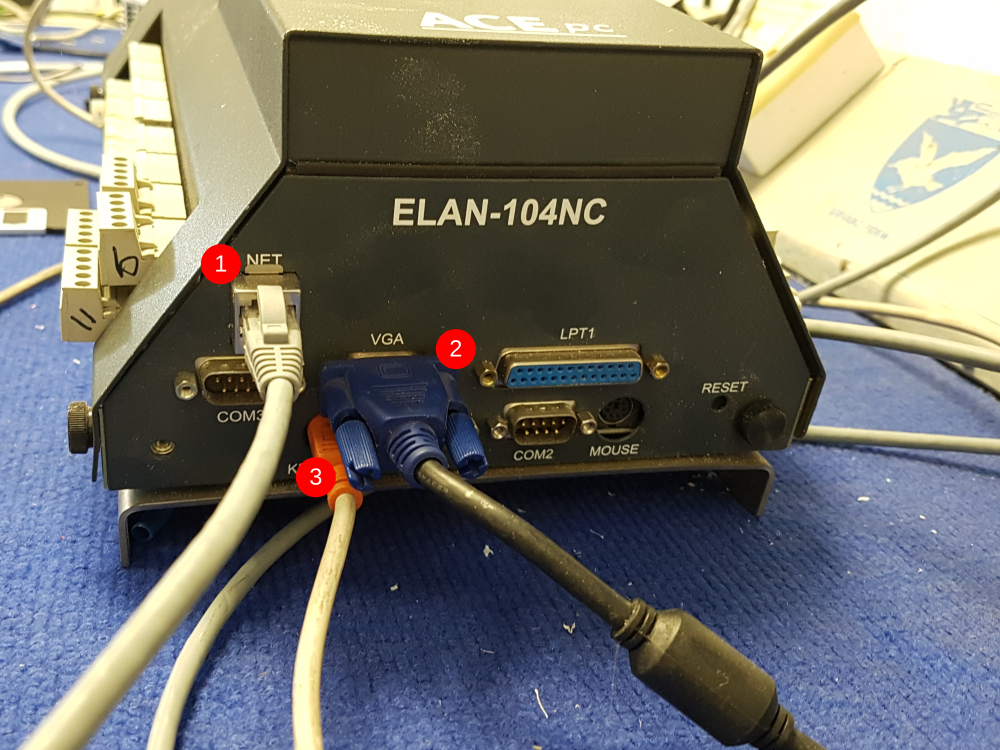
Étape 1 - Plug in
- Ethernet cable to the network
- VGA cable to a monitor
- PS/2 cable to a keyboard
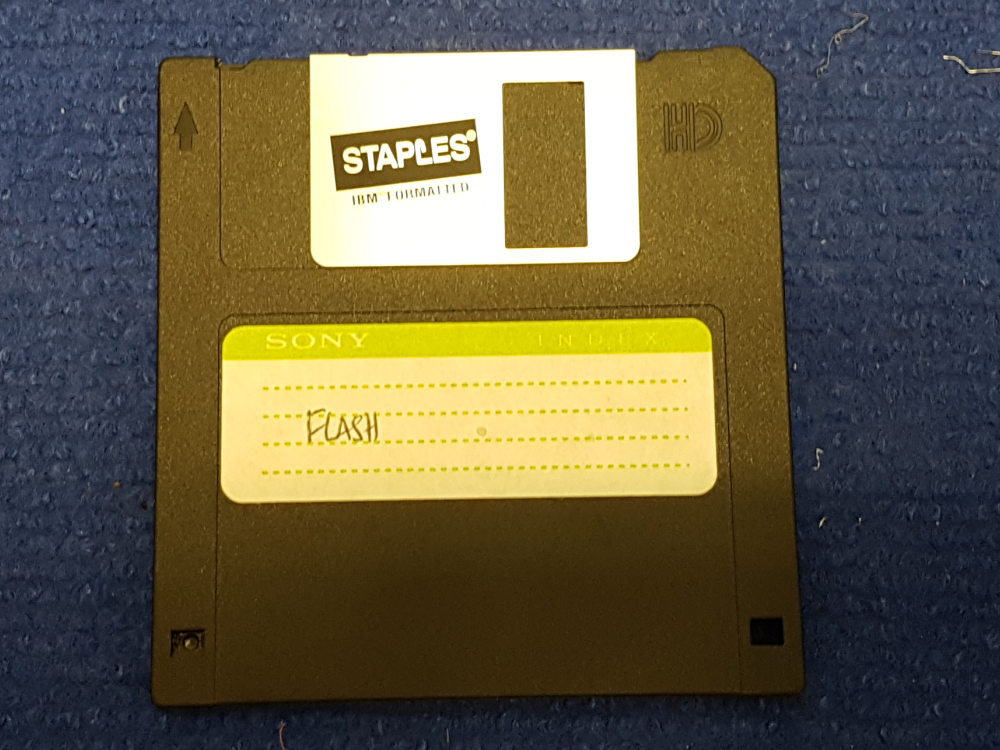
Étape 2 - Insert Flash Disk
Make sure the flash disk is the correct way around when inserting.

Étape 3 - Power On
Using a 24V DC power supply connect the positive and negative rails .

Étape 4 - Faulty ACEpc?
If PC fails to power on, load or operate, label with the fault, date and your initials. This makes sure the PC is not used again.
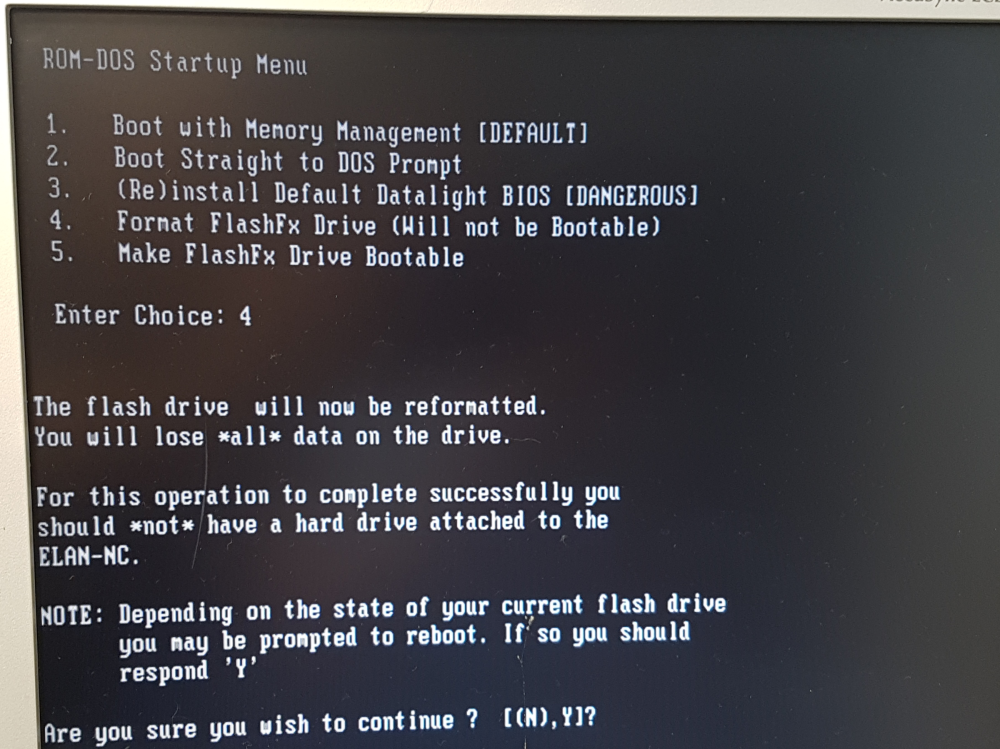
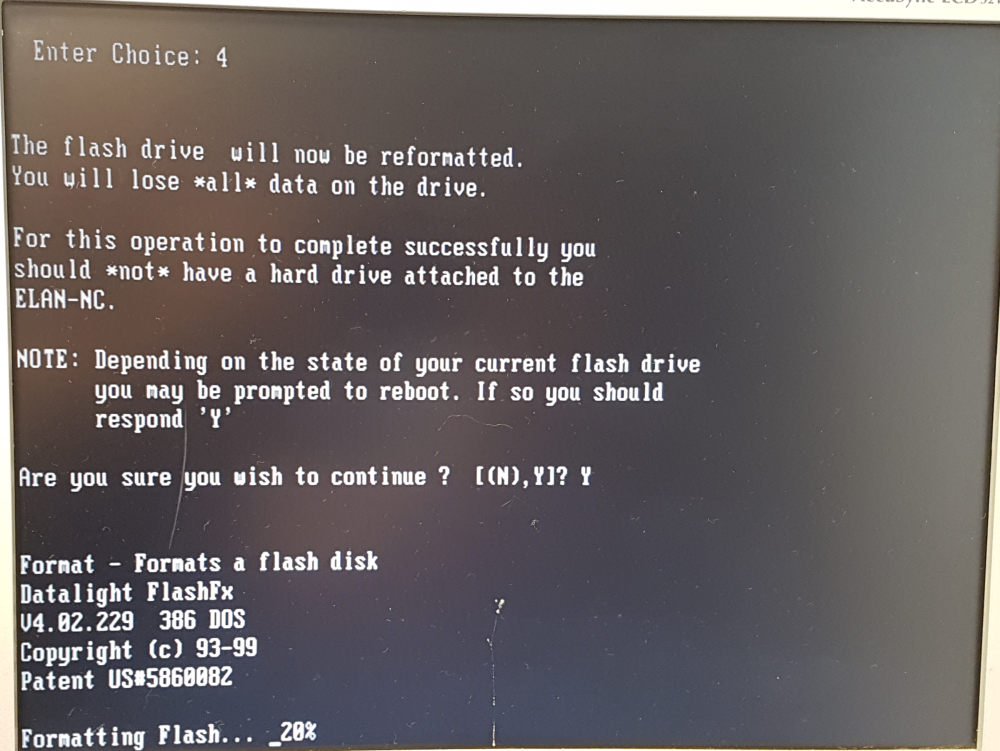
Étape 5 - Option 4: Format flash FX drive

Étape 6 - Reboot
ctrl alt del
Étape 7 - Option 5: Make FlashFx Drive Bootable
Étape 8 - Remove floppy disk!
Étape 9 - Reboot to test
Draft
 Français
 English
 Deutsch
 Español
 Italiano
 Português