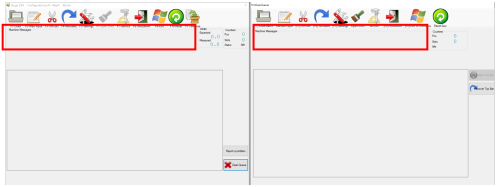
Main screen icons on winMulti

Single Screen Machines
Autoflow, Saw, Ecoline, Routers and Microlines have a single user input screen

Dual Screen Machines (Flowlines, ZX machines)
Flowlines and ZX machines have two operator screens. on on the machining centre side and one on the saw side
On v5 software, the machining centre screen is the same as the above . A separate "winSaw" program runs the saw side. For instructions on operating the saw centre software click here.
On v6 software, the desktop is shared across the saw side and machining centre side screens. The same computer and software runs both sides of the machine.

Menu Bar Icons
the top area of the screen is a row of buttons to access different functions via the icons
| Icon | Function | Notes |
|---|---|---|
| Load Batch
|
||
 |
Manual Input
|
|
 |
Offcuts
|
|
| Remakes
|
||
| Settings
|
||
| Open Door
|
This option is only enabled on Microlines or Sawing machines where the guard door is interlocked | |
| Service
|
||
 |
Shutdown
|
|
 |
Exit to Windows
|
|
| Reset Machine
|
||
| Backup
|
Machine Messages
The messages box displays important text relayed from the machine controller

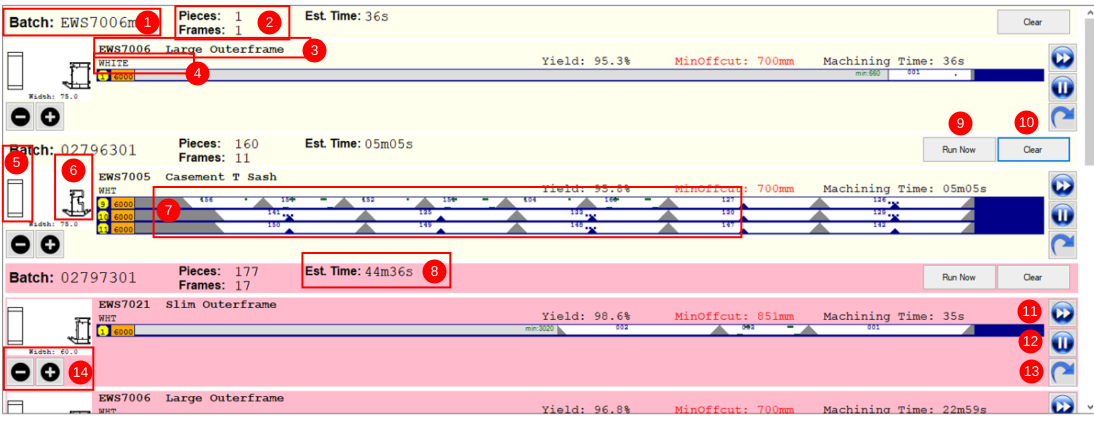
Bar Queue
The bar queue displays the current state of the bars waiting to be processed.
| Title | Description | Notes | |
|---|---|---|---|
| 1 | Batch | The Batch number that the pieces belong to | Batch numbers are created by the Window Designer package in the office. One or more windows are grouped together in a batch |
| 2 | Pieces and Frames Total | The number of pieces (or full frames) left in this batch to cut | A Frame is a collection of pieces in the batch that belong to one "Slot" on the output trolley. When all the pieces in a frame are processed, the frame is flagged as finished |
| 3 | Profile Code and Name | The code is used to reference the profile type, with a longer description to help the operator | The code is up to 10 digits long and needs to be unique. It normally only references the shape of the profile not the colour |
| 4 | Profile Colour Code | A 5 character code that indicates the foil colour and core colour of the profile. |
For more detail and abetter visual impact, the Foil and Core indicator can be used |
| 5 | Foil and Core Indicator | A visual representation of the profile colour, showing the core colour in the centre and the top and bottom face foil colours | For more details on the function and how to update the colours, click here |
| 6 | Profile drawing or DXF | A drawing of the side profile | This image also shows the operator the correct loading orientation |
| 7 | Bar view | A visual representation of the pieces and operations on the bar | The images are a representation only for guidance, not an accurate depiction of the prep. |
| 8 | Estimated Time | An estimation of the remaining machining time for this batch | This number is calculated from actual data recorded timings from machine, so will get more accurate as more work is processed.
The time assumes that the operator keeps the infeed fed with fresh bars and there are no stoppages |
| 9 | Run Now Button | Button to send this batch to the top of the queue | For more detail on Bar Queue Management, click here |
| 10 | Clear Button | Button to clear the batch | For more detail on Bar Queue Management, click here |
| 11 | Fast Fwd Button | Button to advance this profile type to the top of the batch queue | For more detail on Bar Queue Management, click here |
| 12 | Hold Button | Button to hold this profile (if the profile is not available) | For more detail on Bar Queue Management, click here |
| 13 | Reoptimise Button | Button to reoptimise the pieces in the profile stack | For more detail on Bar Reoptimising, click here |
Current Bar
During processing, the current bar will appear above the work queue. The bar will move across the machine in real time to reflect the actual processing position of the gripper axis
Alarms Window

Draft
 Français
 English
 Deutsch
 Español
 Italiano
 Português