| [version en cours de rédaction] | [version en cours de rédaction] |
| Ligne 42 : | Ligne 42 : | ||
|Step_Title=<translate>Wiring loom positioning 300hz power</translate> | |Step_Title=<translate>Wiring loom positioning 300hz power</translate> | ||
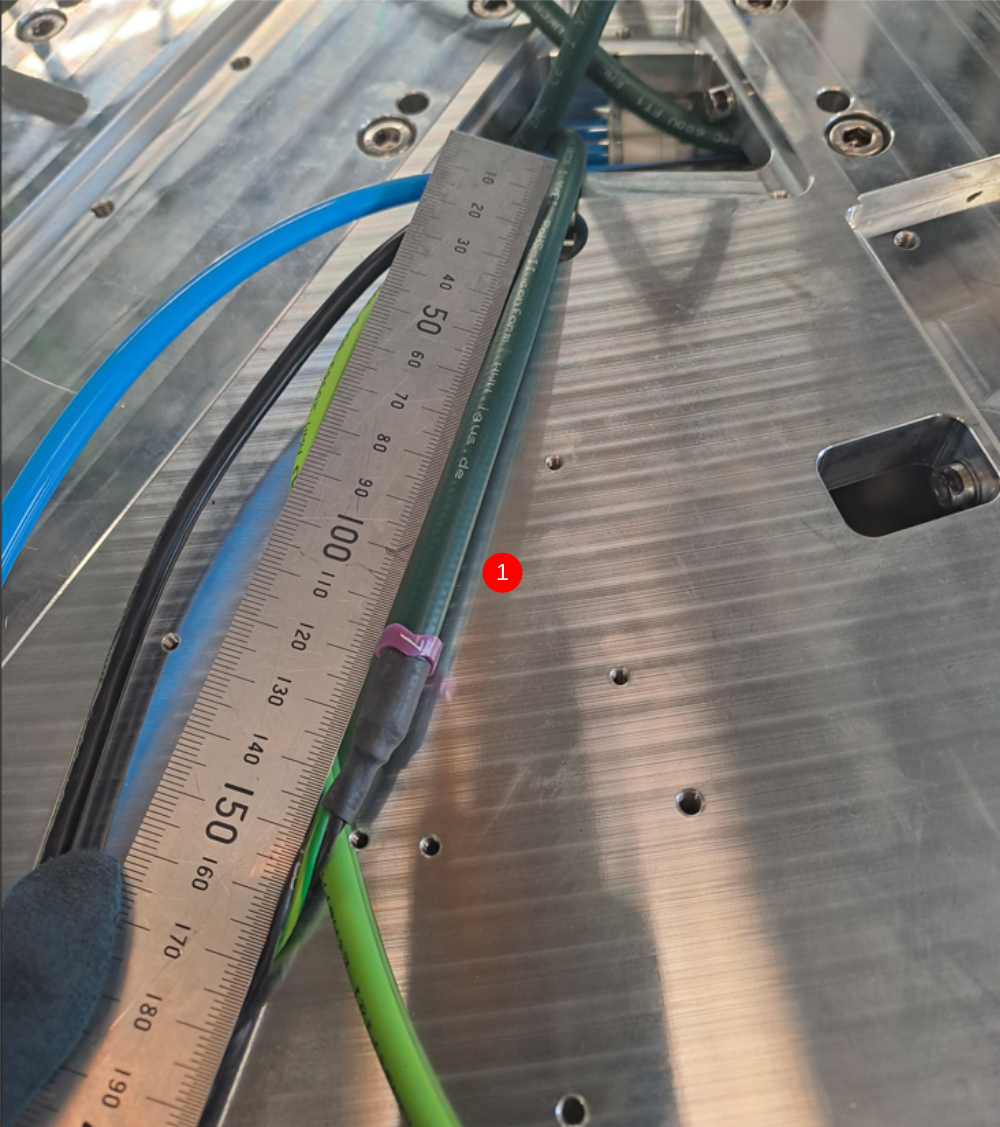
|Step_Content=<translate>1 Start at connection point with 3 power cables exiting . Set one cable as shown to 150mm</translate> | |Step_Content=<translate>1 Start at connection point with 3 power cables exiting . Set one cable as shown to 150mm</translate> | ||
| + | |Step_Picture_00=Finalise_wiring_loom_for_Rotary_head_Screenshot_2023-05-31_154443.png | ||
| + | |Step_Picture_00_annotation={"version":"2.4.6","objects":[{"type":"image","version":"2.4.6","originX":"left","originY":"top","left":0,"top":0,"width":734,"height":827,"fill":"rgb(0,0,0)","stroke":null,"strokeWidth":0,"strokeDashArray":null,"strokeLineCap":"butt","strokeDashOffset":0,"strokeLineJoin":"miter","strokeMiterLimit":4,"scaleX":0.82,"scaleY":0.82,"angle":0,"flipX":false,"flipY":false,"opacity":1,"shadow":null,"visible":true,"clipTo":null,"backgroundColor":"","fillRule":"nonzero","paintFirst":"fill","globalCompositeOperation":"source-over","transformMatrix":null,"skewX":0,"skewY":0,"crossOrigin":"","cropX":0,"cropY":0,"src":"https://stuga.dokit.app/images/f/fc/Finalise_wiring_loom_for_Rotary_head_Screenshot_2023-05-31_154443.png","filters":[]},{"type":"wfnumberedbullet","version":"2.4.6","originX":"left","originY":"top","left":289,"top":331,"width":25,"height":25,"fill":"rgb(0,0,0)","stroke":"#FF0000","strokeWidth":0,"strokeDashArray":null,"strokeLineCap":"butt","strokeDashOffset":0,"strokeLineJoin":"miter","strokeMiterLimit":4,"scaleX":1,"scaleY":1,"angle":0,"flipX":false,"flipY":false,"opacity":1,"shadow":null,"visible":true,"clipTo":null,"backgroundColor":"","fillRule":"nonzero","paintFirst":"fill","globalCompositeOperation":"source-over","transformMatrix":null,"skewX":0,"skewY":0,"objects":[{"type":"circle","version":"2.4.6","originX":"center","originY":"center","left":0,"top":0,"width":24,"height":24,"fill":"#FF0000","stroke":null,"strokeWidth":1,"strokeDashArray":null,"strokeLineCap":"butt","strokeDashOffset":0,"strokeLineJoin":"miter","strokeMiterLimit":4,"scaleX":1,"scaleY":1,"angle":0,"flipX":false,"flipY":false,"opacity":1,"shadow":null,"visible":true,"clipTo":null,"backgroundColor":"","fillRule":"nonzero","paintFirst":"fill","globalCompositeOperation":"source-over","transformMatrix":null,"skewX":0,"skewY":0,"radius":12,"startAngle":0,"endAngle":6.283185307179586},{"type":"text","version":"2.4.6","originX":"center","originY":"center","left":0,"top":0,"width":7.79,"height":15.82,"fill":"rgba(255,255,255,255)","stroke":null,"strokeWidth":1,"strokeDashArray":null,"strokeLineCap":"butt","strokeDashOffset":0,"strokeLineJoin":"miter","strokeMiterLimit":4,"scaleX":1,"scaleY":1,"angle":0,"flipX":false,"flipY":false,"opacity":1,"shadow":null,"visible":true,"clipTo":null,"backgroundColor":"","fillRule":"nonzero","paintFirst":"fill","globalCompositeOperation":"source-over","transformMatrix":null,"skewX":0,"skewY":0,"text":"1","fontSize":14,"fontWeight":"normal","fontFamily":"arial","fontStyle":"normal","lineHeight":1.16,"underline":false,"overline":false,"linethrough":false,"textAlign":"left","textBackgroundColor":"","charSpacing":0,"styles":{} }],"number":1}],"height":676,"width":600} | ||
}} | }} | ||
{{Notes}} | {{Notes}} | ||
Version du 31 mai 2023 à 16:46
correct routing of cables ready for connection boxes

Difficulté
Moyen
Durée
1 heure(s)
Introduction
Tools required
Étape 1 - Wiring loom positioning Ethercat control
Cables must be adjusted between each spindle to ensure the cable lengths are correct .
1 Start at cable point between 6 and 5 . Start with the light green ethercat cable with the right angle plug. Adjust so that 200mm is past the end of the spindle plate . See picture for detail.
2 Move to the next spindle connection between 5 and 4 and adjust the new right angled ethercat cable to match the length of the previous adjusted cable
3 Repeat this process working your way around the spindles to set all ethercat cables


Étape 2 - Wiring loom positioning Ethercat power
1 Start at cable point between 6 and 5 . Adjust black power cable to 200mm from edge of plate. See picture for details
2 Move to the next spindle connection between 5 and 4 and adjust the new black power cable to match the length of the previous adjusted cable
3 Repeat this process working your way around the spindles to set all power cables


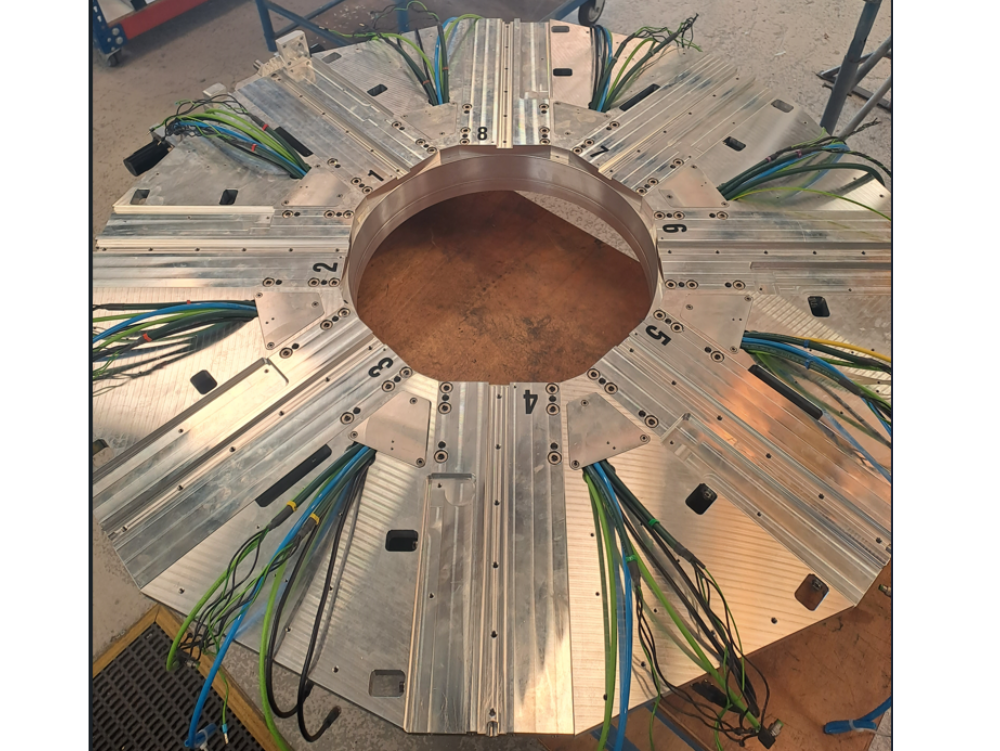
Étape 3 - Wiring loom positioning 300hz power
1 Start at connection point with 3 power cables exiting . Set one cable as shown to 150mm
Draft
 Français
 English
 Deutsch
 Español
 Italiano
 Português