| [version en cours de rédaction] | [version en cours de rédaction] |
(Page créée avec « {{Tuto Details |Main_Picture=R0015337_Bench_Assemble_Guarding_Components_Screenshot_2023-10-23_123737.png |Main_Picture_annotation={"version":"2.4.6","objects":[{"type":"i... ») |
|||
| Ligne 61 : | Ligne 61 : | ||
| − | Cut Acoustic foam to clear switch mounting block</translate> | + | Cut Acoustic foam to clear switch mounting block |
| − | |Step_Picture_00=R0015337_Bench_Assemble_Guarding_Components_Screenshot_2023- | + | |
| + | Approximate size 755 x 845mm . Measure to define exact measurement</translate> | ||
| + | |Step_Picture_00=R0015337_Bench_Assemble_Guarding_Components_Screenshot_2023-11-22_085055.png | ||
| + | |Step_Picture_01=R0015337_Bench_Assemble_Guarding_Components_Screenshot_2023-11-22_085100.png | ||
| + | |Step_Picture_02=R0015337_Bench_Assemble_Guarding_Components_Screenshot_2023-11-22_085048.png | ||
| + | |Step_Picture_03=R0015337_Bench_Assemble_Guarding_Components_Screenshot_2023-11-22_085105.png | ||
}} | }} | ||
{{Tuto Step | {{Tuto Step | ||
|Step_Title=<translate>Fit acoustic foam</translate> | |Step_Title=<translate>Fit acoustic foam</translate> | ||
| − | |Step_Content=<translate>Peel back small area of acoustic foam backing | + | |Step_Content=<translate><u>Peel back small area of acoustic foam backing</u> |
| Ligne 73 : | Ligne 78 : | ||
Remove all adhesive backing and finalise acoustic foam</translate> | Remove all adhesive backing and finalise acoustic foam</translate> | ||
| − | |Step_Picture_00=R0015337_Bench_Assemble_Guarding_Components_Screenshot_2023- | + | |Step_Picture_00=R0015337_Bench_Assemble_Guarding_Components_Screenshot_2023-11-22_085112.png |
| + | |Step_Picture_01=R0015337_Bench_Assemble_Guarding_Components_Screenshot_2023-11-22_085120.png | ||
| + | |Step_Picture_02=R0015337_Bench_Assemble_Guarding_Components_Screenshot_2023-11-22_085300.png | ||
}} | }} | ||
{{Tuto Step | {{Tuto Step | ||
|Step_Title=<translate>Door Handle mounting</translate> | |Step_Title=<translate>Door Handle mounting</translate> | ||
| − | |Step_Content=<translate>Drill through pre drilled holes in door to create clearance holes for mounting of door handle | + | |Step_Content=<translate>Drill through pre drilled holes 8.5mm in door to create clearance holes for mounting of door handle |
| − | Fix with M8 | + | Fix with M8 x 16 socket caps only</translate> |
|Step_Picture_00=R0015337_Bench_Assemble_Guarding_Components_Screenshot_2023-10-23_124754.png | |Step_Picture_00=R0015337_Bench_Assemble_Guarding_Components_Screenshot_2023-10-23_124754.png | ||
| + | |Step_Picture_01=R0015337_Bench_Assemble_Guarding_Components_Screenshot_2023-11-22_085323.png | ||
| + | |Step_Picture_02=R0015337_Bench_Assemble_Guarding_Components_Screenshot_2023-11-22_085328.png | ||
| + | |Step_Picture_03=R0015337_Bench_Assemble_Guarding_Components_Screenshot_2023-11-22_085333.png | ||
}} | }} | ||
{{Tuto Step | {{Tuto Step | ||
|Step_Title=<translate>Fit door hinges</translate> | |Step_Title=<translate>Fit door hinges</translate> | ||
| − | |Step_Content=<translate>Fit 2 off door hinges using M4 x 12 button hex , A form washers, Shakeproof washers and standard nuts</translate> | + | |Step_Content=<translate>Fit 2 off door hinges using |
| + | |||
| + | |||
| + | <u>'''M4 x 12 button hex , A form washers, Shakeproof washers and standard nuts'''</u> (please use these fasteners) | ||
| + | |||
| + | |||
| + | Do not use A form washer under button head on hinge | ||
| + | |||
| + | |||
| + | Ensure hinges are mounted parallel</translate> | ||
|Step_Picture_00=R0015337_Bench_Assemble_Guarding_Components_Screenshot_2023-10-23_124907.png | |Step_Picture_00=R0015337_Bench_Assemble_Guarding_Components_Screenshot_2023-10-23_124907.png | ||
}} | }} | ||
{{Tuto Step | {{Tuto Step | ||
|Step_Title=<translate>Fit panel edging</translate> | |Step_Title=<translate>Fit panel edging</translate> | ||
| − | |Step_Content=<translate>Fit panel edging to all edges that are not covered by hinges or switch mounting block</translate> | + | |Step_Content=<translate>Fit panel edging to all edges that are not covered by hinges or switch mounting block |
| + | |||
| + | |||
| + | ensure corners are pressed in flat and hinges have edging strip cut out around them</translate> | ||
|Step_Picture_00=R0015337_Bench_Assemble_Guarding_Components_Screenshot_2023-10-23_124907.png | |Step_Picture_00=R0015337_Bench_Assemble_Guarding_Components_Screenshot_2023-10-23_124907.png | ||
| + | |Step_Picture_01=R0015337_Bench_Assemble_Guarding_Components_Screenshot_2023-11-22_085552.png | ||
| + | |Step_Picture_02=R0015337_Bench_Assemble_Guarding_Components_Screenshot_2023-11-22_085557.png | ||
| + | |Step_Picture_03=R0015337_Bench_Assemble_Guarding_Components_Screenshot_2023-11-22_085602.png | ||
}} | }} | ||
{{Tuto Step | {{Tuto Step | ||
|Step_Title=<translate>Fit stickers to front</translate> | |Step_Title=<translate>Fit stickers to front</translate> | ||
| − | |Step_Content=<translate>Fit stuga sticker | + | |Step_Content=<translate>Fit Large Clear stuga sticker and Stuga service sticker to front of door |
| + | Fit stuga sticker 300mm down from top face of door and central | ||
| − | + | Fit service sticker butted against bottom of stuga sticker and central</translate> | |
|Step_Picture_00=R0015337_Bench_Assemble_Guarding_Components_Screenshot_2023-10-23_123737.png | |Step_Picture_00=R0015337_Bench_Assemble_Guarding_Components_Screenshot_2023-10-23_123737.png | ||
}} | }} | ||
{{Notes}} | {{Notes}} | ||
{{PageLang | {{PageLang | ||
| + | |Language=en | ||
|SourceLanguage=none | |SourceLanguage=none | ||
|IsTranslation=0 | |IsTranslation=0 | ||
| − | |||
}} | }} | ||
{{Tuto Status | {{Tuto Status | ||
|Complete=Draft | |Complete=Draft | ||
}} | }} | ||
Version du 22 novembre 2023 à 11:40
Assembly details for bench assembly of guarding

Difficulté
Moyen
Durée
1 heure(s)
Introduction
Tools Required
Standard hex key set
Standard spanner set
Standard HSS drill set
Acoustic mat cutting board and straight edge
Utility blade
Parts Required
D0000770 Door Hinge (M0016) x 2
D0001886 Front Door Saw Mk 4 x 1
M0000002 12mm Grey Acoustic Foam with Black PVC Facing x 1
M0000539 Handle Black Nylon 200mm M8 Fixings x 1
M0000031 panel edging ( consumable stock )
M0000150 Stuga sticker clear x 1
M0000154 Stuga service sticker x 1
Étape 1 - Unless otherwise stated
All bolts to have Loctite 243 adhesive applied unless otherwise stated
All Threaded Pneumatic connections to have Loctite 570 applied
All bolts to be pen marked once adhesive applied and correct tension added

Étape 2 - Cut Acoustic foam
Measure and cut acoustic foam to internal area of front door using cutting board and straight edge
Cut Acoustic foam to clear switch mounting block
Approximate size 755 x 845mm . Measure to define exact measurement


Étape 3 - Fit acoustic foam
Peel back small area of acoustic foam backing
Position and neatly align within door aperture
Remove all adhesive backing and finalise acoustic foam


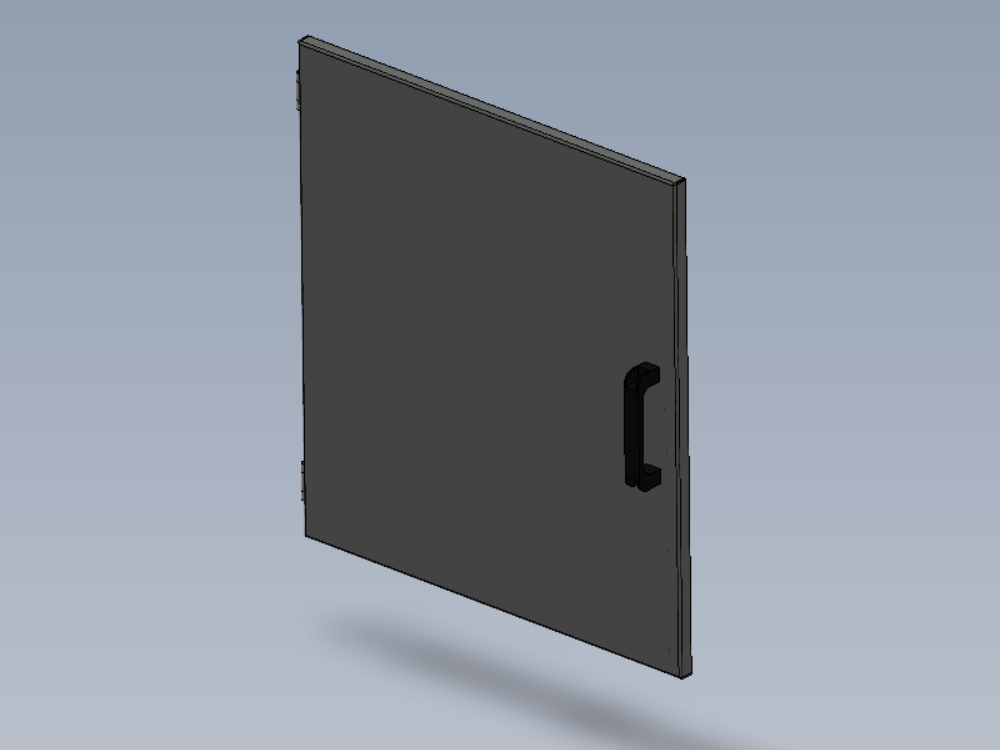
Étape 4 - Door Handle mounting
Drill through pre drilled holes 8.5mm in door to create clearance holes for mounting of door handle
Fix with M8 x 16 socket caps only


Étape 5 - Fit door hinges
Fit 2 off door hinges using
M4 x 12 button hex , A form washers, Shakeproof washers and standard nuts (please use these fasteners)
Do not use A form washer under button head on hinge
Ensure hinges are mounted parallel

Étape 6 - Fit panel edging
Fit panel edging to all edges that are not covered by hinges or switch mounting block
ensure corners are pressed in flat and hinges have edging strip cut out around them


Étape 7 - Fit stickers to front
Fit Large Clear stuga sticker and Stuga service sticker to front of door
Fit stuga sticker 300mm down from top face of door and central
Fit service sticker butted against bottom of stuga sticker and central

Draft
 Français
 English
 Deutsch
 Español
 Italiano
 Português