| [version en cours de rédaction] | [version en cours de rédaction] |
| Ligne 234 : | Ligne 234 : | ||
|Step_Picture_01=R0015329_Fit_Head_Spindle_Posts_Screenshot_2023-11-13_084348.png | |Step_Picture_01=R0015329_Fit_Head_Spindle_Posts_Screenshot_2023-11-13_084348.png | ||
|Step_Picture_01_annotation={"version":"2.4.6","objects":[{"type":"image","version":"2.4.6","originX":"left","originY":"top","left":0,"top":0,"width":531,"height":570,"fill":"rgb(0,0,0)","stroke":null,"strokeWidth":0,"strokeDashArray":null,"strokeLineCap":"butt","strokeDashOffset":0,"strokeLineJoin":"miter","strokeMiterLimit":4,"scaleX":1.13,"scaleY":1.13,"angle":0,"flipX":false,"flipY":false,"opacity":1,"shadow":null,"visible":true,"clipTo":null,"backgroundColor":"","fillRule":"nonzero","paintFirst":"fill","globalCompositeOperation":"source-over","transformMatrix":null,"skewX":0,"skewY":0,"crossOrigin":"","cropX":0,"cropY":0,"src":"https://stuga.dokit.app/images/9/90/R0015329_Fit_Head_Spindle_Posts_Screenshot_2023-11-13_084348.png","filters":[]},{"type":"wfnumberedbullet","version":"2.4.6","originX":"left","originY":"top","left":229,"top":307,"width":25,"height":25,"fill":"rgb(0,0,0)","stroke":"#FF0000","strokeWidth":0,"strokeDashArray":null,"strokeLineCap":"butt","strokeDashOffset":0,"strokeLineJoin":"miter","strokeMiterLimit":4,"scaleX":1,"scaleY":1,"angle":0,"flipX":false,"flipY":false,"opacity":1,"shadow":null,"visible":true,"clipTo":null,"backgroundColor":"","fillRule":"nonzero","paintFirst":"fill","globalCompositeOperation":"source-over","transformMatrix":null,"skewX":0,"skewY":0,"objects":[{"type":"circle","version":"2.4.6","originX":"center","originY":"center","left":0,"top":0,"width":24,"height":24,"fill":"#FF0000","stroke":null,"strokeWidth":1,"strokeDashArray":null,"strokeLineCap":"butt","strokeDashOffset":0,"strokeLineJoin":"miter","strokeMiterLimit":4,"scaleX":1,"scaleY":1,"angle":0,"flipX":false,"flipY":false,"opacity":1,"shadow":null,"visible":true,"clipTo":null,"backgroundColor":"","fillRule":"nonzero","paintFirst":"fill","globalCompositeOperation":"source-over","transformMatrix":null,"skewX":0,"skewY":0,"radius":12,"startAngle":0,"endAngle":6.283185307179586},{"type":"text","version":"2.4.6","originX":"center","originY":"center","left":0,"top":0,"width":7.79,"height":15.82,"fill":"rgba(255,255,255,255)","stroke":null,"strokeWidth":1,"strokeDashArray":null,"strokeLineCap":"butt","strokeDashOffset":0,"strokeLineJoin":"miter","strokeMiterLimit":4,"scaleX":1,"scaleY":1,"angle":0,"flipX":false,"flipY":false,"opacity":1,"shadow":null,"visible":true,"clipTo":null,"backgroundColor":"","fillRule":"nonzero","paintFirst":"fill","globalCompositeOperation":"source-over","transformMatrix":null,"skewX":0,"skewY":0,"text":"2","fontSize":14,"fontWeight":"normal","fontFamily":"arial","fontStyle":"normal","lineHeight":1.16,"underline":false,"overline":false,"linethrough":false,"textAlign":"left","textBackgroundColor":"","charSpacing":0,"styles":{} }],"number":2}],"height":644,"width":600} | |Step_Picture_01_annotation={"version":"2.4.6","objects":[{"type":"image","version":"2.4.6","originX":"left","originY":"top","left":0,"top":0,"width":531,"height":570,"fill":"rgb(0,0,0)","stroke":null,"strokeWidth":0,"strokeDashArray":null,"strokeLineCap":"butt","strokeDashOffset":0,"strokeLineJoin":"miter","strokeMiterLimit":4,"scaleX":1.13,"scaleY":1.13,"angle":0,"flipX":false,"flipY":false,"opacity":1,"shadow":null,"visible":true,"clipTo":null,"backgroundColor":"","fillRule":"nonzero","paintFirst":"fill","globalCompositeOperation":"source-over","transformMatrix":null,"skewX":0,"skewY":0,"crossOrigin":"","cropX":0,"cropY":0,"src":"https://stuga.dokit.app/images/9/90/R0015329_Fit_Head_Spindle_Posts_Screenshot_2023-11-13_084348.png","filters":[]},{"type":"wfnumberedbullet","version":"2.4.6","originX":"left","originY":"top","left":229,"top":307,"width":25,"height":25,"fill":"rgb(0,0,0)","stroke":"#FF0000","strokeWidth":0,"strokeDashArray":null,"strokeLineCap":"butt","strokeDashOffset":0,"strokeLineJoin":"miter","strokeMiterLimit":4,"scaleX":1,"scaleY":1,"angle":0,"flipX":false,"flipY":false,"opacity":1,"shadow":null,"visible":true,"clipTo":null,"backgroundColor":"","fillRule":"nonzero","paintFirst":"fill","globalCompositeOperation":"source-over","transformMatrix":null,"skewX":0,"skewY":0,"objects":[{"type":"circle","version":"2.4.6","originX":"center","originY":"center","left":0,"top":0,"width":24,"height":24,"fill":"#FF0000","stroke":null,"strokeWidth":1,"strokeDashArray":null,"strokeLineCap":"butt","strokeDashOffset":0,"strokeLineJoin":"miter","strokeMiterLimit":4,"scaleX":1,"scaleY":1,"angle":0,"flipX":false,"flipY":false,"opacity":1,"shadow":null,"visible":true,"clipTo":null,"backgroundColor":"","fillRule":"nonzero","paintFirst":"fill","globalCompositeOperation":"source-over","transformMatrix":null,"skewX":0,"skewY":0,"radius":12,"startAngle":0,"endAngle":6.283185307179586},{"type":"text","version":"2.4.6","originX":"center","originY":"center","left":0,"top":0,"width":7.79,"height":15.82,"fill":"rgba(255,255,255,255)","stroke":null,"strokeWidth":1,"strokeDashArray":null,"strokeLineCap":"butt","strokeDashOffset":0,"strokeLineJoin":"miter","strokeMiterLimit":4,"scaleX":1,"scaleY":1,"angle":0,"flipX":false,"flipY":false,"opacity":1,"shadow":null,"visible":true,"clipTo":null,"backgroundColor":"","fillRule":"nonzero","paintFirst":"fill","globalCompositeOperation":"source-over","transformMatrix":null,"skewX":0,"skewY":0,"text":"2","fontSize":14,"fontWeight":"normal","fontFamily":"arial","fontStyle":"normal","lineHeight":1.16,"underline":false,"overline":false,"linethrough":false,"textAlign":"left","textBackgroundColor":"","charSpacing":0,"styles":{} }],"number":2}],"height":644,"width":600} | ||
| − | |||
| − | |||
| − | |||
| − | |||
| − | |||
| − | |||
| − | |||
| − | |||
| − | |||
| − | |||
| − | |||
| − | |||
| − | |||
| − | |||
| − | |||
| − | |||
| − | |||
| − | |||
| − | |||
| − | |||
| − | |||
| − | |||
| − | |||
| − | |||
| − | |||
| − | |||
| − | |||
| − | |||
| − | |||
| − | |||
| − | |||
| − | |||
| − | |||
| − | |||
| − | |||
| − | |||
| − | |||
| − | |||
| − | |||
| − | |||
| − | |||
| − | |||
| − | |||
| − | |||
| − | |||
| − | |||
| − | |||
| − | |||
| − | |||
| − | |||
| − | |||
| − | |||
| − | |||
| − | |||
| − | |||
| − | |||
| − | |||
| − | |||
| − | |||
| − | |||
| − | |||
}} | }} | ||
{{Notes}} | {{Notes}} | ||
Version du 14 novembre 2023 à 09:35
Assembly details for fitment of main saw head and spindle posts


Difficulté
Difficile
Durée
3 heure(s)
Sommaire
- 1 Introduction
- 2 Étape 1 - Unless otherwise stated
- 3 Étape 2 - Attach brace supports
- 4 Étape 3 - Fit web
- 5 Étape 4 - Fit shafts
- 6 Étape 5 - Fit pre assembled head
- 7 Étape 6 - Fix top shaft blocks
- 8 Étape 7 - Finalise bearing blocks
- 9 Étape 8 - Fit spindle
- 10 Étape 9 - Fit motor plate and SR flag bracket
- 11 Étape 10 - Fit saw blade
- 12 Commentaires
Introduction
Tools Required
Standard hex key set
Standard flat hand file
Emery tape 120
standard hand tap set
Stubby hex key set
Ratchet/hex bit set
Blade flange spanner
Parts Required
D0004002 Webb x 1
D0004003 Top Shaft Block x 2
D0004004 Brace Support Bar (D7451) x 1
D0004157 Motor plate spacer x 3
D0004342 Damper Bracket (5312) x 1
D0007451 Brace Support Bar OH (D4004) x 1
D0015490 Saw Turntable Sensor Flag x 1
D0015491 Saw Turntable Flag Bracket x 1
H0004024 Infeed Clamp Post x 1
H0004025 Outfeed Clamp Post (5302) x 1
H0004510 Shaft 30mm: 540 Saw Stroke x 2
P0000055 Adjustable Damper 200mm (Saw Stroke) x 1
R0000560 Bench Assemble Spindle x 1
R0000569E Bench Assemble Head Spindle Posts Mk5 x 1
V0000043B Saw Blade: Ø500 x 160 teeth x 3.2mm pl x 4mm kf x 30mm bore x 1
Étape 1 - Unless otherwise stated
All bolts to have Loctite 243 adhesive applied unless otherwise stated
All Threaded Pneumatic connections to have Loctite 570 applied
All bolts to be pen marked once adhesive applied and correct tension added

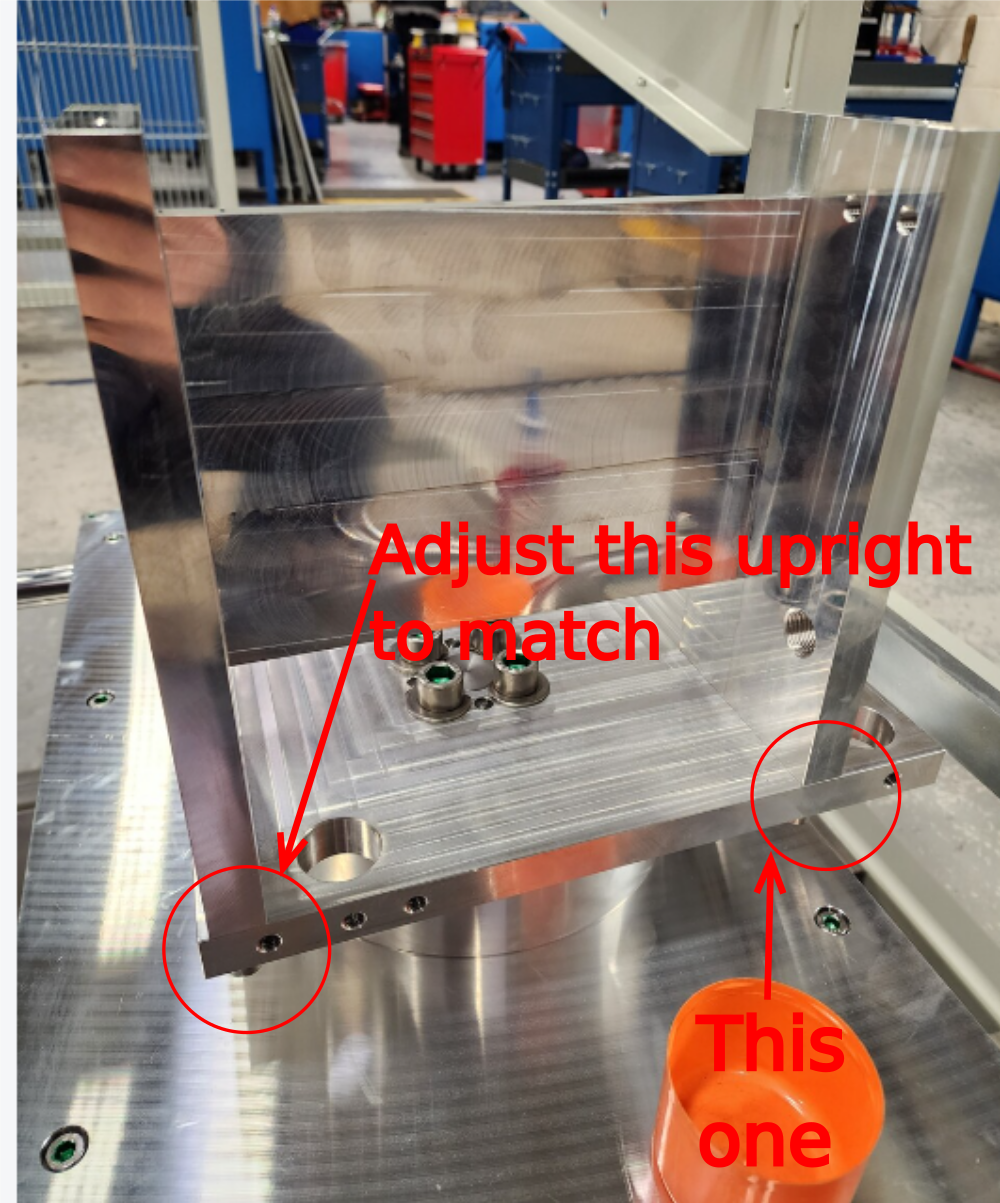
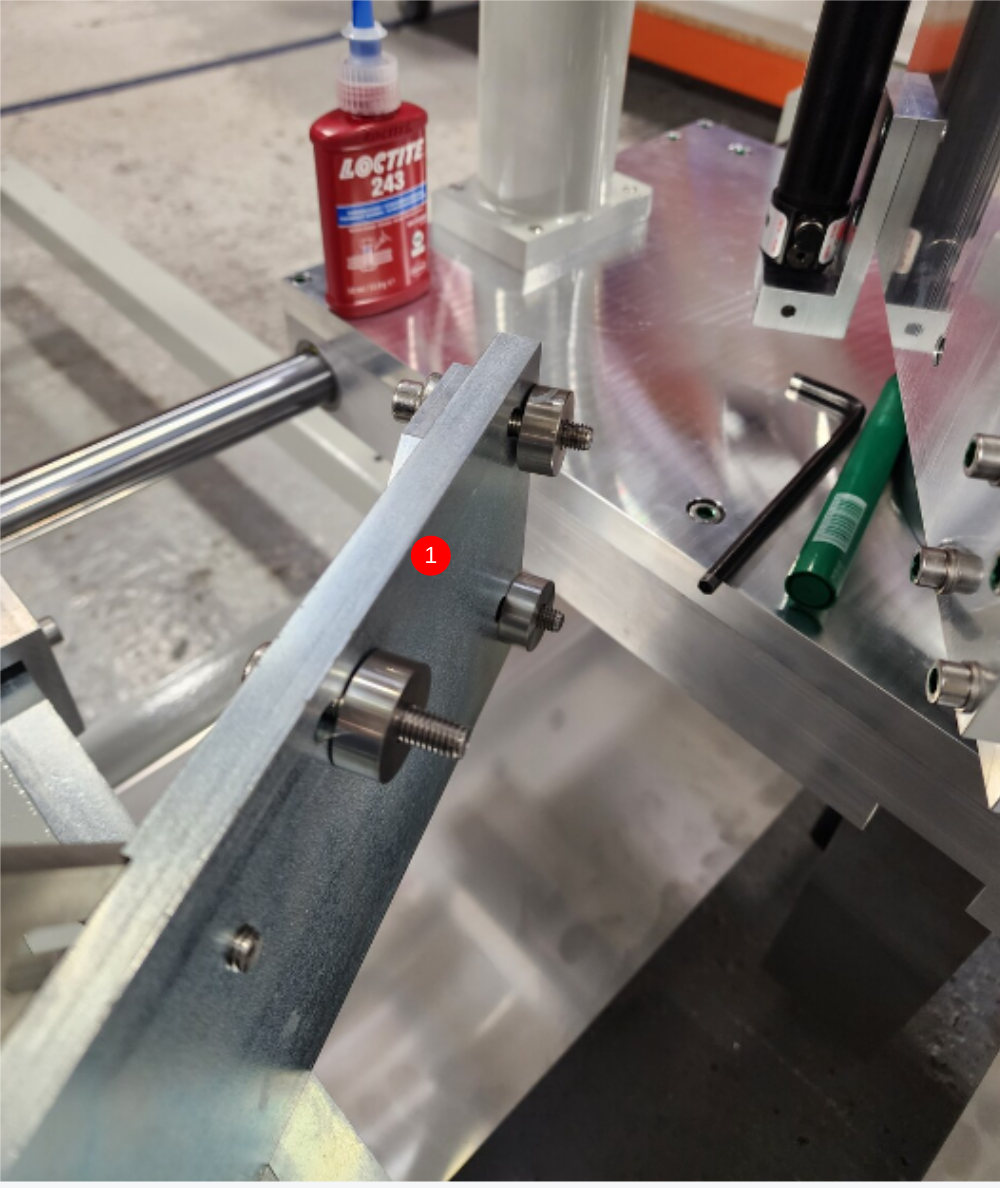
Étape 2 - Attach brace supports
attach brace supports to turntable plate
Do not tension brace 2 , add adhesive ready for next step
Orientate as shown
Use M8 x 35 Socket caps and A form washers .
Use 2 off 8mm x 24mm dowels in brace support 1 that aligns with dowel holes in turntable base
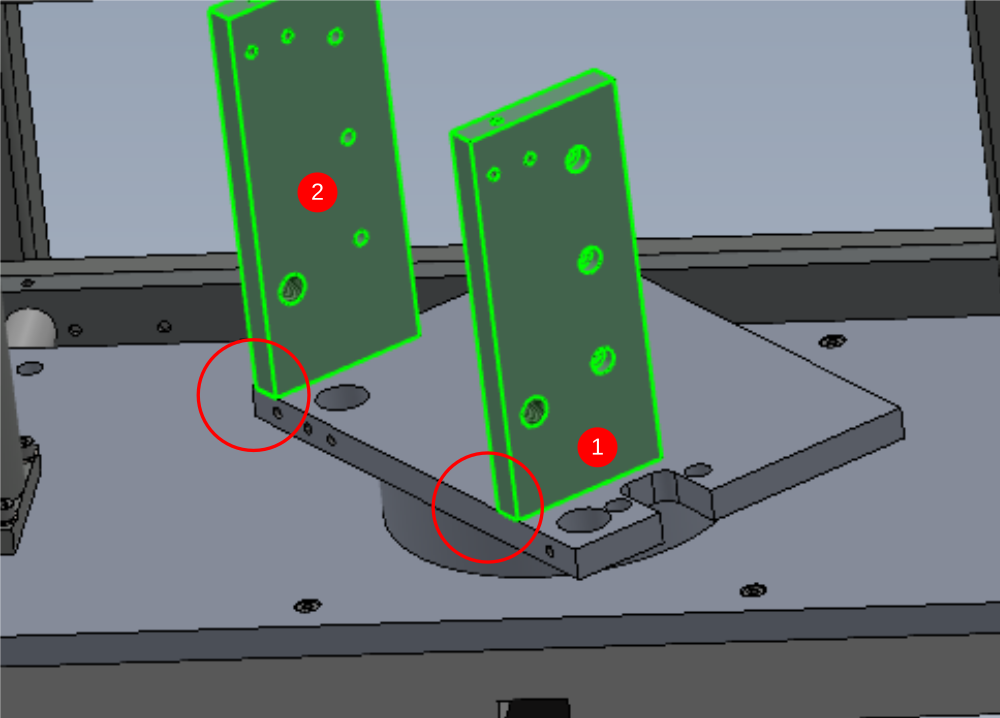


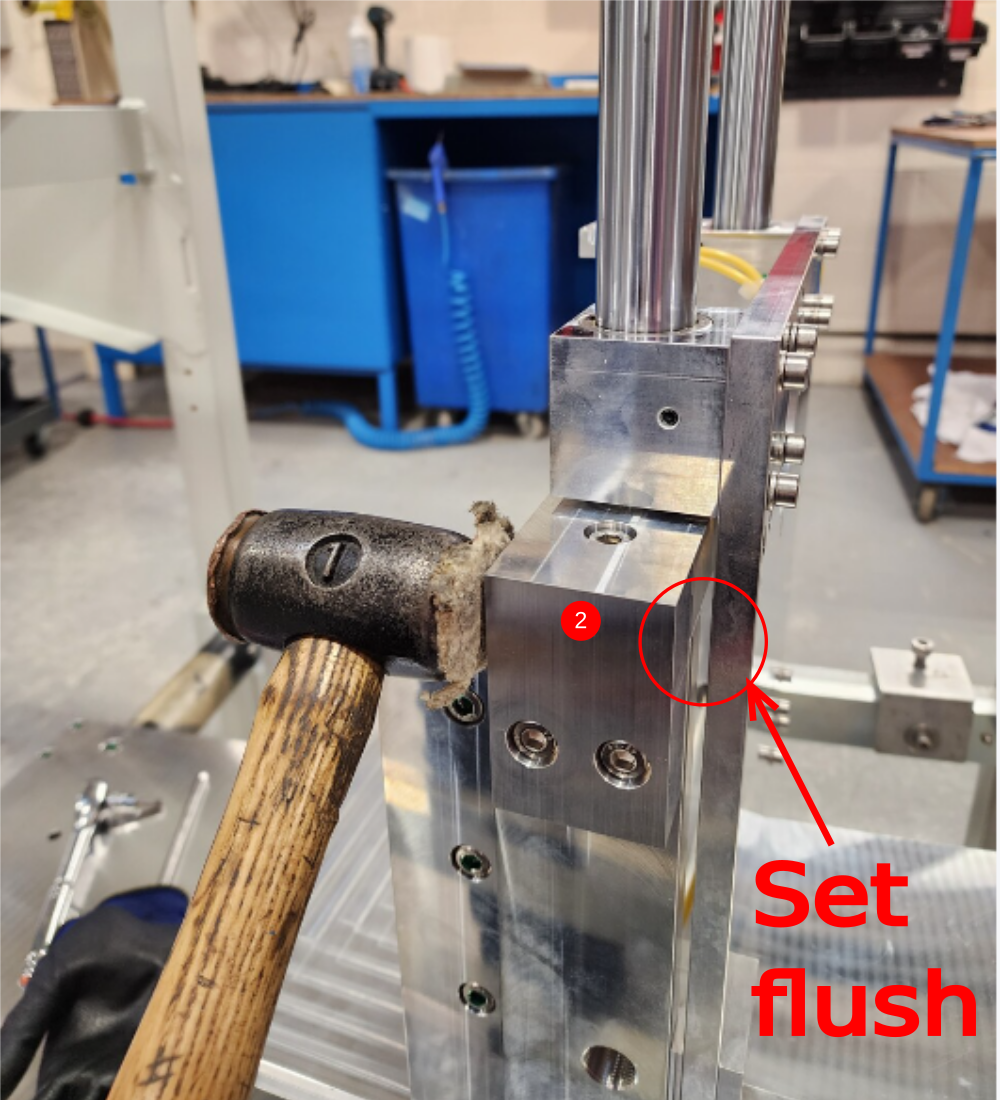
Étape 3 - Fit web
Fit web using 6 of M8 x 25 socket caps
Use to set pitch of brace supports, Tension dowelled upright side first
Adjust to set indicated faces flush
Finalise fasteners on brace supports and web


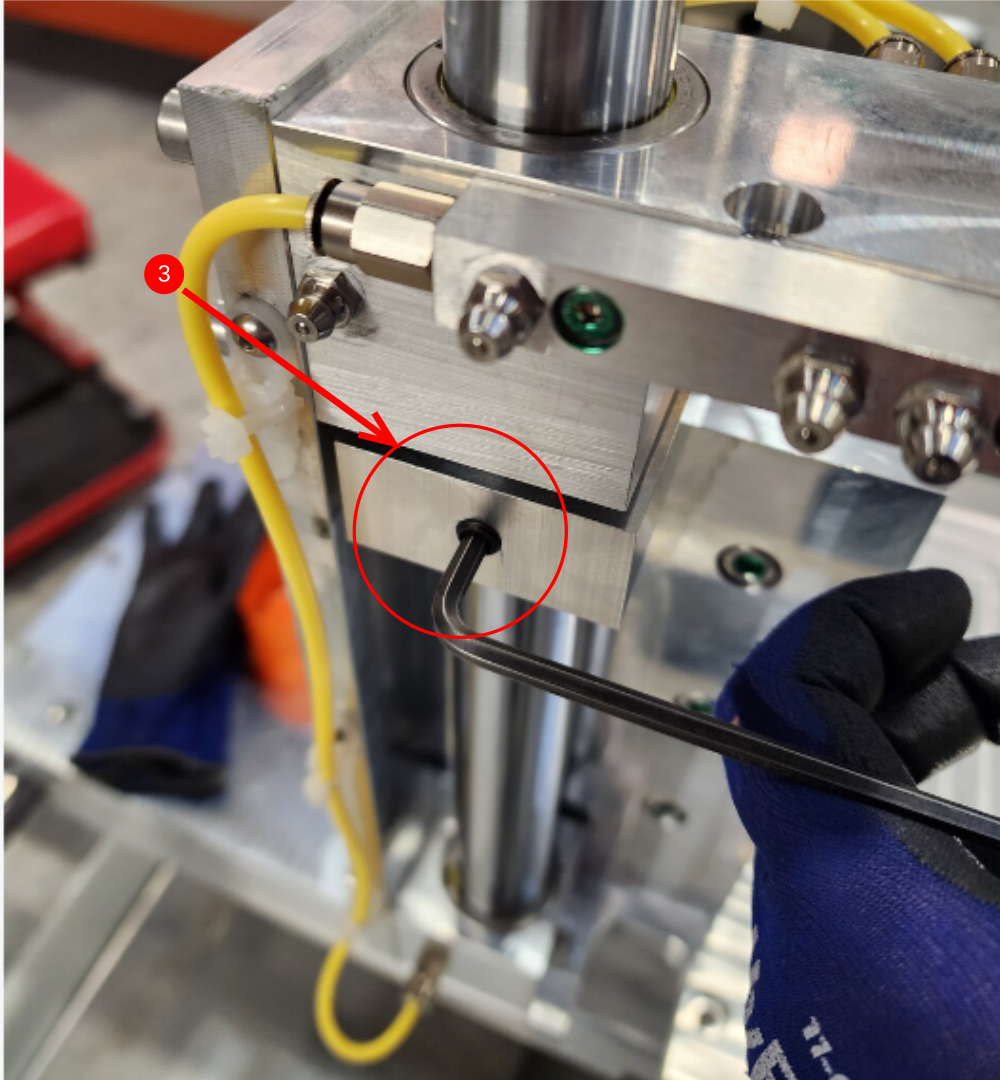
Étape 4 - Fit shafts
Clean shafts with FE10 solvent
Fit shafts to turntable plate using M8 x 12 KCP grubscrews , do not add final tension or adhesive at this point


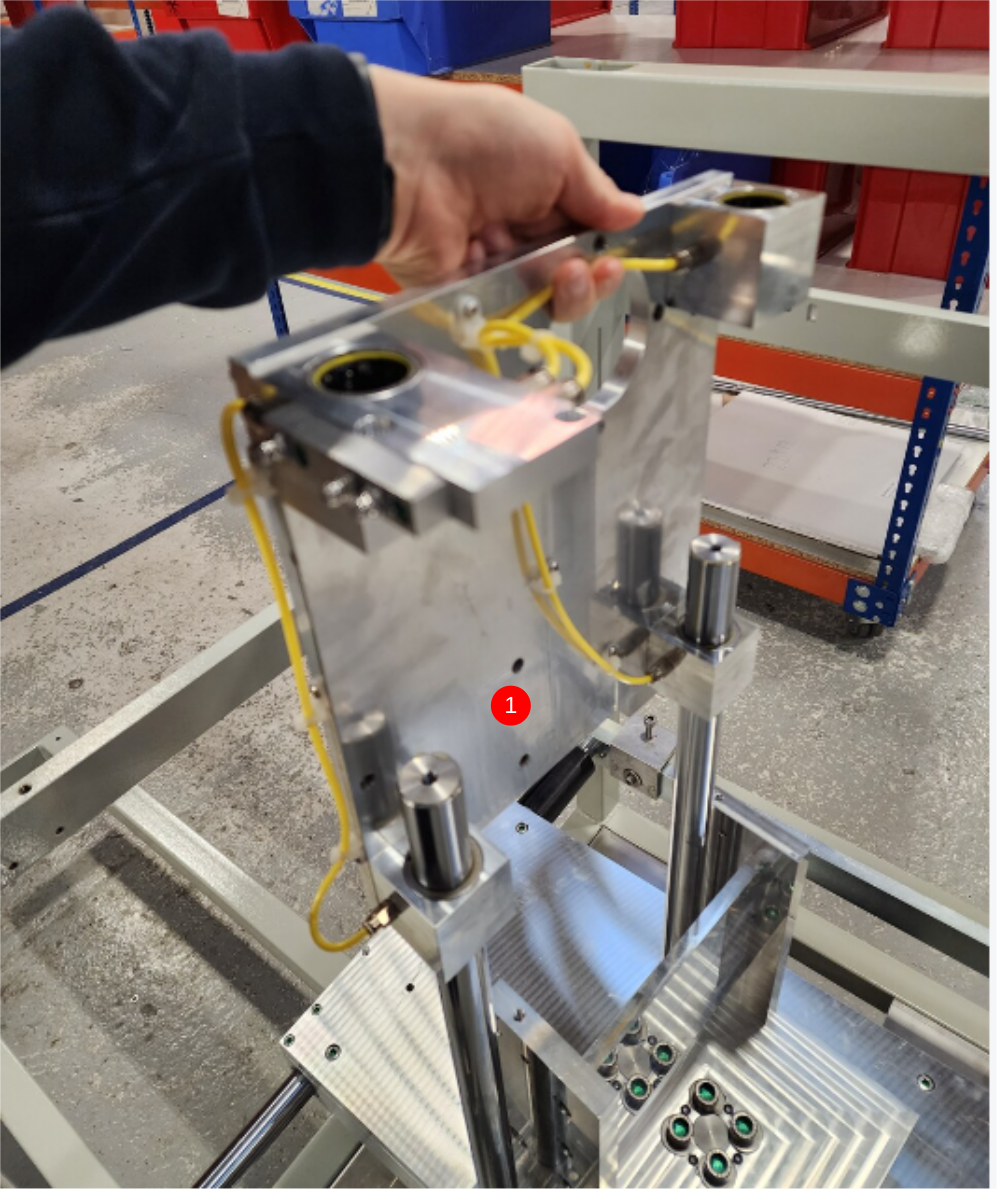
Étape 5 - Fit pre assembled head
1 Position 1st set of bearings over shafts
2 Position shaft tie blocks over shafts as shown
3 Lower and align top set of bearings
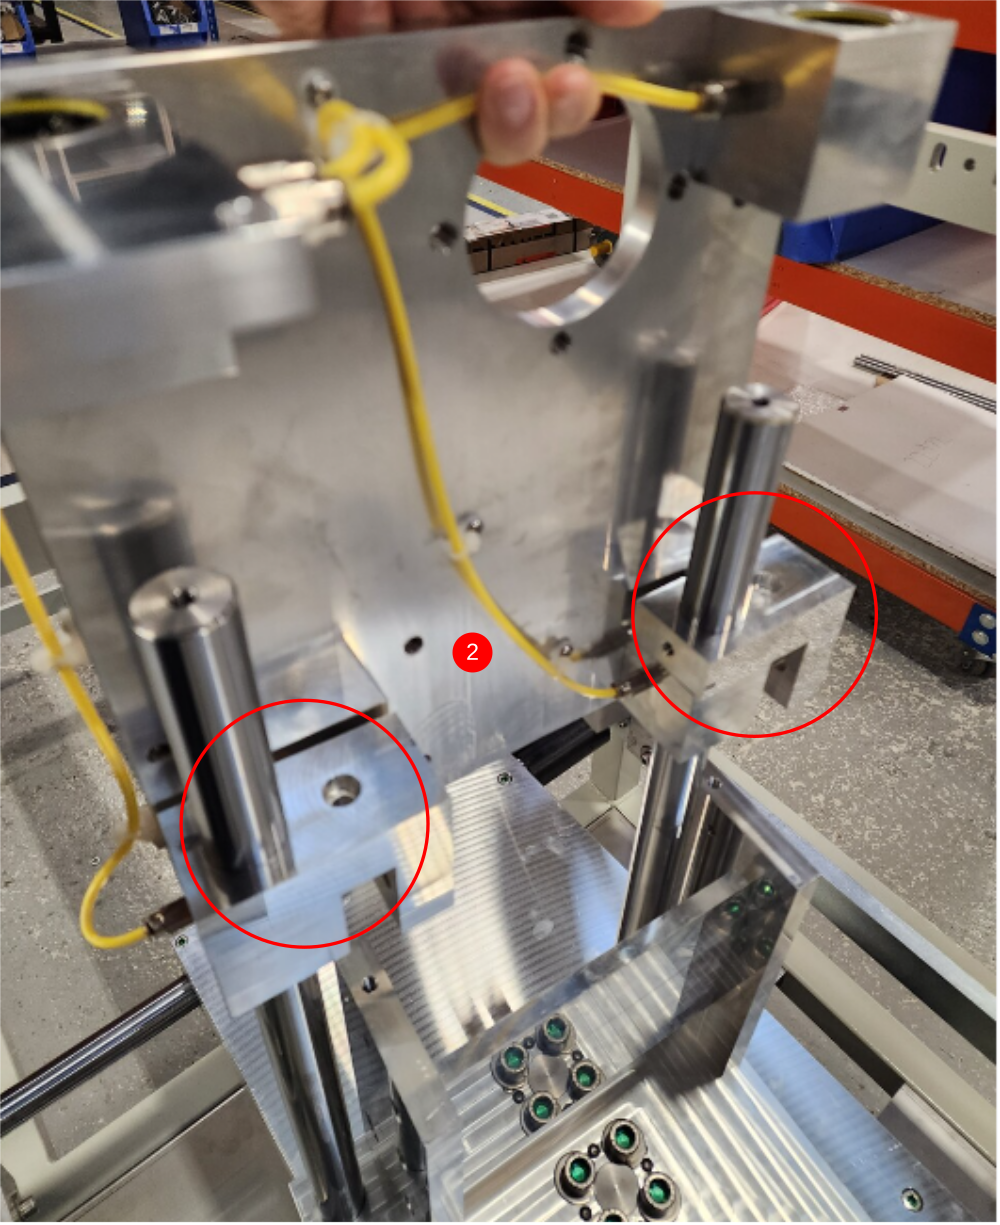

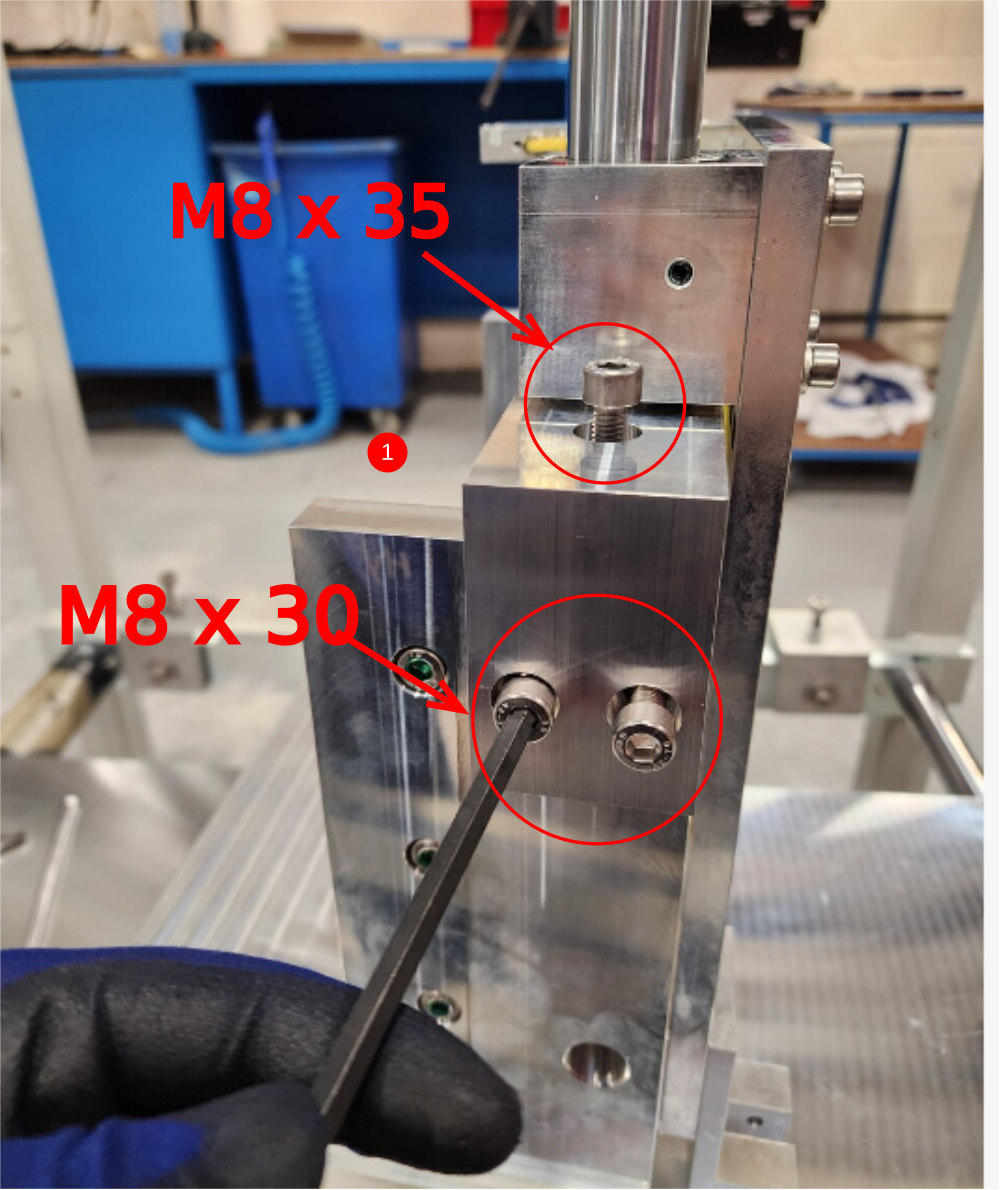
Étape 6 - Fix top shaft blocks
1 Use 4 off M8 x 30 and 2 off M8 x 35 to fix blocks
2 Adjust both blocks to be level on indicated face
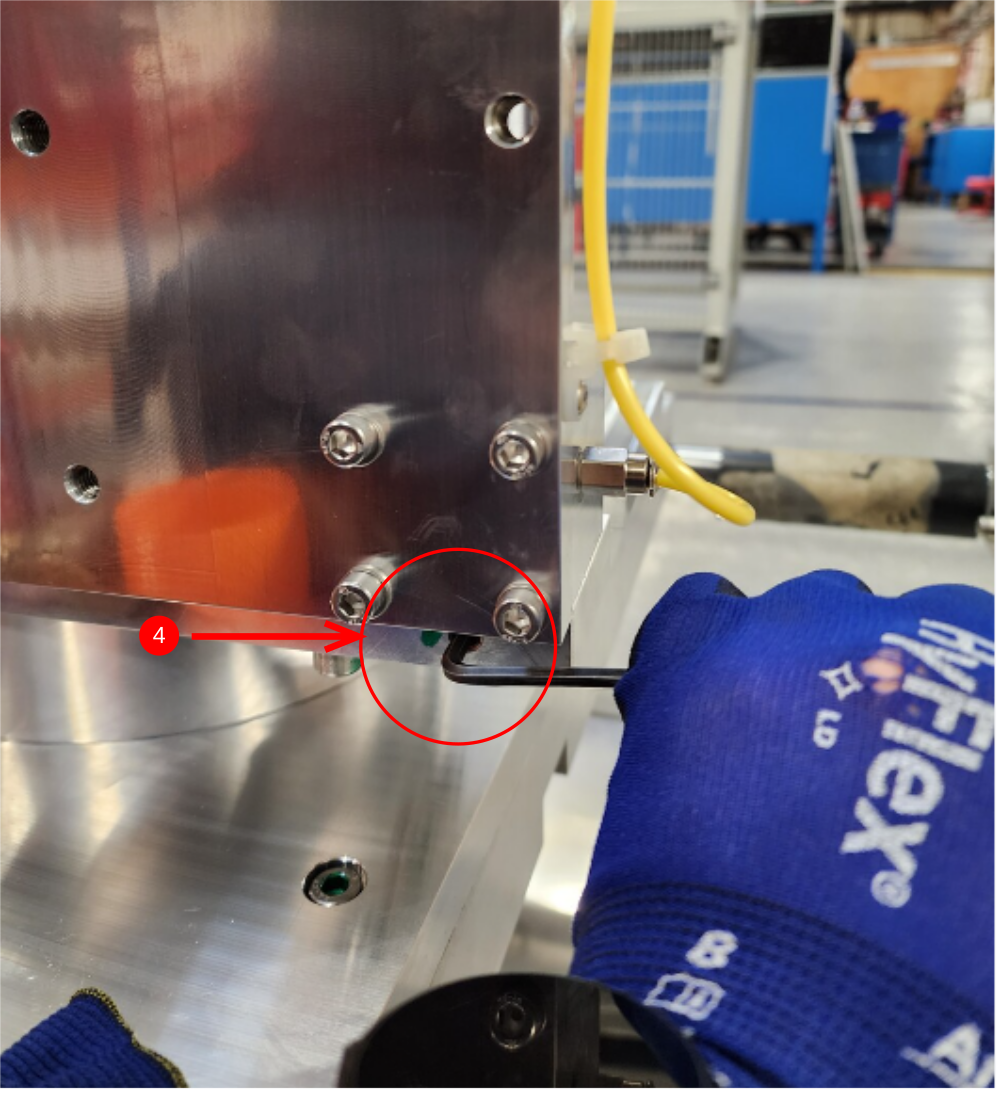
3 Fit M8 x 12 Kcp grubscrew 2 off
4 Finalise shaft grubscrews 2 off
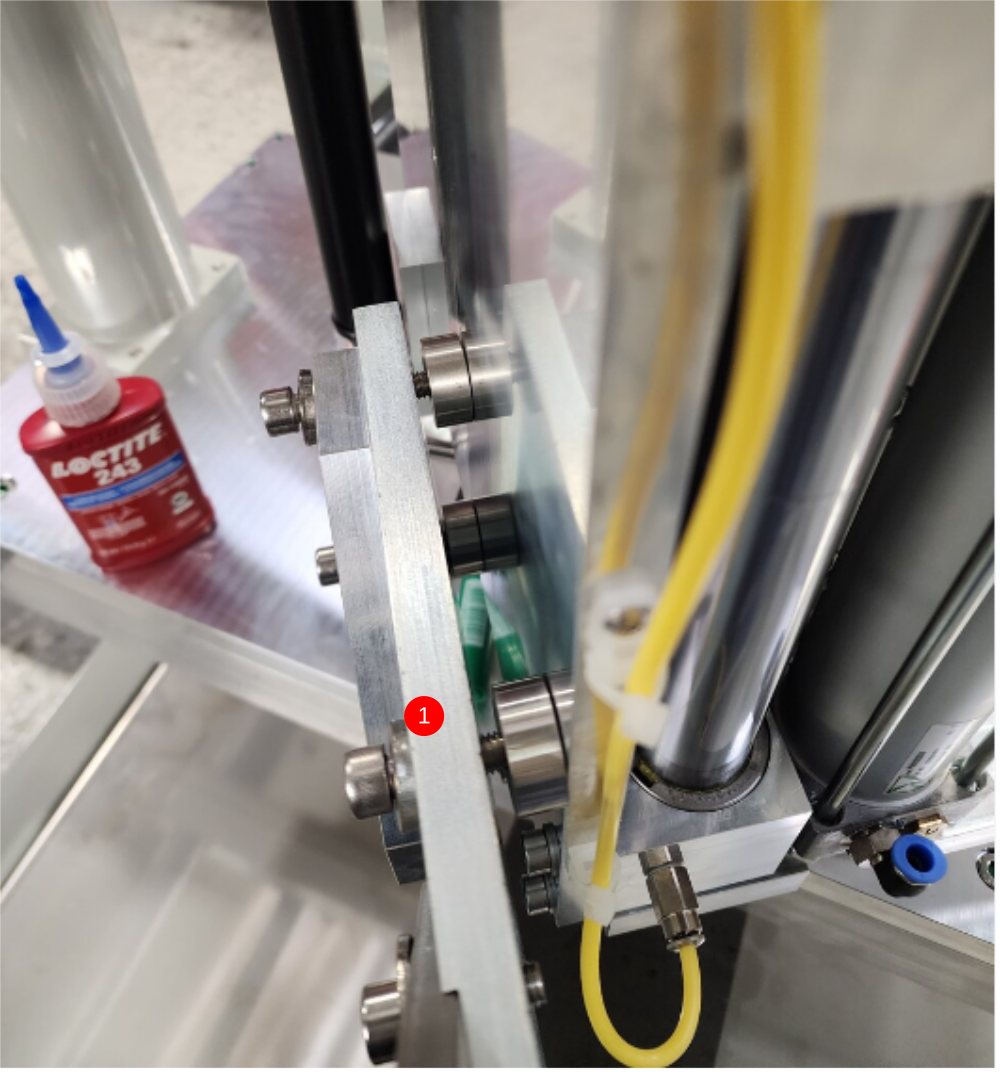
Étape 7 - Finalise bearing blocks
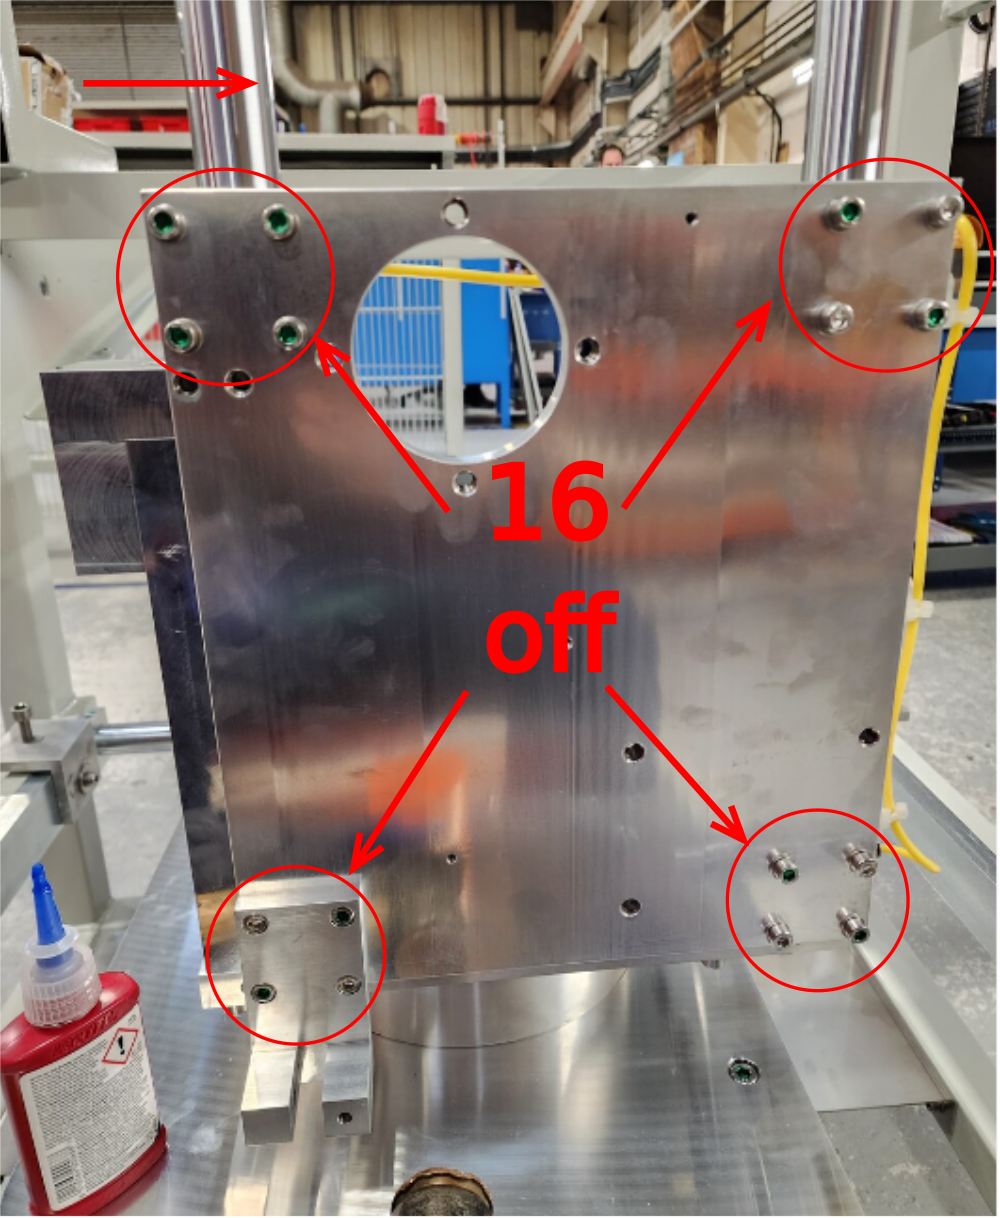
1 Ensure all 16 off fasteners are slightly loose to allow plate to align correctly
2 Add light pressure to all 16 off fasteners , move plate up and down to check free running with consistent pressure required
3 Remove each individual fastener and add loctite 243, and apply final tension
4 Double check correct operation of plate up and down

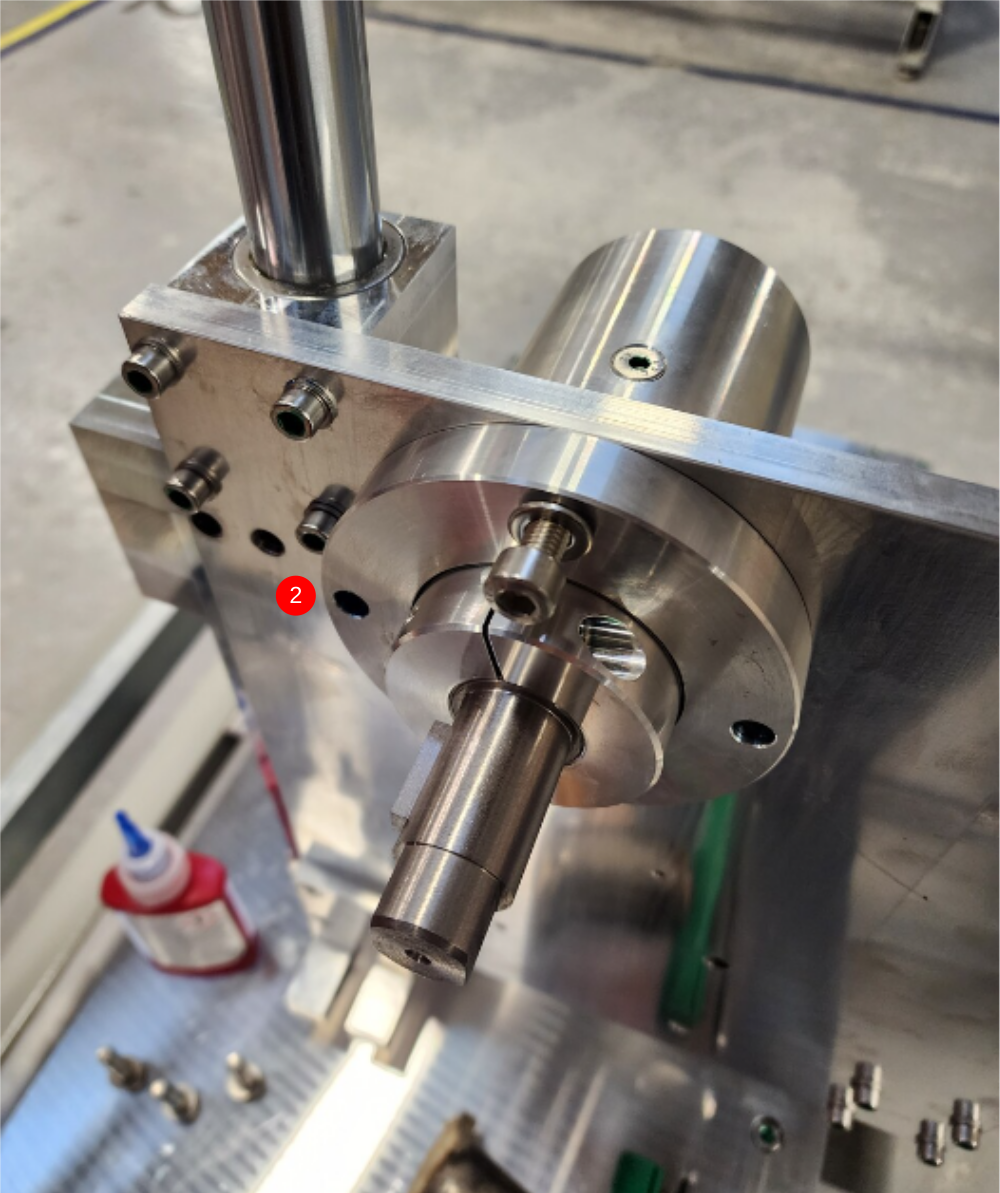
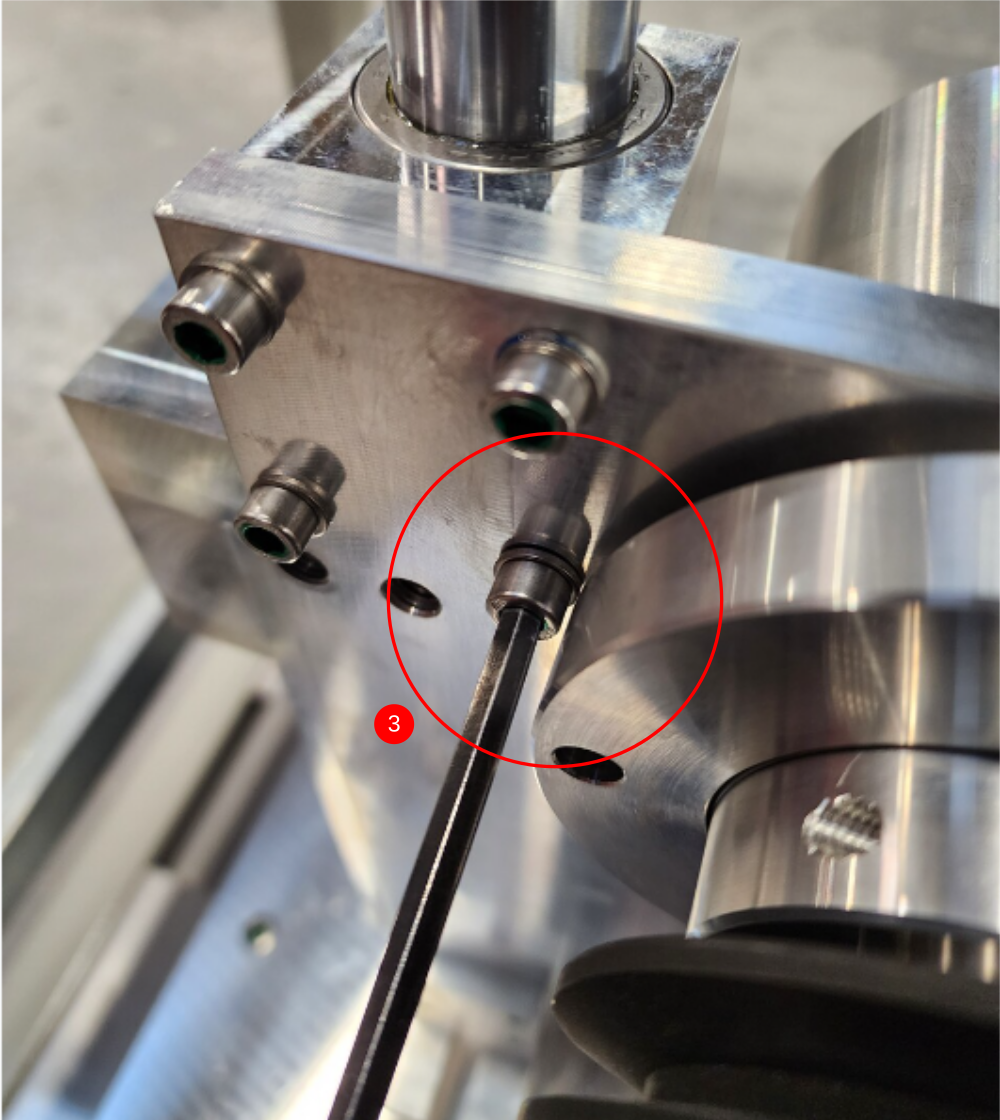
Étape 8 - Fit spindle
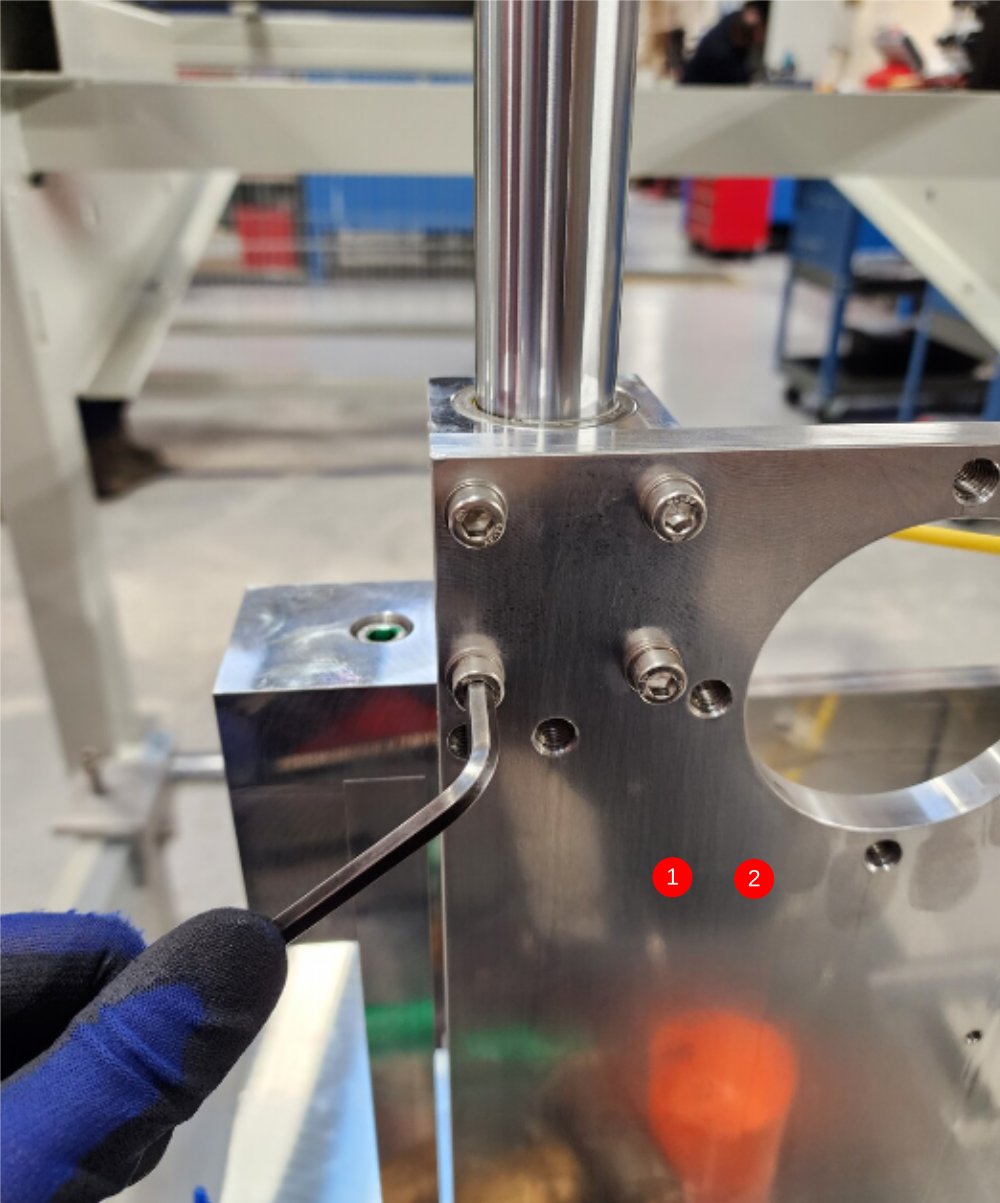
1 Slide off taper lock pully from spindle assembly and remove flanges and bolt for saw blade
2 Position spindle into plate as shown . Use countersunk bolt as reference for alignment . Use M8 x 30 socket cap to help align mounting holes when fitted .
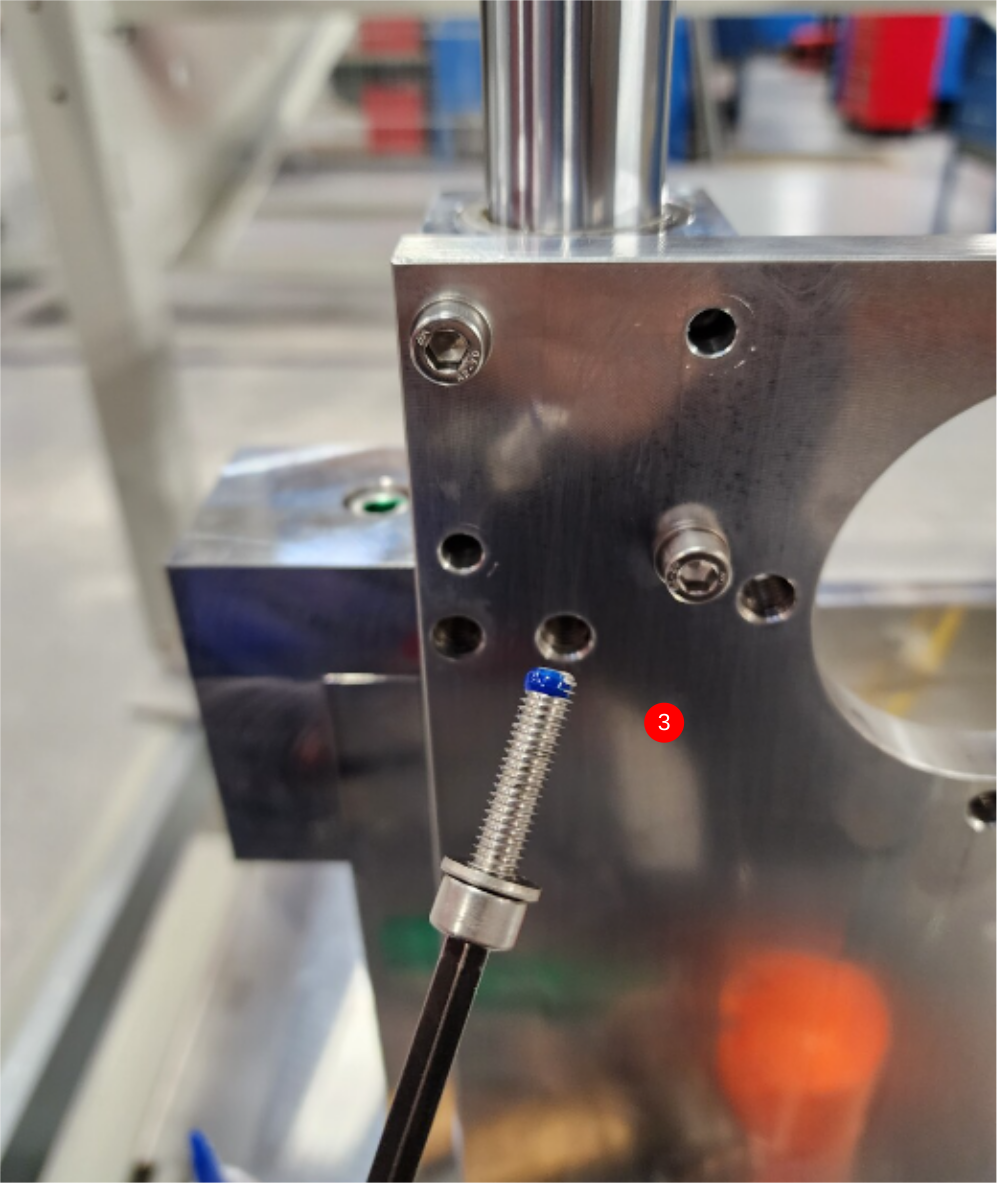
3 Check clearance on washer shown. If washer interferes with spindle, remove washer
4 Remove 1 off locating M8 socket cap. Add 4 off M8 x 30 socket caps and A form washers and finalise
5 Refit taper lock pulley to spindle assembly
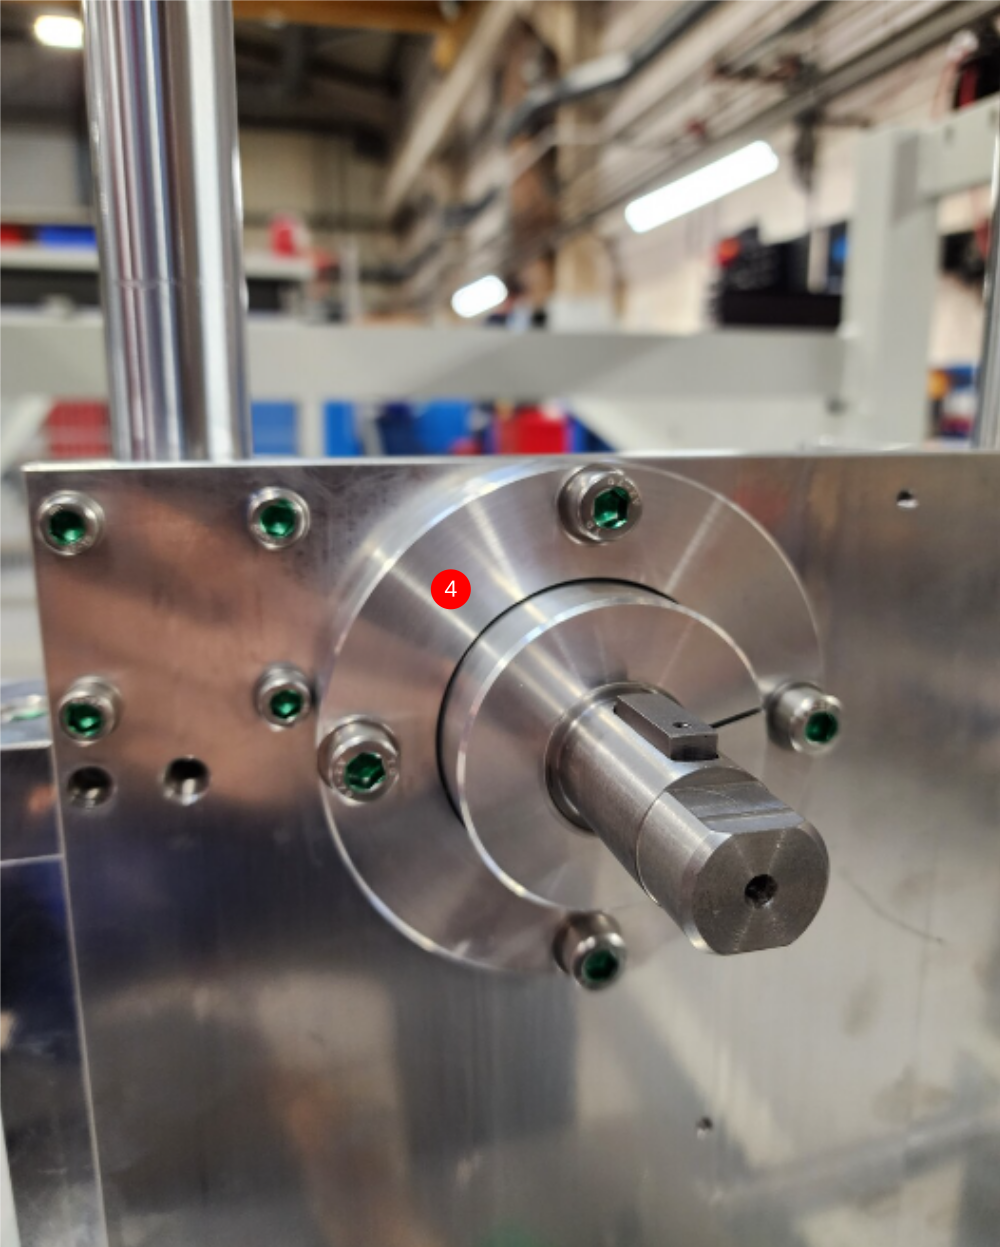
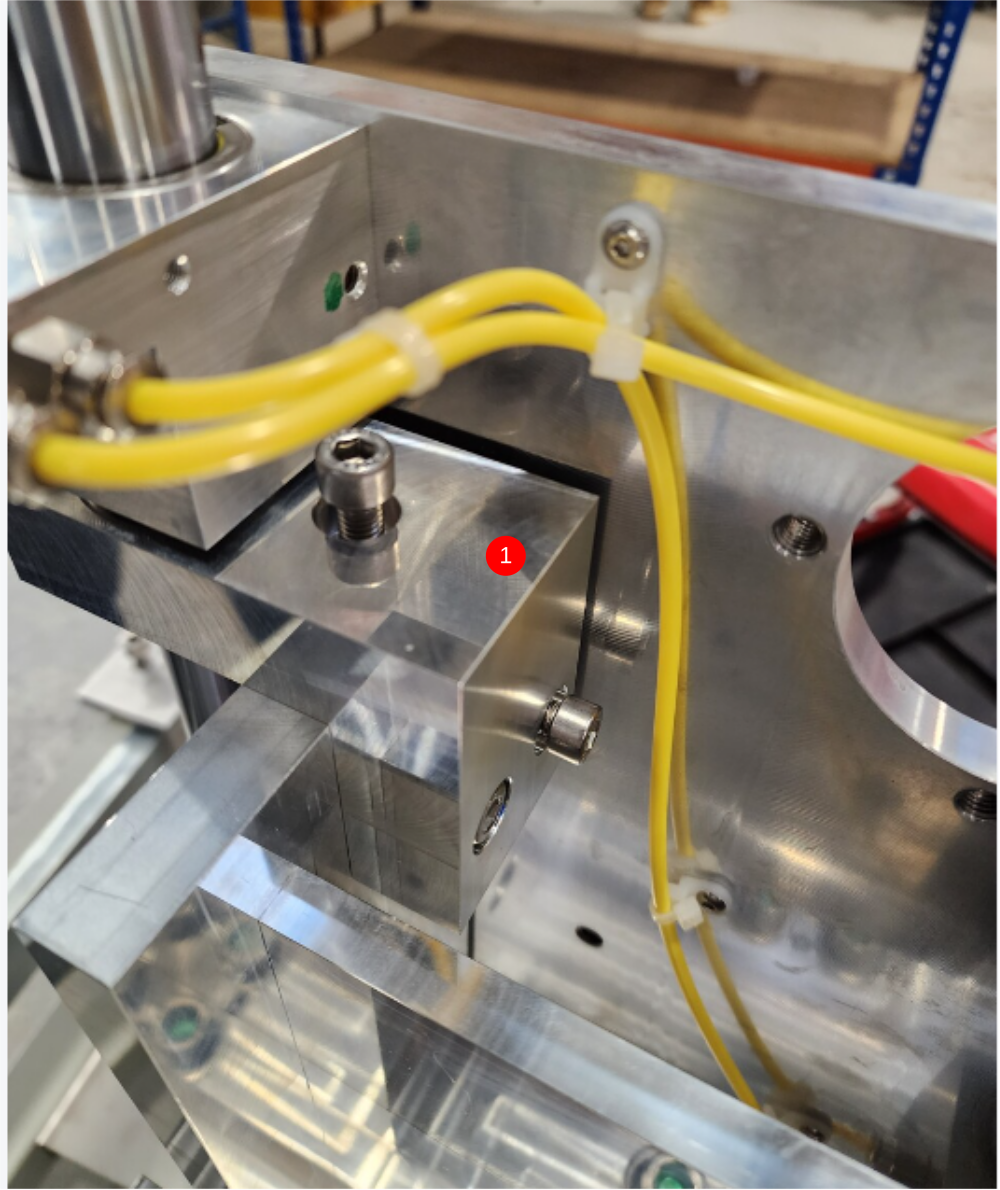
Étape 9 - Fit motor plate and SR flag bracket
1 Fit motor plate to upstroke plate , Combining part D0015491 saw turntable flag bracket and using D0004157 motor plate spacers between upstroke plate and motor plate . Use 2 off M8 x 50 socket caps, 1 off M8 x 40 socket cap and 3 off M8 motor plate washers
2 Attach Sr datum flag as shown using 2 off M6 x 20 socket caps and M6 A form washers


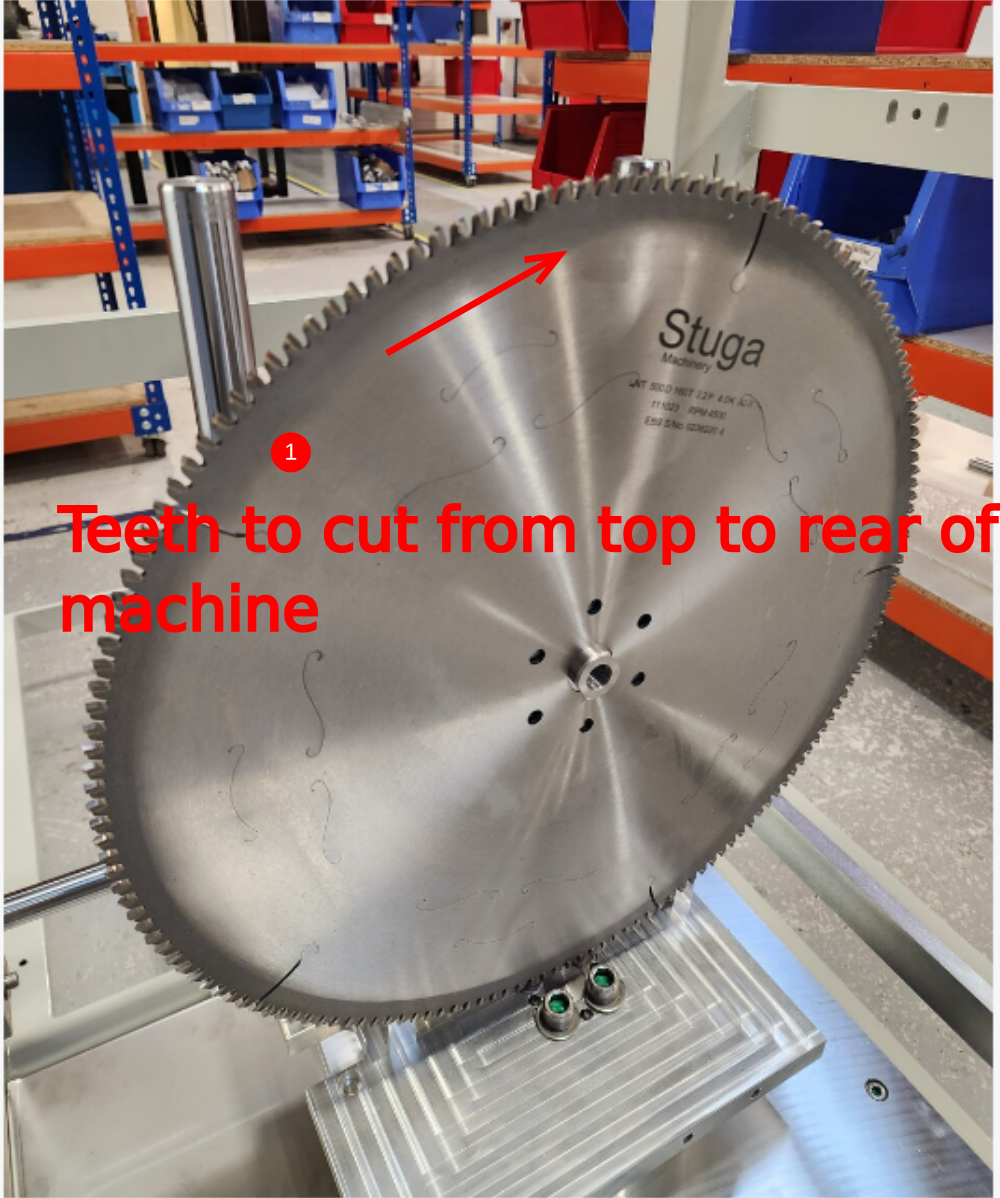
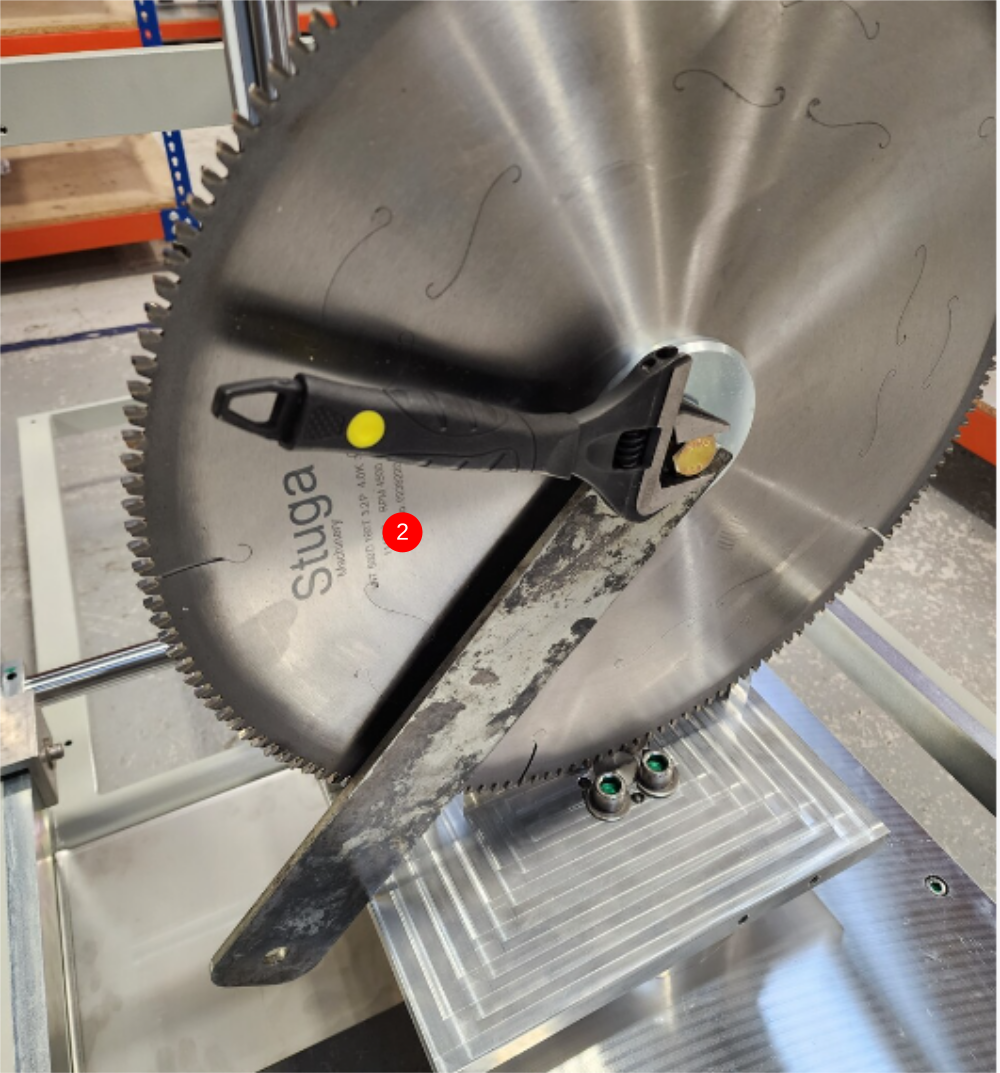
Étape 10 - Fit saw blade
1 Fit first flange to spindle and fit saw blade . Ensure blade is orientated correctly
2 Fit front flange, and locking bolt and washer. Apply medium Tension with 24mm spanner and blade flange spanner
Draft
 Français
 English
 Deutsch
 Español
 Italiano
 Português