| [version en cours de rédaction] | [version en cours de rédaction] |
| Ligne 10 : | Ligne 10 : | ||
{{Introduction | {{Introduction | ||
|Introduction=<translate><u>'''Tools Required'''</u> | |Introduction=<translate><u>'''Tools Required'''</u> | ||
| − | |||
| − | |||
| − | |||
| − | |||
| − | |||
| − | |||
| − | |||
Standard Hex key Set | Standard Hex key Set | ||
| Ligne 43 : | Ligne 36 : | ||
All bolts to be pen marked once adhesive applied and correct tension added</translate> | All bolts to be pen marked once adhesive applied and correct tension added</translate> | ||
|Step_Picture_00=R0015086_Assemble_Pneumatics_on_to_electrical_cabinet_loctite_243.png | |Step_Picture_00=R0015086_Assemble_Pneumatics_on_to_electrical_cabinet_loctite_243.png | ||
| + | }} | ||
| + | {{Tuto Step | ||
| + | |Step_Title=<translate>Sequence for mounting assemblies has been updated</translate> | ||
| + | |Step_Content=<translate>Build sequence has been modified for improved access to key stages of build | ||
| + | |||
| + | |||
| + | Drive shafts will now be fitted before roller beds , this being enabled by a change to the bench assembly process of the roller beds .</translate> | ||
| + | |Step_Picture_00=R0015338_Bench_Assemble_Serial_Plate_caution.png | ||
| + | }} | ||
| + | {{Tuto Step | ||
| + | |Step_Title=<translate>Fitting roller Beds</translate> | ||
| + | |Step_Content=<translate>'''<u>Please take photos of these steps for update</u>''' | ||
| + | |||
| + | |||
| + | 1 Position Bracket on blue section , holding roller frame upright | ||
| + | |||
| + | |||
| + | 2 Fix bracket with M8 x 25 socket caps and heavy M8 washers | ||
| + | |||
| + | |||
| + | 3 Lower roller frame to 90 degrees | ||
| + | |||
| + | |||
| + | 4 Wind cylinder thread into attached rod end bearing</translate> | ||
| + | |Step_Picture_00=R0015338_Bench_Assemble_Serial_Plate_caution.png | ||
}} | }} | ||
{{Tuto Step | {{Tuto Step | ||
Version du 14 novembre 2023 à 11:48
Fitting details for completed assemblies

Difficulté
Moyen
Durée
2 heure(s)
Introduction
Tools Required
Standard Hex key Set
Standard spanner set
Parts Required
Completed Assemblies
R0015081
Étape 1 - Unless otherwise stated
All bolts to have Loctite 243 adhesive applied unless otherwise stated
All Threaded Pneumatic connections to have Loctite 570 applied
All bolts to be pen marked once adhesive applied and correct tension added

Étape 2 - Sequence for mounting assemblies has been updated
Build sequence has been modified for improved access to key stages of build
Drive shafts will now be fitted before roller beds , this being enabled by a change to the bench assembly process of the roller beds .

Étape 3 - Fitting roller Beds
Please take photos of these steps for update
1 Position Bracket on blue section , holding roller frame upright
2 Fix bracket with M8 x 25 socket caps and heavy M8 washers
3 Lower roller frame to 90 degrees
4 Wind cylinder thread into attached rod end bearing
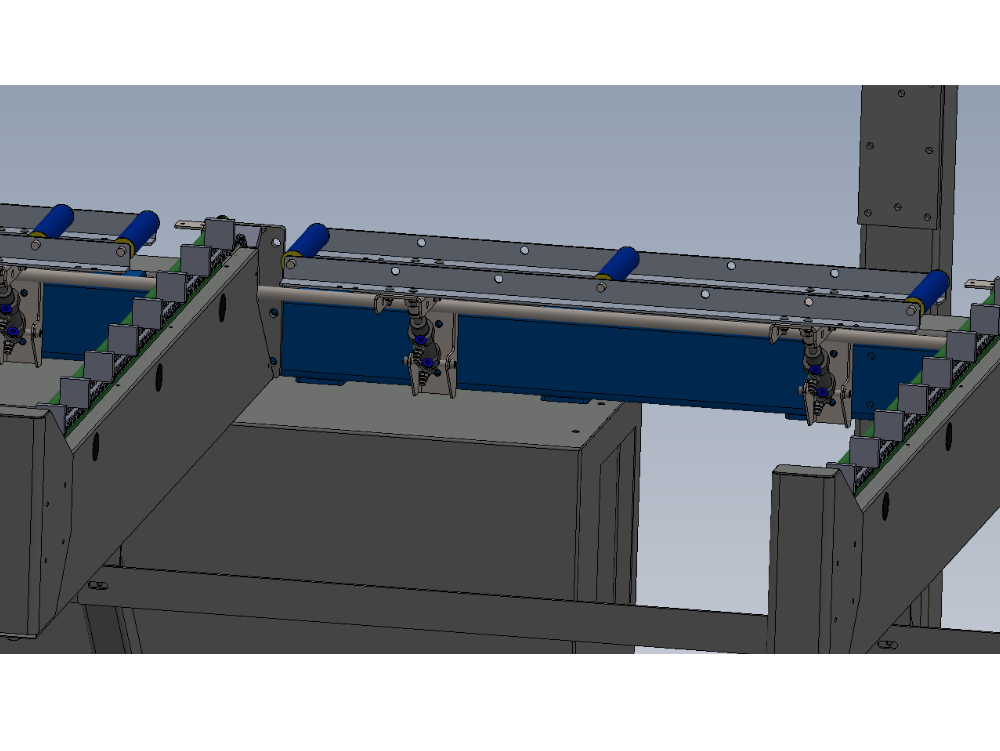
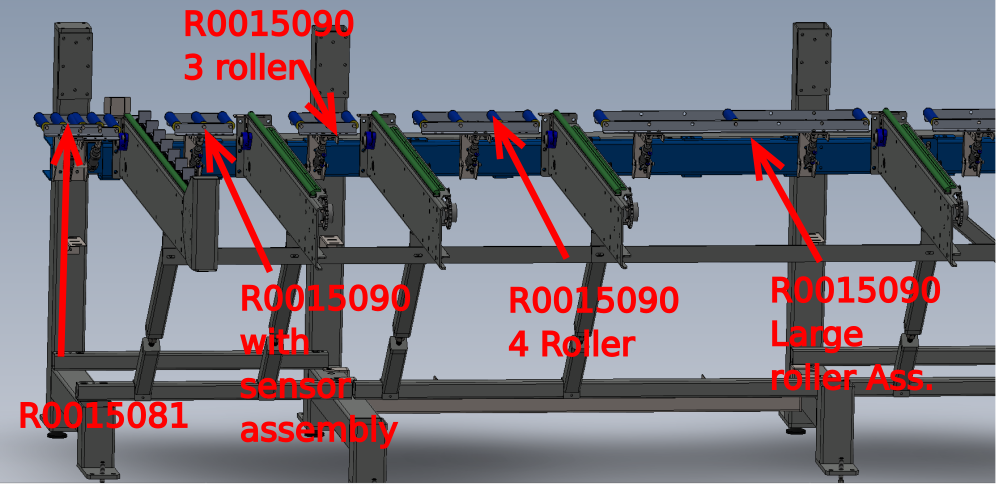
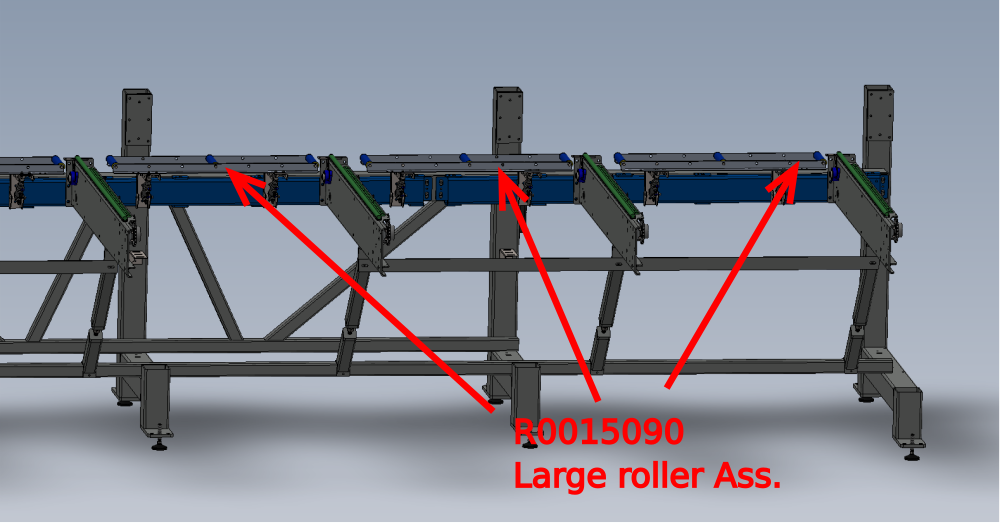
Étape 4 - Roller bed Positions
See Pictures for R0015081 and R0015090 roller bed locations

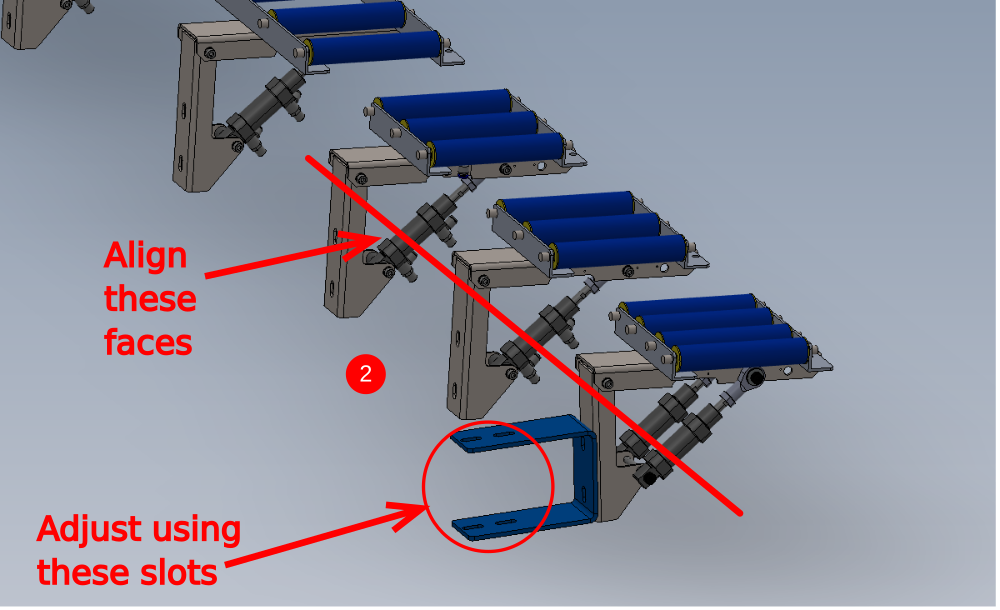
Étape 5 - Attach to Frame
1 Mount assemblies as shown using M8 x 25 socket caps and heavy M8 washers.
Do not apply Loctite 243 at this stage to bolts
Only apply enough tension to fasteners to hold roller assemblies true to the mounting face (Blue section)
2 Attach R0015081 using the same fasteners as above. Ensure the slots are used to align to the other roller bed assemblies as shown

Draft
 Français
 English
 Deutsch
 Español
 Italiano
 Português