| [version en cours de rédaction] | [version en cours de rédaction] |
(Page créée avec « {{Tuto Details |Description=<translate>This Page describes the drives screen in the winMulti Service Menu</translate> |Categories=Operation, Software |Tags=winMulti, Drive... ») |
|||
| Ligne 4 : | Ligne 4 : | ||
|Tags=winMulti, Drives, WinMulti, Motors | |Tags=winMulti, Drives, WinMulti, Motors | ||
}} | }} | ||
| − | <translate>== Drives == | + | <translate>==Drives== |
The Drives tab allows manipulation of each of the axes. Each Machine type will have different drives as shown below. The manipulation of these can only be performed in '''Manual Mode''', to enter manual mode from the main screen press the '''STOP''' Button once. | The Drives tab allows manipulation of each of the axes. Each Machine type will have different drives as shown below. The manipulation of these can only be performed in '''Manual Mode''', to enter manual mode from the main screen press the '''STOP''' Button once. | ||
<br /> | <br /> | ||
| − | === | + | ===Saw Drives=== |
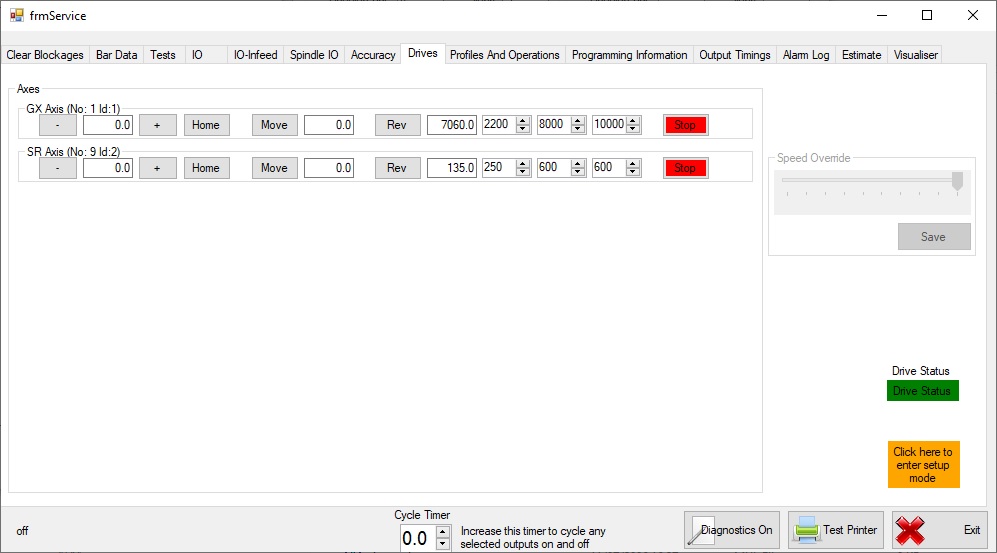
| + | <br />{{#annotatedImageLight:Fichier:WinMulti - Drives DrivesSaw.jpg|0=997px|hash=|jsondata=|mediaClass=Image|type=frameless|align=left|src=https://stuga.dokit.app/images/f/f1/WinMulti_-_Drives_DrivesSaw.jpg|href=./Fichier:WinMulti - Drives DrivesSaw.jpg|resource=./Fichier:WinMulti - Drives DrivesSaw.jpg|caption=Saw Drives|size=997px}} | ||
| + | |||
| + | {| class="wikitable" | ||
| + | |+Autocut Drives | ||
| + | !Drive | ||
| + | !Description | ||
| + | |- | ||
| + | |GX Axis | ||
| + | |This is the axis for the saw pusher and works from 7060 (end if the infeed bed) to 0 (Saw Blade) | ||
| + | |- | ||
| + | |SR Axis | ||
| + | |This is the axis for the Saw Blade Rotation and works from 45 to 135 degrees | ||
| + | |} | ||
| + | <br /> | ||
| + | ===Ecoline=== | ||
| + | |||
| + | |||
| + | |||
| + | ===Flowline / ZX3 Drives=== | ||
| + | |||
| + | |||
| + | ===Microline=== | ||
| − | === | + | ===ZX4 Drives=== |
| − | === ZX5 Drives === | + | ===ZX5 Drives=== |
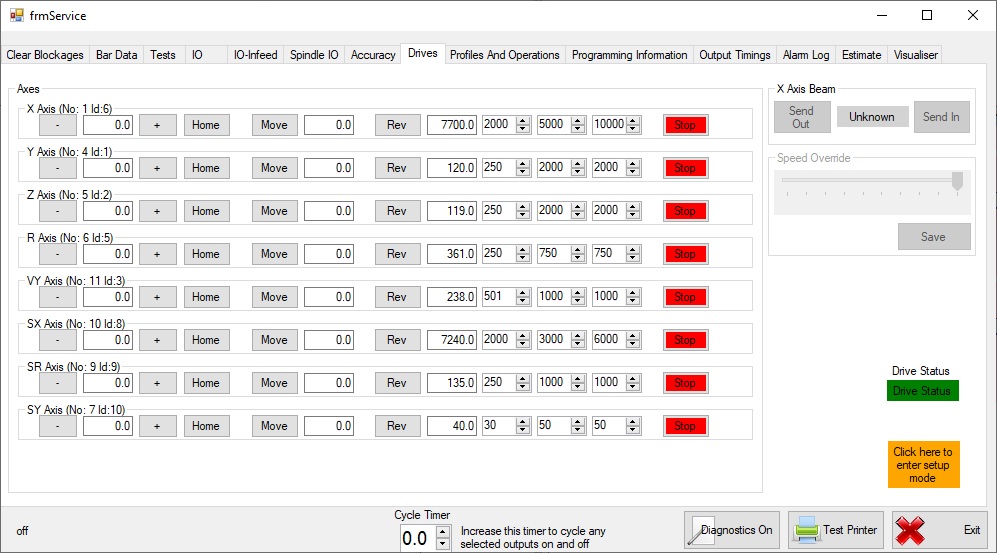
<br />{{#annotatedImageLight:Fichier:WinMulti - Drives DrivesZX5.jpg|0=997px|hash=|jsondata=|mediaClass=Image|type=frameless|align=center|src=https://stuga.dokit.app/images/5/5f/WinMulti_-_Drives_DrivesZX5.jpg|href=./Fichier:WinMulti - Drives DrivesZX5.jpg|resource=./Fichier:WinMulti - Drives DrivesZX5.jpg|caption=ZX5 Drives|size=997px}}<br /> | <br />{{#annotatedImageLight:Fichier:WinMulti - Drives DrivesZX5.jpg|0=997px|hash=|jsondata=|mediaClass=Image|type=frameless|align=center|src=https://stuga.dokit.app/images/5/5f/WinMulti_-_Drives_DrivesZX5.jpg|href=./Fichier:WinMulti - Drives DrivesZX5.jpg|resource=./Fichier:WinMulti - Drives DrivesZX5.jpg|caption=ZX5 Drives|size=997px}}<br /> | ||
| − | === Autoflow Drives === | + | ===Autoflow Drives=== |
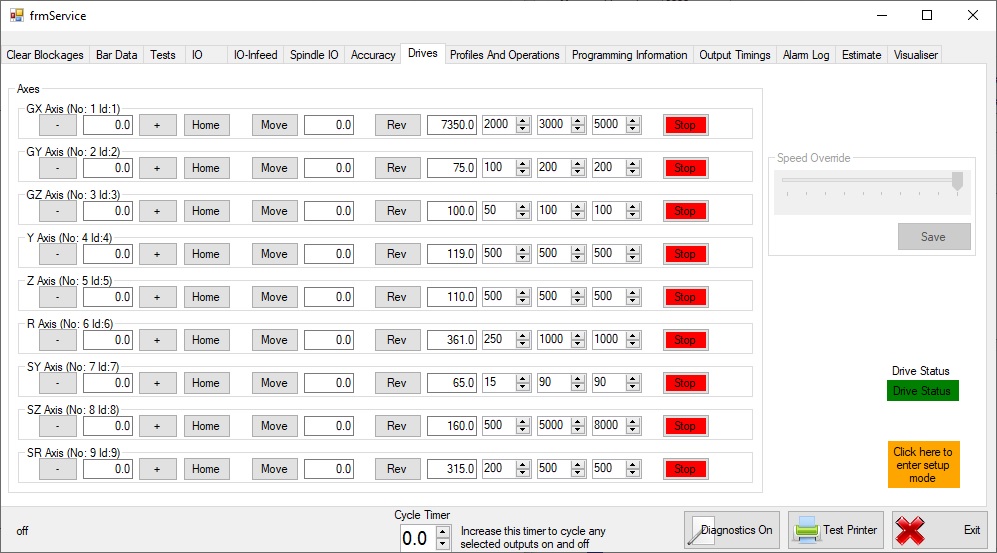
| + | {{#annotatedImageLight:Fichier:WinMulti - Drives DrivesAutoflow.jpg|0=997px|hash=|jsondata=|mediaClass=Image|type=frameless|align=center|src=https://stuga.dokit.app/images/b/b0/WinMulti_-_Drives_DrivesAutoflow.jpg|href=./Fichier:WinMulti - Drives DrivesAutoflow.jpg|resource=./Fichier:WinMulti - Drives DrivesAutoflow.jpg|caption=Autoflow Drives|size=997px}}<br /> | ||
<br /> | <br /> | ||
| − | ==== Axes ==== | + | ====Axes==== |
| − | <br /> | + | <br />+ / - Buttons |
| − | |||
Once in Manual Mode tapping on the + and – buttons next to each of the drives will jog the axis in the appropriate direction, and the numbers between the +/- buttons show the current axis position. | Once in Manual Mode tapping on the + and – buttons next to each of the drives will jog the axis in the appropriate direction, and the numbers between the +/- buttons show the current axis position. | ||
<br /> | <br /> | ||
| − | ===== Home ===== | + | =====Home===== |
Tapping on the Home Button will move the axis back to its home position, as determined in the Settings – Axis screen. | Tapping on the Home Button will move the axis back to its home position, as determined in the Settings – Axis screen. | ||
<br /> | <br /> | ||
| − | ===== Move & Stop ===== | + | =====Move & Stop===== |
Type the position required into the Numbers between the Move and Stop buttons. When the move button is then pressed, the drive will attempt to move to the axis position given. Stop can be pressed at any point to halt this movement. | Type the position required into the Numbers between the Move and Stop buttons. When the move button is then pressed, the drive will attempt to move to the axis position given. Stop can be pressed at any point to halt this movement. | ||
<br /> | <br /> | ||
| − | ==== Inverters ==== | + | ===== Reverse ===== |
| + | The Reverse button reverses the direction of the associated drive. | ||
| + | <br /> | ||
| + | |||
| + | ===== Numbers ===== | ||
| + | |||
| + | ===== The Numbers after the Reverse button are (In order) Maximum Position, Speed, Acceleration, Deceleration ===== | ||
| + | <br /> | ||
| + | ====Inverters==== | ||
The inverters section is only populated for Autoflow machines, each inverter has a Fwd and Rev button which starts the inverter going forward or backward the numbers to the right of these denote the Hertz value required for that inverter. The Stop Button will cease movement. | The inverters section is only populated for Autoflow machines, each inverter has a Fwd and Rev button which starts the inverter going forward or backward the numbers to the right of these denote the Hertz value required for that inverter. The Stop Button will cease movement. | ||
<br /> | <br /> | ||
| − | ==== Speed Override ==== | + | ====Speed Override==== |
The speed override slider slows down the motor movements to give the operator time to intervene in diagnostic exercises. | The speed override slider slows down the motor movements to give the operator time to intervene in diagnostic exercises. | ||
| Ligne 46 : | Ligne 76 : | ||
<br /> | <br /> | ||
| − | ==== Save ==== | + | ====Save==== |
The Save Button saves and setting changes (e.g. Inverter frequencies) | The Save Button saves and setting changes (e.g. Inverter frequencies) | ||
<br /> | <br /> | ||
| − | ==== Setup Mode ==== | + | ====Setup Mode==== |
This puts the machine into setup mode. | This puts the machine into setup mode. | ||
<br /> | <br /> | ||
| − | ==== Test Printer ==== | + | ====Test Printer==== |
This button sends a test label to the printer. | This button sends a test label to the printer. | ||
<br /></translate> | <br /></translate> | ||
{{PageLang | {{PageLang | ||
| + | |Language=en | ||
|SourceLanguage=none | |SourceLanguage=none | ||
|IsTranslation=0 | |IsTranslation=0 | ||
| − | |||
}} | }} | ||
{{AddComments}} | {{AddComments}} | ||
Version du 9 avril 2020 à 12:06
This Page describes the drives screen in the winMulti Service Menu
Drives
The Drives tab allows manipulation of each of the axes. Each Machine type will have different drives as shown below. The manipulation of these can only be performed in Manual Mode, to enter manual mode from the main screen press the STOP Button once.
Saw Drives
| Drive | Description |
|---|---|
| GX Axis | This is the axis for the saw pusher and works from 7060 (end if the infeed bed) to 0 (Saw Blade) |
| SR Axis | This is the axis for the Saw Blade Rotation and works from 45 to 135 degrees |
Ecoline
Flowline / ZX3 Drives
Microline
ZX4 Drives
ZX5 Drives
Autoflow Drives
Axes
+ / - Buttons
Once in Manual Mode tapping on the + and – buttons next to each of the drives will jog the axis in the appropriate direction, and the numbers between the +/- buttons show the current axis position.
Home
Tapping on the Home Button will move the axis back to its home position, as determined in the Settings – Axis screen.
Move & Stop
Type the position required into the Numbers between the Move and Stop buttons. When the move button is then pressed, the drive will attempt to move to the axis position given. Stop can be pressed at any point to halt this movement.
Reverse
The Reverse button reverses the direction of the associated drive.
Numbers
The Numbers after the Reverse button are (In order) Maximum Position, Speed, Acceleration, Deceleration
Inverters
The inverters section is only populated for Autoflow machines, each inverter has a Fwd and Rev button which starts the inverter going forward or backward the numbers to the right of these denote the Hertz value required for that inverter. The Stop Button will cease movement.
Speed Override
The speed override slider slows down the motor movements to give the operator time to intervene in diagnostic exercises.
Save
The Save Button saves and setting changes (e.g. Inverter frequencies)
Setup Mode
This puts the machine into setup mode.
Test Printer
This button sends a test label to the printer.
Draft


 Français
 English
 Deutsch
 Español
 Italiano
 Português