| [version en cours de rédaction] | [version en cours de rédaction] |
| Ligne 102 : | Ligne 102 : | ||
{{Tuto Step | {{Tuto Step | ||
|Step_Title=<translate>Add a backup of Customer Data</translate> | |Step_Title=<translate>Add a backup of Customer Data</translate> | ||
| − | |Step_Content=<translate>{{Info|...If this is a new machine setup, you can | + | |Step_Content=<translate>{{Info|...If this is a new machine setup, you can skip this step}} |
In this step we need to place the most recent backup of the machine into the PC. | In this step we need to place the most recent backup of the machine into the PC. | ||
| − | # Locate the latest backup of the latest customer data, this would come from many sources - service backup folder, from the customer, from the teamviewer backup system, g:\customer folder | + | #Locate the latest backup of the latest customer data, this would come from many sources - service backup folder, from the customer, from the teamviewer backup system, g:\customer folder |
| − | # Now select the MOST UP TO DATE back up and send it to ‘Local Disk (C:)’. | + | #Now select the MOST UP TO DATE back up and send it to ‘Local Disk (C:)’. |
| − | # Extract files in correct location after transfer and replace the files already there</translate> | + | #Extract files in correct location after transfer and replace the files already there</translate> |
}} | }} | ||
{{Tuto Step | {{Tuto Step | ||
| Ligne 123 : | Ligne 123 : | ||
{{Tuto Step | {{Tuto Step | ||
|Step_Title=<translate>Aesthetic Changes</translate> | |Step_Title=<translate>Aesthetic Changes</translate> | ||
| − | |Step_Content=<translate># On the desktop, select all shortcuts except for the ‘Recycling Bin’ and delete them. | + | |Step_Content=<translate>#On the desktop, select all shortcuts except for the ‘Recycling Bin’ and 'Teamviewer Host' and delete them. |
| − | # Empty the recycle bin | + | #Empty the recycle bin |
| − | # Set a desktop shortcut for winMulti.exe (in c:\multi folder) | + | #Set a desktop shortcut for winMulti.exe (in c:\multi folder) |
| − | # Set a desktop shortcut for Flowline Ops. (in the “DDRIVE” folder) | + | #Set a desktop shortcut for Flowline Ops. (in the “DDRIVE” folder) |
| − | # The home page to all browsers should be set to [http://www.stuga.co.uk/ www.stuga.co.uk]</translate> | + | #The home page to all browsers should be set to [http://www.stuga.co.uk/ www.stuga.co.uk]</translate> |
}} | }} | ||
{{Notes}} | {{Notes}} | ||
Version du 20 novembre 2019 à 12:35
These instructions allow the computer to be set up correctly ready for delivery to customer’s site. The customer can plug it in to a network connection and we can then connect to update backups, etc.
Sommaire
- 1 Étape 1 - Connect
- 2 Étape 2 - Ensure Desktop Setup is Correct
- 3 Étape 3 - Check Windows Activated
- 4 Étape 4 - Change PC Name
- 5 Étape 5 - Install Teamviewer Host
- 6 Étape 6 - Add the PC reference to Monday Board
- 7 Étape 7 - Clean up desktop
- 8 Étape 8 - Add to the Company Teamviewer Account
- 9 Étape 9 - Test Teamviewer
- 10 Étape 10 - Activate Teamviewer backup
- 11 Étape 11 - Copy Base Setup
- 12 Étape 12 - Add a backup of Customer Data
- 13 Étape 13 - Share the Saw directory
- 14 Étape 14 - Aesthetic Changes
- 15 Commentaires
Étape 1 - Connect
Connect monitor, network cable, keyboard, mouse/touchpad, and switch on PC.
Étape 2 - Ensure Desktop Setup is Correct
If this is a ZX5, the Saw side PC should be the "Main" Screen, The MH side will be to the right of it
Étape 3 - Check Windows Activated
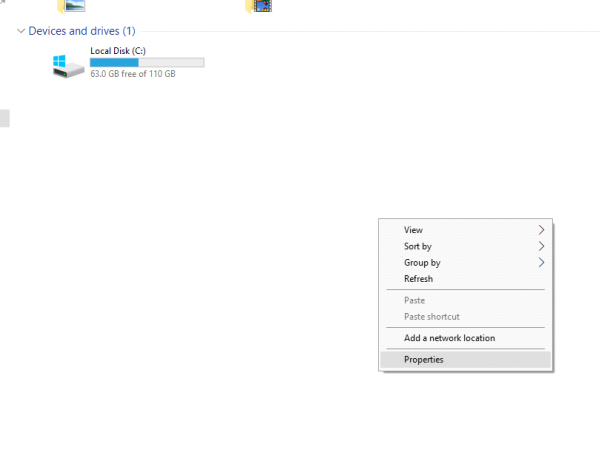
Click on file explorer then go to 'This PC', Right click on unused space and click properties.
Check Windows is activated, "Windows is activated" should be shown.
Étape 4 - Change PC Name
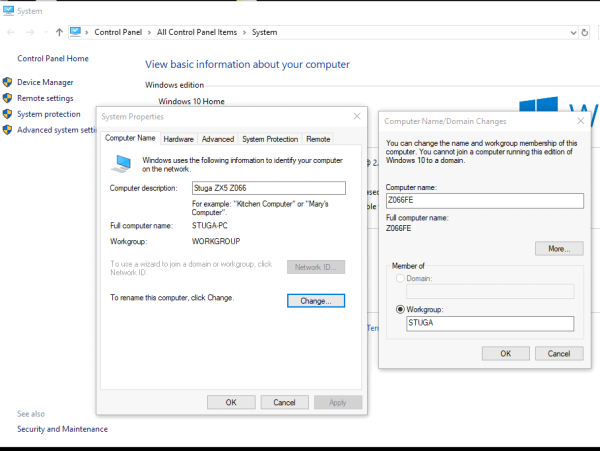
- Under 'Computer name, domain, and workgroup settings' click ' Change settings'.
- For computer description type "Stuga" followed by the machine type. i.e. "Stuga Flowline". Click 'Apply'.
- Under 'Computer name' type the machine's buildNo. If required state the position of the computer (FE, BE, S, etc.), i.e. F035FE.
- Under 'Workgroup' type "STUGA".
- Click 'Ok' on both windows. You will now be prompted to restart your computer. Click 'Restart now'.
Étape 5 - Install Teamviewer Host
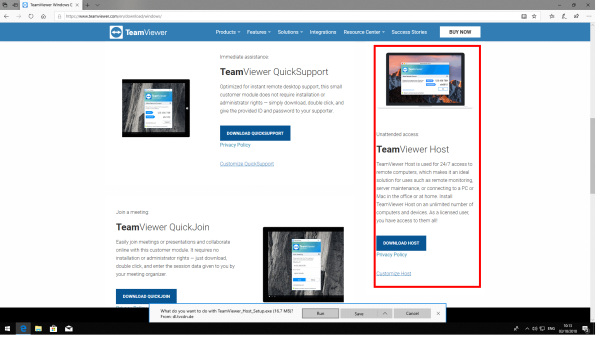
- Go to the browser and search "www.teamviewer.com/en/download/windows/".
- Scroll down to TeamViewer Host and click on 'Download Host',
- When prompted press 'Run' to start download. Make sure download is of the most recent version.
- Click next on the install wizard welcome screen.
- When on the how you would like to use screen select 'Company/commercial use' option and press next.
- Now on the personal password screen, by computer name put the customers company name followed by the buildNo i.e. Sidey Z066FE. (Note: If PC is to replace one on an already operational machine put the month and year after the buildNo i.e. Sidey Z066FE 10/08).
- Password is in convention with Stuga's standard password naming policy. (See Stuga IT department).
- Select the option 'I don't want to create a TeamViewer account now' and press next.
- Press finish. You will now be given the TeamViewer ID for the computer. Take note of this
Étape 6 - Add the PC reference to Monday Board
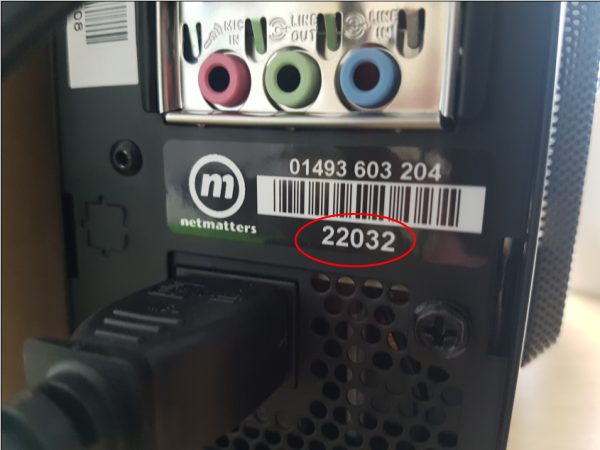
On the Netmatters PC will be an Asset Number
On Monday, navigate to "Control Systems Log"
Find the Build number and add the Netmatters reference to the "Asset no" column
Étape 7 - Clean up desktop
- Now highlight all files and shortcuts on the desktop except the recycle bin and press delete.
- When prompted select “Move to Recycle Bin”.
- Then click into recycle bin and select “Empty Recycle Bin”.
Étape 8 - Add to the Company Teamviewer Account
- On a separate computer sign into your TeamViewer account. If this is the first time your account has been used on this device a conformation e-mail will be sent to your company e-mail address.
- Once logged on, go to the 'Computers & Contacts' tab on the left side.
- Then 'add remote device' from the top right corner of the window.
- From here you can input the TeamViewerID and Password
- Alias will be the company's name followed by the BuildNo and position i.e. Sidey Z065 FrontEnd.
- Group is the machine type this PC will be installed on
Étape 9 - Test Teamviewer
The connection can now be tested between engineer’s computer and host computer. Under the ‘Computer & Contacts’ locate the recently made connection under the group it was designated. When found double-click to control connected computer.
Étape 10 - Activate Teamviewer backup
Contact GG to activate the backup
You do not need to wait for this step, just send GG an email
Étape 11 - Copy Base Setup
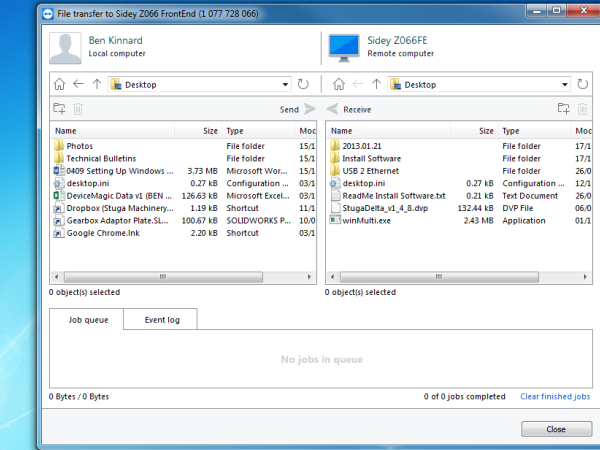
- On the teamviewer connection, select File transfer
- On the left local computer side of the window, go onto the G:\ drive.
- Click on the folder ‘builds’. Then the folder ‘PC installs’ (G:\Builds\PC Installs).
- Then click the folder of the brand of machine that the PC is to be installed in (i.e. ZX4, Router etc.). Within the folder there should be one or multiple of the following folders: “multi”, “saw”, “camera” and “DDRIVE”. The folders that appear will be dependent on what the machines function will be i.e. if you wanted a flowline saw pc F123S you would go to the folder marked “FnnnS Flowline Saw”, within this will be a file that is named “saw”. We now need to transfer this onto the replacement computer.
- On the right side of the file transfer window, click on the dropdown menu and select “C:\” (CDrive).
- Now this file can be sent by pressing the “Send” button. A progress box will appear in the job queue and go to next step.
Étape 12 - Add a backup of Customer Data
In this step we need to place the most recent backup of the machine into the PC.
- Locate the latest backup of the latest customer data, this would come from many sources - service backup folder, from the customer, from the teamviewer backup system, g:\customer folder
- Now select the MOST UP TO DATE back up and send it to ‘Local Disk (C:)’.
- Extract files in correct location after transfer and replace the files already there
- Right click on saw file and click “Properties”
- On the top tab click on “Sharing”
- Click on “Share”.
- On the dropdown box click “Everyone”, when this appears in the main sharing box there will be a little tab with “Read” in it, click on this and set it to “Read/Write”.
- Press ok and close window.
Étape 14 - Aesthetic Changes
- On the desktop, select all shortcuts except for the ‘Recycling Bin’ and 'Teamviewer Host' and delete them.
- Empty the recycle bin
- Set a desktop shortcut for winMulti.exe (in c:\multi folder)
- Set a desktop shortcut for Flowline Ops. (in the “DDRIVE” folder)
- The home page to all browsers should be set to www.stuga.co.uk
Draft
 Français
 English
 Deutsch
 Español
 Italiano
 Português