|
|
| (3 révisions intermédiaires par le même utilisateur non affichées) |
| Ligne 1 : |
Ligne 1 : |
| | {{Tuto Details | | {{Tuto Details |
| | + | |Main_Picture=ZFT_File_Format_Screenshot_2021-02-17_112914.jpg |
| | + | |Main_Picture_annotation={"version":"2.4.6","objects":[{"type":"image","version":"2.4.6","originX":"left","originY":"top","left":38,"top":2,"width":484,"height":435,"fill":"rgb(0,0,0)","stroke":null,"strokeWidth":0,"strokeDashArray":null,"strokeLineCap":"butt","strokeDashOffset":0,"strokeLineJoin":"miter","strokeMiterLimit":4,"scaleX":1.03,"scaleY":1.03,"angle":0,"flipX":false,"flipY":false,"opacity":1,"shadow":null,"visible":true,"clipTo":null,"backgroundColor":"","fillRule":"nonzero","paintFirst":"fill","globalCompositeOperation":"source-over","transformMatrix":null,"skewX":0,"skewY":0,"crossOrigin":"","cropX":0,"cropY":0,"src":"https://stuga.dokit.app/images/4/4a/ZFT_File_Format_Screenshot_2021-02-17_112914.jpg","filters":[]}],"height":449.9020248203788,"width":600} |
| | |Description=<translate>The file format (ZFT file) is completely open and flexible and allows any Zebra label command to be used</translate> | | |Description=<translate>The file format (ZFT file) is completely open and flexible and allows any Zebra label command to be used</translate> |
| | |Categories=Software | | |Categories=Software |
| | }} | | }} |
| | <translate> | | <translate> |
| | + | 21/07/2025 Moved to confluence |
| | | | |
| − | | + | [https://stuga-ltd.atlassian.net/wiki/external/MjQ5MGRmODYwYTNmNDdjNThhZDRhYmMwNWFiZTNhNjI Please click here]</translate> |
| − | To get the correct label information on the label, a method of field substitution is used. The software searches for field codes in the label format that begin and end with “$$”.
| |
| − | {| class="wikitable" border="1" cellspacing="0" cellpadding="0" width="501"
| |
| − | | width="75" valign="top" |'''''Field'''''
| |
| − | | width="347" valign="top" |'''''Description'''''
| |
| − | |-
| |
| − | | width="75" valign="top" |$$XLAB1$$
| |
| − | | width="347" valign="top" |Line 1 from PRN File
| |
| − | |-
| |
| − | | width="75" valign="top" |$$XLAB2$$
| |
| − | | width="347" valign="top" |Line 2 from PRN File
| |
| − | |-
| |
| − | | width="75" valign="top" |$$XLAB3$$
| |
| − | | width="347" valign="top" |Line 3 from PRN File
| |
| − | |-
| |
| − | | width="75" valign="top" |$$XLAB4$$
| |
| − | | width="347" valign="top" |Line 4 from PRN File
| |
| − | |-
| |
| − | | width="75" valign="top" |$$XLAB5$$
| |
| − | | width="347" valign="top" |Line 5 from PRN File
| |
| − | |-
| |
| − | | width="75" valign="top" |$$XLAB6$$
| |
| − | | width="347" valign="top" |Line 6 from PRN File
| |
| − | |-
| |
| − | | width="75" valign="top" |$$XLAB7$$
| |
| − | | width="347" valign="top" |Line 7 from PRN File
| |
| − | |-
| |
| − | | width="75" valign="top" |$$XLAB8$$
| |
| − | | width="347" valign="top" |Line 8 from PRN File
| |
| − | |-
| |
| − | | width="75" valign="top" |$$COLOUR$$
| |
| − | | width="347" valign="top" |Profile colour
| |
| − | |-
| |
| − | | width="75" valign="top" |$$ID1$$
| |
| − | | width="347" valign="top" |first 20 characters of the 40 character id field in the piece record
| |
| − | |-
| |
| − | | width="75" valign="top" |$$ID2$$
| |
| − | | width="347" valign="top" |second 20 characters of id filed (done like this so the id field can go on 2 lines)
| |
| − | |-
| |
| − | | width="75" valign="top" |$$LENGTH$$
| |
| − | | width="347" valign="top" |string representation of piece length – one decimal point
| |
| − | |-
| |
| − | | width="75" valign="top" |$$MITRE$$
| |
| − | | width="347" valign="top" |string representation of mitre characters (eg \ /, [ ], < ], etc)
| |
| − | |-
| |
| − | | width="75" valign="top" |$$PROFILE$$
| |
| − | | width="347" valign="top" |profile code
| |
| − | |-
| |
| − | | width="75" valign="top" |$$TROLNO$$
| |
| − | | width="347" valign="top" |Trolley Number
| |
| − | |-
| |
| − | | width="75" valign="top" |$$BARCODE$$
| |
| − | | width="347" valign="top" |Batch / Piece identification number ( 8 characters of batch name, 4 characters of piece number) – exactly as the number in SAMOUT
| |
| − | |-
| |
| − | | width="75" valign="top" |$$WELDER$$
| |
| − | | width="347" valign="top" |Uses the id field for a welder barcode. This uses the barcodeLength parameter to take the number of digits to use from the left to right, then barcodeTrim trims leading characters from the left.
| |
| − | |}
| |
| − | The label format is a standard ZPL format with the above fields in. All details of the zpl follow in the ZPL programming language manual.
| |
| − | | |
| − | https://www.zebra.com/content/dam/zebra/manuals/printers/common/programming/zpl-zbi2-pm-en.pdf | |
| − | <br />
| |
| − | | |
| − | == Example ==
| |
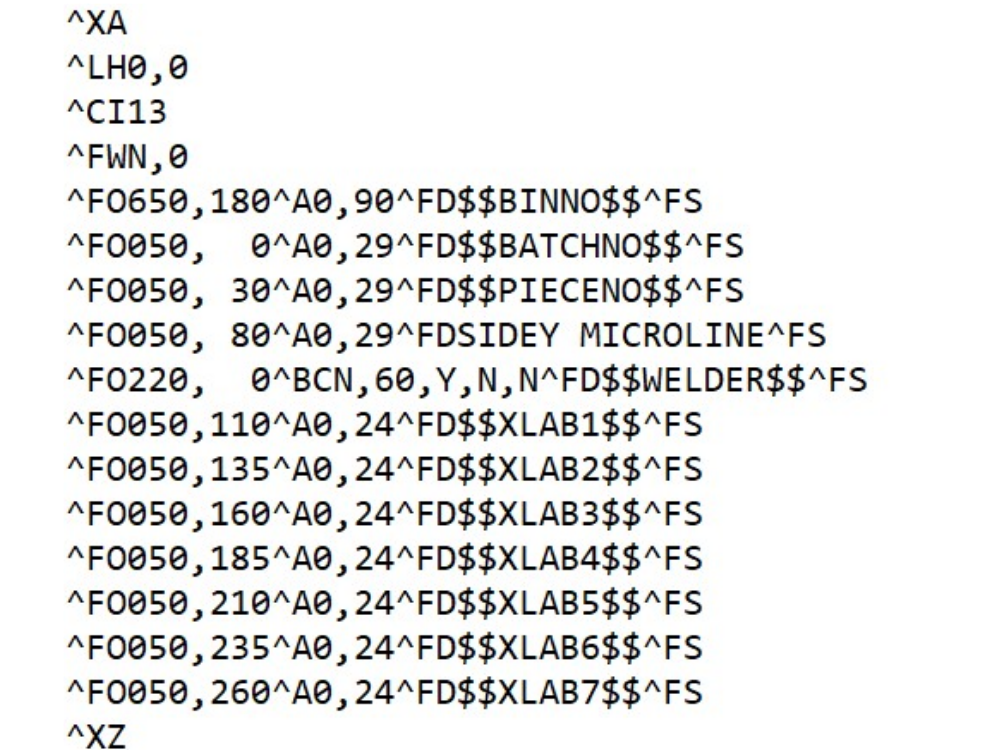
| − | Here is the PRNFMT.ZFT file:
| |
| − | <br /><syntaxhighlight>
| |
| − | ^XA
| |
| − | ^LH10,10
| |
| − | ^FWN,0
| |
| − | ^FO165,10^AS^FDBatch: $$BATCHNO$$ Piece:$$PIECENO$$^FS
| |
| − | ^FO20, 0^AV^FD$$BINNO$$^FS
| |
| − | ^FO20, 75^AF^FD$$XLAB1$$^FS
| |
| − | ^FO20,105^AF^FD$$XLAB2$$^FS
| |
| − | ^FO20,135^AF^FD$$XLAB3$$^FS
| |
| − | ^FO20,165^AF^FD$$XLAB4$$^FS
| |
| − | ^FO20,195^AF^FD$$XLAB5$$^FS
| |
| − | ^FO20,225^AF^FD$$XLAB6$$^FS
| |
| − | ^FO20,255^AF^FD$$XLAB7$$^FS
| |
| − | ^XZ
| |
| − | </syntaxhighlight>
| |
| − | | |
| − | * ^XA and ^XZ start and end the format
| |
| − | * ^LH positions the start of the label
| |
| − | * ^FWN,0 Sets the rotation and left justifies all text fields
| |
| − | * ^FOn,n positions a text field
| |
| − | * ^Ax Selects a font
| |
| − | * ^FD defines the data string for the field – can be straight text or a $$ field substitution
| |
| − | * ^FS denotes the end of the field definition</translate>
| |
| | {{PageLang | | {{PageLang |
| | + | |Language=en |
| | |SourceLanguage=none | | |SourceLanguage=none |
| | |IsTranslation=0 | | |IsTranslation=0 |
| − | |Language=en
| |
| | }} | | }} |
| | {{AddComments}} | | {{AddComments}} |

 Français
 English
 Deutsch
 Español
 Italiano
 Português